Disclosure: This post contains affiliate links and I will be compensated if you make a purchase after clicking through my links. Learn More
Welding aluminum with MIG requires more than just setting up your machine and pulling the trigger. Many beginners wonder if they should push or pull when MIG welding aluminum. This question comes up often, and the answer can change your welds from weak and messy to strong and clean.
Aluminum is not like steel; it reacts differently to heat, moves faster, and needs special care. If you want smooth welds without excessive spatter, burn-through, or ugly beads, you need to understand the correct technique.
This article will explain exactly whether you should push or pull when MIG welding aluminum, why it matters, and how this choice affects your welds. You will learn the science behind the methods, see practical examples, and discover common mistakes that even experienced welders make.
Along the way, you will get tips for setting up your equipment, controlling your torch, and solving the problems that often frustrate beginners. By the end, you will know how to handle aluminum with confidence, avoid wasted time and materials, and get reliable results every time.
What Does Push And Pull Mean In Welding?
Before choosing the right method, it helps to understand what “push” and “pull” mean in welding terms.
- Push technique: You move the welding gun forward, leading the weld pool, and angle the gun so it points away from the weld bead.
- Pull technique: You drag the welding gun back, trailing the weld pool, and angle the gun so it points back toward the completed weld.
These two ways look similar, but they change how heat, gas, and filler material work together. In MIG welding, the angle of the torch, the direction you move, and your body position all matter. For steel, either method can work depending on the job.
For aluminum, the choice is much more important.
The Unique Challenges Of Mig Welding Aluminum
Aluminum is a popular metal for building cars, boats, frames, and many other products because it is light and strong. But it also brings special problems to welding:
- High thermal conductivity: Aluminum spreads heat very fast. The area around your weld heats up quickly, which can cause burn-through or weak welds.
- Oxide layer: Aluminum forms a thin, tough oxide on its surface. This oxide melts at a much higher temperature than the metal below, making it harder to get a clean weld.
- Low melting point: Aluminum melts at about 660°C (1220°F), much lower than steel.
- Sensitive to contamination: Dirt, oil, and even fingerprints can ruin aluminum welds.
Because of these factors, the method you use—push or pull—will affect how your weld looks and how strong it is.
Should You Push Or Pull When Mig Welding Aluminum?
Always push when MIG welding aluminum. Do not use the pull (drag) method for this metal.
Pushing the gun gives you a better gas shield, cleaner welds, and stronger joints. Pulling the gun can trap dirt and oxides, leading to weak or ugly welds. Let’s explore why pushing works best and what happens if you pull instead.
Why Pushing Works Best For Aluminum
When you push the gun, you direct the shielding gas in front of the weld pool. This gas (usually 100% argon) protects the hot metal from air, which can cause porosity and contamination. Pushing also helps lift the oxide layer away from the weld, preventing it from getting trapped in the bead.
- Cleaner welds: The arc and gas work ahead of the weld pool, burning off oxides and pushing them out.
- Better penetration: You get a wider, shallower weld. This is good for aluminum, which can burn through easily.
- Stronger joints: Less contamination means the weld holds better.
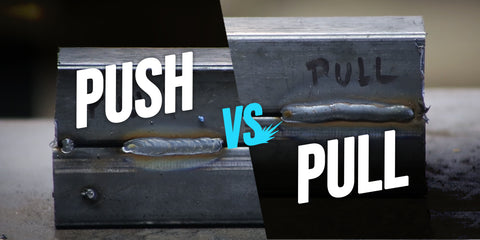
In contrast, pulling the gun pulls the gas away from the weld pool and draws dirt or oxides into the weld. This causes black soot, porosity, and weak spots.
What Happens If You Pull When Mig Welding Aluminum?
If you use the pull technique on aluminum:
- Increased contamination: The arc draws in oxides and dirt, leading to black, sooty welds.
- Poor gas coverage: The weld pool is less protected, so the weld becomes porous.
- Weaker welds: The final joint is not as strong, and the bead is often rough and uneven.
Some welders try pulling because it works for steel. But with aluminum, it almost always makes things worse. This is one of the most common mistakes beginners make.
Push Vs. Pull: Technical Comparison
To show the difference, here is a direct comparison between push and pull methods for aluminum MIG welding:
| Feature | Push Method | Pull Method |
|---|---|---|
| Gas Coverage | Excellent (protects weld pool) | Poor (less coverage, more contamination) |
| Weld Appearance | Clean, shiny, wide bead | Sooty, dark, uneven bead |
| Penetration | Shallower, wider (ideal for aluminum) | Deeper, narrower (risk of burn-through) |
| Oxide Removal | Pushes oxides out of weld | Draws oxides into weld |
| Strength | Strong, reliable joints | Weaker joints, risk of defects |
This table makes it clear: pushing your MIG gun is the best way for welding aluminum.

Credit: yeswelder.com
How To Use The Push Technique Correctly
Knowing you should push is only part of the story. You also need to use the right angle, speed, and torch setup. Here is how to do it:
Gun Angle
- Hold the torch at a 10-15 degree angle from vertical, pointing it in the direction you are moving.
- The gun should “lead” the weld pool, not follow it.
Travel Speed
- Move the gun steadily and not too slow. If you linger, you risk burning through the thin aluminum.
- Watch the weld pool. Keep it small and moving forward.
Wire Stick-out
- Keep a short stick-out: About 3/8 inch (10 mm).
- Too much stick-out can reduce gas coverage and cause spatter.
Gas Flow
- Use 100% argon shielding gas for most aluminum MIG jobs.
- Set the flow rate to about 20-30 cubic feet per hour (CFH).
Torch Position And Comfort
- Stay relaxed and steady.
- Brace your hand or arm to keep the torch moving smoothly.
Example: Welding A 1/8 Inch Aluminum Sheet
Suppose you need to join two pieces of 1/8 inch (3 mm) aluminum. Set your machine to the right voltage and wire speed for your wire size (usually 0. 030″ or 0. 035″ aluminum wire). Clean the metal with a stainless steel wire brush.
Hold your torch at a 10-15 degree push angle, pull the trigger, and move smoothly along the joint. You should see a shiny, even bead with no black soot.
Why Beginners Struggle With Aluminum Mig Welding
Many welders who switch from steel to aluminum for the first time get frustrated. Here’s why:
- Wrong technique: They use the pull method by habit, which works on steel but not on aluminum.
- Not cleaning the metal: Aluminum’s oxide layer is stubborn. If you don’t brush it off, you get ugly welds.
- Improper setup: Using the wrong gas, wire, or machine settings.
- Moving too slow or too fast: Both can cause problems, from burn-through to weak welds.
- Not controlling stick-out: A long stick-out reduces gas coverage and increases spatter.
If you avoid these mistakes, your welds will improve quickly.
Common Myths About Mig Welding Aluminum
There are many myths and false tips about aluminum welding. Here are a few:
- Myth 1: You can use CO2 or mixed gas for aluminum.
Fact: Always use 100% argon for the best results.
- Myth 2: Pulling gives deeper penetration, so it’s better.
Fact: Aluminum does not need deep penetration. Too much heat causes burn-through.
- Myth 3: Steel wire brushes work fine for cleaning aluminum.
Fact: Use only a stainless steel brush, and never use the same brush for steel and aluminum.
- Myth 4: The same settings work for steel and aluminum.
Fact: Aluminum needs higher wire speed and voltage than steel for the same thickness.
Understanding these points can help you avoid wasted time and poor welds.
Step-by-step Guide: Mig Welding Aluminum With The Push Technique
If you want to get started right, follow these steps:
- Choose the right machine and gun: Use a MIG welder that supports aluminum. A spool gun is ideal, as it feeds soft aluminum wire better.
- Select the correct wire: Most jobs use ER4043 or ER5356 aluminum wire. Pick the one that matches your project.
- Set up your machine: Use the recommended voltage and wire speed for your wire and material thickness.
- Prepare the metal: Clean both sides of the joint with a stainless steel wire brush. Remove all oxide, oil, and dirt.
- Install a new contact tip: Aluminum wire wears tips quickly, so use a fresh one for each job if possible.
- Set gas flow: Attach a tank of 100% argon and set the flow to 20-30 CFH.
- Check your safety gear: Wear gloves, a welding jacket, and a proper helmet.
- Hold the torch at a push angle: About 10-15 degrees from vertical, pointing ahead of the weld.
- Start welding: Pull the trigger and move the gun smoothly along the joint, always pushing forward.
- Watch your bead: Look for a shiny, even weld with no black soot.
If things go wrong, check your angle, speed, and gas flow first.

Credit: www.youtube.com
Real-world Examples: Good Vs. Bad Welds
Understanding theory is good, but seeing real outcomes helps more. Here are examples of what happens when you push or pull:
Good Weld (push Technique)
- Appearance: Bright, clean, even bead. No black marks or holes.
- Strength: Weld holds up under stress, no cracks.
- Gas Coverage: No sign of porosity or contamination.
Bad Weld (pull Technique)
- Appearance: Black soot, uneven bead, possible holes or burn-through.
- Strength: Weld cracks or breaks easily.
- Gas Coverage: Porous, weak joint.
A welder who pushes will almost always get better results with aluminum.
Key Tips For Consistent Aluminum Mig Welds
To improve your welding and avoid common problems, try these tips:
- Keep your work clean: Always brush the aluminum just before you weld.
- Use the right wire: Match your wire and filler to the type of aluminum.
- Set correct gas flow: Too low, and you get porosity. Too high, and you waste gas.
- Maintain your equipment: Change contact tips often. Check liners and drive rolls for wear.
- Control your speed: Practice moving at a steady pace.
- Watch your angles: A slight push angle helps gas coverage.
- Check your machine settings: Use charts or guides for voltage and wire speed.
Many beginners miss the importance of tip #1 (clean metal) and #4 (equipment care). Even small bits of dirt or worn-out tips can ruin your weld.
Credit: bakersgas.com
Advanced Insights: What Experienced Welders Know
Some details make a big difference, especially for more advanced welders:
- Preheat thick aluminum: For thick pieces, preheating to about 150°F (65°C) can help prevent cracking.
- Use a spool gun or push-pull gun: Aluminum wire is soft and can jam in standard MIG guns. A spool gun feeds wire smoothly.
- Short-circuit transfer is not ideal: Most aluminum MIG welding uses spray transfer mode for better fusion and appearance.
- Practice on scrap: Aluminum is less forgiving than steel. Test on scrap before working on your real piece.
Many people overlook preheating and the right gun choice, but these can solve many problems.
Equipment Setup: What Matters Most
Having the right tools makes a big difference with aluminum. Here’s a quick guide:
| Item | Why It Matters | Best Practice |
|---|---|---|
| MIG Welder | Must handle spray transfer and spool gun | Use a welder rated for aluminum |
| Spool Gun | Feeds soft aluminum wire better | Use for all but very short jobs |
| Shielding Gas | Protects weld pool | 100% argon |
| Wire | Matches base metal | ER4043 or ER5356 |
| Contact Tip | Wears quickly with aluminum | Change often |
If you use the wrong setup, even the best technique will not save your weld.
Troubleshooting Common Aluminum Mig Welding Problems
Even with the right technique, problems can happen. Here’s how to fix the most common issues:
Porosity (small Holes In Weld)
- Cause: Poor gas coverage, dirty metal, or drafts.
- Fix: Check for leaks, increase gas flow, clean the metal again.
Black Soot
- Cause: Pulling the torch, not enough gas, or dirty metal.
- Fix: Switch to push method, check gas settings, clean metal.
Burn-through
- Cause: Too much heat, moving too slowly, or thin metal.
- Fix: Lower voltage, increase travel speed, use backing bars for thin material.
Wire Jams
- Cause: Wrong drive rolls, kinked liner, or poor wire quality.
- Fix: Use U-groove drive rolls, check liner, buy good wire.
Weak Welds
- Cause: Pulling the torch, wrong wire, or low voltage.
- Fix: Use push method, match wire to base metal, adjust machine settings.
How Push And Pull Affect Different Aluminum Projects
Different jobs may make you think twice about the technique, but the push method always wins for aluminum.
Thin Sheet Aluminum
Push method prevents burn-through and keeps the weld flat.
Thick Aluminum Plate
Pushing gives better gas coverage and prevents oxides from getting trapped. For very thick pieces, preheating and higher voltage help.
Fillet Vs. Butt Joints
Both joint types need the push method for clean, strong welds.
Welding Aluminum Outdoors
Wind can blow away shielding gas. Use wind shields and push the gun for the best protection.
Safety When Mig Welding Aluminum
Welding aluminum produces bright light, heat, and sometimes toxic fumes. Here are key safety tips:
- Wear a proper welding helmet: Use a shade 11 or higher.
- Use gloves and a welding jacket: Protect your skin from UV light and sparks.
- Work in a well-ventilated area: Aluminum welding can create fumes.
- Keep your workspace clean: Remove flammable items.
Never skip safety steps, even for small jobs.
Learning From Mistakes: Two Common Scenarios
Here are two examples that show why pushing is so important:
- Case 1: A welder uses the pull method on a boat repair. The weld turns black, full of holes, and water leaks through. Switching to push method, cleaning the metal, and adjusting speed fixes the problem.
- Case 2: A fabricator tries to weld thick aluminum plate by pulling. The weld looks deep but cracks after cooling. Using push method and a short stick-out makes the weld strong and crack-free.
Both cases show that following the right method saves time and money.
Practical Tips For Better Results
To keep improving, keep these points in mind:
- Practice on scrap aluminum before starting your real project.
- Check your settings each time you change wire, gas, or material thickness.
- Keep your hands steady and brace your arm if needed.
- Don’t rush—speed comes with practice.
- Ask experienced welders for feedback or tips if you can.
These habits help you avoid the small mistakes that ruin a good weld.
Frequently Asked Questions
What Is The Best Angle For Pushing The Mig Gun When Welding Aluminum?
The best angle is about 10-15 degrees from vertical, pointing forward in the direction you are welding. This helps the shielding gas flow ahead of the weld pool, giving the cleanest results.
Can I Use The Pull Technique For Any Aluminum Welding Job?
No. Always use the push technique for aluminum. Pulling leads to contamination, weak welds, and poor bead appearance.
Why Do I Get Black Soot When Welding Aluminum?
Black soot usually means poor gas coverage or pulling the torch. Check your gas flow, clean the metal, and make sure you are pushing the torch.
What Type Of Shielding Gas Should I Use For Mig Welding Aluminum?
You should use 100% argon for almost all aluminum MIG welding. Mixed gases or CO2 are not suitable for aluminum.
Can I Use A Regular Mig Gun For Aluminum, Or Do I Need A Spool Gun?
You can use a regular MIG gun for short jobs and thicker wires, but a spool gun gives much better results. It helps feed the soft aluminum wire without jams.
Final Thoughts
MIG welding aluminum is not as hard as many people think, but it does require the right technique. Always push your gun, keep your metal clean, and use the right setup. Avoid the mistakes that make aluminum welding frustrating: pulling the torch, using the wrong gas, or neglecting your equipment. With practice, patience, and attention to these details, you will get strong, clean, and reliable welds every time. For more details and technical guides, visit the Weld Guru resource. Aluminum can be tricky, but with the right habits, you will master it and get results you can trust.