Disclosure: This post contains affiliate links and I will be compensated if you make a purchase after clicking through my links. Learn More
Welding up a vertical joint with flux core wire is a true test for any welder. Many start confident, but soon see the molten puddle sag or drip, leaving uneven welds and wasted time. The vertical position is challenging because gravity wants to pull the weld metal downward, making control essential.
For beginners and even experienced welders, mastering the best technique for flux core vertical welding can mean stronger, better-looking welds and less frustration. In this guide, you will find practical steps, proven methods, and real examples. You will see what tools work best, the key to setting up your machine, and how your movements should change for a vertical weld.
By the end, you will understand what separates a good vertical weld from a poor one, and you will know how to achieve consistent results.
Understanding Flux Core Vertical Welding
Flux core arc welding (FCAW) uses a special wire filled with flux to shield the weld from air. Unlike MIG welding, which uses a gas bottle for shielding, flux core wire produces its own gas and slag to protect the weld. This makes it useful outdoors or in windy conditions. Vertical welding means welding up or down a surface that stands straight, rather than lying flat. This is called the vertical position or 3G position in welding terms.
When welding vertical, gravity makes things harder. The molten metal tends to run down, making it hard to keep the weld bead where you want it. Flux core is often chosen for vertical welding because it cools faster and creates a stiffer puddle than some other methods, helping control the weld.
Types Of Vertical Welding Techniques
There are two main ways to weld vertical with flux core:
- Vertical Up (Vertical Upward or Uphill): You start at the bottom of the joint and weld upward. This gives deeper penetration and stronger joints, which is important for structural work.
- Vertical Down (Vertical Downward or Downhill): You start at the top and weld down. This is faster and easier for thin metal but gives weaker welds.
For most structural work or anything that must be strong, use vertical up. This guide focuses on the best technique for vertical up welding with flux core.
Choosing The Right Equipment And Settings
Your equipment and settings can make or break your vertical flux core welds. Using the wrong wire, voltage, or technique often leads to ugly, weak welds.
Selecting The Proper Wire
Flux core wire comes in two main types:
- Self-shielded (FCAW-S): No external gas needed. Best for outdoor work or windy areas.
- Gas-shielded (FCAW-G): Uses external shielding gas. Better for cleaner, higher-quality welds indoors.
For most home and field use, self-shielded wire like E71T-11 is common. For shop work or important jobs, E71T-1 (gas-shielded) gives smoother, cleaner welds.
Wire diameter matters too. For vertical welding, 0.030” (0.8mm) or 0.035” (0.9mm) wire is easiest to control. Thicker wire (like 0.045” or 1.2mm) is harder for beginners and tends to produce bigger, harder-to-control puddles.
Setting The Machine: Voltage, Wire Speed, And Polarity
Machine setup is critical for vertical welding. Here’s what to watch:
- Voltage: Lower than for flat welding, to keep the puddle smaller and less runny.
- Wire Speed: Also lower, to avoid building up too much molten metal.
- Polarity: Most self-shielded wires use DCEN (Direct Current Electrode Negative). Gas-shielded flux core often uses DCEP (Direct Current Electrode Positive). Check the wire’s label.
A good starting point for 0.035” E71T-11 wire on 1/4” (6mm) steel:
- Voltage: 16–18 volts
- Wire speed: 120–160 inches per minute
- Polarity: DCEN
Always check the wire manufacturer’s chart. Adjust as needed if your welds are too tall (lower wire speed) or too flat (raise voltage slightly).
Essential Tools For Better Vertical Welds
For vertical flux core welding, gather these tools:
- Welding machine (MIG/flux core capable)
- Proper wire (see above)
- Angle grinder (for cleaning joints)
- Chipping hammer and wire brush (for slag removal)
- Welding helmet (auto-darkening preferred)
- Welding gloves and jacket
- Clamps (hold work steady)
- Measuring tools (for fit-up)
Clean metal is a must. Even the best technique fails with rusty or painted steel.
Preparing The Joint And Work Area
Good preparation improves your welds more than any trick or tip. Many beginners skip this step, causing problems later.
Cleaning The Metal
Flux core can tolerate more dirt than some methods, but clean metal always welds better. Use an angle grinder to remove:
- Rust
- Paint
- Oil and grease
- Mill scale
Clean at least 1 inch (2. 5 cm) on each side of the joint. The cleaner the surface, the easier it is to control the puddle and avoid defects.
Fitting Up The Joint
For a strong weld, make sure the pieces fit tightly together. Gaps cause the molten metal to drop through or make the bead uneven. Tack weld the pieces in place before you start the full weld. Place tacks every 2–3 inches (5–7 cm) so the joint doesn’t move.
Choosing The Joint Design
The joint shape affects how easy it is to weld vertically. For thick steel (over 1/8” or 3mm), use a groove joint with a slight V shape. This lets you weld in layers (passes) for better strength. For thin metal, a simple butt or lap joint is fine.
Mastering The Best Technique For Flux Core Vertical Welding
The right technique separates a strong, neat weld from a weak, messy one. Here are the core steps and tips.
The “uphill” Movement
For vertical up welding, always move the gun upward, not downward. This gives more control and lets the weld metal cool before the next layer.
Gun Angle And Distance
Hold the welding gun at a 10–15 degree angle pointing upward into the joint. Keep the wire tip about 3/4 inch (18–20mm) from the metal. Too close, and you get spatter. Too far, and the arc becomes unstable.
The “whip And Pause” Technique
This is the most common and effective method for vertical up flux core welding.
- Start at the bottom of the joint.
- Pull the gun upward in a small motion (the “whip”).
- Pause at the top of this motion for a split second, letting the puddle cool and fill.
- Move back down slightly to the bottom edge of the puddle.
- Repeat: Whip up, pause, move back.
This motion lets the puddle cool and gives the weld time to solidify, reducing sag. The pause is key—without it, the molten metal may run or drip.
Weave Patterns: Stringer Vs. Weave Beads
- Stringer bead: Move straight up with no side-to-side motion. Good for thin metal or the first pass.
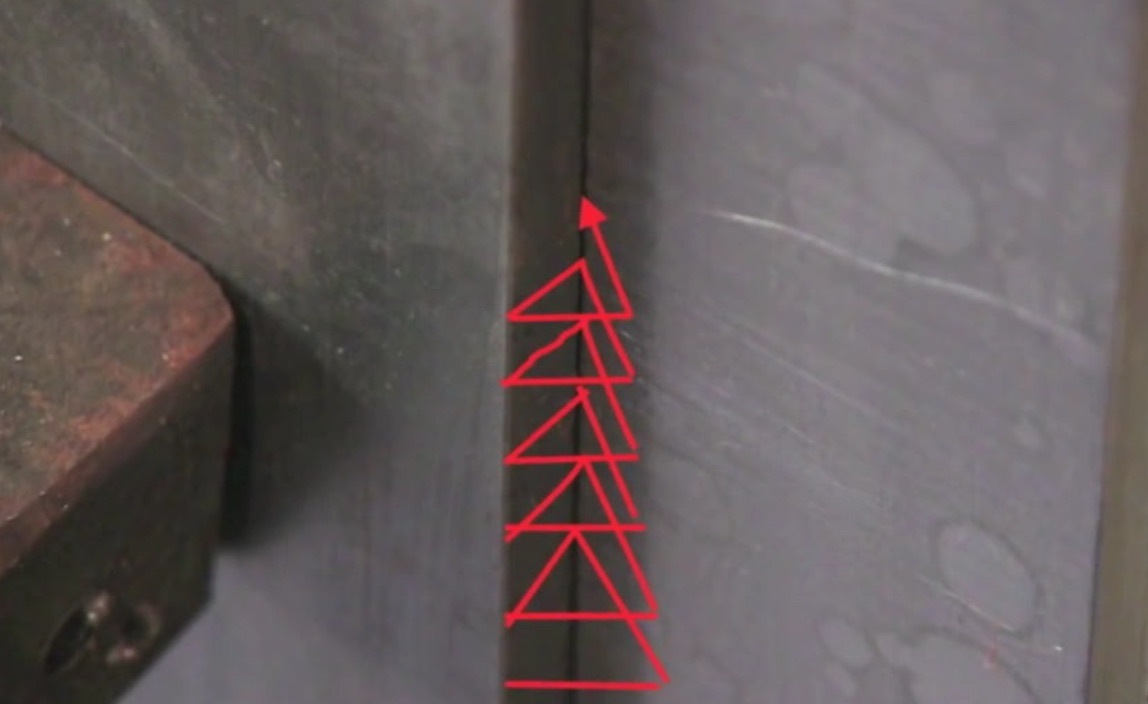
- Weave bead: Move side to side (in a zigzag or triangle). This covers wider joints or thicker steel.
Common weave patterns:
- Triangle: Move up and to one side, down to the center, up and to the other side, pause at each corner.
- Zigzag: Move up and side to side in a smooth motion, pausing at each edge.
For most vertical up welds on thick steel, use a triangle or zigzag weave. Keep the weave tight (no wider than 2–3 times the wire diameter) to avoid trapping slag.
Controlling Travel Speed
Travel too fast, and the bead is thin and uneven. Go too slow, and the weld piles up, trapping slag. Watch the molten puddle—it should be small and controlled, not running down the joint. Adjust your speed so the puddle stays at the right size.
Watching The Puddle
Focus your eyes on the leading edge of the puddle, not the arc or wire. You want to see the metal flow into the joint and the edges melt together. If the puddle starts to sag, pause longer or lower your voltage.
Multi-pass Welding
For thick joints, weld in layers (passes):
- Root pass: First layer, focus on deep penetration.
- Fill passes: Build up the joint in layers.
- Cap pass: Final layer, make it smooth and flush.
Clean off all slag between passes with a chipping hammer and brush. Slag trapped between layers causes weak welds.
Practical Example: Welding A 1/4” (6mm) Vertical Up Joint
Suppose you need to weld two 1/4” plates, 6 inches (15cm) long, in a vertical position:
- Clean both plates 1 inch (2.5cm) back from the joint.
- Fit up with a small gap (1/16” or 1.5mm) and tack every 2–3 inches.
- Set machine: 0.035” E71T-11 wire, 17 volts, 140 IPM, DCEN.
- Hold gun at 10–15 degrees up, 3/4” from surface.
- Start at the bottom. Use a triangle weave, pausing at each corner.
- Weld upward, watching the puddle. Pause longer at each side for fill.
- Clean slag after root pass. Repeat for fill and cap passes.
Common Problems And How To Fix Them
Vertical flux core welding is challenging, and even good welders make mistakes. Here are common problems and solutions:
1. Sagging Or Dripping Bead
- Cause: Too much heat, travel too slow, or too wide weave.
- Fix: Lower voltage, speed up travel, use tighter weave, pause longer.
2. Porosity (holes In The Weld)
- Cause: Dirty metal, wrong polarity, too much wind.
- Fix: Clean joint, check polarity, shield from wind, use proper wire.
3. Undercut (groove Along Edge)
- Cause: Angle too steep, travel too fast, too much voltage.
- Fix: Reduce gun angle, slow down, lower voltage.
4. Slag Inclusions
- Cause: Not cleaning between passes, weaving too wide.
- Fix: Chip and brush slag after every pass, use tighter weave.
5. Lack Of Fusion (weld Not Sticking)
- Cause: Not enough heat, travel too fast, poor fit-up.
- Fix: Increase voltage, slow down, ensure tight joint.
Non-obvious Insight 1: The Pause Duration Is More Important Than The Weave Pattern
Many new welders focus on making a perfect triangle or zigzag. In reality, the pause at the end of each movement is what controls cooling and bead shape. A short pause keeps metal from running, even if your pattern is not perfect.
Non-obvious Insight 2: Slightly Tilting Your Work Piece Improves Control
If possible, tilt the workpiece 10–15 degrees away from you. This reduces gravity’s pull on the weld puddle, making it easier to control, especially for long vertical seams.
Comparing Vertical Welding With Other Positions
Vertical welding is often harder than flat or horizontal welding. Here’s how it compares:
| Position | Control Difficulty | Penetration | Typical Use |
|---|---|---|---|
| Flat (1G) | Easy | Excellent | Plates, general work |
| Horizontal (2G) | Moderate | Good | Beams, pipes |
| Vertical (3G) | Hard | Very Good | Structural, field work |
| Overhead (4G) | Very Hard | Good | Ceiling joints |
Vertical position needs more control and attention to technique, but gives strong, deep welds if done right.
Tips For Consistent, High-quality Vertical Welds
- Keep your work area clean and well-lit. Good visibility improves accuracy.
- Always use two hands when possible: One on the gun, one to steady yourself.
- Practice your whip and pause motion on scrap metal before starting the real joint.
- Wear proper safety gear. Molten slag and metal can fall on your body when welding vertical.
- Check your welds after each pass. Look for defects early to avoid wasting time.
- Don’t rush. Slower, careful movements produce better results than hurrying.
- If the bead looks wrong, stop and adjust. Don’t keep going with a bad setup.
Advanced Techniques For Difficult Joints
Sometimes you face extra tough situations: thick plates, tight corners, or out-of-position joints. Here are some advanced tips:
Using Backing Bars
For open-root vertical joints, a copper or ceramic backing bar can catch the molten metal and prevent it from falling through. This lets you focus on penetration without worrying about burn-through.
Step-lock Welding
For very thick steel, weld a short section (2–3 inches), stop, then start again slightly higher, overlapping each segment. This “step-lock” method avoids overheating and gives cleaner welds.
Pulse Welding
Some advanced welders use pulse settings on their machines. This alternates the current, giving better control of heat and penetration. Only use this if your welder supports it and you have experience.

Credit: www.youtube.com
Table: Common Wire Types For Vertical Flux Core Welding
Choosing the right wire makes vertical welding easier. Here’s a quick comparison:
| Wire Type | Shielding | Typical Uses | Best For |
|---|---|---|---|
| E71T-11 | Self-shielded | Outdoor, field repair | Home/field, windy areas |
| E71T-1 | Gas-shielded | Shop, structural | Clean, strong welds |
| E71T-GS | Self-shielded | Thin metal, hobby work | Light gauge, DIY |
Safety Reminders For Vertical Welding
Vertical welding brings special safety risks. Hot slag and metal can fall onto your body or feet. Always:
- Wear leather boots and gloves
- Use a welding jacket with sleeves down
- Protect your neck and face
- Keep flammable items away from the weld area
Burns from falling slag are common. Cover all skin, even in hot weather.

Credit: www.reddit.com
Real-world Example: Mistakes And Solutions
A small fabrication shop tried to weld a vertical joint on a 1/4” steel frame using E71T-11 wire. Their first attempts led to sagging beads and lots of spatter. After reviewing their technique, they made these changes:
- Lowered voltage by 1 volt
- Slowed wire speed slightly
- Used a triangle weave with a longer pause at each side
- Cleaned the joint better before welding
The result was a much neater weld bead, with no sag or trapped slag. This simple adjustment saved hours of grinding and rework.
Proven Ways To Improve Your Skills
- Weld on scrap steel before every job to warm up your hands.
- Record your settings for different joints and wires in a notebook.
- Ask experienced welders to watch your technique and give feedback.
- Join welding forums or take classes to learn new tricks and get support.
Practicing vertical welds regularly, even on simple projects, builds the muscle memory and confidence needed for consistent results.
Credit: www.weldingtipsandtricks.com
When To Use Vertical Down Welding
Some beginners ask if vertical down welding is ever OK. For flux core, use vertical down only on thin metal (under 1/8” or 3mm) where speed matters more than strength. Vertical down is faster but gives weaker welds with less penetration.
Never use it for heavy-duty or structural work.
Table: Flux Core Vertical Welding Vs. Mig Vertical Welding
How does flux core compare to MIG (solid wire with gas) for vertical joints?
| Factor | Flux Core | MIG (Solid Wire) |
|---|---|---|
| Shielding | Self/gas shielded | Gas only |
| Outdoor Use | Very good | Poor (wind blows gas away) |
| Penetration | Excellent | Good |
| Spatter | More | Less |
| Speed | Moderate | Faster |
| Ideal Metal Thickness | 1/8”+ | Thin to medium |
Flux core is better for outdoor, vertical work and thicker metal. MIG works well for clean, indoor jobs with thin material.
Frequently Asked Questions
What Is The Best Wire For Flux Core Vertical Welding?
The best wire for most vertical flux core jobs is E71T-11 for self-shielded outdoor work or E71T-1 for gas-shielded, clean indoor joints. Choose 0.030” or 0.035” diameter for easier control.
Why Does My Vertical Weld Bead Sag Or Drip?
A sagging bead means too much heat, slow travel, or a wide weave. Lower your voltage, speed up your movement, or pause longer to let the bead cool.
Should I Use Stringer Or Weave Beads For Vertical Welding?
For thin metal, use stringer beads (straight up). For thick joints, use a tight weave (triangle or zigzag), but don’t make it too wide. The pause at each side is more important than the pattern.
Can I Use The Same Settings For Vertical And Flat Welding?
No, vertical welding needs lower voltage and wire speed to keep the puddle from running. Always test and adjust your settings for each position.
Where Can I Find More Detailed Flux Core Welding Guides?
You can find professional welding tips and charts at the American Welding Society website: American Welding Society.
Welding vertical with flux core takes patience, attention, and practice. Use the steps and insights in this guide, and you will see fast improvement in your weld quality and confidence. Always stay safe, work clean, and keep learning from every bead you lay.