Disclosure: This post contains affiliate links and I will be compensated if you make a purchase after clicking through my links. Learn More
Welding is a skill that shapes everything from cars to skyscrapers. Yet, for beginners, the small details matter the most. One of the first things every welder must learn is how to identify a good weld bead. This is not just about looks—safe and strong welds protect lives and property.
If you are just starting, you may feel unsure about what makes a weld bead “good. ” Are smooth welds always better? Does it matter if the bead is too wide or thin? These questions are common, and the answers are important.
This guide will help you see, understand, and judge weld beads with more confidence. You will learn what makes a weld strong, what problems to avoid, and how to spot quality even as a beginner. You do not need to be an expert to start; you just need to know what to look for and why it matters.
With these skills, you can work safer, improve faster, and avoid costly mistakes.
Why The Quality Of A Weld Bead Matters
A weld bead is more than just melted metal joining two pieces together. Its shape, size, and finish tell you a lot about the weld’s strength and safety. A good weld bead means the metal has fused well and will not break under stress.
On the other hand, a poor weld bead can hide cracks, weak spots, or even cause dangerous failures.
For example, the American Welding Society found that over 60% of structural failures in construction come from poor welds. Even in small projects like home repairs or hobby work, a weak weld can cause parts to snap or fall apart.
When you learn to spot a good weld bead, you protect yourself and others. You also save time and money, because you fix problems early. This is why weld bead quality should always be your first checkpoint.
What Is A Weld Bead?
A weld bead is the visible line of metal that forms after welding two pieces together. This bead is created as the welding process melts the base metal and the filler metal (if used), which then cools and solidifies. Weld beads come in different shapes and sizes, depending on the technique, settings, and skill of the welder.
There are several types of weld beads, including:
- Stringer bead: A straight, narrow bead, often used for beginners.
- Weave bead: A wider bead with a side-to-side motion, used for larger joints.
- Fillet bead: Used in T-joints or corners.
Each bead type has specific uses, but the basics of a good weld bead stay the same: strong fusion, correct shape, and no obvious defects.
Key Features Of A Good Weld Bead
A good weld bead shows certain clear traits. As a beginner, you should focus on these features every time you inspect your work.
1. Smooth And Even Appearance
A quality weld bead looks smooth. The surface should be even, without bumps or dips. This shows the heat and speed were controlled. Uneven welds can mean the metal did not melt evenly, which leads to weak spots.
2. Consistent Width
A good weld bead keeps the same width along the joint. If the bead gets wider or thinner, it shows the welder’s hand moved at the wrong speed or distance. Consistency means the weld is strong everywhere, not just in some places.
3. Correct Height And Profile
The best weld beads have a slight, even rise above the base metal. If the bead is too high (overfilled), it can trap air or create stress points. If it is too flat or sunken (undercut), it means not enough filler was used, and the joint may be weak.
4. Good Fusion With The Base Metal
Look at the sides of the bead. The bead must blend smoothly into the base metal without gaps, cracks, or signs of poor melting. If you see a visible line between the bead and the base, the weld may not be strong.
5. No Visible Defects
A good weld bead does not have holes, cracks, or spatter. These flaws weaken the weld and often signal other problems, like dirty metal or wrong settings.
6. Correct Bead Penetration
The weld bead must penetrate into the base metal—not just sit on top. Good penetration means the weld has melted into the joint, making it much stronger. You can often check this by looking at the back side of the weld or by looking for signs of full fusion.
Types Of Weld Bead Defects (and How To Spot Them)
Even skilled welders make mistakes. Knowing the most common defects helps you spot problems and fix them early.
1. Porosity
Porosity looks like tiny holes or bubbles in the weld bead. This happens when gas gets trapped in the molten metal. Porosity weakens the weld and can cause leaks or cracks.
Causes:
- Dirty metal (oil, rust, paint)
- Wrong shielding gas
- Too much or too little gas flow
How To Spot:
Look for small round holes on the surface or inside the bead. These can appear in clusters or randomly.
2. Undercut
Undercut is a groove that forms at the edge of the weld bead, cutting into the base metal. This makes the joint weaker and easier to crack.
Causes:
- Moving the torch or electrode too fast
- Using too high a current
- Poor torch angle
How To Spot:
Check the edges of the weld bead. If you see a sharp dip or line running along the side, it’s likely undercut.
3. Overlap
Overlap means the weld metal flows over the base metal but does not fuse. It looks like the bead is sitting on top, not melting in.
Causes:
- Welding too slowly
- Using too much filler
- Wrong angle
How To Spot:
See if the bead looks like it is “spilling” over the side, without blending into the base metal.
4. Cracks
Cracks are serious. Even small cracks can lead to failure. Cracks can appear right after welding or later due to stress.
Causes:
- Wrong type of filler metal
- Poor cooling (cooling too fast)
- High stress on the joint
How To Spot:
Look closely for thin lines running through the weld bead or at the ends of the weld.
5. Spatter
Spatter is small droplets of metal that stick near the weld bead. While spatter does not always weaken the weld, it looks messy and can cause problems in some applications.
Causes:
- Wrong settings (too much current or voltage)
- Dirty base metal
- Bad technique
How To Spot:
Check for small, round metal dots around the weld area.
6. Incomplete Fusion
Incomplete fusion means the weld did not melt both pieces of metal fully. It is a hidden problem and often leads to joint failure.
Causes:
- Too low heat
- Moving too fast
- Bad joint preparation
How To Spot:
Look for a visible gap between the bead and the base metal or uneven blending.
7. Incomplete Penetration
Incomplete penetration is when the weld does not go all the way through the joint. This is common in thick materials.
Causes:
- Low amperage
- Poor joint setup
- Moving too quickly
How To Spot:
If you can look at the back side of the joint and see no weld, or if the bead looks too shallow, penetration may be incomplete.
Visual Examples: Good Vs. Bad Weld Beads
You cannot always tell the quality of a weld from words alone. Here is a simple comparison to help you recognize good and bad weld beads.
| Feature | Good Weld Bead | Bad Weld Bead |
|---|---|---|
| Surface | Smooth, even, shiny | Rough, uneven, dull |
| Width | Consistent | Irregular, changing |
| Height | Slight, even rise | Too high (overfilled) or too low (undercut) |
| Edges | Blends smoothly | Sharp dips, cracks, or overlap |
| Defects | None visible | Holes, cracks, spatter |
By using this table, you can compare your welds to these features and spot problems early.
Tools To Help You Inspect Weld Beads
While your eyes are your first tool, some simple instruments can make your inspections more accurate.
Visual Inspection Tools
- Magnifying glass: Helps you see small cracks or porosity.
- Flashlight: Good lighting makes defects easier to spot.
- Welding gauge: Measures bead height and width.
Measurement Tools
- Fillet gauge: Checks the size of fillet welds.
- Ruler or caliper: Measures bead width or joint gap.
Advanced Inspection (for Later)
- Dye penetrant kit: Shows hidden cracks.
- Ultrasonic tester: Finds inside defects (used in critical jobs).
As a beginner, focus on visual checks and simple gauges. This is enough for most learning projects.

Credit: yeswelder.com
How To Practice And Improve Weld Bead Quality
Learning to make good weld beads takes practice and attention to detail. Here are steps you can follow:
- Prepare Your Metal
- Clean all oil, rust, and paint from your metal before welding.
- Use a wire brush, grinder, or chemical cleaner if needed.
- Check Your Equipment
- Use the right electrode or wire for your metal.
- Set the correct current, voltage, and gas flow.
- Practice Your Technique
- Keep a steady hand.
- Move at a consistent speed.
- Hold the torch or electrode at the right angle (usually 10-15 degrees).
- Inspect Every Bead
- Look at your weld after each pass.
- Use the tips above to check for evenness, fusion, and defects.
- Adjust and Repeat
- If you see problems, change your speed, angle, or settings.
- Practice on scrap metal until you see steady improvement.
- Keep Records
- Take photos of your welds and write down settings.
- This helps you learn what works best for you.
Common Mistakes Beginners Make (and How To Avoid Them)
Many beginners make the same mistakes when learning to judge weld beads. Here are the most common ones, plus tips to avoid them.
1. Ignoring Metal Preparation
Dirty or rusty metal causes porosity and weak welds. Always clean your metal well before starting.
2. Using The Wrong Settings
Too much or too little power leads to undercut, spatter, or poor fusion. Check your welder’s manual or ask a more experienced welder for starting settings.
3. Moving Too Fast Or Too Slow
If you rush, the weld bead will be thin and weak. Too slow, and you get wide, high beads or overlap. Practice moving at a steady, even pace.
4. Not Checking The Bead From All Angles
Some defects are only visible from the side or back. Always inspect your welds from different views.
5. Not Practicing Enough
Improvement takes time. Try to practice a little each week, and do not get discouraged by early mistakes.
6. Focusing Only On Looks
A shiny weld is not always strong. Always check for fusion, penetration, and other key traits, not just a pretty surface.
Extra Tips: What Most Beginners Miss
Some details are easy to overlook but make a big difference in weld bead quality.
1. Watch For Color Changes
A weld bead that is too dark or has a blue tint may have cooled too slowly or quickly. This can affect strength and appearance. Aim for a silvery or light gray finish for most metals.
2. Listen To The Sound
A good weld often makes a steady “sizzle” sound. If you hear popping, cracking, or hissing, check your settings or technique.
3. Feel For Heat
After welding, the area near the bead should be warm but not burnt or warped. Too much heat can damage the base metal and weaken the joint.
4. Keep Your Workspace Safe
Welding creates sparks and hot metal. Always wear gloves, a helmet, and protective clothing. Check your surroundings for flammable materials before starting.
How Different Welding Processes Affect Bead Quality
Not all welding processes create the same bead. Here’s how the most common methods compare for beginners.
| Process | Bead Appearance | Ease for Beginners | Common Problems |
|---|---|---|---|
| SMAW (Stick) | Thicker, rougher | Medium | Spatter, slag inclusion |
| MIG (GMAW) | Smoother, even | Easy | Porosity, lack of fusion |
| TIG (GTAW) | Very smooth, neat | Harder | Undercut, incomplete fusion |
| Flux-Cored | Similar to MIG, more spatter | Easy-Medium | Porosity, slag |
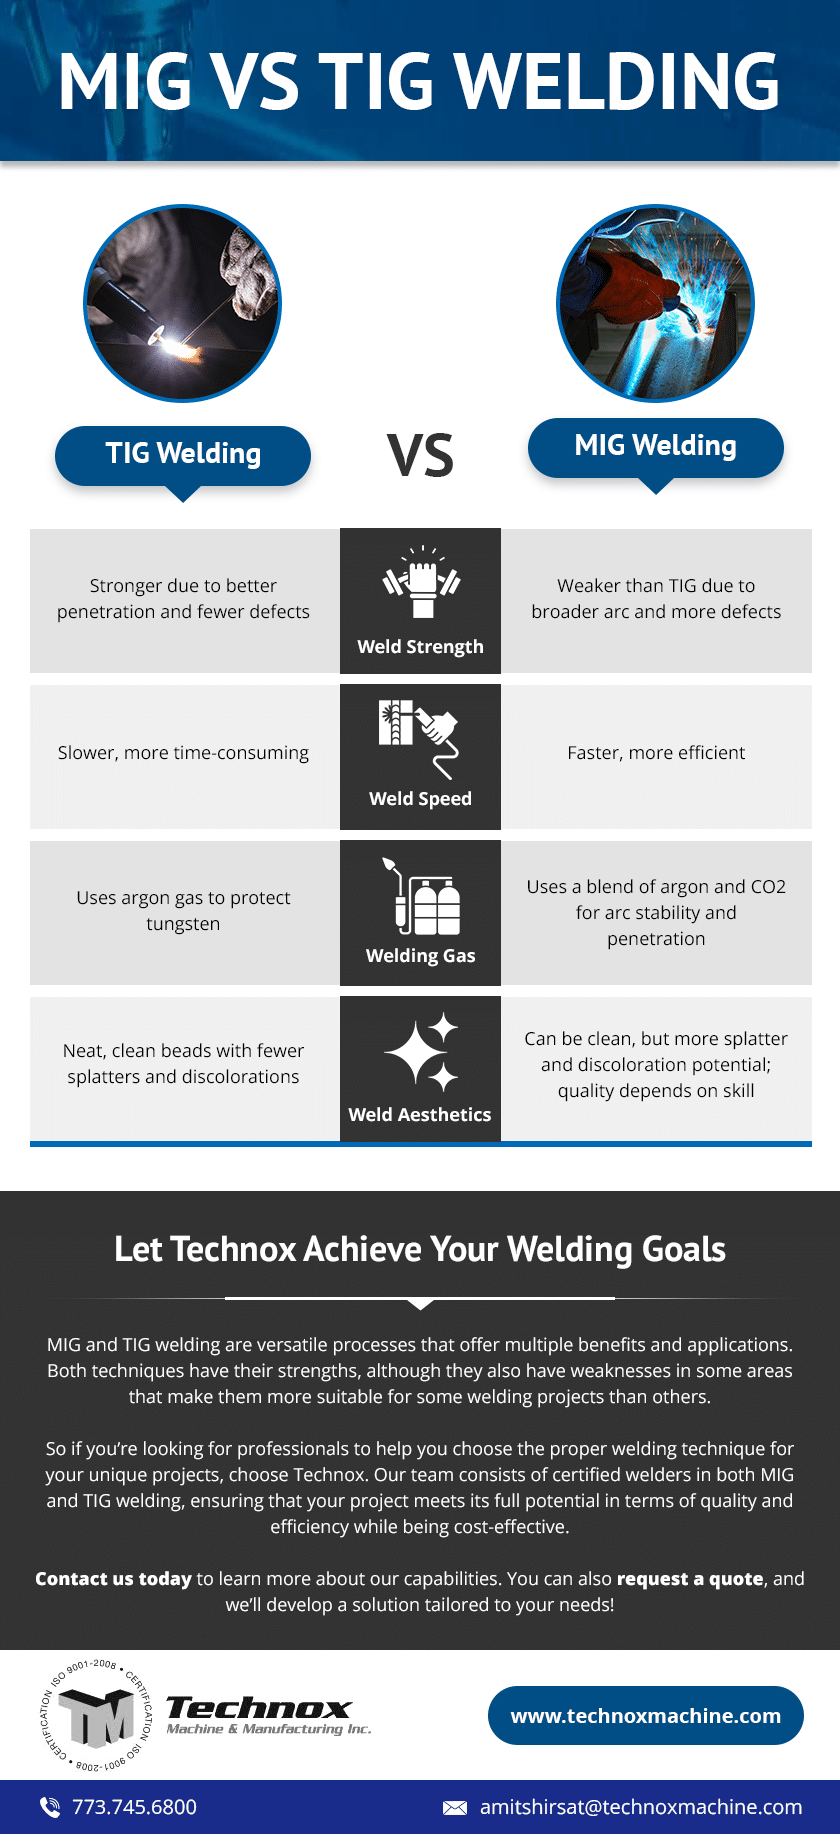
If you are just starting, MIG welding is often easiest for clean, consistent beads. TIG gives the best finish but needs more skill and control.
The Role Of Joint Design And Position
How you set up your metal before welding changes bead quality.
- Joint fit-up: Gaps that are too wide or tight cause uneven beads.
- Welding position: Flat positions are easiest for beginners. Overhead or vertical welds are harder and can lead to more defects.
- Tack welds: Use small “tack” welds to hold parts in place before you run a full bead. This keeps joints from moving and helps you get a consistent weld.
Practice Checklist For Beginners
Here is a quick checklist to use each time you weld:
- Clean all surfaces.
- Set up the correct joint and tack weld.
- Check your welder settings.
- Hold the torch/electrode at the right angle.
- Keep a steady hand and speed.
- Watch the bead form—look for evenness and fusion.
- Inspect the finished bead for defects.
- Adjust technique or settings if needed.
Following these steps helps you create better weld beads and spot problems early.
Real-world Examples: Why Good Weld Beads Matter
A famous example comes from bridge construction. In 1940, the Tacoma Narrows Bridge suffered a dramatic collapse. Investigations found poor welds contributed to its failure, showing how even small defects can cause big problems.
In home repairs, a weak weld on a gate hinge can snap after a few uses, creating safety risks. In car frames, poor welds can lead to accidents.
Good weld beads are not just about skill—they are about safety and lasting results.
Resources For Learning More
Many welding schools, online courses, and certification programs offer in-depth training. The American Welding Society (AWS) is a great resource for guides, videos, and safety information.
Frequently Asked Questions
What Is The Most Important Thing To Look For In A Weld Bead?
Check for evenness and fusion. A good weld bead is smooth, blends into the base metal, and has no cracks or holes.

Credit: www.youtube.com
Can A Weld Bead Look Good But Still Be Weak?
Yes. Sometimes a weld looks nice but did not melt the base metal enough. Always check for signs of fusion and penetration, not just appearance.
How Can I Fix A Bad Weld Bead?
First, remove the bad weld with a grinder or chisel. Then clean the area, adjust your settings, and try again. Practice on scrap metal if you are unsure.
Credit: www.technoxmachine.com
What Are The Risks Of Ignoring Weld Bead Defects?
Defects like cracks, porosity, or undercut can cause the weld to fail. This can lead to broken parts, leaks, or even accidents.
Are There Simple Ways To Test Weld Strength At Home?
You can bend or hammer the welded joint to see if it holds. For safety-critical parts, always use professional testing or get advice from a certified welder.
—
Learning to spot a good weld bead is the first step to becoming a skilled welder. Focus on the basics—clean metal, correct technique, steady speed, and careful inspection. With practice, your confidence and skill will grow. Whether for a hobby or a career, mastering weld bead quality will set you apart and keep your work safe and strong. For more expert advice, visit the American Welding Society.