
Disclosure: This post contains affiliate links and I will be compensated if you make a purchase after clicking through my links. Learn More
Mig welding 304 stainless steel is a core skill for people in construction, food processing, and many industrial fields. This process joins one of the most common stainless steels with a method that offers speed and efficiency. Still, getting strong and neat welds on 304 stainless steel is not simple.
The metal reacts differently than carbon steel, and mistakes can cause cracks, warping, or rust spots. This article gives you a full, step-by-step explanation, from how to set up your equipment to handling real-world problems on the shop floor. You will learn every step and trick, including many that beginners often miss.
What Is 304 Stainless Steel?
304 stainless steel is an austenitic alloy. It contains about 18% chromium and 8% nickel. People use it because it resists rust and stains. You find 304 stainless steel in kitchen sinks, brewing tanks, food storage, pipes, and medical tools. It also handles heat and chemicals better than many other steels.
The main features of 304 stainless steel:
- Good corrosion resistance in most environments
- Non-magnetic in its annealed form
- Good weldability
- Easy to clean
- High ductility (it bends without breaking)
304 stainless steel is popular because it balances cost, strength, and corrosion resistance. It’s not the only stainless grade, but it is the one you’ll see most often in food-grade and chemical uses. The chromium and nickel content creates a thin, invisible oxide layer on the surface, which is what keeps it from rusting.
If that layer is damaged or contaminated, corrosion can start—so careful cleaning before and after welding is important.
Another point: 304 stainless steel is softer and more ductile than many other stainless grades. This makes it easier to cut and form, but also means it can distort more easily if overheated during welding.
Why Use Mig Welding For 304 Stainless Steel?
MIG welding, or Gas Metal Arc Welding (GMAW), uses a wire electrode and shielding gas to join metals. It is popular because:
- Faster process than TIG welding
- Easier for beginners to learn
- High productivity for long welds
- Cleaner welds with less spatter if set up well
For 304 stainless steel, MIG welding is often the best choice when you need to weld long seams, thick plates, or large parts quickly.
MIG also allows for one-handed operation and less operator fatigue. While TIG can make prettier welds, MIG is much faster and more forgiving. That said, MIG welding is less suitable for very thin stainless sheet unless the welder is set up carefully.
A real-world example: In commercial kitchens, when large sections of stainless steel need to be joined, MIG is usually chosen for its speed and ability to make continuous welds. Small custom jobs or repair welds can also be done with MIG, which saves time and money.
Choosing The Right Mig Welder
Not all MIG welders are equal. To weld 304 stainless steel, you need a machine with:
- Stable arc control at low and high amps
- Adjustable voltage and wire speed
- Capability for both short-circuit and spray transfer modes
For thin sheet (1-2mm), a 150-180A welder is enough. For thick plate (6mm+), use a 250A or larger machine.
Pro tip: Many cheap welders struggle with arc stability on stainless steel. Look for a machine with a good reputation, especially for stainless work.
If you’re planning to weld all day, check the duty cycle rating—this tells you how long the welder can operate before it needs to cool down. A low duty cycle can stop your workflow, especially on thicker stainless. Some welders are made for only short jobs.
Also, make sure your welder has a smooth wire feed system. Stainless wire is softer than mild steel wire and can jam in cheap or worn-out feeders.
Don’t forget the gas solenoid and regulator. These must be in good condition—leaks or pressure drops lead to porosity and weak welds.
Shielding Gas Selection
The shielding gas protects the weld from air. For 304 stainless steel, use a tri-mix gas:
- 90% Argon
- 7.5% Helium
- 2.5% CO2
This mix gives a stable arc and smooth welds. Too much CO2 can cause rust and rough welds.
For basic jobs, you can use 98% Argon and 2% CO2, but this gives less control and more spatter.
Common mistake: Many beginners use the same gas as for mild steel (75% Argon/25% CO2). This makes the welds dirty and can cause rust.
Helium in the mix raises the arc temperature and improves penetration—this is especially helpful when welding thick stainless or when working in colder environments. The small amount of CO2 helps stabilize the arc but must be kept low to prevent oxidation of the stainless and preserve the corrosion-resistant properties.
If you’re welding outdoors, wind can blow away your shielding gas. In that case, use screens to block drafts, or increase the gas flow slightly—but too much flow can cause turbulence and suck in air, so don’t overdo it.

Credit: www.youtube.com
Mig Wire Selection
For 304 stainless steel, use ER308L wire. This matches the base metal in composition. The “L” means low carbon, which helps prevent carbide precipitation (less chance of weld rust).
Wire sizes:
- 0.8mm (0.030”) for thin sheet
- 1.0mm (0.040”) for general work
- 1.2mm (0.045”) for thick plate
Never use mild steel wire on stainless steel. It will cause rust and weak welds.
ER308L is the standard for 304 and 304L stainless steels. If you are welding 316 stainless, use ER316L wire instead. The low-carbon versions (“L”) reduce the risk of sensitization—a problem where chromium carbides form at the grain boundaries and reduce corrosion resistance.
Store wire spools in a dry cabinet. Even slight rust or dust on the wire will transfer into your weld and cause problems. Always check the wire for kinks or bends before loading it into your welder. Feeding issues are much more common with stainless wire due to its softness.
Joint Preparation
Welds on stainless steel look best and last longest when you prepare the joint well.
- Clean both sides with a stainless steel wire brush or grinder.
- Remove oil, paint, and dirt.
- Use a dedicated brush for stainless steel (not one used on carbon steel).
- Chamfer thick parts (over 3mm) to a 60° V-groove.
Hidden tip: Even fingerprints can cause rust around the weld. Wear clean gloves and wipe with acetone before welding.
Stainless steel is very sensitive to contamination. Even small amounts of oil, marker ink, or grinding dust can lead to porosity or rust after welding. If you use a grinder, make sure it has a flap disc or wheel that has never touched carbon steel.
One tiny piece of carbon steel can ruin the corrosion resistance in the weld area.
When prepping thick pieces, a proper V-groove ensures good penetration and reduces the risk of lack of fusion. For thin sheet, a simple butt fit is enough, but make sure the edges are perfectly aligned and tight—gaps will cause burn-through.
Setting Up Your Mig Welder
Each welder is different, but here are starting points for 304 stainless steel:
- Voltage: 17-21V for thin sheet; 22-27V for thick plate
- Wire Feed Speed: 3-6m/min (adjust for arc sound)
- Gas Flow Rate: 14-18 liters per minute
- Polarity: DC positive (DCEP)
Listen for a crisp, steady “sizzle. ” Too much spatter means bad settings or gas.
Most welders will need some fine-tuning based on your actual setup, joint fit-up, and welding position (flat, vertical, overhead). Always start with the recommended settings, then adjust by listening to the arc and watching the weld bead shape. Too low voltage gives a tall, narrow bead with poor fusion.
Too high voltage gives a wide, flat bead with undercut at the edges.
A consistent wire feed speed is critical. If you hear popping or the wire stubs into the plate, increase the speed slightly. If the arc sounds like a machine gun, decrease the speed. Every wire and gas mix behaves a little differently, so practice on a scrap piece before starting your actual project.
Welding Techniques For 304 Stainless Steel
Travel Speed
Move the gun at a steady pace. Too slow means too much heat and burn-through. Too fast gives poor fusion and weak welds.
If you are new, practice keeping your travel speed consistent. Use both hands if possible for better control. On thin sheet, you may need to “pulse” your movement to avoid overheating one spot. For longer seams, pause between welds to let the metal cool.
Gun Angle
Hold the gun at a 10-15° push angle. Pushing the weld pool gives cleaner results on stainless steel.
A push (forehand) angle helps keep the weld pool clear of contamination and allows the shielding gas to cover the area better. If you pull (drag) the gun, you may trap slag or create a rougher bead.
Stickout
Keep the wire stickout short—about 10mm (3/8”). Longer stickout makes the arc unstable and causes overheating.
Short stickout gives you better control, a more focused arc, and less chance of the wire burning back into the tip. If you need to weld in a tight corner, adjust your gun position rather than lengthening the stickout.
Weaving
Use a straight bead or a small side-to-side weave for wider joints. Do not weave more than 2x wire diameter.
Weaving is useful for filling wider joints, but too much side-to-side motion increases heat input and can cause warping. For most stainless steel welds, a straight pass or a slight wiggle is best. Practice on scrap to see how your weave affects the finished bead.
Common Weld Joint Types
You will see these joints on 304 stainless steel:
- Butt joint: Edge to edge for sheet or plate.
- Lap joint: One piece overlaps another.
- T-joint: Pieces meet at a right angle.
- Corner joint: For box shapes or frames.
- Edge joint: For thin parts or covers.
Fit-up should be tight, with no gaps. Use clamps to hold parts steady.
In many food and medical applications, joint cleanliness is as important as strength. For example, a smooth, flush weld on a butt joint is easier to clean and less likely to trap bacteria. On lap joints, make sure the overlap is not too large—otherwise, you risk incomplete fusion at the root.
For T-joints and corner joints, always check that both pieces are fully tacked before running the main bead. This prevents movement or misalignment as the weld shrinks.
Avoiding Warping And Distortion
Stainless steel expands and contracts more than mild steel. This leads to warping if you use too much heat.
Tips:
- Use short welds (stitch welding) instead of long beads.
- Alternate welds from side to side.
- Clamp workpieces well.
- Let parts cool between welds.
Insight: Many new welders ignore pre-clamping. Warped parts are hard to fix later, so always secure before starting.
You can also reduce warping by welding on the inside corners first, then the outside. If possible, plan your weld sequence so the heat input is balanced across the part. For very thin sheet, a copper or aluminum backing bar absorbs heat and supports the joint.
Some shops use “skip welding”—welding small sections far apart, then filling in the gaps. This spreads the heat more evenly and minimizes distortion.
Controlling Heat Input
Too much heat causes discoloration, grain growth, and weak welds. Too little heat gives poor fusion.
- Use the lowest settings that still give good penetration.
- Pause to let the part cool if it gets too hot.
- On thick plate, use a back-step technique: Weld short sections, then go back and fill gaps.
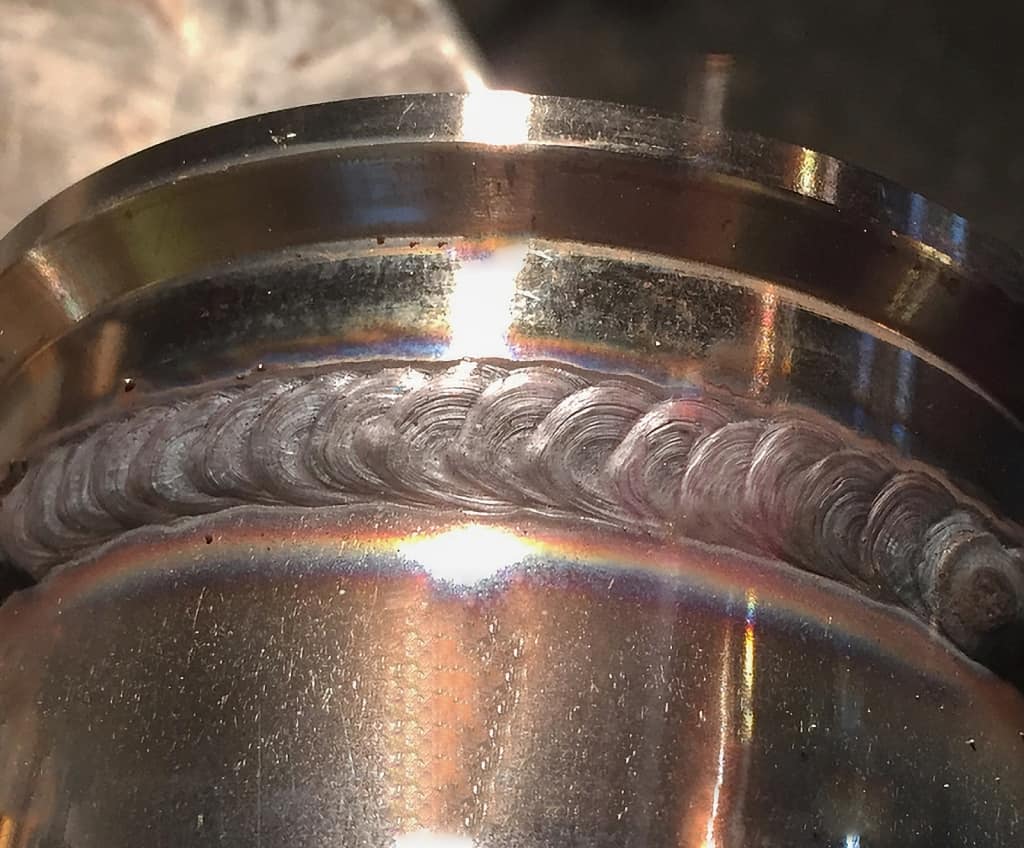
A pale straw or gold color around the weld is normal, but blue, purple, or black colors mean overheating. In critical applications, these colors must be cleaned off and the area passivated to restore corrosion resistance.
If you’re working on a big job, don’t rush. Short welds with pauses in between give much better results than one long, overheated bead.
Cleaning After Welding
After welding, you need to clean the weld to remove oxide colors (heat tint) and contamination.
- Use a stainless steel wire brush or power tool.
- Wipe with acetone.
- For best results, pickle the weld with a special acid paste.
Leaving heat tint can cause rust later. Never use carbon steel brushes, as they embed particles that rust.
Pickling paste is an acid gel that removes the blue, gold, and black colors caused by welding heat. Apply it with a brush, let it sit for the recommended time, then rinse thoroughly with water. Always wear gloves and goggles when using pickling paste—it is very corrosive.
In food-grade or pharmaceutical applications, welds must be perfectly clean and smooth. Any discoloration or roughness is a place where bacteria can grow.
Passivation
Passivation means restoring the chromium oxide layer that protects stainless steel.
- After welding and cleaning, apply a passivation solution (usually nitric or citric acid).
- Rinse well with water.
Extra tip: Skipping passivation is a common cause of rust in welded stainless steel, even if the weld looks clean.
Passivation removes iron particles left from tools or welding and rebuilds the protective layer. You can buy passivation solutions ready to use, or send the part to a shop with a full immersion tank. For small jobs, a wipe-on gel works fine.
After passivation, always rinse the part well and dry it. Any leftover acid can cause staining or pitting.
Inspection And Testing
Check your welds for:
- Cracks or porosity
- Incomplete fusion
- Undercut at the toes of the weld
- Even bead shape
For critical parts, use dye penetrant or X-ray testing. For most jobs, a visual and bend test is enough.
To perform a bend test, clamp the welded joint and try to bend it with steady pressure. The weld should not crack or separate from the base metal. Dye penetrant testing highlights small surface cracks that are hard to see with the eye.
For high-pressure or food-grade tanks, you may need to perform a hydrostatic test (filling with water under pressure) to check for leaks.
Table: Mig Welding Parameters For 304 Stainless Steel
Here is a quick reference for common thicknesses.
| Material Thickness | Wire Size | Voltage | Wire Feed Speed | Gas Flow |
|---|---|---|---|---|
| 1 mm | 0.8 mm | 17 V | 3.5 m/min | 14 L/min |
| 3 mm | 1.0 mm | 20 V | 4.5 m/min | 16 L/min |
| 6 mm | 1.2 mm | 25 V | 6.0 m/min | 18 L/min |
These values are a starting point. Adjust based on your specific welder, wire, and joint fit-up.
Common Problems And Solutions
Porosity
Porosity means holes in the weld. It is usually from bad gas coverage.
- Check for wind or drafts in your shop.
- Make sure the gas nozzle is clean.
- Increase gas flow slightly.
Porosity can also be caused by contaminated wire or base metal. Always check your wire and clean the joint area thoroughly before starting.
Cracking
Cracks often come from too much heat or wrong wire. Use the right settings and always use ER308L wire.
Cracking can also happen if you move the part before it cools. Let welds cool naturally in still air. If you weld thick plates to thin sheet, the difference in expansion can also cause cracking—preheat thick sections if needed, and use a joint design that reduces stress.
Lack Of Fusion
If the weld sits on top of the metal and does not melt in, use more heat or slow your travel speed.
This problem also happens if the joint fit-up is poor or dirty. Make sure the edges are tight and free of rust or paint before welding.
Rust Spots
Rust after welding means contamination. Clean the joint well, use the right wire and gas, and passivate after welding.
Even clean-looking welds can rust if they were touched by tools, gloves, or rags contaminated with carbon steel. Always keep stainless and carbon steel tools separate.
Credit: weldguru.com
Table: Stainless Vs Mild Steel Mig Welding
See the key differences:
| Factor | 304 Stainless Steel | Mild Steel |
|---|---|---|
| Shielding Gas | Tri-mix or Ar/CO2 | 75% Ar/25% CO2 |
| MIG Wire | ER308L | ER70S-6 |
| Heat Input | Lower (to avoid warping) | Higher allowed |
| Cleaning | Stainless brush, passivation | Wire brush, paint |
| Corrosion Resistance | High | Low |
This table highlights why stainless steel welding needs more care and different materials than mild steel welding.
Personal Safety
Welding stainless steel produces fumes that contain chromium and nickel. These are harmful if breathed.
- Always wear a fume extraction mask or weld in a well-ventilated area.
- Use gloves, a helmet, and a long-sleeve jacket.
- Clean up grinding dust with a vacuum, not a broom.
Note: Fume sickness is real. Many new welders ignore ventilation and feel sick after a day’s work.
Welding fumes from stainless steel are more hazardous than mild steel fumes. They can cause metal fume fever (flu-like symptoms), and long-term exposure increases the risk of lung disease and cancer. A portable fume extractor or a powered air-purifying respirator (PAPR) is a smart investment if you weld stainless often.
Hot metal and UV rays from the arc can burn skin and eyes. Always cover exposed skin and wear safety glasses under your helmet. Sparks and grinding dust can travel far, so keep your work area clear of flammable materials.

Credit: yeswelder.com
Practical Tips For Better Results
- Store wire spools in dry places. Moisture causes rust and poor welds.
- Use a short, high-quality ground cable for a stable arc.
- Purge the backside with argon gas for critical welds (like food-grade pipes).
- Do not touch the wire with bare hands. Oils can cause rust.
- If you see blue, gold, or black heat tint, clean and passivate before use.
A few extra tips: For closed tubes or pipes, back-purge with argon to prevent oxidation inside the weld. This is critical for food and medical lines. For small gaps, use copper backing to help control heat and reduce burn-through. Always inspect your gas nozzle and diffuser for spatter buildup; a clogged nozzle gives poor gas coverage and leads to defects.
Table: Troubleshooting Guide
A quick look-up for common issues.
| Problem | Possible Cause | Fix |
|---|---|---|
| Cracks in weld | Too much heat, wrong wire | Lower voltage, use ER308L |
| Porosity | Poor gas coverage | Check nozzle, raise flow |
| Rust after welding | Contamination, no passivation | Clean and passivate |
| Warped parts | Excess heat, no clamping | Use clamps, stitch weld |
Always solve the root cause, not just the symptom. If you see repeated defects, stop and check your whole process—from material prep to settings and technique.
Real-world Examples
- In a food factory, workers weld 304 stainless steel tanks. They use tri-mix gas and ER308L wire for clean, rust-free seams. They passivate each weld to meet hygiene rules.
- Pipefitters making brewery lines purge the inside of the pipe with argon while welding, to prevent rust inside the pipes.
- On construction sites, welders use clamps and stitch welds to keep long stainless steel covers straight and flat.
- In a small repair shop, a welder uses a copper bar behind thin stainless sheet to absorb heat and avoid burning through. He cleans and passivates every weld, even on hidden surfaces, to prevent future rust complaints from customers.
- When joining stainless handrails, fabricators often tack every joint first, check alignment, then finish welds in a sequence to keep the whole structure straight.
Non-obvious Insights
- The color of the weld can tell you if your settings are correct. A pale gold is good; dark colors mean too much heat.
- Always use separate tools for stainless and carbon steel. Even tiny bits of carbon steel can ruin the corrosion resistance.
- For very thin stainless steel, use a copper backing bar to absorb heat and prevent burn-through.
- Let the welded part cool slowly in air. Do not quench in water; this can cause cracking.
- If you need to weld stainless to carbon steel, use a special “309L” wire and clean both metals extremely well. Still, the joint will never be as corrosion-resistant as a full stainless weld.
- When welding outside, always check wind direction. Even small breezes can blow away shielding gas and ruin your weld.
Where To Learn More
If you want detailed standards and safety info, visit the Wikipedia GMAW page for more resources.
Frequently Asked Questions
How Do I Prevent Rust After Mig Welding 304 Stainless Steel?
Clean the weld with a stainless steel brush, then apply a passivation solution. Make sure you do not use tools that touched carbon steel. Always use the correct wire and shielding gas.
Can I Weld 304 Stainless Steel With The Same Mig Wire As Mild Steel?
No. You must use ER308L wire for 304 stainless steel. Mild steel wire will cause rust and weak welds.
What Is The Best Shielding Gas For Mig Welding 304 Stainless Steel?
A tri-mix (90% Argon, 7. 5% Helium, 2. 5% CO2) is best. For basic work, 98% Argon/2% CO2 works, but it gives more spatter.
Why Does My Weld Turn Blue Or Black?
This means you used too much heat or moved too slowly. Clean the weld and passivate it to restore corrosion resistance.
Is Mig Welding Good For Thin 304 Stainless Steel Sheet?
Yes, with the right settings. Use low voltage, a small wire (0. 8mm), and move quickly to avoid burn-through.
Mig welding 304 stainless steel gives strong, clean results if you follow these steps. With the right wire, gas, and careful cleaning, your welds will last in tough environments. Use this guide as your reference for both small repairs and large projects.

