Disclosure: This post contains affiliate links and I will be compensated if you make a purchase after clicking through my links. Learn More
Flux core welding is popular because it works well outdoors and does not need a gas tank. Many people—both beginners and professionals—choose flux core for repairs, fabrication, and construction. But to get strong welds, you must set the wire speed and voltage correctly. If these settings are wrong, your welds can be weak, messy, or full of holes.
This article explains how to use a flux core wire speed and voltage chart, why these settings matter, and how to adjust them for different metals and wire sizes. You will find clear tables, practical examples, and answers to common questions. Whether you are new to welding or want better results, this guide gives you the knowledge to set up your machine with confidence.
What Is Flux Core Welding?
Flux core welding uses a special wire filled with flux. The flux creates a protective shield around the weld, so you do not need extra gas. This makes flux core welding good for outdoor work, windy areas, and quick repairs.
Flux core wire comes in different diameters. The most common are .030 inch and .035 inch. You must match the wire size to your project and adjust your machine settings.
Another benefit of flux core welding is its ability to handle dirty or slightly rusty metal. Unlike MIG welding with shielding gas, flux core can tolerate less-than-perfect surfaces. This is why many repair shops and field welders use it for quick fixes on farm equipment, vehicles, and construction steel.
However, while it is forgiving, you will still get better results if you remove heavy rust, paint, or grease before welding.
Flux core welding is also known for its deep penetration. This means the weld fuses well, even on thicker metals, making it a good choice for heavy-duty jobs. But this deep penetration can be a problem on thin sheet metal if your settings are too high, causing burn-through or distortion.
Why Do Wire Speed And Voltage Matter?
Wire speed controls how fast the wire feeds into the weld. Voltage controls the heat of the arc. These two settings must work together.
- If wire speed is too low, the arc will keep starting and stopping. You get poor fusion and gaps.
- If wire speed is too high, the wire may push into the weld pool and cause spatter.
- If voltage is too low, the weld will be cold and weak.
- If voltage is too high, the weld will be too hot and could burn through the metal.
Finding the right balance means your welds are strong, smooth, and clean.
The relationship between wire speed and voltage is not always one-to-one. For example, if you increase wire speed, you often need to adjust voltage higher to keep a stable arc. Many beginners make the mistake of changing one setting but not the other, leading to inconsistent welds.
A good habit is to adjust both settings in small steps, testing after each change.
Another point to remember: thicker wire feeds more metal into the weld, requiring more voltage to melt it properly. If you put thick wire in your machine but leave voltage low, you will hear popping and the wire may even “stub” or bounce off the metal instead of melting smoothly. Watch and listen to the weld as you go—experience will help you recognize when something is off.
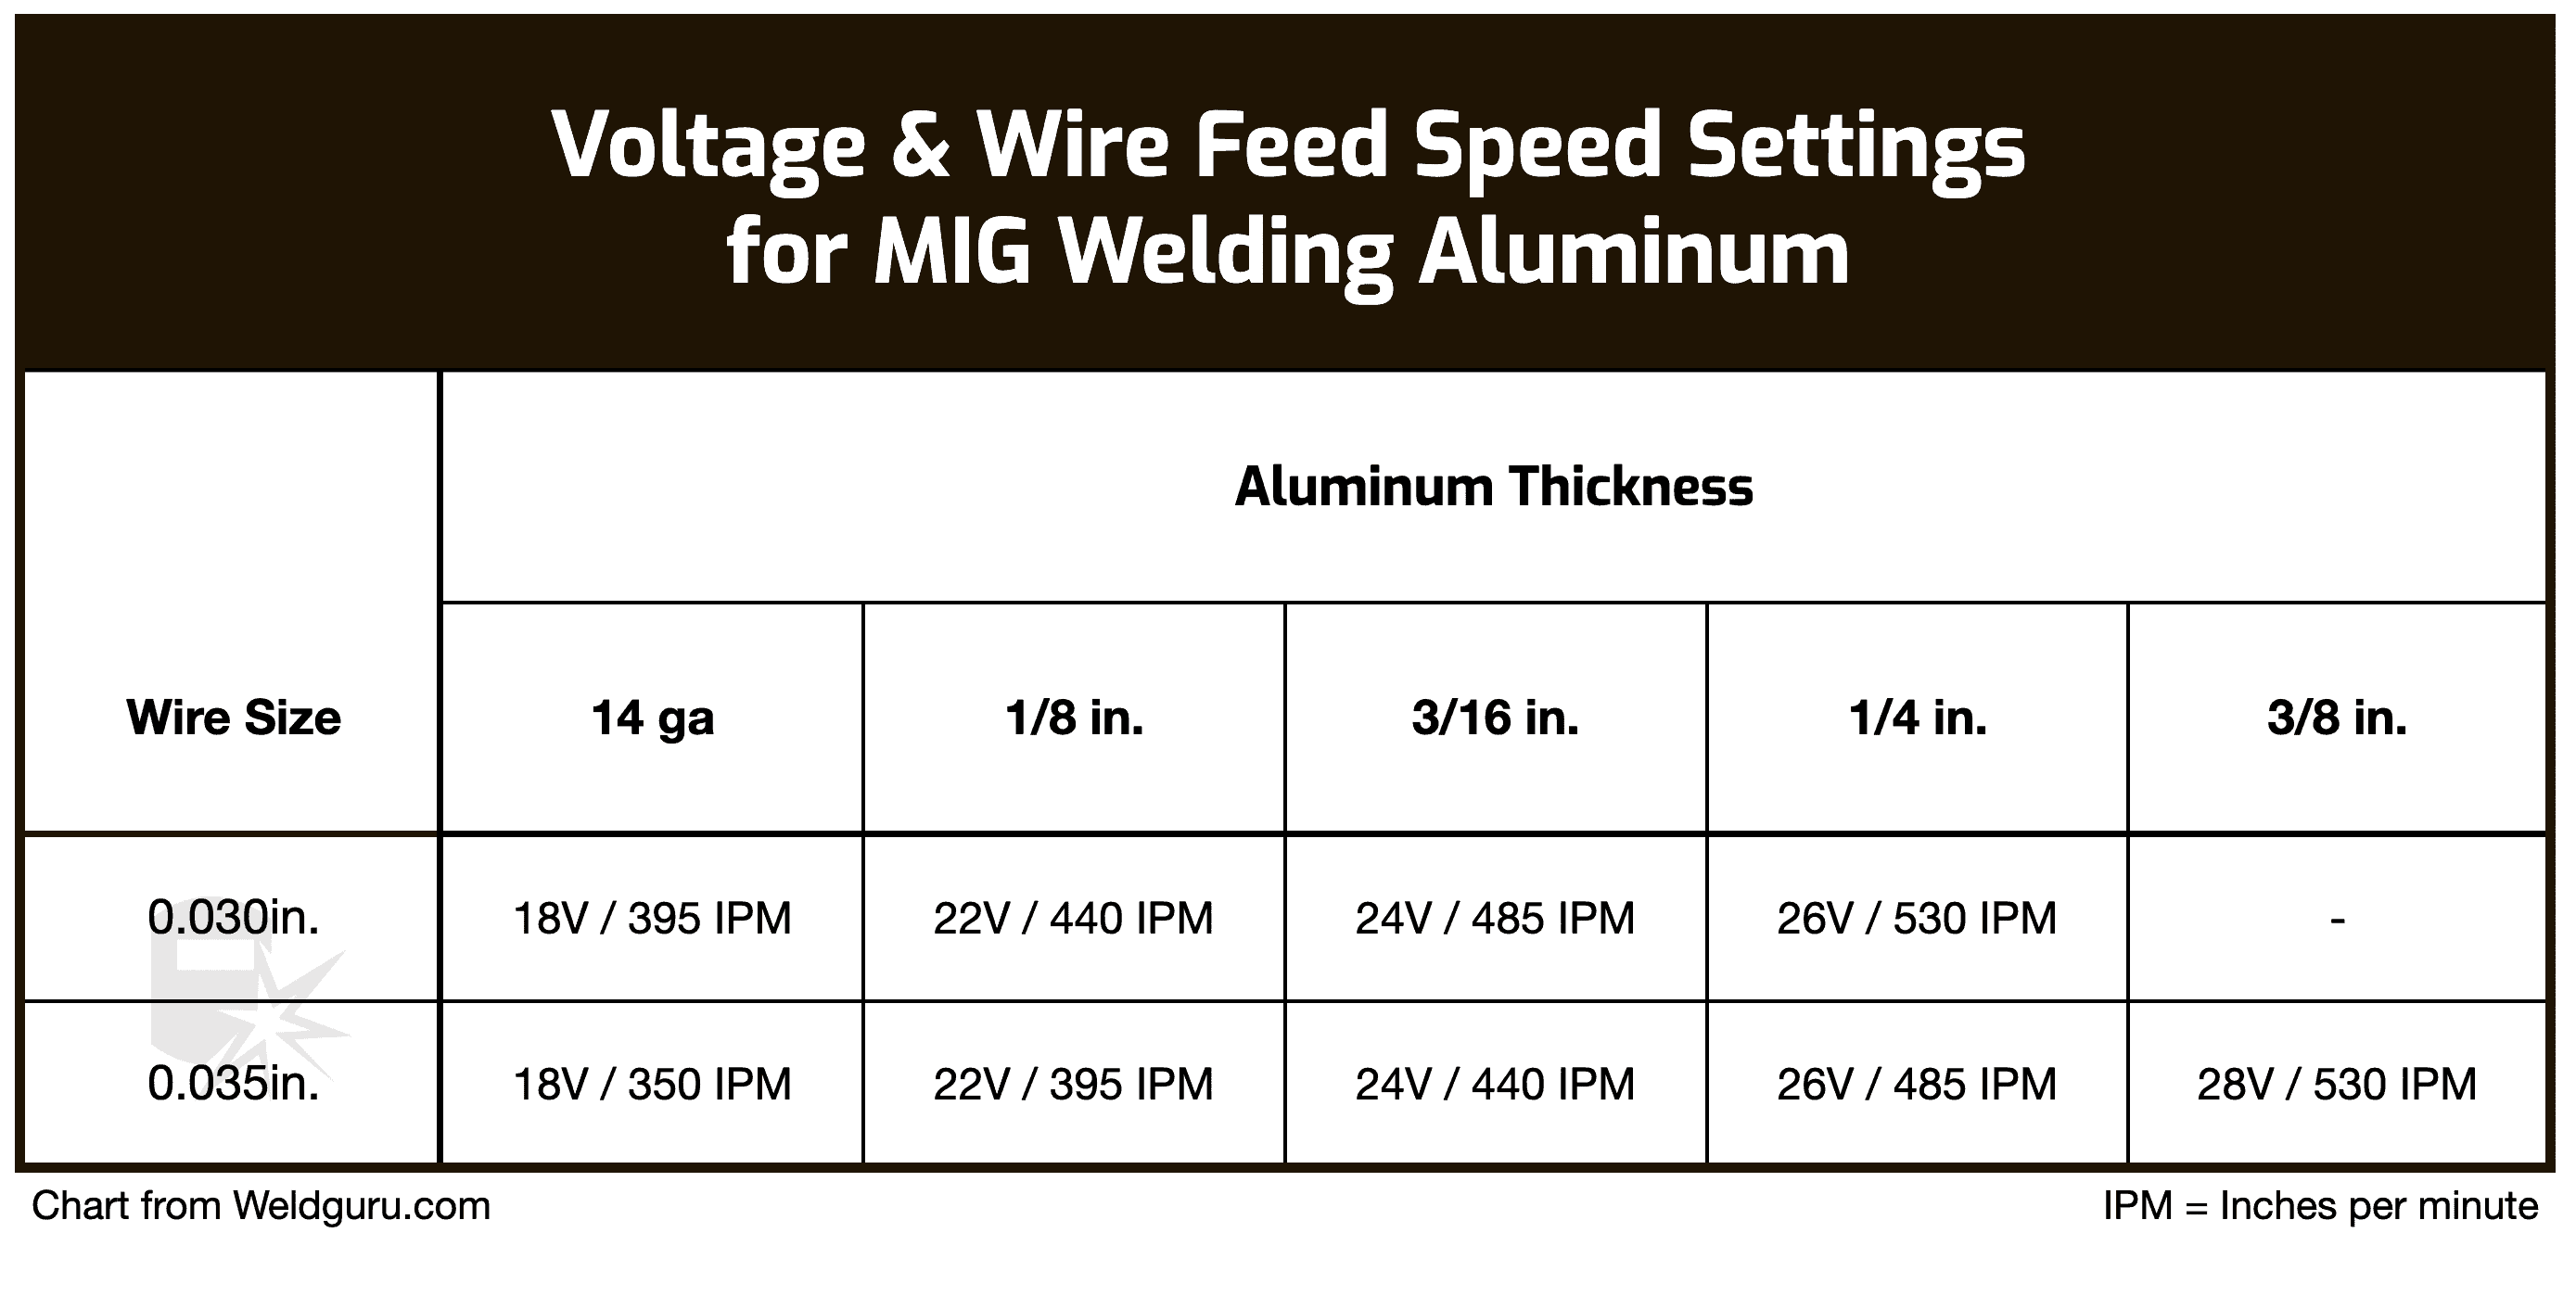
Credit: weldguru.com
How To Read A Flux Core Wire Speed And Voltage Chart
A wire speed and voltage chart lists the best settings for different wire sizes and metal thicknesses. Most welding machines include a chart inside the cover. If not, you can use the tables in this article.
A typical chart has:
- Wire diameter (like .030″, .035″, .045″)
- Metal thickness (gauge or inch)
- Suggested voltage (V)
- Suggested wire speed (inches per minute, or ipm)
Here is a basic example for .030″ flux core wire:
| Metal Thickness (inches) | Voltage (V) | Wire Speed (ipm) |
|---|---|---|
| 1/16″ | 14-15 | 240-270 |
| 1/8″ | 16-17 | 300-340 |
| 1/4″ | 18-19 | 350-400 |
This table shows that as the metal gets thicker, you need higher voltage and faster wire speed.
Some charts also include recommendations for stick-out (the length of wire from the tip to the workpiece) and travel speed (how quickly you move the gun). While these are not always listed, they are important. For flux core, a stick-out of about 1/2 inch works well.
Too much stick-out can make the arc unstable, and too little can cause the tip to overheat.
If your machine’s chart gives ranges (for example, 14–15 volts), start in the middle and adjust as you test. Remember, these charts are guides, not strict rules. Metal condition, joint type, and even your welding speed can require small changes.
Key Factors That Affect Wire Speed And Voltage
Many things can change your best settings. Here are the main factors:
1. Wire Diameter
Thicker wire needs more voltage and higher wire speed.
2. Metal Thickness
Thicker metal needs more heat and wire. Thin sheet metal needs low settings to avoid burn-through.
3. Welding Position
Flat welds allow higher wire speed. For vertical or overhead welding, lower settings help control the weld pool.
4. Machine Brand And Type
Different machines have their own controls. Always check your manual for starting points.
5. Type Of Flux Core Wire
Some wires are self-shielded (FCAW-S), others need extra gas (FCAW-G). Most home welders use self-shielded types.
6. Joint Type
Lap joints, butt joints, and T-joints may need different settings, even if the metal is the same thickness. For example, a corner joint can cool faster, so you might need a little more voltage.
7. Ambient Temperature And Wind
Welding outside in cold or windy conditions may cool the weld too fast, requiring you to bump up settings slightly for good fusion.
A practical tip: If you are welding on painted or galvanized steel, remove as much coating as possible in the weld area. Not only does this prevent porosity, but it also allows your chosen settings to work as intended. Many beginners do not realize that coatings can soak up heat or interfere with the weld arc, even if you follow the chart perfectly.
Example Charts For Popular Flux Core Wire Sizes
Below are detailed charts for the most common flux core wire sizes: .030″, .035″, and .045″.
.030″ Flux Core Wire Settings
| Metal Thickness (inches) | Voltage (V) | Wire Speed (ipm) |
|---|---|---|
| 3/64″ (18 gauge) | 13-14 | 210-240 |
| 1/16″ | 14-15 | 240-270 |
| 3/32″ | 15-16 | 270-300 |
| 1/8″ | 16-17 | 300-340 |
| 1/4″ | 18-19 | 350-400 |
If you are unsure, start at the lower end for thin metal and higher end for thick metal. For patching car panels (thin steel), stay at the lowest voltage and wire speed to avoid burn-through.
.035″ Flux Core Wire Settings
| Metal Thickness (inches) | Voltage (V) | Wire Speed (ipm) |
|---|---|---|
| 1/16″ | 15-16 | 250-290 |
| 3/32″ | 16-17 | 290-330 |
| 1/8″ | 17-18 | 330-380 |
| 1/4″ | 19-20 | 400-450 |
| 3/8″ | 21-22 | 450-500 |
. 035″ wire is often the best all-around choice for home and farm projects. It gives good penetration on 1/8″ to 1/4″ steel, but you can also use it for thinner materials if you dial the settings down.
.045″ Flux Core Wire Settings
| Metal Thickness (inches) | Voltage (V) | Wire Speed (ipm) |
|---|---|---|
| 1/8″ | 18-19 | 300-350 |
| 1/4″ | 20-22 | 350-420 |
| 3/8″ | 23-24 | 420-500 |
| 1/2″ | 25-26 | 500-600 |
Use. 045″ wire only if your machine is powerful enough (usually 220V or higher). This wire size is common for industrial and heavy repair work.
Practical Steps To Set Wire Speed And Voltage
Many welders struggle with setting up their machine. Here is a simple process:
1. Know Your Wire Size
Check the spool. Most home welders use. 030″ or. 035″.
2. Check Metal Thickness
Use a gauge or measure with calipers.
3. Look Up Starting Settings
Use the chart in this article or your machine’s manual.
4. Set Wire Speed And Voltage
Turn the dials to the suggested numbers.
5. Test On Scrap Metal
Weld a short bead. Look at the weld.
- Adjust as Needed
- Too much spatter? Lower wire speed or voltage.
- Poor fusion? Increase voltage.
- Burning through? Lower voltage.
- Weld Your Project
Once your test looks good, start welding the real piece.
Tip: Write down your best settings for future projects.
Many welders skip the test weld, thinking it is a waste of time. But a 5-minute test can save hours of grinding and fixing bad welds. Also, keep a notebook or take a photo of your machine’s settings for future reference.
You will thank yourself when you do a similar job later.
How To Adjust For Welding Position
Welding position changes how the weld pool acts. Flat welding is easiest. For vertical or overhead, you need more control.
- Flat position: Use higher wire speed and voltage. The weld pool stays in place.
- Vertical up: Lower wire speed and voltage. Move the gun in a small “upward U” motion.
- Overhead: Use the lowest voltage that still gives fusion. Move quickly to avoid drips.
Many beginners forget to adjust for position. This can cause sagging welds and poor results.
When welding vertical up, try using a “weave” pattern instead of a straight line. This helps support the molten metal and prevents it from falling. For overhead, keep your stick-out short and stay alert for slag or hot metal falling onto you.
Always wear proper safety gear, especially when welding above your head.
Common Problems And How To Fix Them
Even with a chart, you may face issues. Here are common problems and solutions.
Too Much Spatter
- Wire speed too high or voltage too low.
- Lower wire speed or increase voltage.
Poor Penetration
- Not enough voltage.
- Raise voltage or slow down travel speed.
Wire Stubbing Into Plate
- Wire speed too high.
- Reduce wire speed.
Burn-through On Thin Metal
- Voltage too high or wire speed too high.
- Lower both settings.
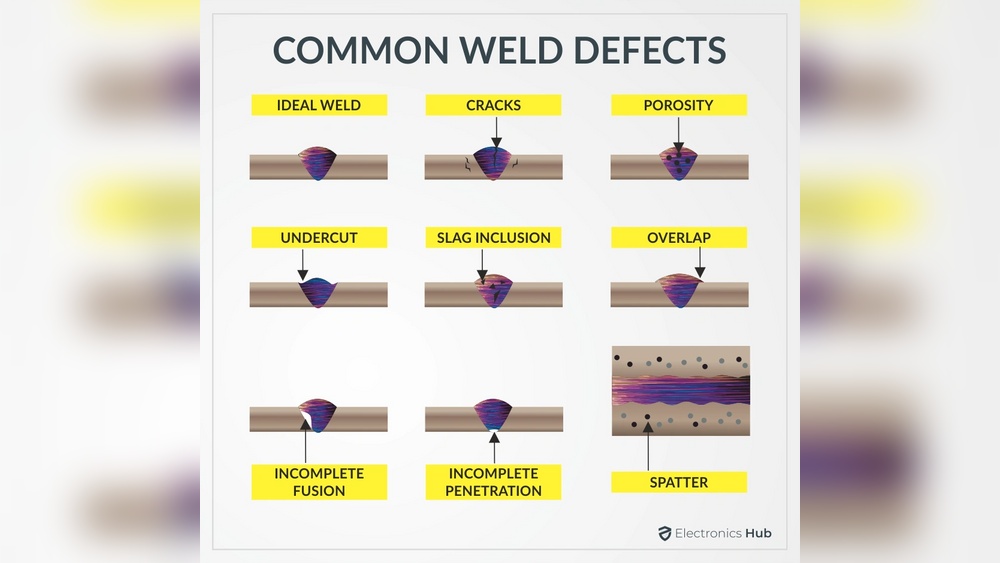
Porosity (holes In Weld)
- Dirty metal or bad wire.
- Clean the metal, use fresh wire, and keep a steady hand.
Non-obvious insight: Many people blame the machine, but often the metal is not clean. Clean steel welds better with flux core.
Another hidden pitfall: Old or rusty wire can cause erratic arc and porosity. If your wire has white powder, rust, or feels rough, replace it. Always store wire in a dry, sealed bag or container.
Matching Wire Size To Machine Power
Not all machines can weld thick steel with thick wire. Check your machine’s max output.
- 110V machines: Best for .030″ or .035″ wire and metal up to 1/4″.
- 220V machines: Can use .045″ wire and weld thicker pieces.
Never force a small machine to weld thick steel. The result will be weak.
If you try to weld 1/2″ steel with a 110V welder, your weld may look okay but will not hold under stress. For safety, always check your welder’s duty cycle and maximum rated thickness before starting. For bigger jobs, consider making multiple passes or using a more powerful machine.
How To Use A Chart When Your Machine Uses “numbers” Instead Of Volts
Some welders have machines with settings from 1–10 instead of real voltage or wire speed numbers. In this case:
- Start with the middle setting for wire speed and voltage.
- Adjust up or down based on test welds.
- Listen for a smooth “crackling bacon” sound.
Write down what setting numbers work for your wire and metal.
If your machine only shows percentage or colors (like “blue zone” or “green zone”), read the manual for suggested starting points. Some brands also have smartphone apps or online calculators to help you translate your chart into your machine’s settings.

Credit: www.weldingweb.com
Selecting The Right Flux Core Wire
You must use the right wire for your job.
- E71T-11: Most common for self-shielded (no gas) welding. Works with DCEN (electrode negative).
- E71T-GS: Also popular for thin steel, easy to use.
- E71T-1: For higher strength, often used with gas.
Always check if your wire is for self-shielded or gas-shielded welding.
For most hobby and small shop work, E71T-11 or E71T-GS is the best bet. If you are unsure, check the label or ask at the welding supply store. Using the wrong type of wire can cause poor welds or damage to your machine.
How Weather Affects Flux Core Settings
One big advantage of flux core is that it works in wind. But strong wind can still blow away the shielding gas that comes from the flux.
- If the wind is over 35 mph, try to block it with a screen.
- You may need to raise wire speed to keep the weld hot in cold weather.
Tip: Store wire in a dry place. Moisture can cause porosity.
Another factor is humidity. If you weld in very damp weather, moisture can get into the wire or onto the workpiece. This can lead to porosity or cracking. Try to keep your work area as dry as possible. Even a small amount of water or dew can cause problems when welding with flux core.
Safety Tips For Flux Core Welding
Welding can be dangerous if you do not take care.
- Always wear a welding helmet with the right shade.
- Use gloves and a long-sleeve shirt.
- Ventilate the area. Flux core makes smoke and fumes.
- Never weld near flammable items.
Many beginners forget fume safety. Use a fan or work outdoors.
Flux core welding produces more smoke than MIG welding. Some fumes can be hazardous, especially when welding galvanized or painted metal. If you feel dizzy or get a headache, stop and get fresh air. For indoor work, a fume extractor or at least an open window and fan are strongly recommended.
How To Read Weld Results
Your finished weld tells you a lot.
- Smooth bead, little spatter: Settings are good.
- Tall, narrow bead: Wire speed too low or voltage too low.
- Wide, flat bead: Voltage too high.
- Undercut (groove at edge): Too much voltage or travel speed.
- Porosity: Dirty metal or wet wire.
Non-obvious insight: Watch for arc stability. A stable arc means your settings are close to perfect.
Also, tap the slag with a chipping hammer after the weld cools. If the slag comes off easily and the bead underneath is shiny and smooth, your settings are likely right. If the slag is stuck or the bead is dull and rough, adjust your settings and try again.
Quick Reference: Wire Speed And Voltage For Common Projects
Here are some real-world examples:
- Repairing a lawnmower deck (1/8” steel):
- .030” wire, 17 volts, 320 ipm wire speed.
- Building a trailer frame (1/4” steel):
- .035” wire, 20 volts, 420 ipm.
- Fixing a gate (thin sheet, 18 gauge):
- .030” wire, 14 volts, 220 ipm.
- Welding a car panel (20 gauge):
- .030” wire, 13 volts, 190 ipm.
- Farm equipment (3/8” steel):
- .045” wire, 23 volts, 480 ipm.
Always test on scrap before final welding.
If you weld a mix of new and old metal, start with the settings for the thickest piece. You can always make multiple passes or adjust your travel speed for better fusion. For repairs, do not be afraid to grind out bad welds and try again until you get it right.
How To Keep Consistent Results
- Use the same brand of wire for repeat jobs.
- Keep your drive rolls clean and tension correct.
- Replace worn contact tips.
- Store wire in a dry place.
Small changes in wire or machine can change your settings. Write down what works for each project.
Another tip: Check your ground clamp for good contact. A weak or dirty ground connection can cause arc instability, even if all your settings are correct. Clean the ground spot on the workpiece and clamp regularly.
The Difference Between Flux Core And Mig Settings
Many people switch between flux core and MIG (gas shielded) welding. The settings are not the same.
- Flux core needs a bit more voltage and wire speed than MIG for the same wire size.
- The arc is harsher with flux core.
- Clean up is more with flux core due to slag.
Do not use MIG settings for flux core wire. Always check your chart or manual.
If you try using MIG settings with flux core wire, you might get a cold, weak weld. On the other hand, using flux core settings with solid MIG wire can burn through or cause excess spatter. If you often switch processes, keep a separate list of settings for each one.
Useful Resources For Welders
You can find more details in your machine’s manual or from wire makers like Hobart, Lincoln, and Miller. Some welding calculators are also online. For deep technical reading, visit the Wikipedia article on Flux-cored arc welding.
Welding forums and YouTube channels also offer practical advice. Just be careful to check that the advice fits your machine and wire type.
Frequently Asked Questions
What Happens If My Wire Speed Is Too High?
If wire speed is too high, the wire will push into the weld pool and cause spatter. The arc may stutter, and the weld can look messy. Lower the wire speed until the arc sounds steady and the bead is smooth.
Also, you may notice the wire “stubbing” into the metal. This feels like the gun is jerking in your hand. The solution is to slow the wire feed and re-test.
Can I Use The Same Settings For All Wire Sizes?
No, each wire size needs different voltage and wire speed. Thicker wire (.045″) needs higher settings than thin wire (.030″). Always match the settings to your wire size and metal thickness.
Using the wrong settings can lead to weak welds or burn-through, so always check the chart for your specific setup.
How Do I Know If My Voltage Is Correct?
Check the weld bead. If voltage is too low, the weld is tall and narrow. If voltage is too high, the weld is flat and wide, with possible burn-through. A good weld has a smooth bead and good fusion at the edges.
You can also listen: a smooth, steady arc is a good sign. If you hear lots of popping or hissing, your voltage may be off.
Should I Change Settings For Vertical Or Overhead Welding?
Yes, position matters. Lower the wire speed and voltage for vertical or overhead welding. This helps control the weld pool and avoid drips or sagging.
For best results, practice on scrap in the same position as your project before welding the real piece.
What Is The Best Way To Find The Right Settings For My Welder?
Start with a wire speed and voltage chart for your wire size and metal thickness. Weld on scrap metal, then adjust based on the results. Write down what works for your machine, wire, and project.
Experienced welders often keep a “settings log” for each project, wire, and position. This saves time and improves consistency.
Final Thoughts
Using the right flux core wire speed and voltage chart is key for strong, clean welds. Set your machine based on wire size and metal thickness, then test and adjust. Watch for a smooth arc and good bead shape. Always keep your wire and metal clean. With practice and attention to detail, you can get reliable results every time.
Welding is as much about skill as it is about knowing your settings. Use this guide as your reference, and do not be afraid to adjust based on your own machine and work style. Consistency, safety, and careful setup will give you the best welds with flux core wire.
With every weld, you will learn more about your equipment, materials, and technique. Trust your eyes and ears—your senses are the best tools for fine-tuning your welds. And remember, even the best chart is just a starting point. The real secret to great flux core welding is patient practice and always learning from your results.