Disclosure: This post contains affiliate links and I will be compensated if you make a purchase after clicking through my links. Learn More
Building your own custom welding table can bring huge benefits to your workshop. A well-made table supports your work and protects your tools. You can adjust the size, shape, and features to match your projects. Many ready-made tables cost a lot, and they often lack special features you need. By making your own, you get strong construction, the right size, and useful details like tool racks or clamps.
This article guides you through everything: planning, choosing materials, cutting and welding, adding features, and finishing. You will also find tips that save time, money, and effort. Whether you weld for work or as a hobby, a homemade table can improve your results and make your projects safer and more enjoyable.
Why Build A Custom Welding Table?
A standard table often does not suit every project. Some are too small, too weak, or hard to clean. Others may not handle heat well or lack places to secure clamps. A custom welding table gives you control.
First, you can select a work surface that matches your most common project sizes. This means less time moving parts around or worrying about space. Second, you can choose a strong frame that holds heavy items without shaking. Third, you can add features like tool holders, shelves, or wheels for easy movement.
Many people also find that making a table themselves saves money. High-quality tables with thick steel tops and adjustable features can cost more than $600. By buying your own materials, you can often build a table for less than half that price.
Planning Your Welding Table
Size And Height
Measure your workspace and think about the types of projects you do most. Most welding tables are between 30 and 36 inches tall. A higher table can reduce back pain during long jobs. The surface size usually ranges from 2×4 feet to 4×8 feet. For most home shops, a 3×5 foot table works well.
Think about where you will put the table. Leave enough space around it for moving large parts or walking safely.
Table Top Thickness
The table top needs to handle heat and heavy items. Most builders use steel plates between 1/4 inch (6 mm) and 1/2 inch (12 mm) thick. Thicker tops last longer and resist bending. If you weld small parts, a 1/4 inch top is enough. For heavy work, go thicker.
Materials Needed
You will need:
- Steel plate for the top
- Steel box tubing (usually 2×2 inch or 2×3 inch) for the frame and legs
- Angle iron for supports and tool holders
- Steel mesh or extra plate for a lower shelf (optional)
- Four heavy-duty casters if you want the table to roll
You will also need welding wire or rods, cutting tools, and primer and paint for the frame.
Must-have Features
A good welding table should have:
- A flat, strong surface
- Holes for clamps or fixtures
- Good grounding for electrical safety
- Tool storage or shelves
- Wheels (optional, but useful for small shops)
Gathering Tools And Materials
Having the right tools makes the work easier and safer. You need:
- A welder (MIG, TIG, or Stick)
- An angle grinder with cutting and grinding wheels
- A drill and metal drill bits
- Clamps and magnets for holding parts
- Measuring tape, square, and marker
- Welding helmet, gloves, and safety glasses
You can buy steel from a metal supplier. Some shops will cut steel to length for you. This can save time and effort, especially for thick pieces.
Estimated Cost Breakdown
Here is a sample cost breakdown for a mid-sized welding table:
| Item | Size/Qty | Estimated Cost (USD) |
|---|---|---|
| Steel Plate (Table Top) | 3×5 ft, 1/4 inch thick | $120 |
| Box Tubing (Frame) | 24 ft, 2×2 inch | $70 |
| Angle Iron | 12 ft | $20 |
| Casters (wheels) | 4 pcs | $40 |
| Welding Supplies | – | $30 |
| Primer & Paint | – | $20 |
| Total | $300 |
Prices can change depending on your location and the quality you choose.
Cutting And Preparing The Steel
Start by measuring and marking all pieces. Accurate cuts make the frame strong and help the top stay flat.
- Cut the table top to size using a plasma cutter or angle grinder.
- Cut the box tubing for the legs and frame.
- Grind the cut edges to remove sharp burrs.
Tip: Use a magnetic square to keep pieces at a true 90-degree angle during fitting.
Many beginners forget to clean new steel before welding. Remove all oil, rust, and scale with a wire brush or grinder. Clean steel welds better and gives a stronger table.
Building The Frame
Lay out all frame pieces on a flat surface. Clamp them in place. Tack weld the corners first. Check the frame for squareness by measuring corner to corner. If both measurements are equal, the frame is square.
Once you confirm the frame is square, finish welding all joints. Let the frame cool. Double-check for warping. If any area is out of line, use clamps and gentle pressure to correct it while welding.
For extra strength, weld angle iron or crossbars under the top. This keeps the table from sagging.
Attaching The Table Top
Place the steel plate on the frame. Weld it around the edges. For large tables, weld in short sections to avoid heat warping. Leave small gaps (1/16 inch) between welds for expansion.
Some builders use countersunk bolts instead of welding the top. This lets you replace the plate later if it gets damaged. Drill holes in the frame and top, then bolt them together tightly.
Check the surface with a straight edge. If you see any gaps, tap the plate gently or add shims under low spots.
Insight: Many skip checking flatness after welding. A slightly uneven top can ruin precise work. Always check before using the table.
Adding Legs And Leveling Feet
Weld the legs to each corner of the frame. For extra stability, add angle iron or box tubing as lower cross-braces between the legs.
Install leveling feet on each leg. These let you adjust the table to stay flat, even if your floor is not perfect. You can buy weld-on feet or use thick bolts and nuts.
If you want the table to move, weld mounting plates for casters instead of feet. Choose casters that lock, so the table stays in place during work.
Useful Features To Add
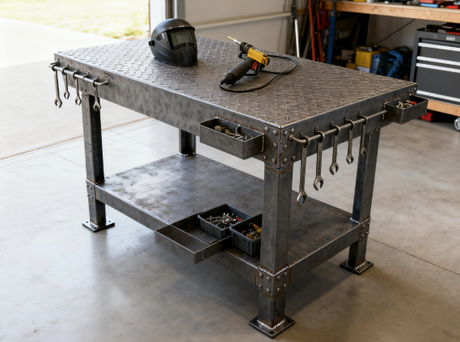
A custom table lets you add any features you need. Some ideas:
- Clamp holes: Drill holes (usually 5/8 or 3/4 inch) across the top for easy clamping.
- Tool racks: Weld hooks or holders to the sides for quick access to hammers, clamps, and squares.
- Lower shelf: Add a steel mesh or plate shelf below the table. This is useful for storing tools or scrap metal.
- Power strip mount: Attach a power bar to the frame for grinders or drills.
- Grounding lug: Weld a bolt or grounding clamp to the frame for electrical safety.
- Removable top sections: Some builders make part of the top removable for special projects.
- Sliding drawer: Store small tools or parts inside a drawer under the table.
Non-obvious insight: If you work on many small projects, add a metal tray with raised edges to catch sparks or small parts before they fall to the floor.

Credit: www.youtube.com
Welding Table Surface Finishes
A bare steel top is common, but you can protect it with different finishes:
- Clear lacquer: Prevents rust but wears off under heavy use.
- Paste wax: Easy to apply and keeps spatter from sticking. Reapply every few weeks.
- Oil coating: Wipe the top with machine oil after cleaning.
Never use paint on the welding surface. Paint burns and can create toxic fumes when welding.
Safety Features And Practices
A welding table improves safety, but you must use it correctly.
- Always connect your welder’s ground clamp to the table frame. This reduces stray current and makes your welds smoother.
- Keep the area under the table clear. Store only metal items below, as welding sparks can start fires in wood or cardboard.
- Add a fire extinguisher nearby, especially if you work in a small space.
- Use the table’s flat surface for tacking parts together, not for storing junk. A messy table increases accident risks.
Many new welders forget to check for sharp corners after building. Smooth all edges with a grinder to avoid injuries.
Comparing Store-bought Vs Homemade Welding Tables
Making your own table has clear advantages. Here’s a direct comparison:
| Feature | Homemade Table | Store-Bought Table |
|---|---|---|
| Cost | $200–$400 | $600–$1500 |
| Custom Size | Any size you want | Limited by product lines |
| Surface Thickness | Choose your own | Usually thin (1/8–1/4 inch) |
| Features | Personalized | Standard (few options) |
| Repairable | Yes, easy to fix | Harder to repair |
You control every detail of a homemade table, while store-bought tables are often made to fit many users, not your needs.
Common Mistakes To Avoid
Many people make the same mistakes when building a welding table. Watch out for these:
- Choosing a thin table top: A thin plate bends from heat. Always use at least 1/4 inch steel for even small tables.
- Ignoring flatness: A warped top makes precise work impossible. Check for flatness after every step.
- No clamp holes or mounting points: You will want to attach parts in many ways. Add holes before welding the top down.
- Using the wrong wheels: If you add casters, buy ones rated for heavy loads. Cheap wheels can fail under table weight.
- No storage: Forgetting shelves or tool racks leads to clutter. Plan storage before building.
- Skipping safety checks: Always smooth sharp edges and add grounding points.
Pro tip: Test fit all frame parts with clamps before welding. This helps catch errors early.
Maintenance And Care Tips
A custom welding table is easy to care for if you follow a few steps.
- After each project, brush off all dust and spatter.
- Wipe the surface with a clean rag. For stuck-on spatter, use a scraper or wire brush.
- Apply a light oil or wax coat to stop rust.
- Once a month, check the table for loose bolts or cracked welds. Fix problems right away.
- Keep the area under the table clear to prevent fire risks.
If the top gets deeply scratched or bent, you can grind it flat or replace the plate. This is much easier with a bolted-on top.
Upgrades For Advanced Users
Once you get used to your table, you may want to add more advanced features:
- Hold-down clamps: Add tracks or holes for quick clamps that hold workpieces steady.
- Fixture grids: Drill a grid of holes across the top for repeatable setups.
- V-blocks or angle jigs: Weld these to the sides or store them under the table for quick setups.
- Sliding tool tray: A tray on rails lets you move tools close to your work.
- Welding fume extraction: Attach a small fan or duct to remove smoke from the work area.
- Lighting mounts: Add adjustable arms for work lights.
- Powerful magnets: Weld magnet holders to keep small parts from rolling away.
Advanced insight: Some professional tables use copper inserts for areas where welding spatter is a problem. Copper does not stick to spatter, making cleanup easy.
Project Example: Building A 3×5 Foot Welding Table
Here’s a real-world example of building a 3×5 foot table.
- Table top: 3×5 ft, 1/4 inch steel plate
- Frame: Four sides of 2×2 inch box tube, 1/8 inch wall
- Legs: Four pieces, each 34 inches tall
- Lower shelf: Expanded metal, 2×4 ft
- Features: 5/8 inch clamp holes every 6 inches, power strip, four locking casters
The builder spent about 14 hours from start to finish. Costs were $320. The table supports over 1,000 pounds and stays flat. The owner added a sliding tray under the top for tools and a grounding lug on one corner.
Table Of Feature Ideas And Their Usefulness
Here is a quick comparison of common features and their value:
| Feature | Usefulness | Complexity to Add |
|---|---|---|
| Clamp holes/grid | Very high | Medium |
| Power strip | High | Low |
| Lower shelf | High | Low |
| Casters | Medium | Medium |
| Lighting mounts | Medium | Medium |
| Sliding tool tray | Medium | High |
| Removable top | Low | High |
Pick features that match your projects and skill level.

Credit: texasmetalworks.com
Sourcing Materials And Help
You can buy steel from local suppliers, recycling yards, or even online. Many suppliers cut pieces for free or a small fee. Used steel can save money, but always remove paint and rust before welding.
If you are new to welding, ask a friend or local welder for advice. Many online forums or YouTube videos give step-by-step guides. For more information, check the Wikipedia welding table page for more background.
Environmental Tips
Reusing old steel reduces waste. If you use leftover pieces, clean them well and check for cracks. Avoid galvanized steel, as its coating creates dangerous fumes when welded.
You can also collect slag, dust, and scrap for recycling instead of throwing them away. This keeps your workshop clean and helps the environment.
Credit: www.xtool.com
Frequently Asked Questions
What Is The Best Size For A Homemade Welding Table?
The best size depends on your workspace and projects. For most home workshops, a 3×5 foot table gives enough space without taking up too much room. If you work on larger items, consider a 4×8 foot table.
How Thick Should The Table Top Be?
A 1/4 inch (6 mm) steel plate is enough for most jobs. If you often weld heavy or large parts, a 3/8 or 1/2 inch top will last longer and resist bending.
Can I Use A Wooden Table With A Steel Top?
It is safer to build the whole table from steel. Wood can catch fire from sparks and does not ground your welder well. Always use steel for both the frame and the top.
Should I Bolt Or Weld The Table Top?
Both work. Welding gives a stronger joint, but bolting lets you replace the top if it gets damaged. Many builders weld the frame and bolt the top.
How Do I Keep My Welding Table From Rusting?
Clean the surface after every project. Wipe on a light oil or wax coat to keep moisture away. Store the table in a dry place and cover it if you do not use it for a long time.
Building a homemade custom welding table is a project that pays off for years. You get a strong, flat, and safe work area that matches your needs. With careful planning, the right materials, and attention to detail, you will enjoy better results and safer work on every project.