Disclosure: This post contains affiliate links and I will be compensated if you make a purchase after clicking through my links. Learn More
Short Answer:
Set your MIG welder’s wire speed and voltage by matching the wire size, material type, and metal thickness. Start with manufacturer charts, then fine-tune during test welds for a consistent, stable arc and proper bead shape.
—
Welding with a MIG machine can feel intimidating at first, especially when you see all those knobs and numbers. But once you understand how to control wire speed and voltage, you unlock the secret to strong, clean welds. These two settings are the backbone of quality welding. They decide your bead appearance, penetration, and whether your weld splatters everywhere or lays down smooth and steady. If you’ve ever asked, “How do I actually set these for my project?” you’re not alone. The truth is, most welders—even experienced ones—take a few test passes before dialing in the perfect settings. The goal is simple: predictable, repeatable results. This guide will show you how to set MIG wire speed and voltage step by step, explain why they matter, and help you avoid common mistakes that ruin welds. You’ll learn industry-proven techniques, practical tips, and real-world examples. Whether you’re fixing a trailer, building a fence, or starting a career in fabrication, you’ll walk away knowing exactly how to set your MIG welder for any job.
Why Wire Speed And Voltage Matter
Both settings control heat input and how the molten metal flows. The right values make a weld strong and neat. Wrong values cause burn-through, poor fusion, or ugly beads. In MIG welding, the wire feeds automatically and acts as both the electrode and the filler metal. The voltage controls the arc length, while wire speed controls how much filler enters the weld pool per second.
What Happens If You Get Them Wrong?
- Too much wire speed: The wire “pushes” into the weld pool, causing spatter and a tall, ropy bead.
- Too little wire speed: The arc cuts the wire, creating a stuttering, weak weld with gaps.
- Too high voltage: The arc gets too long, beads become wide and flat, and penetration can suffer.
- Too low voltage: The arc is short, leading to poor fusion, excessive spatter, and a narrow bead.
Every material and thickness needs its own sweet spot.
Understanding Mig Welding Variables
Before you adjust settings, know the variables that affect your choices:
- Wire diameter: Common sizes are 0.023″, 0.030″, 0.035″, and 0.045″.
- Shielding gas: Argon/CO2 mixes for mild steel; pure CO2 for deep penetration; argon for aluminum.
- Base metal thickness: Thicker metals need more heat.
- Welding position: Overhead, vertical, or flat all respond differently.
- Type of joint: Butt, lap, or fillet joints change the required settings.
Each factor changes how your MIG welder performs.
Credit: www.arccaptain.com
How To Set Wire Speed For Mig Welding
Wire speed is measured in inches per minute (IPM). It controls how fast the filler wire feeds into the weld. Setting it right ensures good fusion and consistent beads.
Step 1: Check The Manufacturer’s Chart
Most MIG welders have a chart inside the door. Look up:
- Metal thickness
- Wire diameter
- Gas type
Find the recommended IPM. For example, 18-gauge steel (0. 0478″, about 1. 2mm) with 0. 030″ wire might suggest 250 IPM.
Step 2: Start At The Chart Value
Set your machine to the recommended wire speed. This is your baseline. Many welders try to skip this and guess. Don’t. Manufacturer charts are based on thousands of hours of testing.
Step 3: Run A Test Bead
Weld a short bead on scrap metal that matches your project. Listen and watch:
- A steady, “sizzling bacon” sound means you’re close.
- If the wire pushes into the pool or “stubs,” lower the speed.
- If the arc cuts the wire or stutters, raise the speed.
Step 4: Adjust In Small Steps
Increase or decrease the wire speed by 10–20 IPM at a time. Small changes can have a big effect. Always watch the bead shape and listen to the sound.
Step 5: Re-test Until Satisfied
Repeat until you get:
- A smooth bead with even width
- Minimal spatter
- Good penetration (see a slight burn-through mark on the back for thin metals)
Wire Speed Quick Reference
Here’s a practical table for common wire sizes and steel thicknesses (using C25 gas: 75% Argon/25% CO2):
| Wire Size | Steel Thickness | Wire Speed (IPM) |
|---|---|---|
| 0.023″ | 18 gauge (1.2mm) | 240–260 |
| 0.030″ | 1/8″ (3.2mm) | 320–350 |
| 0.035″ | 1/4″ (6.4mm) | 380–400 |
| 0.045″ | 3/8″ (9.5mm) | 420–450 |
These are starting points. Always fine-tune during test welds.
How To Set Voltage For Mig Welding
Voltage controls the arc length and the shape of the bead. Higher voltage means a wider, flatter bead. Lower voltage creates a narrower bead.
Step 1: Use The Chart
Again, start with the manufacturer’s recommendation. For example, welding 1/8″ steel with 0. 030″ wire may suggest 18 volts.
Step 2: Set The Voltage Knob
Most machines use simple dials. Set it to the chart value.
Step 3: Test And Observe
Weld a short bead. Look for:
- Good arc stability
- Bead shape: Not too tall, not too flat
- No excessive spatter
If the bead is tall and narrow, increase voltage. If it’s wide and flat with undercut, decrease voltage.
Step 4: Fine-tune
Adjust in 0. 5-volt steps. Small changes matter—a 1-volt difference can make or break your weld.
Voltage Quick Reference
Here’s a useful table for voltage settings:
| Wire Size | Steel Thickness | Voltage (Volts) |
|---|---|---|
| 0.023″ | 18 gauge (1.2mm) | 15–16 |
| 0.030″ | 1/8″ (3.2mm) | 17–19 |
| 0.035″ | 1/4″ (6.4mm) | 20–22 |
| 0.045″ | 3/8″ (9.5mm) | 23–25 |
Again, these are starting points. Your test passes will guide you to the perfect setting.
Balancing Wire Speed And Voltage: The Core Principle
Wire speed and voltage are linked. Changing one often means adjusting the other. For example, raising wire speed adds more filler, so you often need more voltage for a stable arc.
Example: What Happens When You Mismatch?
- High wire speed, low voltage: The wire “pushes” into the pool, leading to spatter.
- Low wire speed, high voltage: The wire melts too fast, causing burn-back or gaps.
Always adjust in small steps and re-test.
Pro Tip: Use The “push Test”
Weld with your settings. If the wire pushes the gun back, wire speed is too high. If the arc is erratic or the wire melts before reaching the weld, voltage is too high or wire speed is too low.
Key Factors That Affect Wire Speed And Voltage Choices
1. Wire Diameter
- Thin wire (0.023″–0.030″): For sheet metal and thin materials.
- Thick wire (0.035″–0.045″): For structural steel and heavy parts.
Larger wire needs more voltage and higher wire speed.
2. Base Metal Thickness
Thicker metals require more heat. Use higher voltage and faster wire feed. Thin metals need lower settings to avoid burn-through.
3. Welding Position
- Flat position: Easier, higher settings possible.
- Vertical or overhead: Lower wire speed and voltage to control the puddle.
4. Shielding Gas
Gas affects penetration and bead shape. C25 (75% Argon/25% CO2) is the industry standard for steel. Pure CO2 gives deeper penetration but more spatter.
5. Type Of Joint
- Butt joint: Needs full fusion across the gap.
- Lap or fillet joint: May need less penetration but more filler.

Credit: www.youtube.com
Common Mistakes And How To Fix Them
Mistake 1: Ignoring The Chart
Never guess. The chart is your best starting point. Don’t try to “eyeball” settings, especially if you’re new.
Mistake 2: Setting One Without Adjusting The Other
Wire speed and voltage work together. Changing one without the other often leads to poor results.
Mistake 3: Not Doing Test Welds
Always test on scrap. Metals of the same thickness, cleaned and clamped, give you the real answer.
Mistake 4: Using The Wrong Wire Or Gas
Match the wire and gas to your metal. For example, don’t use pure CO2 on thin sheet metal—it’s too hot and causes burn-through.
Mistake 5: Ignoring Bead Appearance
A good bead tells you a lot:
- Even width
- Slight crown, not flat or undercut
- Little to no spatter
If your bead looks wrong, adjust settings.
Practical Steps: Setting Your Mig Welder For A New Job
You have a project—say, welding 1/8″ mild steel with 0.030″ wire and C25 gas. Here’s how to set up:
- Open the door and check the chart.
- Set wire speed to around 320–350 IPM.
- Set voltage to 17–19 volts.
- Clean your metal—remove rust, paint, and oil.
- Clamp your work firmly.
- Run a 1–2 inch test bead.
- Inspect the bead and listen. Adjust wire speed up or down in small steps.
- Adjust voltage if the bead is too narrow or too flat.
- Repeat test welds until satisfied.
- Once the bead is perfect, write down your settings for future use.
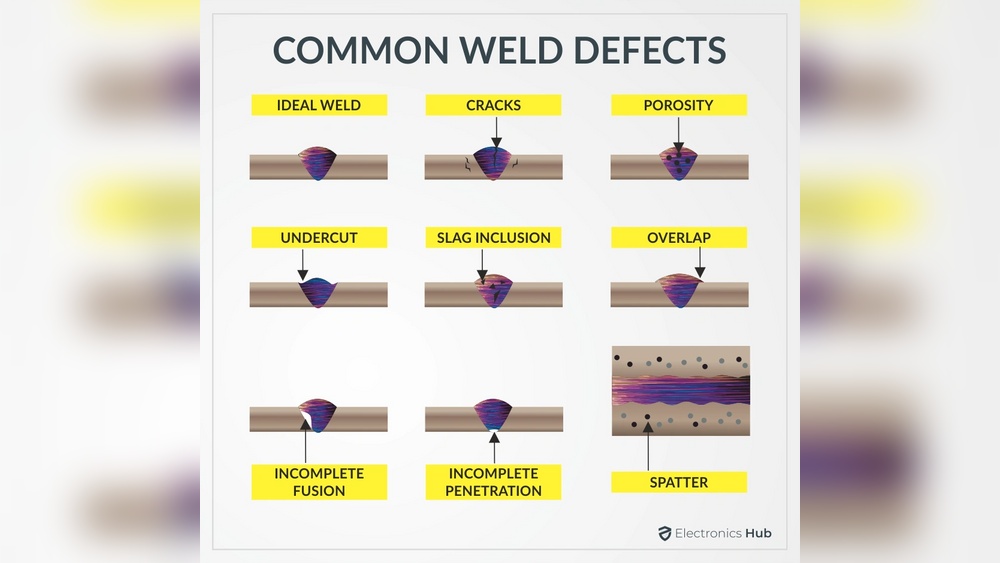
How To Read The Weld Bead: The Visual Guide
Your weld bead is your best feedback. Here’s what to look for:
- Tall, narrow bead: Wire speed too low, voltage too low.
- Wide, flat bead with undercut: Voltage too high.
- Spatter everywhere: Wire speed too high or voltage too low.
- Good bead: Smooth, even, slightly crowned.
Welds on thicker metal should show a faint outline on the back—proof of penetration.
Sound And Feel: The Welder’s Ears
Experienced welders know the machine’s “bacon sizzle” is the goal. A loud, popping sound means the arc is unstable. A smooth, steady sizzle means good settings.
If you hear sputtering, raise wire speed or adjust voltage. If it hisses, lower voltage.
Adjusting For Different Materials
Mild Steel
Most common. Use C25 gas. Follow the chart and test.
Stainless Steel
Needs tri-mix gas (90% helium/7. 5% argon/2. 5% CO2) or C2 gas. Use slightly lower voltage. Clean the metal well.
Aluminum
Use 100% argon. Set higher voltage and wire speed. Use a spool gun for best results. Clean with a stainless brush before welding.
Using Digital Readouts Vs. Analog Dials
Some welders have digital displays showing exact wire speed and voltage. Others use simple numbered dials.
- Digital: Set exactly, repeat easily.
- Analog: Use the chart and adjust by feel.
Both work—test welds are always necessary.
Table: Settings For Common Welds
Here’s a comparison of settings for different projects.
| Project | Wire Size | Metal Thickness | Wire Speed (IPM) | Voltage (Volts) | Gas |
|---|---|---|---|---|---|
| Auto body panel | 0.023″ | 20 gauge | 230–250 | 14–15 | C25 |
| Trailer frame | 0.035″ | 1/4″ | 380–400 | 21–22 | C25 |
| Stainless railing | 0.030″ | 1/8″ | 280–300 | 17–18 | Tri-mix |
| Aluminum box | 0.035″ | 1/8″ | 400–420 | 21–23 | Argon |
These are starting points. Always adjust for your specific machine and conditions.
Two Key Insights Most Beginners Miss
- Ambient temperature and draft matter. Cold metal or wind can suck heat from your weld, changing the arc. If you’re welding outdoors, block wind and preheat thick metal.
- Contact tip-to-work distance changes everything. Keep the tip about 3/8″ from the weld pool. Too far, and the arc becomes unstable. Too close, and you risk burn-back.
Why Test Welds Are Non-negotiable
No two welders are exactly the same, even if made by the same company. Mains voltage, extension cords, and even humidity can change how your machine performs. Test beads let you see and hear what’s happening in real time. Never skip this step.
How Advanced Welders Fine-tune For Perfection
Experienced welders adjust settings mid-weld for changing thickness, joint fit-up, or position. They use their eyes and ears, not just charts. This skill comes with practice. Start with the chart, test, and trust your senses.
Recording Your Best Settings
Once you find the perfect combo for a certain job, write it down. Keep a notebook with settings for different wires, metals, and positions. This saves time and makes future projects easier.
Safety First: Don’t Overlook Ppe
Setting the right wire speed and voltage is useless if you’re not protected. Always wear:
- Auto-darkening helmet
- Welding gloves
- Flame-resistant jacket
- Safety glasses
Clean, safe work means better welds.

Credit: www.arccaptain.com
Where To Get More Mig Welding Data
For more detailed charts and scientific data on MIG welding parameters, check resources like the Wikipedia GMAW page. These sources offer additional technical guidance for every material and process.
Frequently Asked Questions
How Do I Know If My Wire Speed Is Too High Or Too Low?
If your wire speed is too high, the arc will sound harsh and the wire may push the gun away. If it’s too low, the arc stutters or the wire burns back into the tip. A steady “sizzle” is ideal.
What Voltage Should I Use For Thin Sheet Metal?
For thin steel (18–20 gauge), use 14–16 volts with 0. 023″ or 0. 030″ wire and C25 gas. Start at the lower end and adjust after test welds to prevent burn-through and get a clean bead.
Can I Use The Same Settings For All Metals?
No, different metals need different settings. Mild steel, stainless, and aluminum require their own wire, gas, and voltage/wire speed combinations. Always check the chart and do test beads for each material.
How Does Shielding Gas Affect Settings?
Shielding gas changes arc characteristics and penetration. Argon/CO2 mixes (like C25) are standard for steel. Pure CO2 gives deeper penetration but more spatter. Use 100% argon for aluminum. Adjust settings for each gas type.
Why Does My Mig Welder Spatter So Much?
Excessive spatter usually means your wire speed is too high, voltage is too low, or you’re too far from the work. Check your chart, adjust settings, and maintain proper distance for cleaner welds.
—
Setting the correct wire speed and voltage for MIG welding is the difference between weak, messy welds and strong, pro-quality results. Use charts as your starting point, but always test and fine-tune for your project. Watch your bead, listen to your arc, and trust your senses. With practice, you’ll set your machine fast and weld with confidence every time.