Disclosure: This post contains affiliate links and I will be compensated if you make a purchase after clicking through my links. Learn More
Many people want to weld at home or in small workshops but find gas cylinders heavy, costly, or hard to use. Gasless MIG welding offers a good solution. It uses a flux-cored wire, so you don’t need a gas tank.
This method makes MIG welding possible almost anywhere—outside, inside, even in windy places. Some think you just plug in your welder, load the wire, and start, but there’s more to know if you want good welds and safe work.
Setting up a MIG welder without gas takes careful steps. You need to pick the right wire, set correct polarity, adjust tension, and select the best voltage and wire speed. You must also prepare your work area, use the right safety gear, and understand how to avoid common mistakes.
If you skip or rush through these steps, you may get poor welds, lots of spatter, or damage your machine.
This article will show how to set up a MIG welder without gas from start to finish. You’ll learn what tools you need, how to prepare your machine, and how to set the controls for strong, clean welds. By the end, you’ll know how to weld safely and well—without using a gas bottle.
What Is Gasless Mig Welding?
Gasless MIG welding uses a process called flux-cored arc welding (FCAW). In this method, you don’t use an external shielding gas. Instead, the wire has a special core filled with flux. When you weld, the flux melts and creates gas and slag. These protect the weld from air.
How It Differs From Traditional Mig
Traditional MIG welding uses solid wire and a bottle of shielding gas (like CO₂ or argon). The gas flows through the gun and shields the weld pool from oxygen and water vapor. Gasless MIG welding does not need this extra gas. The flux in the wire does the job.
Key Differences:
- Gasless uses flux-cored wire; gas MIG uses solid wire.
- Gasless is better for outdoor welding because wind cannot blow away the protection.
- Flux-cored welding usually produces more spatter and smoke than gas MIG.
- Gasless wires are often for mild steel, but some types can weld stainless or hardfacing.
Where Gasless Mig Is Useful
- Outdoor jobs where wind blows away shielding gas
- On-site repairs on farms, construction, or auto work
- Hobby welding in garages without gas supply
- Welding dirty or rusty steel (flux cleans better than gas)
Tools And Equipment You Need
Before you start, gather all tools and parts you need. Missing one can stop your work or make welding unsafe.
- MIG Welder – Must support flux-cored wire. Not all MIG welders can use flux wire.
- Flux-Cored Wire – Usually labeled as E71T-GS or E71T-11. Pick the right diameter (often 0.8mm/0.030” or 0.9mm/0.035”).
- Power Supply – Check your welder’s voltage (110V or 220V).
- Wire Feed Rollers – These grip and move the wire. Use a knurled roller for flux wire.
- Contact Tips – Match the tip size to your wire. For 0.9mm wire, use a 0.9mm tip.
- Work Clamp (Ground Clamp) – Needed for the electrical circuit.
- Protective Gear – Welding helmet (auto-darkening is best), gloves, long sleeves, pants, and boots.
- Chipping Hammer & Wire Brush – To clean slag after welding.
- Welding Pliers – For cutting and removing wire, changing tips.
- Welding Table or Safe Work Area – Non-flammable, stable surface.
Pro Tip: Some small welders come “gasless ready,” but double-check the manual. Older or industrial units may need a polarity change.
Preparing Your Mig Welder For Gasless Use
If your machine was last used with gas, you need to change several settings for flux-cored wire.
Polarity Change
Flux-cored wire needs DCEN (Direct Current Electrode Negative). This means the gun is negative, and the ground clamp is positive. Most gas MIG welding uses DCEP (positive on the gun).
To change polarity:
- Turn off and unplug the welder.
- Open the machine’s front panel.
- Find the two output lugs or wires—usually labeled “+” and “-”.
- Move the gun’s cable to the “-” terminal and the ground clamp to the “+” terminal.
- Double-check connections are tight.
- Close the panel and plug in the machine.
If you skip this, your wire will melt poorly, and welds will be weak.
Fitting The Right Wire
- Buy a flux-cored wire that matches your welder (usually 0.8mm or 0.9mm for home machines).
- Open the side door of the welder.
- Remove the spool lock and old wire (if any).
- Install the new spool. Make sure it spins easily and feeds from the bottom.
- Clip the wire end cleanly. Feed it into the wire feed tube about 10–15cm (4–6”).
- Check the wire feed roller matches your wire. Use a knurled roller for flux-cored wire. If not, swap it.
- Reattach the spool lock.
- Close the door.
Changing The Contact Tip
- Unscrew the old tip from the end of the welding gun.
- Screw on a new tip that matches the wire size.
- Make sure the tip is not loose or dirty.
Setting Wire Tension
- Turn the tension knob on the wire feed assembly.
- Too loose: Wire slips or stops.
- Too tight: Wire flattens, deforms, or the motor strains.
- Test by feeding wire through the gun (hold gun away from face). It should feed smoothly without slipping or jerking.
Beginner Insight: Many skip this step, leading to wire jams or bad welds. Always test wire feed before welding.
Preparing Your Work Area And Metal
Welding without gas means more spatter and slag. Good prep gives better welds.
Clean The Metal
- Use a wire brush or grinder to remove rust, paint, oil, or dirt from where you’ll weld.
- Clean at least 2–3cm (1”) on each side of the joint.
- Wipe with a dry cloth to remove dust.
Clamp The Workpiece
- Use welding clamps to hold pieces tight together.
- Secure the work to a metal table or bench.
- Attach the ground clamp directly to bare metal near the weld.
Remove Flammables
- Take away rags, paper, gas cans, or anything that can catch fire.
- Work in a well-ventilated space—flux-cored wire makes more smoke than gas welding.
Wear Protective Gear
- Wear a welding helmet (auto-darkening saves time).
- Use thick gloves and long sleeves. Sparks and spatter are common.
- Wear closed boots and pants without cuffs.
Hidden Tip: Some new welders don’t wear ear protection. Spatter can burn inside your ear. Use earplugs if possible.
Setting The Right Controls On Your Welder
Voltage and wire speed matter most for gasless MIG. Good settings prevent burn-through, spatter, or weak welds.
Setting Voltage
- Thicker metal: Use higher voltage.
- Thinner metal: Lower voltage to avoid burn-through.
Start with the welder’s chart (often inside the door). For 1. 5mm sheet metal, set voltage low (1–2 on many machines). For 6mm plate, set higher (4–5).
Adjusting Wire Feed Speed
- Too slow: Wire burns back to tip, arc is unstable.
- Too fast: Gun “pushes” off metal, spatter increases.
Start with a mid-range setting. Listen for a steady “crackling” sound (like frying bacon). If the sound is harsh or wire pops, adjust the speed.
Example Settings Table
Here’s a guide for common machines with 0.9mm E71T-GS wire:
| Metal Thickness (mm) | Voltage Setting | Wire Speed (m/min) |
|---|---|---|
| 1.5 | 1–2 | 4–5 |
| 3 | 2–3 | 5–6 |
| 6 | 4–5 | 6–7 |
Note: Each welder is different. Always do a test weld on scrap.
Burn-back And Inductance
Some welders allow you to adjust burn-back (how much wire remains after you stop welding) and inductance (controls spatter and arc smoothness). For beginners, keep these at default. If you notice too much wire sticking out or not enough, adjust burn-back slightly.
Loading The Wire And Feeding It Through
After setting up the spool, feed the wire through the liner and gun.
- Squeeze the trigger on the gun.
- Hold the gun away from your face.
- Let the wire feed until it sticks out 10–15mm (about half an inch).
- Cut the wire with pliers for a clean end.
Check that the wire feeds smoothly. If it snags or jams, stop and fix the problem before welding.
Common Mistake: Beginners often forget to match the tip size to the wire. If wire is too loose in the tip, arc will be unstable.
Performing Your First Gasless Mig Weld
Now your machine is ready. Before you start on your main project, do a test weld.
Tack Welds
- Place two pieces of scrap steel together.
- Do short “tack” welds at the ends to hold them.
- Tack welds keep metal from moving during long welds.
Welding Technique
- Hold the gun at a 10–15° angle, “dragging” the gun (pull, not push).
- Move at a steady speed. Too slow causes buildup; too fast makes thin, weak welds.
- Keep the contact tip about 6–10mm from the metal.
Watching The Weld Pool
Look at the edge of the molten pool, not the bright arc. Try to keep the pool even and straight.
Cleaning The Slag
Gasless wire leaves a slag layer. Chip it off with a hammer, then brush clean before welding another pass.
Advanced Tip: The slag can hide defects. Always clean and inspect between passes.
Fine-tuning Your Welds
Every welder and project is different. Adjust your settings as you work.
Troubleshooting Table
If your welds look wrong, use this guide:
| Problem | Likely Cause | Fix |
|---|---|---|
| Weld sits high (no penetration) | Voltage too low | Increase voltage |
| Burns through metal | Voltage too high | Lower voltage, speed up travel |
| Too much spatter | Wire speed too high | Lower wire speed |
| Wire stubs or burns back | Wire speed too low | Increase wire speed |
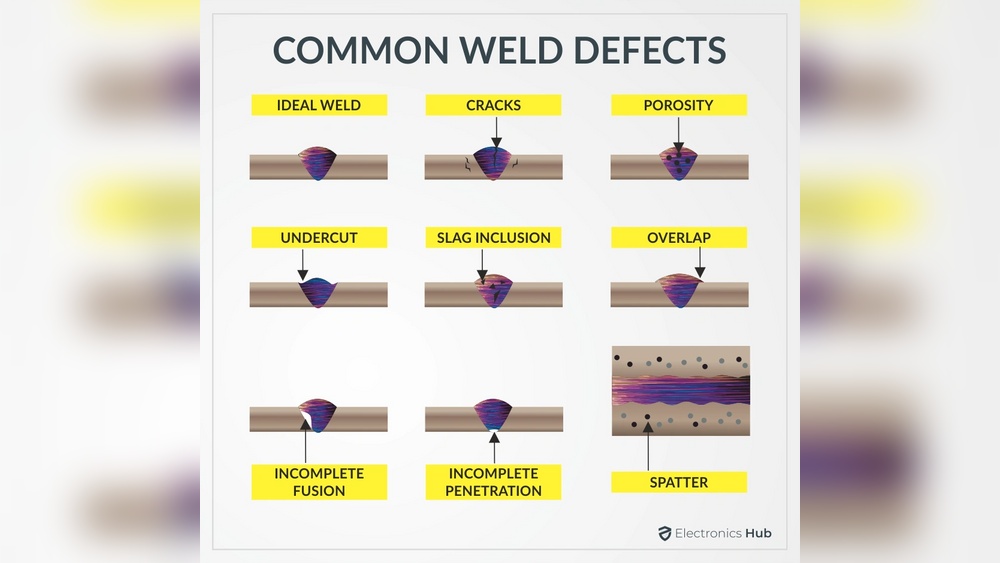
| Porosity (holes in weld) | Dirty metal or wet wire | Clean metal, dry wire |
Non-obvious Insight: Humidity can ruin flux-cored wire. Store spools in a dry place or sealed bag.
Credit: weldguru.com
Pros And Cons Of Gasless Mig Welding
Advantages
- No gas bottle to buy, store, or move.
- Weld outdoors even in wind.
- Good for dirty or rusty steel.
- Machines are often lighter and cheaper.
Disadvantages
- More spatter and smoke.
- Slag cleaning needed after each weld.
- Not as pretty or smooth as gas MIG.
- Some wires are only for mild steel.
Quick Comparison Table
Here’s a summary:
| Feature | Gasless MIG | Gas MIG |
|---|---|---|
| Outdoor Use | Excellent | Poor |
| Metal Prep Needed | Less | More |
| Spatter & Smoke | High | Low |
| Weld Appearance | Rough | Smooth |
| Slag Removal | Yes | No |
Tips For Best Results
- Use Good Wire. Cheap wire causes jams and ugly welds. Buy trusted brands.
- Dry Storage. Keep wire away from moisture.
- Short Arc. Hold the tip close to the work for best results.
- Drag, Don’t Push. Always pull the gun, don’t push.
- Practice on Scrap. Don’t start on your main project. Try scrap first.
- Good Lighting. See your weld pool clearly.
- Ventilation. Welding fumes can be harmful. Use a fan or open window.
Beginner Miss: Many think gasless is “messy.” With practice, you can get strong, neat welds.
Safety Reminders
- Avoid Fumes: Flux-cored wires make more smoke. Don’t breathe it in.
- Fire Risk: Sparks can travel several meters. Keep the area clear.
- Eye Protection: UV rays from welding can cause burns. Helmet is a must.
- Hot Metal: Welded pieces stay hot for long. Use pliers to move them.
Non-obvious Insight: Even after turning off the welder, the tip can stay hot for minutes. Touch carefully.
Maintenance After Welding
- Clean the Gun: Remove spatter and check the tip after each use.
- Check Rollers: Flux dust can build up. Brush off rollers monthly.
- Store Wire: Seal wire in a bag with silica gel if not using for weeks.
- Inspect Cables: Look for cuts or burns before next use.
Common Mistakes And How To Avoid Them
- Wrong Polarity: Always set to DCEN. Double-check before welding.
- Dirty Metal: Even though flux cleans, rust and oil still cause trouble.
- Too Long Stick-Out: Keep wire stick-out short (6–10mm).
- Pushing the Gun: Always pull for gasless.
- Ignoring Slag: Chip and brush after every pass.
- Poor Ventilation: Don’t weld in closed spaces.
- Loose Ground Clamp: Must touch bare metal. Paint or rust blocks the circuit.
- Wrong Roller: Use knurled roller for flux wire.
Practical Example: Setting Up A Typical Gasless Mig Welder
Imagine you have a 140A home MIG welder and want to weld 3mm mild steel outside.
- Plug in and unplug machine for safety.
- Change polarity: Gun to “-”, ground to “+”.
- Install 0.9mm E71T-GS wire spool.
- Fit 0.9mm contact tip.
- Use a knurled roller.
- Feed wire through gun, cut 10mm stick-out.
- Set voltage to “2”, wire speed to “5”.
- Clean and clamp steel, attach ground clamp.
- Wear full safety gear.
- Do a test weld on scrap. Listen for steady crackle.
- Adjust settings after first weld if needed.
- Clean slag, inspect weld.
Pro Tip: Every machine is slightly different. Keep a notebook of settings for each wire and metal thickness.

Credit: www.youtube.com
When Gasless Mig Is Not The Right Choice
- Aluminum or thin stainless steel: Flux-cored wire for these is rare and expensive.
- Automotive bodywork: Gasless may burn through thin car panels.
- Pretty welds: If appearance matters, gas MIG gives smoother results.
Where To Learn More
For deeper information about welding processes, you can check Wikipedia’s article on flux-cored arc welding.

Credit: www.youtube.com
Frequently Asked Questions
What Is The Best Flux-cored Wire For Beginners?
E71T-GS is a popular choice. It works well on most home welders, is easy to use, and welds in any position. It is made for single-pass welds on mild steel.
Can I Use My Mig Welder Without Gas For All Jobs?
You can use it for most mild steel projects, especially outdoors or for repairs. For thin metal, stainless steel, or aluminum, you may need gas or a different process.
Why Does My Gasless Weld Look So Rough?
Gasless welds often have more spatter and a rougher finish. Check your settings: too much voltage or wire speed makes it worse. Clean and brush off slag to see the true weld.
Is Gasless Mig Welding As Strong As Gas Mig?
Weld strength is similar if you use the right wire and settings. Gasless welds can be strong, but may not look as smooth. Always test your welds before using them in important projects.
How Do I Avoid Porosity (holes) In My Weld?
Clean the metal well, keep wire dry, and don’t weld over paint or rust. If you still see holes, try adjusting voltage and wire speed, and check for drafts blowing on your weld.
Setting up a MIG welder without gas is a practical way to weld at home or outside. With the right wire, settings, and a bit of practice, you can create strong, safe welds for many jobs. Always work safely, keep your gear in good shape, and take time to learn as you go.
Gasless MIG welding puts welding within reach, even without a gas cylinder.