
Disclosure: This post contains affiliate links and I will be compensated if you make a purchase after clicking through my links. Learn More
What size wire for a 220 welder? Most home 220V welders need 8-gauge copper wire for up to 50 feet. For longer runs, use 6-gauge. Always match the wire size to your welder’s amp draw and follow the National Electrical Code (NEC) for safety.
Choosing The Right Wire Size For A 220 Welder
Selecting the proper wire size for a 220-volt welder is not just about code compliance—it’s about safety, performance, and long-term reliability. The wrong wire can overheat, cause voltage drops, and even start a fire. In the welding industry, there’s no room for guesswork. Every connection matters.
Getting this decision right means understanding the relationship between amperage, wire gauge, distance, and the specific needs of your welder. You also need to consider your local codes, the type of wire, and even the outlet and breaker sizing. This guide walks you through everything from the basics to expert-level details, so your welder runs at peak performance and your workspace stays safe.
When you install a 220V welder, you’re working with high currents that can stress ordinary wiring. Mistakes with wire size aren’t always obvious at first. The wire may work for months before the insulation softens, or connections loosen, leading to sudden failure.
Proper sizing from the start ensures that your setup supports your welder’s maximum output, even during demanding jobs like heavy fabrication or long welding sessions.
Many new welders focus only on the welder’s specs and forget about the wiring as the backbone of their system. But your wire size choice directly affects everything from arc quality to equipment lifespan. Even if your welder is compact, a small mistake in wiring can turn into costly repairs or electrical hazards.
By giving attention to wire size, you build in confidence for every welding project.
Why Wire Size Matters For 220 Welders
The wire feeding power to your welder acts like a highway for electricity. If the highway is too narrow (the wire too small), it can’t safely carry the current. This causes heat buildup, voltage drop, and possibly damage to both the welder and your building. Using the right wire gauge prevents these risks and keeps your project running smoothly.
Even a slight undersize can cause your welder to perform poorly, with weak arcs or fluctuating heat output. Sometimes, you’ll notice the plug or outlet gets warm, or the breaker trips unexpectedly. These are warning signs that the wiring isn’t handling the load.
Over time, under-rated wiring can degrade from repeated overheating, leading to insulation breakdown and even fire risk.
A wire that’s too small can also lead to nuisance breaker tripping, especially when you push your welder near its maximum settings. The right wire size ensures that your system delivers consistent voltage, so you get steady, reliable welds every time.
It also means your breaker, outlet, and wiring all work together to protect your equipment and your building’s electrical system.
Key Factors Affecting Wire Size
There’s more to choosing wire than just matching numbers. Here’s what you need to know:
1. Welder’s Input Amps
Every welder draws a specific amount of current. Check the welder’s nameplate for “input amps” or “rated current.” Most home 220V welders draw between 30 and 50 amps. For example, a compact MIG welder might need only 23 amps, while a heavy-duty stick welder can draw 50 amps or more.
2. Wire Gauge (awg)
The smaller the gauge number, the thicker the wire. Thicker wire carries more current safely. For example, 6 AWG wire is much thicker than 10 AWG and can carry higher current over longer distances without overheating.
3. Distance (wire Run Length)
The further the wire runs from your breaker panel to the outlet, the thicker the wire needs to be. Longer runs mean more voltage drop. For instance, a 40-foot run might be fine with 8 AWG, but at 75 feet, you’ll want 6 AWG to maintain safe operation and avoid performance loss.
4. Wire Type
Use copper wire for best conductivity. Aluminum wire requires upsizing (one size thicker) due to higher resistance. Copper is preferred for most home and shop installations because it’s more durable and less prone to loosening over time.
5. Breaker Size
Your breaker must match or slightly exceed the welder’s amp draw, and the wire must match the breaker. For example, if your welder draws 40A, use a 40A breaker and wire rated for at least 40A.
6. Duty Cycle
Welders used continuously (high duty cycle) may require a larger wire size for sustained current. If you plan to weld for hours at a time, consider upgrading the wire size to handle the heat buildup.
Many beginners overlook the effect of ambient temperature, insulation, or how wire routing (through attics or near heat sources) can affect ampacity. Always consult the NEC ampacity tables if your installation is non-standard.
Basic Wire Sizing Chart For 220 Welders
The following chart gives a quick reference for most common welders. Always check the manual for your exact model.
| Welder Input Amps | Wire Size (Copper, up to 50 ft) | Breaker Size |
|---|---|---|
| 20-30A | 10 AWG | 30A |
| 30-40A | 8 AWG | 40A |
| 40-50A | 6 AWG | 50A |
Keep in mind, these values assume copper wire and normal ambient temperatures. If your wiring runs through hot spaces (like attics) or through insulation, consult the NEC for ampacity adjustments.
The National Electrical Code (nec) And Local Requirements
The NEC sets the standard for wire sizing in the USA. Local building codes often match or exceed these requirements. Always check with your city or county before installation.
Key NEC Points:
- Ampacity: Wire must safely carry the maximum current expected. Ampacity tables in the NEC account for both continuous and short-term loads.
- Continuous Load: For loads over 3 hours, use 125% of rated amps. This means, for a 40A welder, size your wire and breaker as if you need to support 50A continuous use.
- Voltage Drop: Keep total voltage drop under 3% for branch circuits. This is especially important for welders, as voltage drop directly affects weld quality.
Local codes may require permits, specific types of conduit, or special outlets. Some areas prohibit aluminum wiring for new circuits or require special anti-oxidant paste on aluminum connections. Always ask your local inspector about any unique requirements.
How To Calculate The Correct Wire Size
1. Find The Input Amps
Example: A welder rated at 40A input. This is usually listed on the machine’s data plate or manual.
2. Measure The Distance
From panel to welder outlet (straight line, add 10% for bends and detours). For example, if your run is 60 feet with several turns, plan for 66 feet to be safe.
3. Check The Chart
40A at 50 feet = 8 AWG copper. This is your starting point.
4. Adjust For Long Runs
If the run is over 50 feet, go up one size: use 6 AWG. For runs over 100 feet, consider 4 AWG.
5. Check Breaker And Outlet
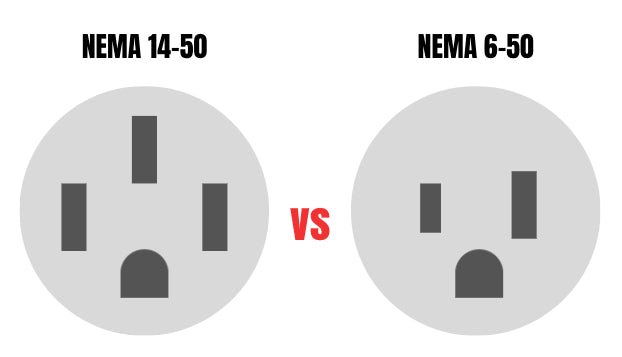
Use a breaker and outlet rated for the amps and wire. For a 40A circuit, use a 40A breaker and an outlet like NEMA 6-50R.
If you’re wiring multiple outlets on the same circuit, calculate for the total load, not just a single device. For example, if you plan to run a compressor and a welder together, add their amps.
Wire Types: Thhn, Romex, And Others
You’ll find several common types of wire:
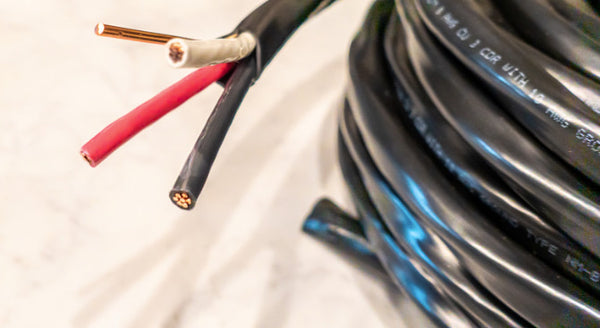
- THHN: Single, stranded or solid copper wires in conduit. Best for exposed or garage work. THHN is heat-resistant and durable, making it ideal for workshops.
- Romex (NM-B): Sheathed cable, easy for indoor walls. Common in home construction but not for wet or outdoor areas.
- Aluminum: Rare for welders, but if used, size up one gauge. Always use correct connectors and anti-oxidant paste.
Stick with copper unless your inspector says otherwise.
Some installations, like running wire through concrete or underground, require special wire types like UF (Underground Feeder) or direct burial-rated cables. Always verify with local code what’s allowed for your specific situation.
Example Wire Sizing For Popular 220v Welders
Here are real-world examples of popular welders and their recommended wire sizes:
- Lincoln Electric AC-225 (50A input): Use 6 AWG copper, 50A breaker.
- Miller Thunderbolt (40A input): Use 8 AWG copper, 40A breaker.
- Hobart Handler 210 MVP (23A input): Use 10 AWG copper, 30A breaker.
These examples assume runs under 50 feet. If your panel is farther away, increase the wire size. For instance, if you install a Lincoln AC-225 in a detached garage 80 feet from the panel, step up to 4 AWG wire for safety and performance.
Voltage Drop: What It Is And Why It Matters
Voltage drop means loss of voltage as electricity travels down the wire. Too much voltage drop makes your welder underperform, causes erratic arcs, and shortens equipment life.
Keep voltage drop under 3% for best performance. For every 100 feet, voltage drop increases, so always upsize for long runs.
For example, a 40A load on 8 AWG wire over 90 feet can lose over 4 volts—enough to affect weld quality. By moving up to 6 AWG, you cut this loss nearly in half. If your welder’s performance drops during long welds or the arc feels unstable, voltage drop is a common culprit.
Common Mistakes When Choosing Wire Size
1. Guessing The Wire Size
Always check the manual and code. Don’t trust “what your buddy used. ” Every installation is unique.
2. Ignoring Distance
Even the right gauge can be wrong if your run is too long. Don’t just use the wire that came with your welder’s plug kit for a garage 100 feet away.
3. Mixing Copper And Aluminum
Don’t mix wire types in the same run. This can cause corrosion and poor connections.
4. Using Underrated Breakers
Breaker must match or exceed welder’s rated current. Don’t downsize the breaker to “protect the wire”—it’s the wire’s job to be strong enough.
5. Skipping Permits
Always get electrical work inspected. Insurance and safety depend on it.
Other mistakes include routing wire near heat sources without adjusting ampacity, or forgetting to label panels and outlets for future users.
Step-by-step Guide: Wiring A 220v Welder Outlet
Here’s a simplified overview for a standard installation. Always hire a licensed electrician if you’re unsure.
- Turn Off Power at the breaker panel. Double-check with a voltage tester.
- Choose the Proper Wire (e.g., 8 AWG copper for 40A).
- Run the Wire from panel to outlet location, using conduit if exposed. Secure wire with clamps and avoid sharp bends.
- Install the Outlet (NEMA 6-50R or 14-50R common for welders). Mount it in a metal box for durability.
- Connect the Wires: Black and red (hot), white (neutral if required), green (ground). Tighten all connections securely.
- Install the Breaker of the correct size. Snap it into the panel and connect the hot wires.
- Test the Outlet with a multimeter before plugging in the welder. Verify voltage and correct wiring.
If you must pull wire through conduit, use wire lube to prevent damage. Label the new breaker and outlet for future reference.
Special Considerations For Shop And Garage Welders
If your welder will be used in a detached garage, barn, or shed, consider these factors:
- Longer Wire Runs: May require 6 AWG or even 4 AWG. Measure total path length, not just straight-line distance.
- Subpanels: Often needed for remote buildings. Use proper feeder wire. Subpanels must be grounded and bonded correctly.
- Environmental Hazards: Use wire rated for damp, heat, or rodent resistance. For barns or outdoor shops, consider armored cable or conduit.
If your shop has multiple heavy tools, plan for future expansion by installing a larger subpanel and running heavier feeder wire. It’s much easier to do this up front than to upgrade later.
Table: Minimum Wire Size For Different 220v Welder Amps And Distances
| Amps | Up to 50 ft | 50–100 ft | Over 100 ft |
|---|---|---|---|
| 20–30A | 10 AWG | 8 AWG | 6 AWG |
| 30–40A | 8 AWG | 6 AWG | 4 AWG |
| 40–50A | 6 AWG | 4 AWG | 3 AWG |
Remember, these are minimums. There’s no problem going up a size for extra safety, especially if you might upgrade your welder later.
How To Read Your Welder’s Nameplate
Most welders have a metal nameplate or sticker with important info:
- Input Voltage: 220V or 240V
- Input Amps: Maximum current draw
- Duty Cycle: Percentage of time welder can run at max output
Find the “input amps” and use that for wire sizing.
Some nameplates list “input kVA” instead of amps. To convert: divide kVA by voltage, then multiply by 1,000 (for example, 8 kVA at 240V is about 33 amps).
Matching Wire Size To Breaker Size
The wire, breaker, and outlet must all match. If you use a 50A breaker, use at least 6 AWG wire. Never undersize the wire, even if the breaker is lower.
If your wire is oversized compared to the breaker, that’s fine. But never use a breaker larger than the wire rating. For example, don’t put a 50A breaker on 10 AWG wire.
What If You Oversize The Wire?
There’s no harm in using a thicker wire than required. It costs more but lowers voltage drop and runs cooler. Never undersize.
Some pros oversize wire when they expect to upgrade welders later. Thicker wire also gives extra safety margin if your shop is in a hot climate or the wire run is near other circuits.
What Is Grounding And Why Is It Important?
Every 220V welder circuit must have a ground wire. This protects users from electric shock and ensures breaker trips in a fault.
- Use green or bare copper for ground.
- Never use neutral as ground.
- Ground must run to the panel or subpanel.
In detached buildings, you may need a ground rod and proper bonding between neutral and ground. Check local code for details.
Aluminum Wire: When And Why To Use It
Aluminum wire is lighter and cheaper but has higher resistance. If local code allows, use one gauge size larger than copper. Example: For 40A, use 6 AWG aluminum instead of 8 AWG copper.
Aluminum wire must be installed carefully. Use only connectors rated for aluminum, and apply anti-oxidant paste to all connections. Loose or corroded aluminum connections can overheat rapidly.
Conduit Vs. Nm Cable
- Conduit (with THHN wire): Best for garages, exposed runs, or outdoor use. Offers excellent physical protection and flexibility for future upgrades.
- NM Cable (Romex): Best for indoor walls. Easy to install, but not rated for wet or exposed locations.
Choose based on where your wire will run and code requirements.
Upgrading Existing Wiring For A New Welder
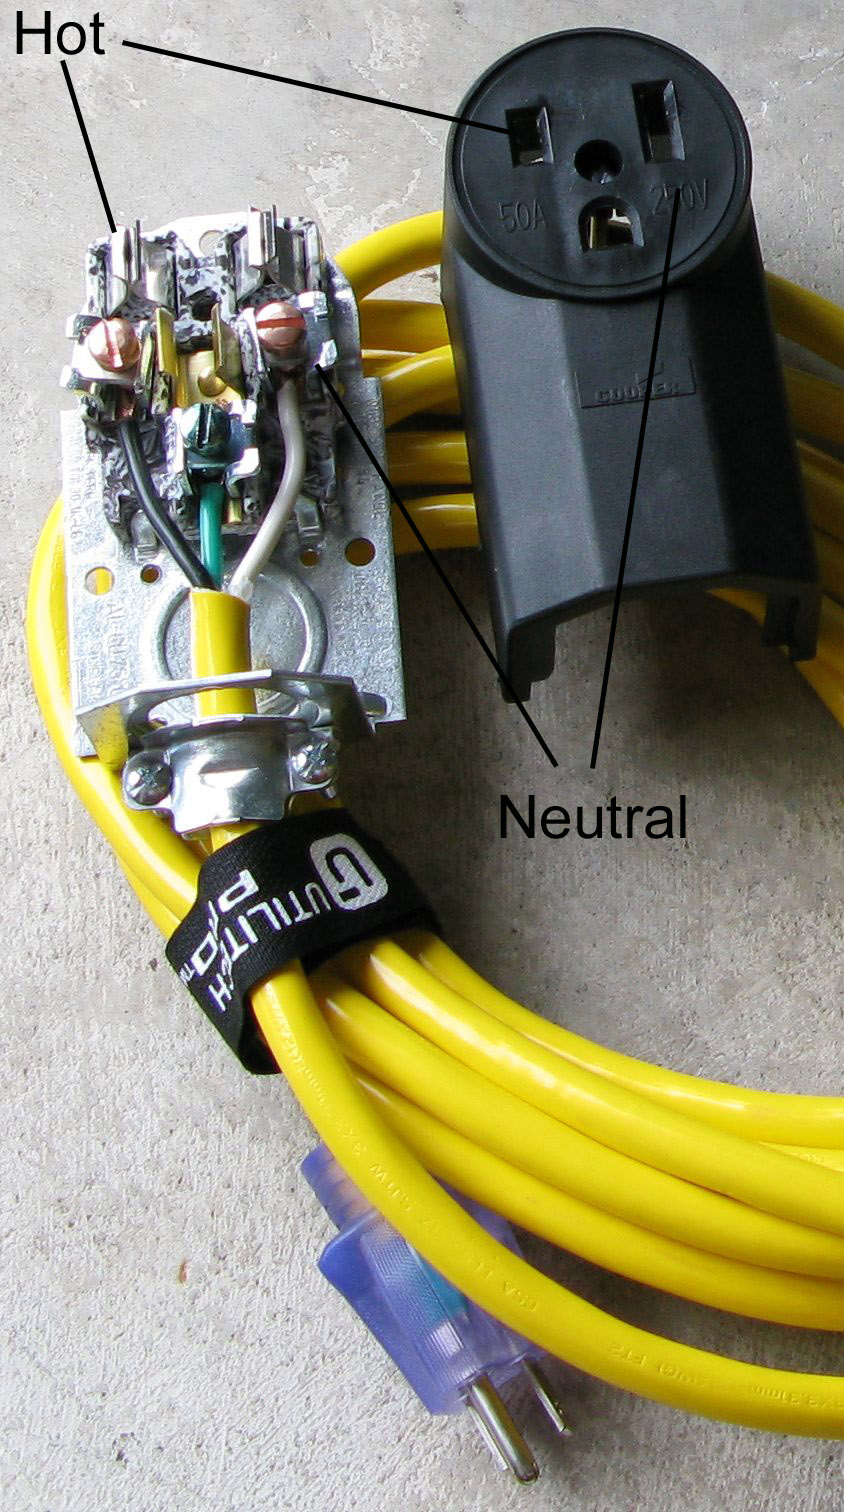
Adding a larger welder to an existing circuit? Don’t just swap the breaker or outlet. Upgrade the wire to match the new amp load.
For example, if you previously used a 10 AWG wire for a 30A welder and now want to install a 50A machine, you must run new 6 AWG wire. Failing to do so risks overheating and fire.
Credit: robrobinette.com
The Cost Of Wiring For A 220v Welder
Copper wire isn’t cheap. Expect to pay $1–$3 per foot for 6 AWG wire. Factor in outlets, breakers, and conduit. Hiring a pro is the safest move and protects your investment.
If you’re wiring a detached garage 75 feet away, wire alone can cost $150–$250 for 6 AWG. Don’t forget the price of quality outlets, boxes, and GFCI protection if required.
Common Questions Beginners Miss
1. Does The Duty Cycle Affect Wire Size?
Yes, if you weld for long periods, go up one size. A 40A welder used at high output for hours may need 6 AWG even for a 50-foot run.
2. Can I Use Extension Cords?
Only heavy-duty, short cords rated for welder amps. Most home improvement cords are under-rated. Use welding-specific extension cords with heavy wire.
3. Is 220v Wiring Different From 240v?
In the USA, 220V and 240V are often the same for residential. Just make sure your breaker and outlet are rated for the voltage.
4. Can I Use Two 110v Wires For 220v?
No, you need a dedicated 220V circuit. Don’t try to combine outlets or circuits.
- What if my wire run is in an attic or hot space?
Upsize wire one gauge for heat. High temperatures reduce wire ampacity, so play it safe.
Another detail often missed: outdoor circuits must be GFCI-protected in many areas. Check code before installing.
Signs You Chose The Wrong Wire Size
If you notice these, shut down and fix immediately:
- Breaker trips during welding
- Wire or outlet feels hot
- Welder arc is weak or unstable
- Lights flicker when welding
Other red flags include melted insulation, burnt smell near the outlet, or repeated nuisance tripping.
What The Pros Do
Professional welders always:
- Check amp draw and wire length
- Use copper wire for reliability
- Ground every circuit
- Get work inspected
Pros also label each outlet with its amp rating and keep a wiring diagram for future troubleshooting.
Credit: www.arccaptain.com
Real-world Example: Installing A 220v Welder In A Garage
Let’s say your welder draws 40A, and your panel is 60 feet away. Here’s what a pro would do:
- Use 6 AWG copper for reduced voltage drop
- Install a 40A breaker
- Use NEMA 6-50R outlet
- Run wire in conduit for protection
- Ground to main panel
If the shop is unheated or exposed to moisture, the pro might use THWN wire in sealed conduit. They’ll also mark the panel and test the outlet before first use.
Table: Cost Comparison Of Wire Sizes For 50 Feet
| Wire Gauge (Copper) | Approximate Cost (per foot) | Total Cost (50 ft) |
|---|---|---|
| 10 AWG | $0.80 | $40 |
| 8 AWG | $1.30 | $65 |
| 6 AWG | $2.00 | $100 |
| 4 AWG | $3.20 | $160 |
These are rough estimates; copper prices change often. Always buy a little extra wire for mistakes or rerouting.
Local Code And Permit Requirements
Some cities require a permit and inspection for any new 220V circuit. Always check with your local authority before starting. Failing to do so can void insurance and cause issues if you sell your property.
Permits help ensure your work meets safety standards. Inspectors can also answer questions and catch problems early.
Safety Tips For Wiring A 220v Welder
- Always shut off main power before working.
- Use insulated tools.
- Label all breakers clearly.
- Test every outlet before use.
Wear safety glasses when cutting or stripping wire. If you’re unsure, stop and call a pro.
How To Maintain Your Welder Circuit
Inspect your wiring and outlet every 6 months:
- Check for loose connections
- Look for discoloration or heat damage
- Test GFCI if installed
Keep the area around your outlet clear of dust, debris, and flammable materials. Tighten any loose screws and replace damaged outlets immediately.
When To Call A Professional
If you’re not 100% confident, hire a licensed electrician. A mistake here can cost you your welder—or worse.
Professionals have the tools and knowledge to handle code compliance, troubleshooting, and safe installation. It’s a smart investment.
Credit: www.arccaptain.com
Key Takeaways For Wire Size Selection
- Match wire size to welder amps and distance
- Use copper wire for reliability
- Never undersize your wire
- Follow NEC and local codes
- Get your work inspected
Making the right choice at the start saves you time, money, and worry down the road.
More Resources
For detailed NEC code tables and advanced calculations, visit the official National Fire Protection Association website.
Frequently Asked Questions
What Gauge Wire Is Best For A 220v Welder In A Home Garage?
For most home 220V welders, 8 AWG copper wire is best for runs up to 50 feet. If your welder draws more than 40 amps or your run is longer, use 6 AWG. Always check your welder’s manual and local codes.
Can I Use Aluminum Wire For My 220 Welder?
You can use aluminum wire, but it must be one size larger than copper. For example, if copper 8 AWG is required, use 6 AWG aluminum. Always check local codes and use approved connectors for aluminum wire.
What Breaker Size Should I Use For A 220v Welder?
Breaker size must match the welder’s input amps. Most small welders use a 30A or 40A breaker. Larger welders may need a 50A breaker. Never exceed the wire’s amp rating, and always follow NEC guidelines.
Is It Safe To Use An Extension Cord With A 220v Welder?
Yes, but only use heavy-duty, short extension cords rated for your welder’s amps. Most standard cords are not safe. A 6 AWG cord is recommended for high amp welders. Avoid long cords to prevent voltage drop and overheating.
What Happens If I Use Too Small A Wire For My Welder?
Using too small a wire causes overheating, voltage drop, and can start a fire. It also damages your welder and may trip your breaker frequently. Always size wire for the welder’s amps and distance for safe operation.
Final Thoughts
Getting the right wire size for your 220 welder is about more than just following rules—it’s about protecting your equipment, your property, and your safety. Choose the right gauge based on amps and distance, use quality materials, and always check your local codes. When in doubt, consult a pro. That’s the smart, industry-standard approach every time.

