Disclosure: This post contains affiliate links and I will be compensated if you make a purchase after clicking through my links. Learn More
Welding is a process that uses heat and electricity to join metals. But many people do not realize that welding machines cannot run at full power all the time. Each machine has a limit called the duty cycle. Understanding this limit is critical for safety, machine life, and project quality. Many beginners ignore the duty cycle or misunderstand it, which can cause machine failure or dangerous situations.
This article will give you a complete, clear explanation of welding machine duty cycle. You will learn what the duty cycle means, how to read it, and why it matters. You will also see real examples, comparisons, and practical advice for using and choosing welding machines.
By the end, you will feel confident about this topic, whether you are a hobbyist, a student, or a professional welder.
What Is Welding Machine Duty Cycle?
The duty cycle of a welding machine is a measure that tells you how long the machine can work safely at a certain power before needing a rest. It is usually shown as a percentage over a 10-minute period. For example, if a welding machine has a duty cycle of 60% at 200 amps, it can run for 6 minutes and must then cool down for 4 minutes.
This rating protects the machine from overheating. Most welding machines use a fan or natural air to cool down. If you push the machine past its duty cycle, you risk burning out the internal parts or causing a fire.
Why Duty Cycle Exists
Welding creates a lot of heat, both at the welding point and inside the machine. The electric current running through the cables, transformer, and electronics also generates heat. If the machine does not rest, this heat builds up and can break the insulation, damage the wires, or destroy the circuits.
Manufacturers test machines in controlled environments to set the duty cycle. They want to make sure that, if you follow the duty cycle, the machine will last for years and operate safely.
Reading The Duty Cycle Label
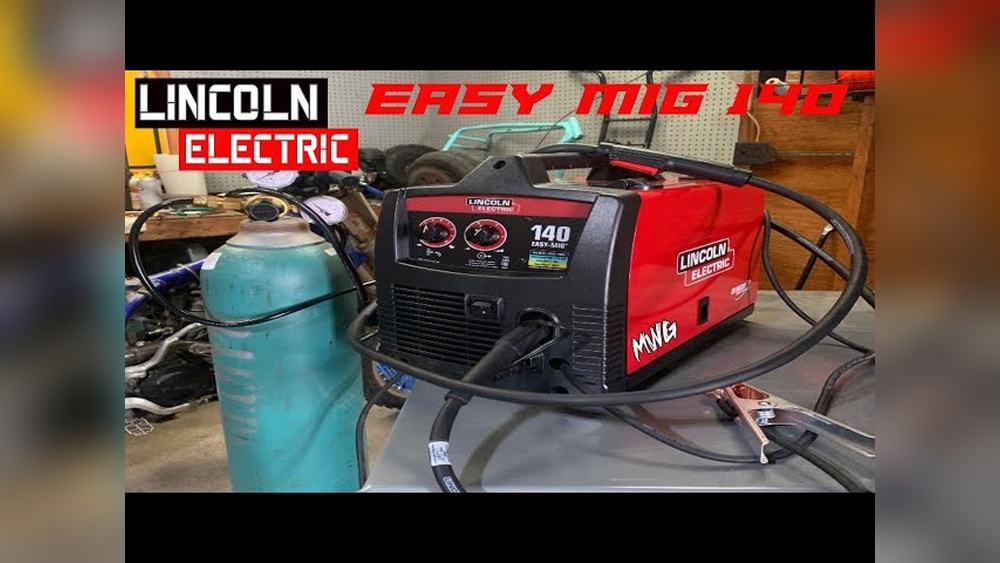
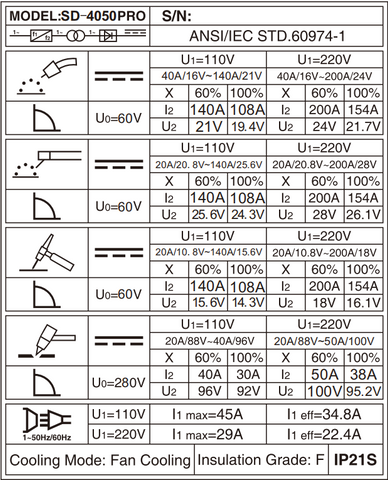
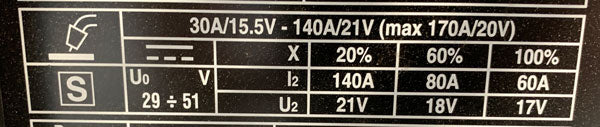
Every quality welding machine should have a duty cycle label on the side or in the manual. You will see something like this:
- 200A @ 60% duty cycle
- 150A @ 100% duty cycle
This means that at 200 amps, you can weld for 6 out of every 10 minutes. If you lower the current to 150 amps, you can weld nonstop without pausing.
How Duty Cycle Is Calculated
Many people find the math confusing, but it is actually simple. The duty cycle is always based on a 10-minute time block. Here’s how to calculate it:
- Take the duty cycle percentage (for example, 40%).
- Multiply by 10 minutes (0.40 x 10 = 4 minutes).
- That is your safe welding time before the machine must cool for the rest of the 10 minutes.
If you need to weld longer, reduce the amperage. As amperage decreases, the machine can work for longer periods without overheating.
Example
If your machine says “160A @ 40% duty cycle,” you can weld at 160 amps for 4 minutes. Then, you need to stop and let the machine cool for 6 minutes. If you ignore the pause, you risk breaking the welder.
Why Duty Cycle Matters In Welding
The duty cycle is not just a technical term. It has real effects on your work, safety, and cost.
Impact On Project Planning
If you have a big job, a low duty cycle can slow you down. You will need to pause often to let the machine cool. This can double your work time. For factories and workshops, picking a machine with a higher duty cycle can save hours and money over weeks and months.
Machine Life And Maintenance
Ignoring the duty cycle will wear out the welding machine quickly. Overheating can melt insulation, break wires, or damage the circuit board. Many machines have built-in thermal protection that shuts the unit off when it gets too hot. This protects the machine, but can be annoying if you are in the middle of a job.
Safety
Overheating is dangerous. Internal parts can catch fire or cause electric shocks. A machine running over its duty cycle is not safe for you or others nearby. Fire is a real risk, especially if you weld in a workshop with wood, oil, or other flammable materials.
Quality Of Welds
A stressed or overheated machine can cause poor welds. Voltage may drop, or the arc may become unstable. This means weak joints, more spatter, and the need to redo work. For critical welds (like in buildings or vehicles), this can be a big problem.
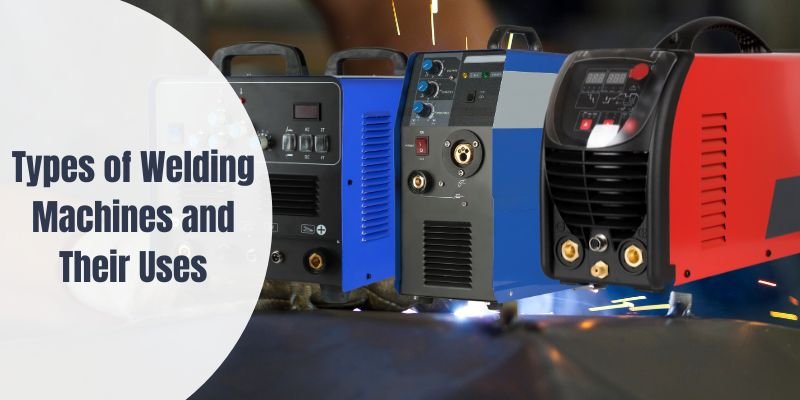
Different Types Of Welding Machines And Their Duty Cycles
Not all welding machines are the same. The duty cycle depends on machine type, size, and design.
Stick (smaw) Welders
Stick welders are often used for home, farm, and repair work. Most basic stick welders have a duty cycle between 20% and 40% at their maximum output. This is enough for small jobs, but you will need to pause often for bigger projects.
Mig (gmaw) Welders
MIG welders are common in workshops and factories. They usually have a higher duty cycle, often 40% to 60% at mid-range amperage. Some industrial MIG welders can reach 100% duty cycle at lower settings, meaning you can weld without stopping.
Tig (gtaw) Welders
TIG welders are used for thin metals and high-quality welds. They can have lower duty cycles (20%-40%) at high amperage, but higher cycles at low settings. TIG work often needs more control and less heat, so this is usually not a problem.
Multi-process Welders
These machines can do stick, MIG, and TIG in one unit. Their duty cycle depends on the process and amperage. Check the specs for each mode, as the duty cycle may change.
Industrial Welders
Heavy-duty machines used in shipyards or factories often have a 100% duty cycle at a high amperage. These are built for continuous welding and are more expensive and larger.
Comparison Of Duty Cycles By Machine Type
| Machine Type | Typical Duty Cycle | Usual Amperage Range |
|---|---|---|
| Stick Welder | 20-40% @ max | 100-200A |
| MIG Welder | 40-60% @ mid-range | 100-250A |
| TIG Welder | 20-40% @ high | 50-200A |
| Industrial MIG/TIG | 60-100% @ high | 200-500A |
How To Choose A Welding Machine Based On Duty Cycle
Selecting the right welding machine means matching the duty cycle to your real work needs. Here is how you can make a better choice.
1. Know Your Project Needs
Estimate how long you need to weld in one session. For small repairs, a 20%-40% duty cycle may be enough. For longer jobs, like building frames or gates, look for machines with a 60% or higher duty cycle.
2. Match Amperage To Material
Think about the metal thickness and type. Higher amperage is needed for thick steel. Duty cycle ratings drop as amperage rises. Do not buy a machine only by its maximum amps; always check the duty cycle at the amps you will use most.
3. Consider Work Environment
If you weld outdoors or in a hot workshop, the machine will get hotter faster. Some duty cycles are measured at 40°C (104°F), others at 25°C (77°F). If you work in high temperatures, you may need a higher-rated machine.
4. Check The Power Source
Machines running on 220V or 415V often have higher duty cycles than small 110V units. If you have access to industrial power, you can use bigger machines for longer periods.
5. Think About Future Growth
If you expect to do more or bigger jobs in the future, buy a machine with a higher duty cycle than you need today. This gives you flexibility and protects your investment.
Example Comparison: Choosing Between Two Mig Welders
| Model | Max Amps | Duty Cycle @ Max Amps | Price | Best For |
|---|---|---|---|---|
| Welder A | 180A | 30% @ 180A | $350 | Small jobs, home use |
| Welder B | 200A | 60% @ 200A | $600 | Workshops, frequent use |
Welder B costs more but is better for longer, tougher jobs. If you only do short repairs, Welder A will be enough.
Common Myths And Mistakes About Duty Cycle
Many people misunderstand or ignore the duty cycle. Here are some common myths and the truth behind them.
“i Can Weld Until The Machine Shuts Off”
This is not safe. Some machines do not have thermal protection. Even if they do, running until the shutdown will reduce the machine’s life. Always follow the duty cycle, even if the machine keeps running.
“duty Cycle Is The Same On All Machines”
Different brands, models, and types have different ratings. Always check your machine’s label or manual. Do not assume that one machine’s rating applies to another.
“higher Amps Mean Better Machine”
A higher amperage does not always mean a better or stronger welder. If the duty cycle is low at high amps, the machine can only weld a few minutes at a time. A lower-amp machine with a high duty cycle may be better for your needs.
“cooling Fans Mean Unlimited Use”
Fans help, but they do not remove all heat instantly. You still need to respect the duty cycle. Overheating can still happen, especially in hot environments.
“i Can Ignore Duty Cycle For Small Jobs”
Even small jobs can heat up the machine if done many times without a break. Always be aware of the machine’s limits.
Credit: www.ssimder.com
How To Increase Duty Cycle Or Work Efficiently
You may wonder if there is a way to get more out of your welder. Here are some practical tips:
1. Lower The Amperage
Duty cycle increases as you reduce amperage. If possible, use the lowest amperage that works for your job.
2. Improve Cooling
Keep the machine’s vents clear. Use fans or air conditioners in your workspace. Do not cover the machine or block airflow.
3. Take Smart Breaks
Organize your work so that you weld for the duty cycle period, then use the rest time to clean, check, or set up your next weld. This keeps you productive and protects the machine.
4. Use Multiple Machines
For large projects, using two welders allows one to cool while the other works. This is common in big workshops.
5. Buy The Right Machine For The Job
If you need to weld for hours, do not try to force a small machine to do a big job. Invest in a machine with a higher duty cycle.
Example: Working Within Duty Cycle
If you have a machine with a 40% duty cycle at your usual settings, plan to weld for 4 minutes, then do prep work or check your welds for 6 minutes. This pattern keeps both you and your machine in good shape.
Duty Cycle Ratings: Industry Standards And Testing
Not all duty cycles are measured the same way. Some companies test at lower room temperatures, which makes the machine seem better than it is. Others follow strict standards like the IEC 60974-1, which tests at 40°C (104°F). Always check what standard your machine uses.
What Is Iec 60974-1?
This is an international rule for testing welding machines. It requires that duty cycle tests are done at 40°C, which is hot but realistic for many workshops. If your machine is rated using this standard, you can trust the numbers more.
Example: Different Standards
If a machine is rated 60% at 200A but tested at only 25°C, it may overheat faster in a real workshop. A machine with the same rating tested at 40°C is likely more reliable.

Credit: www.youtube.com
Practical Examples: Duty Cycle In Real Life
Numbers and charts are useful, but real examples make the concept clear.
Home Repair
You have a stick welder rated 130A @ 30% duty cycle. You weld a broken gate. You weld for 3 minutes, then let the machine rest for 7 minutes while you fit the next piece. This works well for small home jobs.
Automotive Work
A car repair shop uses a MIG welder rated 200A @ 60% duty cycle. Mechanics can weld for 6 minutes straight, then do other work for 4 minutes. This keeps the job moving and avoids overheating.
Industrial Fabrication
A shipyard uses an industrial welder with a 100% duty cycle at 350A. The machine can run all day without stopping, as long as the cooling system is working. This is essential for making large steel parts.
What Beginners Miss
Many beginners focus only on maximum amps and price. They miss that a machine with a higher duty cycle can do the same job faster, better, and with fewer repairs. Also, beginners often do not realize that the real duty cycle drops if the workshop is hot or dirty.
How Temperature And Environment Affect Duty Cycle
Duty cycle is always linked to temperature. The hotter the room, the shorter the safe welding time.
Ambient Temperature
Most home garages are 20-30°C (68-86°F), but in summer or in factories, it can be 40°C (104°F) or more. Higher temperatures mean the machine will get hot faster and need longer breaks.
Dust And Airflow
Dust can block cooling fans or vents, making it harder for the machine to cool. Always keep the machine clean and in an open space.
Sunlight
Welding outdoors in direct sun can heat up the machine quickly. Shade the machine if possible.
Table: How Temperature Changes Duty Cycle
| Rated Duty Cycle (at 25°C) | Amps | Estimated Duty Cycle at 40°C |
|---|---|---|
| 60% | 200A | 40-45% |
| 100% | 150A | 80-85% |
| 30% | 180A | 18-22% |
Always use the lower number for safety if you are not sure of your workshop temperature.
How To Read A Duty Cycle Chart
Most manuals have a chart or curve that shows how long the machine can run at different amperages. Find the chart for your machine and see where your usual work fits.
- The vertical axis shows amperage.
- The horizontal axis shows duty cycle percentage.
Follow the curve to see how reducing amperage increases duty cycle. This helps you plan your work and avoid mistakes.
Signs Of Duty Cycle Overload
If you push your welding machine too hard, you will see warning signs. Watch for these:
- The machine gets very hot to touch.
- The arc becomes unstable or weak.
- The machine shuts off (if it has thermal protection).
- You smell burning or see smoke from the machine.
- The welds become poor in quality.
If you see any of these, stop welding and let the machine cool fully before starting again. Ignoring these signs can ruin your welder permanently.
Extending Machine Life Through Duty Cycle Awareness
Respecting the duty cycle is one of the best ways to keep your welding machine working for years. Here are practical tips:
- Always know your machine’s duty cycle at the amps you use.
- Plan your work in short runs, not long, continuous welds.
- Clean the machine often, especially the vents and fans.
- Store the machine in a cool, dry place.
- If you need to weld a lot, invest in a bigger machine.
Many welders who follow these rules use the same machine for 10 years or more with few problems.
Frequently Asked Questions
What Happens If I Ignore The Duty Cycle?
If you keep welding past the duty cycle, the machine will overheat. This can cause internal damage, melted wires, or even fire. Some machines will shut off automatically, but not all have this feature. Always follow the duty cycle to protect your machine and stay safe.
Can I Improve My Welding Machine’s Duty Cycle?
You cannot change the built-in limit, but you can help the machine stay cool. Use lower amperage, keep vents clean, and work in a cool area. These steps help the machine run closer to its maximum safe time, but you cannot make a 40% machine work like a 100% one.
Does The Duty Cycle Matter For Home Projects?
Yes, even for small projects, duty cycle is important. You may not notice problems right away, but ignoring the duty cycle wears out the machine faster. It also means you might have to stop in the middle of a job if you overheat the machine.
How Do I Know What Duty Cycle My Welder Has?
Look at the label on the machine or in the user manual. It will show the duty cycle at different amperages. If you cannot find it, check the manufacturer’s website or ask the seller. Always use the official numbers, not guesses.
Where Can I Read More About Welding Safety And Machine Ratings?
A good resource is the Wikipedia welding page. You will find detailed explanations about welding processes, safety, and standards.
A welding machine’s duty cycle is a key factor for safety, efficiency, and machine life. Take the time to understand and respect it, and your welding work will be smoother, faster, and more reliable. Always check the duty cycle before you buy, and use your machine wisely for the best results.
Credit: www.basicwelding.co.uk