
Disclosure: This post contains affiliate links and I will be compensated if you make a purchase after clicking through my links. Learn More
Welding with a stick welder can be simple or complex, depending on your setup and the metal you want to join. Many people start stick welding because the machines are reliable, work in different weather, and cost less than other types. But one challenge is knowing the right settings for your machine. If you set the amps, polarity, or electrode size wrong, you may get weak welds, too much spatter, or burn through the metal. This is why a stick welder settings chart is so important. It acts like a guide, helping both beginners and skilled welders get better results every time.
This article explains what a stick welder settings chart is, why it matters, and how to use it for different metals and electrodes. You will find clear tables, examples, and tips for both new and experienced welders. By the end, you will understand how to adjust your welder for safe, clean, and strong welds.
What Is A Stick Welder Settings Chart?
A stick welder settings chart is a simple reference showing the best machine settings for different jobs. It usually lists important details such as:
- Electrode type and size
- Recommended amperage (amps)
- Polarity (DC or AC)
- Metal thickness
Most stick welders (also called SMAW or Shielded Metal Arc Welders) use these charts to help set up the machine fast. The chart removes guesswork, so you do not have to try many settings before starting.
For example, if you want to weld 1/8” mild steel with a 6011 electrode, the chart tells you the best amp range. If you choose the wrong settings, you might get a weak joint or ruin your workpiece.
Why The Right Settings Matter
Good welds need the correct settings for the metal and electrode. If you use too much power (amps), the metal may melt too fast, causing holes. If you use too little, the electrode sticks, and you get poor fusion. Polarity also affects how the arc forms and how deep it penetrates.
Many beginners think they can just “feel” what is right. But even skilled welders check the chart, especially with new electrodes or metals. Using a chart saves time and money. It also protects your safety by reducing spatter and poor welds.
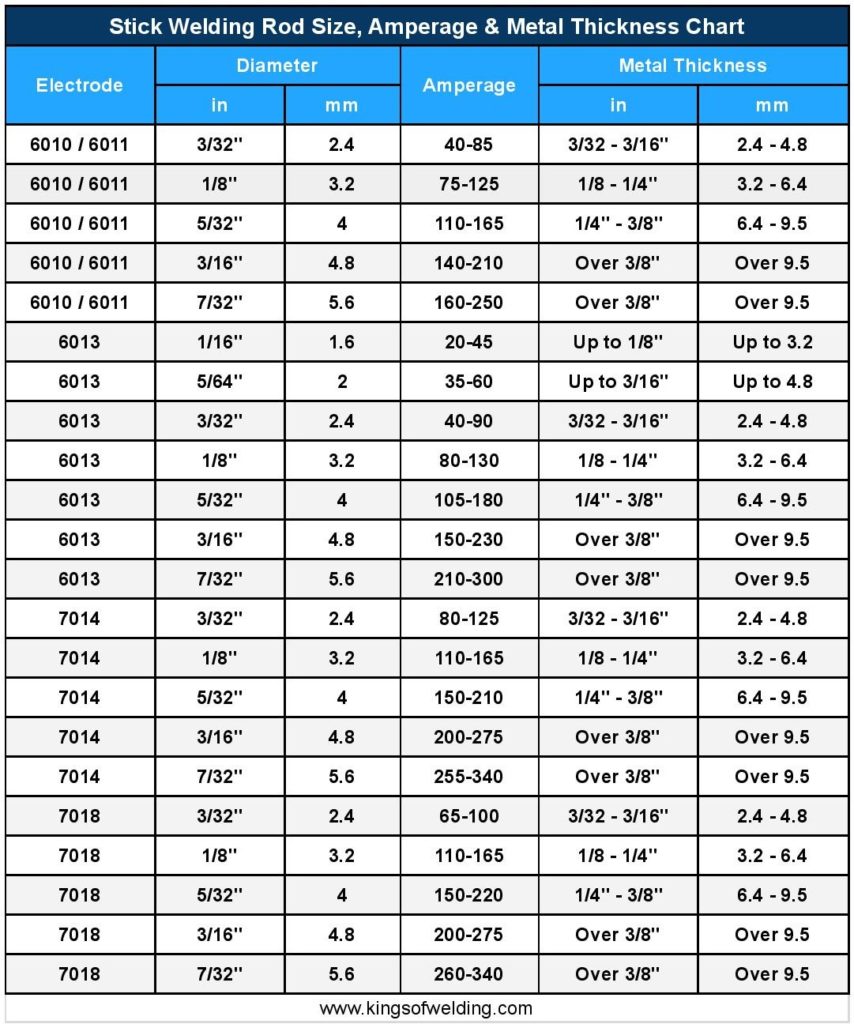
Credit: www.kingsofwelding.com
Key Factors On A Stick Welder Settings Chart
Understanding each part of the chart is important. Here is what you will usually find:
Electrode Type
Common stick electrodes include:
- 6010 (deep penetration, fast-freeze)
- 6011 (all position, works with AC and DC)
- 6013 (smooth bead, low spatter)
- 7018 (strong welds, low hydrogen)
Each type has a number for a reason. For example, “60” means 60,000 psi tensile strength, “1” means all position, and “8” means low hydrogen coating.
Electrode Size
Sizes range from 1/16” (small) to 1/4” (large). Thicker electrodes weld thicker steel. The chart shows the best amp range for each size.
Amperage
This is the main setting. Too low, and the rod sticks. Too high, and you burn through. The chart gives a range, such as 90–140 amps for a 1/8” 7018 rod.
Polarity
Most electrodes work with DC+, DC-, or AC. The chart tells you which to use. For example, 7018 rods usually need DC+ (reverse polarity), but 6011 can work with both AC and DC.
Metal Thickness
Thicker metals need more amps and bigger rods. The chart matches electrode size to steel thickness.
Common Stick Welder Settings Chart Example
Below is a typical stick welder settings chart for mild steel. This gives a clear idea of how each factor relates.
| Electrode | Size (inches) | Amperage Range (amps) | Polarity | Metal Thickness (inches) |
|---|---|---|---|---|
| 6010 | 3/32 | 40–85 | DC+ | 1/16–1/8 |
| 6011 | 1/8 | 75–125 | AC/DC+ | 1/8–1/4 |
| 6013 | 5/64 | 30–60 | AC/DC | 1/16–1/8 |
| 7018 | 3/32 | 70–110 | DC+ | 1/16–1/8 |
This chart is a starting point. You may need to adjust slightly for your machine, your welding style, or position.
How To Read And Use A Stick Welder Settings Chart
To get the best results, follow these steps when using a chart:
- Identify your metal type and thickness. Measure the steel or other material you plan to weld.
- Choose the correct electrode type. For example, use 7018 for strong, clean welds on new steel.
- Pick the right electrode size. Thicker metals need thicker rods.
- Set the amperage. Use the range shown, and start near the middle value.
- Set the polarity. Switch your machine to AC, DC+, or DC- as the chart shows.
Try a test weld first. If the rod sticks or the weld looks poor, adjust the amps up or down by 5–10. Watch the bead shape and listen for a steady arc.
Stick Welder Settings For Different Electrodes
Different electrodes need different settings. Here’s a closer look at the most common types.
6010 Electrodes
- Deep penetration
- Used for dirty or rusty steel
- Needs DC+ only
- Best for root passes and pipe welding
Settings example:
- 3/32” rod: 40–85 amps
- 1/8” rod: 75–125 amps
6011 Electrodes
- Works with AC and DC
- Good for farm, repair, or outdoor work
- Cuts through rust, paint, and dirt
Settings example:
- 3/32” rod: 40–90 amps
- 1/8” rod: 75–125 amps
6013 Electrodes
- Smooth, clean bead
- For clean sheet metal or thin stock
- Works with small welders
Settings example:
- 1/16” rod: 20–40 amps
- 3/32” rod: 40–90 amps
7018 Electrodes
- Low hydrogen, strong welds
- Used for critical jobs (bridges, frames)
- Needs DC+ (some types work with AC)
Settings example:
- 3/32” rod: 70–110 amps
- 1/8” rod: 90–150 amps
Comparing Electrode Types
Here’s a comparison table for quick reference:
| Electrode | Polarity | Strength (psi) | Best Use |
|---|---|---|---|
| 6010 | DC+ | 60,000 | Pipes, root passes |
| 6011 | AC/DC+ | 60,000 | Repair, dirty metal |
| 6013 | AC/DC | 60,000 | Sheet metal, thin steel |
| 7018 | DC+ (some AC) | 70,000 | Structural, strong welds |
Adjusting Settings For Metal Thickness
The thickness of your workpiece is a key factor. Thin metals need less heat; thick metals need more. The electrode size should match the job.
- For 1/16” to 1/8” steel: Use 3/32” electrodes, 40–90 amps.
- For 1/8” to 1/4” steel: Use 1/8” electrodes, 90–150 amps.
- For over 1/4” steel: Use 5/32” or 3/16” electrodes, 120–250 amps.
Welding thin metal with thick electrodes often leads to burn-through. For thin metal, lower the amps and use a smaller rod.
Fine-tuning: Arc Length, Angle, And Speed
Settings on the machine are important, but your welding technique matters too.
- Arc length: Keep the gap between the rod and metal about the same as the rod’s diameter. Too far, and the arc may go out. Too close, and the rod sticks.
- Travel angle: Hold the electrode at 10–15° from vertical (push or drag, as needed).
- Travel speed: Move slowly enough for good fusion, but not so slow that you build up a big bead.
Most charts do not show these factors, but they affect your final weld. Many beginners forget to adjust their hand position when changing settings.
Polarity: What It Means And Why It Matters
Polarity controls how current flows through the electrode. Most stick welders have three options:
- AC (Alternating Current): Changes direction, works with basic rods like 6011 and 6013.
- DC+ (Direct Current Electrode Positive): Electrode is positive, more penetration and heat.
- DC- (Direct Current Electrode Negative): Less penetration, sometimes used for thin metals.
The chart shows which polarity works for each rod. For example, 7018 rods need DC+ for best results, but you can buy AC-compatible 7018 rods.
Settings For Aluminum And Stainless Steel
Most stick welding is for mild steel, but some jobs use other metals.
Aluminum
Stick welding aluminum is not common. Special rods (such as 4043) are needed, and settings are different.
- Use high amps (about 180–250 for 1/8” rods)
- Use AC polarity
- Clean the metal well before welding
Aluminum welds can look rough. Stick is not the best process, but you can do repairs if needed.
Stainless Steel
Use special stainless rods (like 308 or 312). Settings vary, but start around:
- 3/32” rod: 60–90 amps
- 1/8” rod: 80–110 amps
- Use DC+ polarity
Stainless needs a clean surface and steady travel to prevent cracking.

Credit: www.arccaptain.com
How To Use A Settings Chart For Overhead And Vertical Welds
Welding out of position (overhead, vertical, or uphill) changes the settings you need.
- Use the lower end of the amp range to reduce spatter and sag.
- Hold a tighter arc to control the weld pool.
- Some rods (6010, 6011, 7018) are rated “all position,” but 6013 is harder to use overhead.
If your chart gives a range, start at the lower number for vertical or overhead work.
Common Beginner Mistakes With Stick Welder Settings
Even with a chart, beginners make a few common mistakes:
- Setting amps too high: This causes holes and burn-through.
- Setting amps too low: The rod sticks or the weld is weak.
- Wrong polarity: The arc does not start, or the bead is poor.
- Wrong rod size: Thick rods on thin metal cause problems.
- Ignoring test welds: Always do a test on scrap steel.
One extra tip: Always check your connections. Loose leads or clamps can cause a weak arc, no matter what the settings are.
How Weather And Welding Position Affect Settings
Outdoor welding (in wind or rain) may need higher amps because the arc loses heat. Weld position also matters:
- Flat position: Use the normal amp range.
- Vertical or overhead: Drop the amps by 5–10% to control the puddle.
Charts often show a single range. Use common sense and adjust for your job conditions.
How To Make Your Own Settings Chart
Some welders make their own charts after testing on different jobs. Here’s how:
- Track your best settings for each rod, metal, and position.
- Write down the amp range, polarity, and results.
- Test with different machines if you use more than one brand.
- Update your chart as you learn new techniques.
A personal chart helps you repeat good results and avoid mistakes.
Example: Stick Welder Settings For Common Jobs
Here are examples of common welding jobs and the best settings to start with.
Repairing A Trailer Frame (mild Steel, 1/8” Thick)
- Electrode: 6011 or 7018, 1/8”
- Amps: 90–130
- Polarity: DC+ (or AC for 6011)
- Tip: Clean the joint well, use short beads
Building A Gate (sheet Metal, 1/16” Thick)
- Electrode: 6013, 3/32”
- Amps: 40–70
- Polarity: AC or DC
- Tip: Use a small rod, low amps, and fast travel
Welding Pipe (root Pass, 6010, 3/32”)
- Amps: 40–85
- Polarity: DC+
- Tip: Use a tight arc, move uphill
Stainless Exhaust Repair (1/16” Thick)
- Electrode: 308L, 3/32”
- Amps: 60–80
- Polarity: DC+
- Tip: Clean well, use short beads
Table: Stick Welder Settings For Different Metals
Here is a quick reference for mild steel, stainless, and aluminum.
| Metal | Electrode | Size (inches) | Amps | Polarity |
|---|---|---|---|---|
| Mild Steel | 7018 | 1/8 | 90–150 | DC+ |
| Stainless Steel | 308L | 3/32 | 60–90 | DC+ |
| Aluminum | 4043 | 1/8 | 180–250 | AC |

Credit: bakersgas.com
Practical Tips For Better Stick Welding
- Always clean your metal before welding. Dirt, rust, and oil ruin the arc.
- Use the right rod for the job. Don’t use a 7018 on rusty steel.
- Keep rods dry. Store in a sealed container or rod oven.
- Check your ground clamp. A poor ground causes weak arcs.
- Keep extra rods and tips ready. Changing rods during a weld can affect quality.
- Wear proper safety gear. Use gloves, helmet, and long sleeves.
Non-obvious Insights Most Beginners Miss
- Machine age and type affect settings. Older or cheaper machines may need more amps to get the same result as a new inverter.
- Extension cords reduce power. If you use a long cord, you may lose some amps. Adjust your settings higher to compensate.
- Voltage drop matters. If you weld far from your power source, the arc can get weak, even at the right amp setting.
- Humidity affects rods. Wet rods cause poor welds and more spatter. Keep them dry, especially low hydrogen types like 7018.
- Small changes matter. Moving the amp dial even 5 amps can change the bead and arc. Don’t be afraid to make small adjustments.
How To Troubleshoot Poor Welds
If your welds look bad, use this checklist:
- Sticking rod: Increase amps, check for clean metal.
- Burn-through: Lower amps, use a smaller rod.
- Porosity (holes): Clean metal better, dry rods, reduce arc length.
- Spatter: Lower amps, improve technique, use the right rod.
- Cracks: Preheat thick steel, use proper rod for the metal, avoid moving too fast.
Keep notes on what works to improve each time.
Stick Welder Settings Chart And Safety
Always put safety first:
- Do not weld near flammable materials.
- Use gloves and a helmet with the right shade.
- Work in a ventilated area to avoid fumes.
- Let rods cool before touching.
Charts do not cover safety, but bad settings can cause dangerous situations. For example, too high amps can make hot metal spit or explode.
Where To Find Stick Welder Settings Charts
Most manufacturers include a chart in the welder manual or on their website. Some rods also have settings printed on the box. For more detailed charts, check trusted resources like:
lincoln Electric
Using charts from respected brands helps you start with proven settings.
Frequently Asked Questions
What Does The Number On Stick Electrodes Mean?
The first two numbers are the tensile strength (in thousands of psi). The third number shows welding position (1 = all positions, 2 = flat/horizontal). The last number tells you the coating and current type.
Can I Use The Same Settings For All Stick Welders?
No. Different machines (old vs. new, AC vs. DC) may need different settings, even with the same rod. Always test before starting your job.
What Happens If I Use The Wrong Polarity?
The arc may not start or the weld may look poor. For example, using DC- with a 7018 rod gives weak welds. Check the chart and your machine.
How Do I Know If My Amps Are Set Right?
A good weld has a steady arc, little spatter, and a smooth bead. If the rod sticks or the bead is tall, raise the amps. If you burn holes, lower the amps.
Do I Need A Chart For Every Welding Job?
You do not need a chart for every job, but using one helps avoid mistakes. Experienced welders may adjust by feel, but charts are best for repeatable, safe results.
Making strong, clean welds with a stick welder is easier when you have the right information. A good stick welder settings chart gives you a clear starting point, but always test and adjust for your own tools and materials. By learning how to read and use these charts, you save time, avoid common mistakes, and get better results with every weld.

