
Disclosure: This post contains affiliate links and I will be compensated if you make a purchase after clicking through my links. Learn More
Mig welding square tubing is a skill that many welders, fabricators, and DIY builders need. This process connects square steel tubes with strong, clean welds. If you want to build furniture, gates, frames, or even trailers, you will likely use MIG welding on square tubes. While MIG welding is known for its speed and ease, welding square tubing has its own rules and best practices. If you skip the details, you will get weak joints, burn-through, or ugly welds that need grinding.
This guide explains every part of MIG welding square tubing—from preparation to finishing—so you can work with confidence. You will learn how to set up your machine, choose the right gas, pick the best technique, and avoid common mistakes. Practical tips and real-world examples will help you weld square tubing safely and professionally, even if you are new to MIG welding.
What Is Mig Welding And Why Use It For Square Tubing?
MIG welding, or Metal Inert Gas welding, uses a wire electrode and shielding gas to join metal. The wire feeds through a gun and melts into the workpiece. The gas protects the weld from air, which keeps the joint strong. MIG welding is popular because it is fast, flexible, and works on many types of metal.
Square tubing is a hollow, rectangular steel shape. It is strong and often used for frames and structures. You find it in construction, auto shops, and home projects. MIG welding works well on square tubing because:
- The welds are clean and strong.
- You can weld quickly.
- It is good for both thick and thin tubes.
- You can weld in different positions.
Many professionals choose MIG for square tubing because it is reliable and gives good results with less effort than stick or TIG welding.
Types Of Square Tubing For Mig Welding
Not all square tubing is the same. You must know what you are welding to set up your MIG machine correctly.
Common materials for square tubing:
- Mild steel: Most common, easy to weld, comes in different wall thicknesses.
- Stainless steel: Resists rust, harder to weld, needs special wire and gas.
- Aluminum: Lightweight, needs a special MIG welder and spool gun.
- Galvanized steel: Coated to prevent rust; requires grinding off the coating at the weld area.
Most people weld mild steel square tubing. The thickness can range from 1/16” (1.6 mm) for light frames to 1/4” (6 mm) or more for heavy structures. Thinner tubing is easier to burn through, so you must adjust your settings.
Preparing Square Tubing For Mig Welding
Preparation is half the job. Skipping these steps leads to weak welds or messy work.
Cutting The Tubing
Cut your tubing as straight as possible. Use a chop saw, band saw, or angle grinder with a cut-off wheel. Clean, straight cuts help the tubing fit together well.
- Check angles with a square.
- Remove sharp edges with a file or grinder.
Cleaning The Metal
Clean metal welds better. Remove oil, paint, rust, and mill scale (the black surface layer on new steel).
- Use a wire brush, sanding disc, or grinder.
- For galvanized tubing, grind off the coating at least 1 inch from the joint. Breathing zinc fumes is dangerous.
Fitting And Clamping
Good fit-up is key. Poor gaps make welding harder.
- Align the pieces with a magnetic square or clamp.
- Tack weld the corners to hold them.
- Check the fit before final welding.
Beveling Edges (for Thick Tubing)
If your tubing is over 1/8” (3 mm) thick, grind a small bevel on the edges that meet. This lets the weld fill the joint, making it stronger.
Choosing The Right Mig Welder And Settings
Not all MIG welders can handle thick tubing. Choose a machine that matches your project.
Welder Power
- For tubing under 1/8” (3 mm): A 120V welder (up to 140 amps) is enough.
- For tubing over 1/8” (3 mm): A 220V welder (180 amps or more) is better.
Wire Type And Size
- ER70S-6 wire is standard for mild steel.
- Use .023” (0.6 mm) wire for thin tubing; .030” (0.8 mm) or .035” (0.9 mm) for thicker tubing.
Shielding Gas
Most MIG welders use a mix of 75% argon and 25% CO₂ (C25). This gives a smooth, low-spatter weld. Pure CO₂ is cheaper but gives more spatter and a rougher bead.
Basic Settings
Always check your manual, but here is a starting point:
| Material Thickness | Wire Size | Voltage | Wire Speed | Gas Flow (CFH) |
|---|---|---|---|---|
| 1/16” (1.6 mm) | .023” | 16-17V | 180-200 | 15-20 |
| 1/8” (3 mm) | .030” | 18-19V | 220-250 | 20-25 |
| 1/4” (6 mm) | .035” | 20-22V | 250-300 | 25-30 |
Start low and test on scrap tubing. Adjust until you get a smooth, flat bead.

Credit: www.youtube.com
Joint Types And Welding Positions
Square tubing can be joined in different ways. Each has its own best practices.
Joint Types
- Butt joint: Ends of two tubes meet edge to edge.
- Corner joint: Tubes meet at a 90-degree angle.
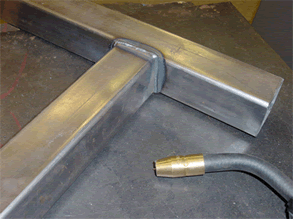
- T-joint: One tube meets the side of another, forming a “T.”
- Lap joint: One tube overlaps another.
Butt and corner joints are most common for frames. For strong welds, keep the gap small—ideally less than 1/16” (1. 6 mm).
Welding Positions
- Flat (1G/1F): Tubing lies flat; easiest position.
- Horizontal (2G/2F): Tubing is sideways.
- Vertical (3G/3F): Tubing stands up.
- Overhead (4G/4F): Tubing is above you; hardest position.
Flat welds are simplest. For other positions, you may need to lower voltage or wire speed to stop the weld from sagging.
Mig Welding Technique For Square Tubing
MIG welding square tubing is not just about pulling the trigger. Good technique gives strong, neat welds.
Gun Angle
Hold the gun at a 10-15 degree angle toward the direction you move. For inside corners, aim the wire at the joint center.
Stickout
Keep the wire stickout (distance from tip to metal) at 3/8” to 1/2” (9-13 mm). Too much stickout reduces heat and causes spatter.
Travel Speed
Move the gun steadily. Too slow causes burn-through or a tall bead. Too fast gives a skinny, weak weld.
Weave Or Straight?
For square tubing, use a straight drag (pull) or push motion. Only weave slightly if the tubing is thick. Small circles or a side-to-side motion can help fill wide gaps, but keep movements tight.
Tack Welds
Before final welding, place tack welds every few inches. This holds the tubing and stops distortion from heat.
Welding Sequence
Weld small sections at a time, moving from one side to the opposite. This keeps the tubing straight and reduces warping.
Welding Thin Vs Thick Square Tubing
Thin-walled tubing (under 1/8” or 3 mm) is easy to burn through. Thick tubing needs more heat but can crack if welded wrong.
Tips For Thin Tubing
- Use lower voltage and wire speed.
- Use .023” wire.
- Move the gun quickly.
- Stitch weld: Weld a short bead, then stop. Let the metal cool before the next bead.
- Use a copper backing bar to absorb heat and prevent burn-through.
Tips For Thick Tubing
- Use higher voltage and wire speed.
- Bevel the edges.
- Make multiple passes if needed: First a root pass, then fill, then cap.
- Weld slowly to allow the joint to fill.
Avoiding Common Mig Welding Mistakes On Square Tubing
Even experienced welders make mistakes. Here are problems to watch for:
Burn-through
Happens when the weld melts through thin tubing. Fix it by lowering heat, moving faster, or using smaller wire.
Porosity
Small holes or bubbles in the weld. Caused by dirty metal, poor gas coverage, or wind. Clean the metal well and keep your gas nozzle close to the weld.
Cold Lap
The weld sits on top without melting into the tubing. Increase voltage or slow down your travel speed.
Warping
Heat can bend your tubing. Use tack welds, alternate welding sides, and clamp well.
Spatter
Hot metal drops around the weld. Clean your nozzle often and use the right settings.
Credit: www.westermans.com
Safety Tips For Mig Welding Square Tubing
Welding creates heat, sparks, and fumes. Stay safe with these steps:
- Wear a proper auto-darkening helmet with the right shade.
- Use welding gloves, a fire-resistant jacket, and closed shoes.
- Work in a ventilated area. If you weld galvanized tubing, use a respirator or grind off the coating.
- Keep a fire extinguisher nearby.
- Never weld near flammable materials.
Special insight: Beginners often forget that even after welding, the tubing stays hot for a long time. Never touch it without gloves, even if it looks cool.
Finishing Welded Square Tubing
A good weld is not finished until you clean and inspect it.
Removing Slag And Spatter
MIG welding makes less slag than stick welding, but you will get some spatter. Use a chipping hammer, wire brush, or grinder to clean up.
Checking Weld Quality
Look for these signs of a good weld:
- Smooth, even bead
- No cracks or holes
- Good penetration (weld melted into both pieces)
- No sharp undercut at the edges
Tap the weld gently with a hammer. If it chips or cracks, it is not strong enough.
Grinding And Painting
If appearance matters, grind the weld smooth with a flap disc. Wipe the tubing with acetone or alcohol. Then, paint or coat the tubing to stop rust.
Tip: Many beginners rush this part. Taking time to finish makes your project look and last better.
Examples: Common Projects With Mig Welded Square Tubing
MIG welded square tubing is used for many things. Here are a few real projects:
1. Table Or Workbench Frame
A strong table frame uses 1” x 1” (25 x 25 mm) tubing, about 1/16” to 1/8” thick. Weld butt and corner joints. Clamp tightly so the frame stays square.
2. Gates And Fences
For outdoor gates, use 1-1/2” x 1-1/2” (38 x 38 mm) tubing, often 1/8” thick. MIG welds make strong, neat corners. Galvanize or paint for weather protection.
3. Trailer Frames
Heavy-duty trailers need 2” x 2” (50 x 50 mm) tubing, 1/8” to 1/4” thick. Use multiple passes for thick joints. Check for cracks after each weld.
4. Shelving Units
Shelving frames use light tubing, 3/4” x 3/4” (19 x 19 mm), under 1/16” thick. Use short welds to avoid burning through.
5. Automotive Roll Cages
Roll cages use round or square tubing, often 1-3/4” (45 mm) diameter, 0. 120” (3 mm) wall. Welds must be strong and neat for safety.
Extra insight: Many beginners try to weld long beads on thin tubing, which leads to warping. Always use short welds and let the tubing cool.
Comparing Mig To Other Welding Methods For Square Tubing
You may wonder if MIG is the best choice. Here’s how it compares to stick and TIG welding:
| Method | Speed | Skill Needed | Best For | Downsides |
|---|---|---|---|---|
| MIG | Fast | Beginner | Thin to medium tubing | Needs clean metal, gas bottle |
| Stick | Medium | Intermediate | Outdoor, thick tubing | Messy, more spatter |
| TIG | Slow | Advanced | Thin, precise work | Hard to learn, slow |
MIG is the easiest and fastest method for most square tubing jobs.
Advanced Tips For Better Mig Welding Results
Once you are comfortable, these tips help you improve your welds:
- Preheat thick tubing: If welding very thick tubing, preheat with a torch to 200-300°F. This prevents cracking.
- Use anti-spatter spray: Spray around the joint to make cleanup easier.
- Backstep welding: Start each bead from the middle of the last weld and move away. This reduces warping.
- Joint reinforcement: Add small gusset plates to high-stress corners for extra strength.
- Check gas hose leaks: Even a small leak can ruin weld quality.
Non-obvious insight: Many people ignore the grounding clamp. Always connect it to clean, bare metal on your workpiece, not a painted or rusty spot. This ensures a stable arc.
Troubleshooting Mig Welding Problems On Square Tubing
Problems happen. Here is how to fix the most common ones:
Problem: Weld Bead Too High
- Cause: Travel speed too slow or voltage too low.
- Fix: Increase voltage or move faster.
Problem: Weld Undercut (groove At Edge)
- Cause: Too much voltage or travel speed.
- Fix: Lower voltage or slow down.
Problem: Noisy Arc, Excessive Spatter
- Cause: Wrong wire speed or poor ground.
- Fix: Adjust wire speed, check ground clamp connection.
Problem: Wire Feeds But No Arc
- Cause: Poor connection or out of gas.
- Fix: Check cables, make sure gas is on.
| Problem | Possible Cause | Solution |
|---|---|---|
| Popping sound | Wire speed too high | Lower wire speed |
| Porous weld | Dirty metal, low gas | Clean metal, increase gas flow |
| Burn-back (wire fuses to tip) | Stickout too short | Increase stickout |

Credit: www.youtube.com
Essential Tools And Accessories For Mig Welding Square Tubing
You need more than just a welder.
- Auto-darkening helmet
- Welding gloves and jacket
- Angle grinder with grinding and cutting discs
- Wire brush
- Magnetic squares and clamps
- Measuring tape and marker
- Chipping hammer
- MIG pliers for cleaning the nozzle
- Fire extinguisher
Extra insight: Many new welders skip good clamps. Using strong clamps makes your welds straighter and less frustrating.
Learning Resources And Certifications
If you want to get better, consider training and certifications. Many community colleges offer short courses. The American Welding Society (AWS) has standards and tests for professionals. You can learn a lot from online videos and forums, but nothing beats hands-on practice.
For more technical details, visit the Wikipedia page on Gas Metal Arc Welding.
Frequently Asked Questions
What Is The Best Wire Size For Mig Welding Square Tubing?
For tubing under 1/8” (3 mm) thick, use .023” wire. For thicker tubing, use .030” or .035”. Smaller wire helps avoid burn-through on thin metal.
Do I Need To Bevel Square Tubing Before Welding?
Beveling is best for tubing over 1/8” (3 mm) thick. It lets the weld fill the joint and makes it stronger. For thin tubing, keep the edges square.
Can I Mig Weld Galvanized Square Tubing?
Yes, but you must grind off the zinc coating at least 1 inch from the weld area. The fumes are toxic, so always work in a well-ventilated space or use a respirator.
Why Does My Weld Have Holes And Bubbles?
This is called porosity. It happens when the metal is dirty or the shielding gas does not cover the weld. Clean your tubing well and keep the gas nozzle close to the joint.
How Do I Keep Square Tubing Straight While Welding?
Clamp the tubing tightly and use tack welds at each corner before final welding. Weld small sections, moving from side to side, to balance heat and reduce warping.
Final Thoughts
MIG welding square tubing is a practical skill that helps you build strong, clean structures. With the right machine, proper setup, and careful technique, you can produce professional results—whether you are building a table, a gate, or a trailer. Pay attention to preparation, use the correct settings, and always work safely.
The more you practice, the better your welds will look and perform. Take your time, check your work, and you will see clear progress with every project.

