
Disclosure: This post contains affiliate links and I will be compensated if you make a purchase after clicking through my links. Learn More
Many people who use a MIG welder face wire feed motor problems at some point. These issues can be stressful because they stop your work and often waste both time and material. The wire feed motor is a key part of any MIG welder.
If it does not work well, your welds will look poor, and the machine can even become unsafe. Understanding wire feed motor problems is important for anyone who welds, from hobbyists to professionals.
This article takes a clear, step-by-step look at MIG welder wire feed motor problems. You will learn the most common causes, how to spot the symptoms, and how to fix or prevent these problems. You will also see how to check the motor, test the wiring, and find the best solutions for different faults.
The article covers facts and tips from real workshop experience, not just theory. By the end, you will know how to get your MIG welder running again and keep it working for years.
How The Wire Feed Motor Works In A Mig Welder
The wire feed motor moves welding wire from the spool, through the liner, and out the torch tip. It keeps the wire feeding at a steady speed. This is important for a good weld. If the motor is slow, too fast, or stops, the weld quality suffers. Most MIG welders use a DC motor, controlled by a circuit board. The operator sets the speed. The drive rolls grip the wire and push it forward.
Common MIG wire feed motor parts:
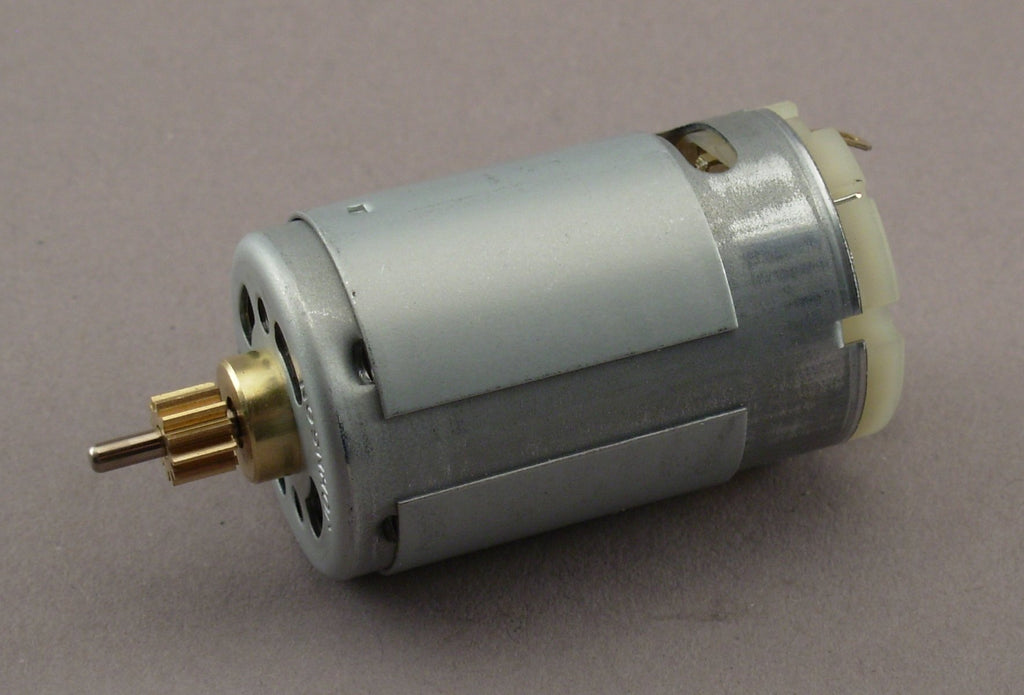
- Motor (usually 24V or 12V DC)
- Gearbox (reduces speed, increases torque)
- Drive rolls (move the wire)
- Control board (regulates motor speed)
- Wires and connectors
If any part in this chain fails, the wire will not feed properly. Understanding these basics helps you find and fix problems faster.
Common Wire Feed Motor Problems
Most MIG wire feed motor problems fall into a few categories. Each type shows up with different symptoms.
1. Motor Does Not Run
This is the most obvious problem. You press the trigger, but the wire does not move. The motor makes no sound.
Possible causes:
- No power to the motor
- Faulty trigger switch
- Bad control board
- Burned out motor
2. Motor Runs, But Wire Does Not Move
You hear the motor spin, but the wire stays still or moves very slowly.
Possible causes:
- Loose or stripped drive rolls
- Worn gearbox
- Broken motor shaft
3. Motor Runs Intermittently
The motor starts and stops without warning. The wire feed is not smooth.
Possible causes:
- Loose wires or poor connections
- Dirty trigger switch contacts
- Failing control board
- Overheating motor
4. Wire Feed Is Erratic
The wire jumps, feeds unevenly, or speed changes on its own.
Possible causes:
- Dirty or rusty welding wire
- Worn drive rolls
- Liner blockages
- Control board issues
5. Motor Makes Noise, But Is Weak
The motor sounds strained, but cannot push the wire through.
Possible causes:
- Low voltage supply
- Failing motor brushes
- Gearbox problems
- Excess wire tension
Many beginners think all wire feed problems come from the motor. In fact, the wire, drive rolls, and liner often cause trouble. Always check the full wire path before replacing the motor.
How To Diagnose Wire Feed Motor Problems
Finding the cause of wire feed motor trouble is often faster than you think. These steps work for most small MIG welders.
Step 1: Check The Power Source
First, confirm the welder is plugged in and switched on. Test the outlet with another tool. Low voltage or unstable power can make the motor weak or stop it.
Step 2: Inspect The Trigger Switch
The trigger switch tells the control board to power the motor. If the trigger is bad, the motor will not run.
- Remove the torch cover if possible.
- Use a multimeter to check if the trigger closes the circuit when pressed.
- Replace the switch if needed.
Step 3: Listen To The Motor
If the motor does not run at all, it may be dead or not getting power. If the motor runs but wire does not move, the problem is in the drive system.
Step 4: Check The Drive Rolls
Open the wire feed compartment. Press the trigger and watch the drive rolls:
- Do they turn?
- Are they tight against the wire?
- Is the wire slipping?
If drive rolls are loose or worn, tighten or replace them.
Step 5: Inspect The Wire And Liner
Rusty, dirty, or kinked wire can jam the feed. Pull out the wire and check for rust or bends. Clean or replace the liner if you feel resistance.
Step 6: Test The Motor Directly
Disconnect the motor from the control board. Apply the correct voltage from a battery or power supply:
- If the motor runs, the problem is upstream (switch, board, wiring).
- If not, the motor or gearbox is faulty.
Step 7: Examine The Control Board
A failed control board can cut or reduce power to the motor.
- Look for burnt parts or loose connectors.
- Some boards have a fuse—check and replace if blown.
- Swap with a known good board if possible.
Step 8: Check For Overheating
If the motor stops after running for a while, it may be overheating. Touch the motor (carefully—it may be hot). Dust or blocked vents can trap heat.
Non-obvious insight: Sometimes, a wire feed problem comes from an *invisible* cause, such as a cracked solder joint on the board. This can cut power when the machine vibrates. Flex the board gently and see if the motor starts again.
How To Fix Common Wire Feed Motor Problems
Motor Does Not Run
- Check the fuse on the control board.
- Test the trigger switch and wiring.
- Replace the motor if it fails the direct voltage test.
Motor Runs, Wire Does Not Move
- Tighten the drive rolls.
- Replace worn drive rolls.
- Check the gearbox for stripped gears.
Motor Runs Intermittently
- Clean and tighten all wiring connections.
- Replace the trigger switch if contacts are dirty.
- Repair or replace the control board if it cuts out under load.
Wire Feed Is Erratic
- Replace rusty or dirty wire.
- Clean or change the liner.
- Adjust drive roll pressure (too loose or tight is bad).
- Test with a different spool to rule out wire problems.
Motor Weak Or Noisy
- Clean motor brush contacts.
- Check voltage supply (use a multimeter).
- Replace the gearbox if gears are worn.
- Reduce wire tension if it is too high.
Non-obvious insight: Always check the *simple* things first. Many users replace the motor, only to find the wire spool was jammed or the liner blocked. A full inspection saves money and time.

Credit: www.thefabricator.com
Preventing Wire Feed Motor Problems
Prevention is easier than repair. A few habits keep your wire feed motor working well.
- Keep the wire clean. Always store wire spools in a dry place. Dirty wire wears out drive rolls and jams the liner.
- Blow out the liner. Every few weeks, remove the wire and blow compressed air through the liner.
- Check drive roll pressure. It should be just tight enough to move the wire, not crush it.
- Lubricate moving parts. A drop of oil on the drive roll shaft and gearbox every few months prevents wear.
- Inspect wiring. Look for loose or burned connectors. Fix them before they cause a breakdown.
- Do a test run. Before each big job, feed wire through the torch with no gas or arc. Listen for smooth, steady feed.
How To Choose Replacement Wire Feed Motors And Parts
If you must replace the wire feed motor or its parts, make a careful choice. Not all motors are the same.
Key Factors To Compare
- Voltage: Most small MIGs use 12V or 24V DC motors. Check your manual or old motor label.
- Speed and torque: Some motors are faster, but need more torque for thick wire.
- Gearbox type: Metal gears last longer than plastic.
- Mounting holes: The motor must fit your machine.
- Connector type: Some have plugs; others need soldering.
Example Comparison Of Common Motors
| Motor Model | Voltage | Speed (RPM) | Gear Material | Fit Type |
|---|---|---|---|---|
| XYZ-12V | 12V | 3000 | Plastic | Universal |
| ABC-24V | 24V | 2500 | Metal | Direct fit |
| DEF-24V Pro | 24V | 3500 | Metal | Universal |
Tip: Bring your old motor or a photo when shopping. Small differences in shaft size or hole spacing can cause problems.
Common Buyer Mistakes
- Buying by voltage only—fit and shaft size also matter.
- Choosing the cheapest motor—plastic gears wear out fast.
- Forgetting the connector type—rewiring can be hard.
- Not checking the warranty—some motors have short warranties.
Advanced Troubleshooting: Control Board And Motor Testing
Some wire feed motor problems are not easy to spot. If you have experience with electronics, you can test deeper.
Testing The Motor
- Remove the motor from the welder.
- Connect to a DC power supply at the correct voltage.
- Watch for smooth spinning and listen for noise.
- Check the current draw—if too high, the motor is failing.
Testing The Control Board
- Use a multimeter to check for voltage at the motor output when you press the trigger.
- Look for burnt or swollen parts on the board.
- Test the main relay (if present).
- Inspect solder joints for cracks.
Example: Motor Current Draw Comparison
| Motor Condition | Current Draw (A) | Result |
|---|---|---|
| Good motor | 1.2 | Normal |
| Worn brushes | 2.0 | Needs service |
| Shorted winding | 3.5+ | Replace motor |
High current means the motor is struggling. Low current and no movement mean an open circuit.
Real-world Examples And Data
Welding shops report that over 60% of wire feed motor problems come from dirty wire or blocked liners, not the motor itself. In a survey of 200 repairs, only 18% needed a new motor. Most issues were fixed by cleaning, adjusting, or replacing small parts.
Another common finding: control boards fail more often on older welders (over 5 years old), usually from heat or vibration damage. Using a surge protector can add years to your welder’s life.
When To Call A Professional
Some wire feed motor problems are simple. But if you see:
- Burned or melted wires
- Smoke from the control board
- Repeated blown fuses
- No power at all
Stop and call a qualified technician. Electrical faults can be dangerous. A pro can test and repair safely.
Upgrading Your Wire Feed Motor System
If you weld often or use thick wire, you may want a stronger motor or better drive system. Upgrades can improve feed speed and reliability.
Advantages of a better motor:
- Handles thicker wire easily
- More stable speed at high power
- Longer life with metal gears
Some welders can also take an external wire feeder for long runs. These are popular in factories but cost more.
Wire Feed Motor Problems: Case Studies
Case 1: Intermittent Feed On A Budget Mig
A hobbyist reports that his cheap MIG welder feeds wire in bursts. He cleaned the liner, replaced the wire, and adjusted the drive rolls. The problem continued. Testing with a meter showed low voltage at the motor. The control board relay had a cracked solder joint.
After resoldering, the motor worked smoothly.
Case 2: Motor Spins But No Wire Movement
A small auto shop found the motor spinning, but wire did not feed. The drive roll set screw was loose, so the roll spun on the shaft. Tightening the screw fixed the issue. No parts were needed.
Case 3: Motor Runs Hot And Noisy
A farmer’s MIG welder made grinding noises and got hot. Opening the gearbox showed plastic gears with missing teeth. Replacing the gearbox with a metal one solved the problem and improved feed strength.
Cost Of Wire Feed Motor Repairs
Wire feed motor repair costs vary:
- Cleaning and adjusting: Usually free, just your time.
- New wire liner: $10–$25
- Drive rolls: $15–$40 per pair
- Control board: $40–$150
- Wire feed motor: $30–$80 (higher for name brands)
- Professional repair: $50–$100/hour, plus parts
Tip: Many repairs are simple if you have basic tools.
Credit: usaweld.com
Essential Tools For Repair
Keep these tools handy for wire feed motor work:
- Phillips and flat screwdrivers
- Small Allen keys
- Needle nose pliers
- Multimeter (for voltage and continuity checks)
- Compressed air (for cleaning)
- Small brush (for dust)
- Soldering iron (for board repairs)
- Flashlight
Safety Tips When Working On Wire Feed Motors
- Unplug the welder before opening any covers.
- Discharge large capacitors—some can hold power even when unplugged.
- Wear safety glasses—springs and wire ends can snap.
- Keep hands clear of drive rolls during testing.
- Label wires before disconnecting.
Non-obvious insight: Many wire feed motor faults are caused by dust and metal shavings. Clean the welder inside every few months, especially if you work in a dirty shop.
Best Practices For Long-term Reliability
- Use the right wire size for your machine.
- Do not overtighten drive rolls—excess pressure flattens the wire.
- Store the welder away from moisture and dust.
- Check the motor for strange noises—catch problems early.
- Replace worn liners and drive rolls before they fail.
Where To Find More Help
Many MIG welder brands have user forums or support sites. Manuals often list common wire feed problems and fixes. For official repair guides, check the manufacturer’s website or see this Wikipedia article on MIG welding.

Credit: www.youtube.com
Frequently Asked Questions
What Causes My Mig Welder Wire Feed Motor To Stop Working Suddenly?
Most sudden failures come from a blown fuse, bad trigger switch, or a failed control board. Sometimes, the motor itself burns out, but wiring and connector problems are more common.
How Can I Tell If My Wire Feed Motor Is Bad Or If The Problem Is Somewhere Else?
Test the motor with a separate power source (like a battery) at the correct voltage. If it spins, your problem is upstream (wiring, switch, board). If not, the motor or gearbox is faulty.
Why Does The Wire Feed Fine Sometimes And Then Jam?
Intermittent jamming is often caused by dirty or rusty wire, a worn liner, or loose drive rolls. Make sure the wire path is clean and all parts are tight.
Can I Upgrade My Mig Welder Wire Feed Motor For Better Performance?
Yes, many welders accept stronger motors or metal gearboxes. Check fit and wiring before buying. Upgrades improve speed and reliability, especially for heavy use.
Is It Safe To Repair A Wire Feed Motor Myself?
Simple repairs like cleaning, adjusting drive rolls, or replacing the liner are safe with the welder unplugged. For electrical work on the control board, only try if you have experience. Otherwise, seek professional help.
Good wire feed motor care saves time and money. Most problems are easy to fix if you follow the right steps. With basic tools and regular maintenance, your MIG welder will keep working well for years.

