Disclosure: This post contains affiliate links and I will be compensated if you make a purchase after clicking through my links. Learn More
Stick welding, also known as Shielded Metal Arc Welding (SMAW), is one of the most widely used welding methods for construction, repair, and fabrication. Many welders, both new and experienced, often face problems when they need to restart a stick weld.
If you restart incorrectly, you might see defects such as porosity, cracks, undercut, or weak joints. These problems can make your welds unsafe, unattractive, or cause them to fail inspection.
Knowing how to restart a stick weld without defects is a key skill. Good restarts help your welds look better and last longer. They also reduce wasted time fixing mistakes. The process may sound easy, but there are many details that make a big difference.
Small changes in technique, cleaning, and preparation can prevent most defects. This guide will explain every step, offer clear examples, and share tips from practical experience.
You will learn why restarts cause problems, how to prepare your welds, which tools to use, how to adjust your technique, and what to do if you spot a defect. By following these steps, you can restart stick welds with confidence and achieve strong, clean results.
Why Restarts Often Cause Defects
Restarts in stick welding can create weak spots if not done right. When you stop and start again, you change the heat, the flow of the weld metal, and the connection to the base material. If you do not control these factors, defects are likely.
Common problems include:
- Porosity: Tiny holes inside the weld caused by trapped gas.
- Cracks: Small or large splits that start at the restart point.
- Inclusions: Slag or other material trapped in the weld.
- Poor fusion: Weak bond between the new weld and the old weld.
- Excess spatter: Drops of hot metal that stick near the weld.
These defects can appear for several reasons. Sometimes the end of the weld cools too quickly. Sometimes slag or rust is left behind. Other times, the wrong arc length or angle causes trouble.
Understanding The Stick Welding Process
Before you can restart a stick weld well, you must understand the process itself. Stick welding uses an electric arc to melt a metal rod (the electrode) and the base metal. The rod is covered with flux, which turns into gas and slag to protect the weld from air.
Here is how the process works:
- Strike the arc: The electrode touches the metal and pulls away, starting the arc.
- Melt the rod and base: Both the electrode and the base metal melt together.
- Form the weld pool: The molten metal creates a small pool.
- Protect the weld: Flux turns into gas and slag, covering the pool.
- Move along the joint: The welder keeps the arc at the right distance and angle.
- Cool and solidify: The metal cools and the slag forms a crust.
When you stop, the end of the weld is covered by solid slag. The metal underneath can also cool fast, making it harder to restart. To get a strong restart, you must remove the slag and prepare the area well.
Preparing For A Clean Restart
Preparation is the foundation for a good restart. Many welders rush this part and cause defects. You need to clean, inspect, and set up before you restart. Here is what you should do:
1. Remove All Slag
After you finish a weld pass and stop, use a chipping hammer or slag hammer to knock off the hard crust. Follow with a wire brush to clear away fine particles. Leftover slag will cause inclusions or porosity.
2. Check For Cracks Or Undercut
Look closely at the end of your weld bead. If you see a crack or a groove at the edge (undercut), grind it smooth before restarting. These flaws can spread under the new weld.
3. Clean The Surrounding Metal
Rust, oil, paint, or moisture near the restart spot can cause defects. Use a grinder, file, or sandpaper to clean the area at least 1 inch (25 mm) beyond the end. Wipe away dust with a dry cloth.
4. Inspect Your Electrode
A damaged or heavily worn electrode can make restarts difficult. If the tip is dirty, short, or has a poor flux coating, replace it.
5. Adjust Your Welder Settings
Check your machine’s amperage before you restart. Old electrodes or thick material may need a slightly higher setting. Too low can cause sticking or poor fusion.
Insight: Many welders overlook the importance of cleaning beyond just the weld bead. Always clean a wider area than you think you need. Even small specks of slag or rust outside the bead can cause defects to spread into your new weld.
Mastering The Restart Technique
Restarting a stick weld is not just about cleaning. The way you strike the arc, position the electrode, and move your hand is critical. Here are the best practices for a smooth, defect-free restart.
1. Start Slightly Ahead Of The Crater
Do not start directly in the middle of the crater (the hole left at the end of your last weld). Instead, place the electrode about 1/8 inch (3 mm) ahead of it.
- Why: The crater may have trapped gas or slag. Starting ahead allows fresh metal to fill the crater when you move back.
2. Strike The Arc At A 10–15° Angle
Hold the electrode at a slight angle, not straight up and down. This helps the arc start smoother and the flux burn off evenly.
- Tip: Use a “scratch start” (drag the rod briefly along the metal) if the arc is hard to start.
3. Move Back To Fill The Crater
After the arc starts, quickly move the electrode back into the crater to fill it with new weld metal. Pause for a moment to let the metal settle, then move forward along your weld path.
4. Match The Speed And Arc Length
Keep your arc length (distance from tip to metal) short—about the same as the diameter of the rod. Move at a steady speed to avoid lumps or undercut.
5. Overlap The Welds Smoothly
Overlap the new weld slightly onto the old bead. This helps blend them together and avoids weak spots.
Insight: Many beginners focus only on the arc start and ignore the movement after. It is just as important to move correctly after the arc strikes. Filling the crater and overlapping properly can prevent cracks and cold laps.
Credit: weldmongerstore.com
Tools And Materials That Affect Restarts
The right tools and materials make a big difference in your results. Some electrodes and machines are easier to restart than others.
Common Stick Electrodes For Restarts
- E6010: Good for deep penetration, easier to restart, but may leave a rough surface.
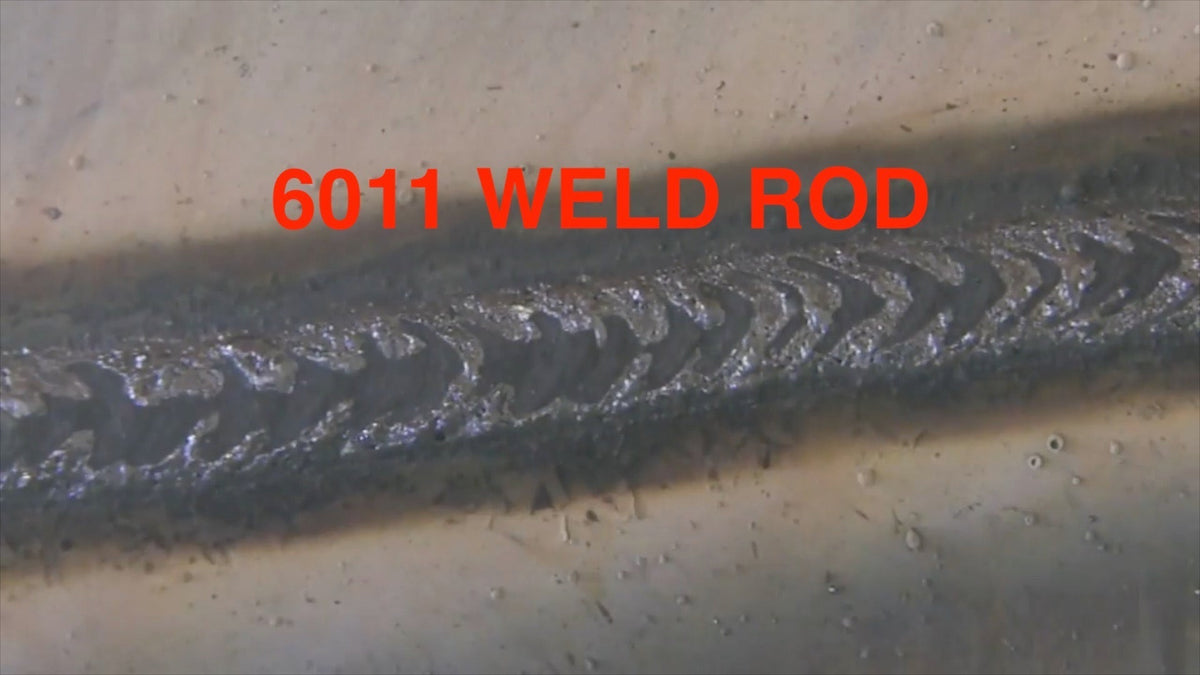
- E6011: Similar to 6010, works well with AC or DC, easy slag removal.
- E6013: Smooth arc, easy to restart, good for thin metal.
- E7018: Strong and clean, but the low-hydrogen coating is harder to restart if cooled.
Tip: E7018 electrodes are popular for strong welds but are sensitive to moisture and cooling. Store them in a rod oven and use them quickly after removing.
Electrode Size
Thicker rods need more heat and may be harder to restart. For small work or thin metal, use 3/32 inch or 2. 5 mm rods. For heavy work, 1/8 inch or larger is better.
Welding Machine
Older machines or those with poor arc control can make restarts harder. Newer inverter welders often have “hot start” features that help.
Cleaning Tools
- Chipping hammer
- Wire brush
- Angle grinder
- Sandpaper
Quality cleaning tools last longer and do a better job. Do not use worn-out brushes or broken hammers.
Practical Steps For A Defect-free Restart
Now, let’s go through the step-by-step process every time you need to restart a stick weld. This checklist can help you avoid most problems.
- Stop at a Good Place: If possible, finish your weld at a joint, corner, or spot where a restart will be less visible.
- Remove All Slag: Use your chipping hammer and wire brush to get the area spotless.
- Check for Flaws: Look for undercut, cracks, or other problems and repair them.
- Clean Around the Restart: Remove rust, paint, or oil with a grinder or sandpaper.
- Prepare the Electrode: Use a fresh rod if the old one is short or dirty.
- Check Your Settings: Make sure your welder is set to the correct amperage.
- Strike the Arc Ahead of the Crater: Start about 1/8 inch in front, not inside the crater.
- Move Back to the Crater: Fill it with new metal, then proceed.
- Overlap and Blend: Make sure the new weld blends smoothly into the old.
- Cool Slowly: Let the weld cool naturally to avoid cracks.
Common Mistake: Rushing the cleaning stage is the number one cause of defects at restarts. Take your time, even if it feels slow.
Comparing Electrode Restart Performance
Some electrodes are easier to restart cleanly than others. Here’s a comparison for common types:
| Electrode Type | Restart Ease | Common Defects | Best Use |
|---|---|---|---|
| E6010 | Easy | Spatter | Pipes, deep welds |
| E6011 | Easy | Rough bead | AC/DC, outdoor repair |
| E6013 | Very easy | Porosity if dirty | Thin metal, sheet work |
| E7018 | Harder | Crater cracks | Critical joints, structure |
Dealing With Common Restart Defects
Even with good technique, sometimes defects appear. Spotting and fixing them early saves time and money.
Porosity
Porosity is caused by trapped gas. If you see small holes in the weld bead after restarting:
- Cause: Slag or moisture was present, or the arc was too long.
- Fix: Grind out the defect and clean the area. Use a shorter arc and dry rods.
Cracks
Cracks often start at the crater or restart point.
- Cause: The area cooled too fast, or you did not fill the crater.
- Fix: Grind out the crack and restart, making sure to fill the crater and let it cool slowly.
Undercut
Undercut is a groove at the edge of the weld.
- Cause: Arc too long, electrode angle wrong, or moving too fast.
- Fix: Adjust your angle and speed; weld over the area to fill the groove.
Slag Inclusions
Slag trapped in the weld makes it weak.
- Cause: Poor cleaning or too fast a restart.
- Fix: Remove all slag before restarting. Slow down and overlap correctly.
Cold Lap
Cold lap is when the new weld metal does not fuse fully to the old weld.
- Cause: Low heat or poor technique.
- Fix: Increase amperage slightly and angle the rod for better fusion.
Tip: If you see any of these defects, do not just weld over them. Grind them out fully and fix the cause before trying again.

Credit: www.amazon.com.be
Advanced Techniques For Better Restarts
Once you master the basics, you can use some advanced tricks to get even better results.
Preheating
For thick or high-carbon steel, warming the metal with a torch before welding can prevent cracks.
- Heat the area to about 250–400°F (120–200°C) with a propane torch.
- This slows cooling and reduces stress.
Rod Manipulation
Try these movements for smooth restarts:
- Weave: Slight side-to-side motion helps blend the new weld into the old.
- Circle: Small circles fill the crater and avoid holes.
- Pause: Hold for a second at the start to fill any gaps.
Hot Start Feature
Many modern welders have a “hot start” setting. This gives extra current at the start of the weld, making arc strikes easier and reducing sticking. Check your machine’s manual.
Use Of Weld Backing
If you weld a joint that will have several passes, you can use a backing bar or strip behind the weld. This supports the pool and helps fill craters.
Controlled Cooling
Cover the weld with a blanket or insulating material to slow cooling, especially on thick parts or high-strength steel.
Practical Example: On a pipeline job, a welder used preheating and a backing strip. He made all restarts with the “hot start” setting and always ground out any cracks he found. His welds passed X-ray inspection with zero defects.
Comparing Cleaning Tools For Restarts
Choosing the right cleaning tool matters. Here’s a quick look at common tools:
| Tool | Best For | Speed | Finish Quality |
|---|---|---|---|
| Chipping Hammer | Breaking slag | Medium | Rough |
| Wire Brush | Fine particles | Fast | Smooth |
| Angle Grinder | Heavy cleaning | Very fast | Very smooth |
| Sandpaper | Final touch-up | Slow | Very smooth |
Insight: A cheap wire brush can shed bristles and scratch the base metal. Invest in a good quality brush and replace it if worn.
The Role Of Amperage In Stick Weld Restarts
Correct amperage is crucial for defect-free restarts. Too low, and the rod sticks or the weld is weak. Too high, and the metal burns through or spatters.
- E6013 (3/32″): 90–120 amps
- E7018 (1/8″): 110–150 amps
- E6010 (1/8″): 75–125 amps
Adjust your amperage within the recommended range based on the metal thickness and position. If you have trouble restarting, increase by 5–10 amps.
Practical Tip: Keep a test piece nearby. Before restarting on your actual work, strike an arc and weld on the test piece to check your settings.
Practice Makes Perfect
Restarting stick welds without defects is a skill you build with practice. Try these exercises:
- Practice restarts on scrap metal. Make a weld, stop, clean, and restart several times in a row.
- Try different rods. See which ones work best for your style.
- Test in various positions: Flat, vertical, and overhead.
Keep notes on what works and what causes problems. Over time, you will spot patterns and improve your results.
Safety Tips For Stick Welding Restarts
Working safely is always the first step. Stick welding can create sparks, fumes, and hot surfaces.
- Always wear a welding helmet with the correct shade.
- Use leather gloves and a long-sleeve shirt.
- Work in a well-ventilated area to avoid fumes.
- Keep a fire extinguisher nearby.
- Check all cables and connections before each restart.
Tip: Do not weld in wet or damp conditions. Moisture can cause electric shock and more porosity in your welds.
Common Myths About Stick Weld Restarts
There are many myths and half-truths about restarting stick welds. Here are a few:
- “You can just weld over slag.” This will always cause defects.
- “All rods restart the same.” Some are much easier than others.
- “Cracks at the restart will heal.” They usually get worse under stress.
- “Grinding is not needed if you brush hard.” Only grinding removes deep cracks or undercut.
Understanding these truths will help you avoid common mistakes.
How To Inspect Restarted Welds
After you finish your weld and restarts, inspect your work. Use these steps:
- Visual inspection: Look for holes, cracks, or uneven beads.
- Tap test: Tap with a hammer. A dull sound may mean porosity.
- Bend test: For test coupons, bend the weld to check for cracks.
- Grind and etch: For critical work, grind the bead flat and etch with acid to see inside.
For professional jobs, X-ray or ultrasonic inspection may be required. For most home or farm repairs, a careful visual check and tap test are enough.
Example: Restarting A Stick Weld On A Farm Gate
Suppose you are repairing a steel farm gate. The weld bead stops midway, and you need to restart.
- Clean the area with a grinder and wire brush.
- Knock off all slag with the hammer.
- Inspect for cracks or undercut. Grind smooth if needed.
- Use a new E6013 rod.
- Set your welder to 110 amps.
- Strike the arc 1/8 inch ahead of the crater.
- Move back to fill the crater, then weld forward.
- Overlap the bead slightly and let it cool slowly.
After cooling, check the weld. If it is smooth and strong, you did it right.
Table: Defects And Their Causes At Stick Weld Restarts
| Defect | Possible Cause | Prevention |
|---|---|---|
| Porosity | Slag, moisture, long arc | Clean well, dry rods, short arc |
| Cracks | Fast cooling, crater not filled | Fill crater, preheat, slow cool |
| Slag inclusion | Poor cleaning, fast restart | Remove all slag, slow restart |
| Undercut | Wrong angle, high amps | Adjust angle, lower amps |
| Cold lap | Low amps, poor overlap | Raise amps, blend welds |
Getting Help And Further Learning
If you still have trouble restarting stick welds, you can:
- Watch instructional videos from trusted welders on YouTube.
- Ask questions on forums like WeldingWeb or Reddit’s r/Welding.
- Read detailed guides from welding equipment makers.
- Attend classes at local trade schools.
- Check standards and guides from the American Welding Society (AWS).
Final Thoughts
Restarting a stick weld without defects takes practice, but it is not difficult once you know the key steps. Clean thoroughly, check for flaws, use the correct technique, and always inspect your work. Take your time, and do not skip preparation.
The extra few minutes spent cleaning and checking can save hours of repair later. Good restarts make your welds stronger, safer, and more professional.
Frequently Asked Questions
What Is The Best Way To Remove Slag Before A Restart?
Use a chipping hammer to break the slag, then follow with a wire brush to remove all fine particles. For thick slag or stubborn areas, an angle grinder works well. Always clean beyond the weld bead to avoid defects at the edges.
Can I Restart With The Same Electrode, Or Should I Use A New One?
You can restart with the same electrode if it is still long and clean. If the tip is dirty, melted, or the flux is chipped away, use a new rod. A bad tip can cause sticking or poor arc starts.
Why Do My Restarts Create Holes Or Cracks In The Weld?
Holes (porosity) or cracks often happen if there is slag, rust, or moisture left behind, or if the crater is not filled at the restart. Clean well, start just ahead of the crater, and move back to fill it before welding forward.
How Can I Make Restarts Smoother On Difficult Rods Like E7018?
Store E7018 rods in a rod oven to keep them dry. Use the “hot start” feature if your welder has it. Strike the arc briefly on scrap metal to warm the rod, then restart on your work. Clean thoroughly and fill the crater each time.
Where Can I Learn More About Stick Welding Techniques?
You can read the Wikipedia page on Shielded Metal Arc Welding for more details, or look for classes and video tutorials from the American Welding Society.
Stick welding restarts may seem tricky, but with the right steps, you can get strong, clean welds every time. Practice and attention to detail will set your work apart.

Credit: www.youtube.com