Disclosure: This post contains affiliate links and I will be compensated if you make a purchase after clicking through my links. Learn More
Welding stainless steel with an arc welder can seem difficult at first, but with the right approach, anyone can achieve strong, clean results. Stainless steel is popular in many industries because it resists rust and keeps its strength. But it also reacts differently to heat and contamination compared to mild steel.
If you want to get good welds, you need to know how to set up your tools, pick the right materials, and use careful techniques. This guide will walk you through every step, from preparation to finishing, and will help you avoid mistakes that many beginners make.
What Makes Stainless Steel Different
Stainless steel contains chromium, which forms a thin layer that protects the metal from rust. This makes it ideal for kitchens, medical tools, and structures that face weather. But this same layer can break if you use the wrong welding methods.
Stainless steel also expands and warps more than mild steel when heated. This means you must control heat carefully to avoid cracks and weak spots.
There are several types of stainless steel, but the most common for welding are:
- Austenitic (300 series): Contains chromium and nickel, easy to weld, used in food and medical equipment.
- Ferritic (400 series): Contains chromium, less nickel, used for car parts and appliances.
- Martensitic: Harder but less common, used for knives and tools.
Each type needs a slightly different method, but most home projects use the 300 series.
Choosing The Right Arc Welding Method
Three main arc welding methods work for stainless steel:
- Shielded Metal Arc Welding (SMAW or stick welding): Simple, portable, uses a coated rod.
- Gas Tungsten Arc Welding (GTAW or TIG): Precise, clean, uses a tungsten electrode and gas shield.
- Gas Metal Arc Welding (GMAW or MIG): Fast, uses a wire feed and gas shield.
This article focuses on stick welding (SMAW) since it is affordable and works well for many home and repair jobs. If you understand the basics, you can move to TIG or MIG later.
Credit: weldguru.com
Tools And Materials You Need
To weld stainless steel with an arc welder, gather these items:
- Arc welder: AC or DC. DC gives smoother welds, but AC can work.
- Stainless steel electrodes: E308L, E309L, or E316L rods, depending on the metal.
- Welding helmet: Auto-darkening makes the job easier.
- Welding gloves: Protects your hands from heat and sparks.
- Welding jacket or sleeves: Shields your arms and body.
- Angle grinder or wire brush: Cleans the metal.
- Clamps: Holds pieces together.
- Measuring tools: For accuracy.
- Chipping hammer: Removes slag after welding.
- Safety glasses: Protects your eyes when grinding.
Using the wrong rod or not cleaning the metal can ruin your weld. For most 300 series stainless steel, the E308L electrode works best.
Preparing The Stainless Steel
Preparation is the first key step. Stainless steel picks up dirt and grease easily, which can cause defects in your weld.
- Clean the joint area: Use a stainless steel brush or an angle grinder with a flap disc. Never use a brush that touched carbon steel, as it can cause rust.
- Remove grease and oil: Wipe with acetone or a special degreaser.
- Fit the pieces tightly: Gaps cause weak welds and more warping.
- Clamp the pieces: Movement during welding can ruin alignment.
Even a tiny bit of carbon steel dust can make stainless steel rust. Always use tools meant only for stainless steel.
Setting Up The Arc Welder
Correct settings depend on your welder and the thickness of your metal.
- Polarity: Use DC+ (electrode positive) for most rods.
- Amperage: Set between 60–90 amps for thin (1.5–3 mm) metal, and 90–130 amps for thicker pieces (3–6 mm). Always check rod packaging for advice.
- Electrode size: 2.5 mm rods work for most jobs. Use 3.2 mm for thicker steel.
Test your settings on scrap pieces before starting the real job.
How To Weld Stainless Steel: Step-by-step
Follow these steps for a strong, neat weld:
- Tack weld: Make short welds at the ends and middle to hold pieces in place.
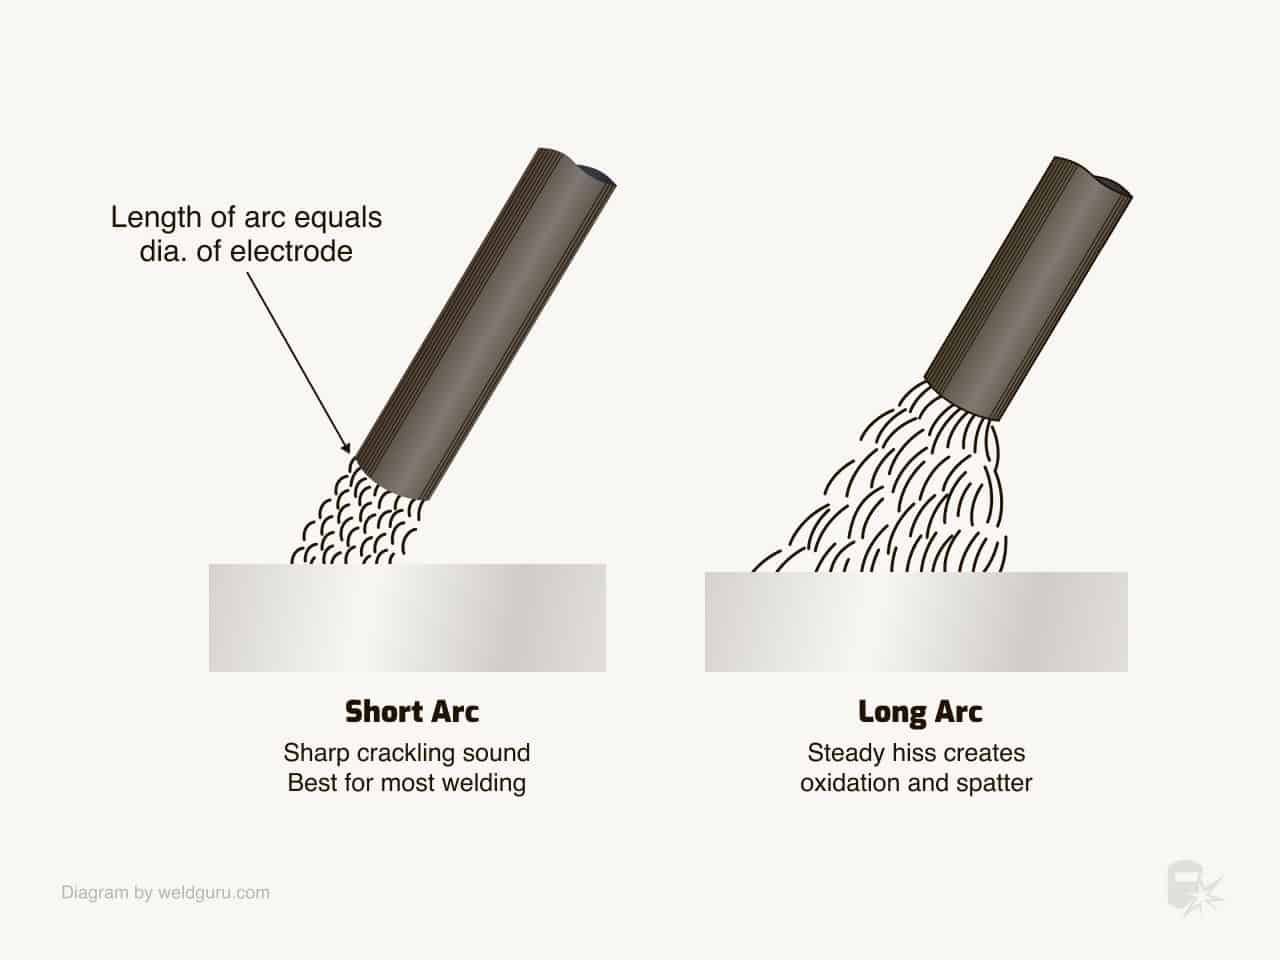
- Keep your arc short: Hold the rod close to the metal, about 2–3 mm gap. A long arc makes a messy weld.
- Move steadily: Use a slow, smooth motion. Stainless steel needs less heat, so avoid lingering in one spot.
- Weld in short sections: Weld 2–4 cm, then let the metal cool. This prevents warping.
- Chip off slag: After each pass, use a chipping hammer and brush to clean.
- Check your work: Look for cracks, holes, or uneven beads.
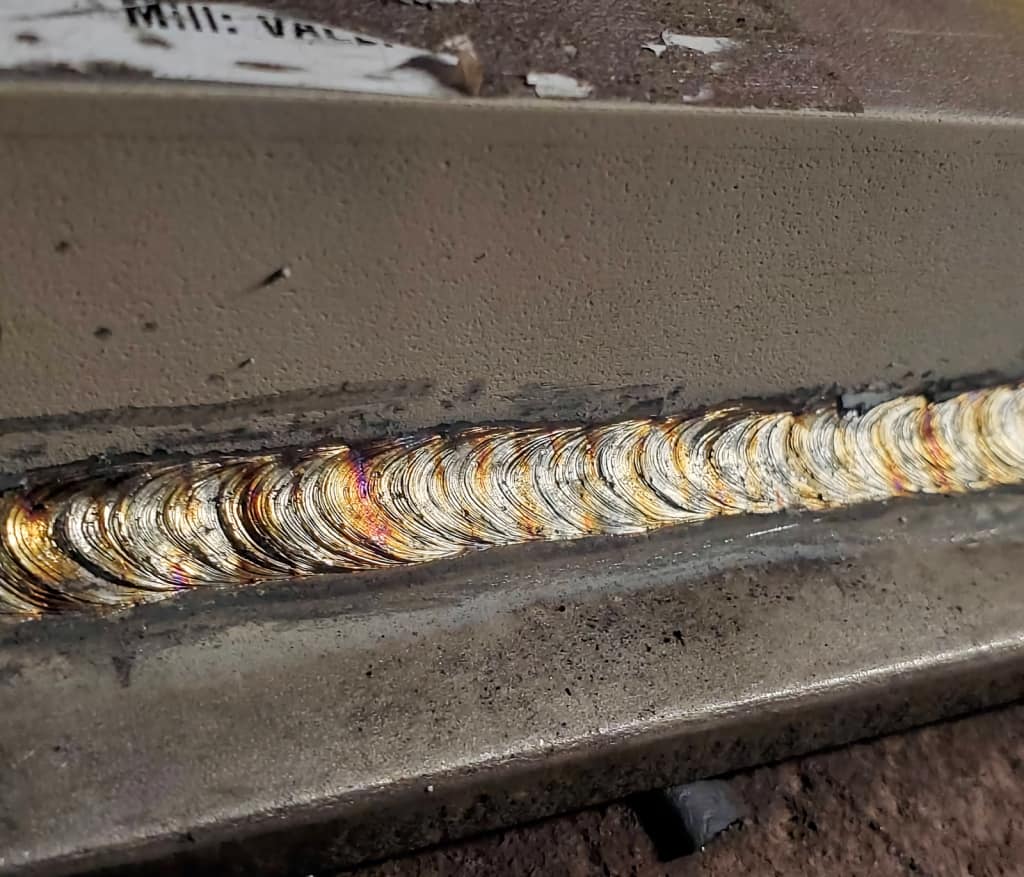
If you see blue or brown colors near the weld, it means you overheated the metal. This weakens the stainless steel.
Controlling Heat: Why It Matters
Too much heat is the biggest problem when welding stainless steel. Overheating can cause:
- Warping: The metal bends and twists.
- Cracking: Welds break under stress.
- Loss of corrosion resistance: The protective layer breaks, and rust forms.
To control heat:
- Use short welds, then cool.
- Clamp the metal tightly.
- Use the lowest amperage that still gives a good arc.
If you need to weld a long seam, try welding in 2–3 cm sections, moving back and forth to spread the heat.
Common Mistakes And How To Avoid Them
Many beginners make the same errors with stainless steel. Here’s how to avoid them:
- Dirty metal: Always clean before welding. Even fingerprints can cause flaws.
- Wrong electrode: Only use rods made for stainless steel.
- Too much heat: Causes warping and color change. Use short welds and let cool.
- Long arc: Makes a messy, weak bead. Keep the rod close.
- Welding too fast: Causes holes and poor fusion. Go slow but steady.
- Not cleaning between passes: Leaves slag in the weld, causing weakness.
One non-obvious tip: Do not use grinding discs or wire brushes that have ever touched mild steel, even once. This tiny cross-contamination can cause the weld to rust.
How To Finish And Clean The Weld
After welding, the bead may look dark or colored. This is due to heat tint and slag.
- Chip away slag: Use a chipping hammer and stainless steel brush.
- Remove heat tint: Use a wire brush or a flap disc meant for stainless steel.
- Clean again: Wipe with acetone to remove dust and grease.
- Passivate the weld: For high-quality projects, use a passivating solution to restore corrosion resistance. This is a mild acid that removes iron from the surface.
Heat tint is not just a color issue—it shows the protective layer is damaged. Remove it fully for the best results.
Example: Welding A Simple Stainless Steel Frame
Suppose you want to weld a 25mm x 25mm x 2mm stainless steel tube frame.
- Cut and clean all pieces.
- Clamp pieces to form a square corner.
- Tack weld at each corner.
- Weld short beads along each joint, rotating to spread heat.
- Let the metal cool between sections.
- Clean slag and heat tint after each weld.
- Check for straightness before final welds.
This process gives a strong, square frame with little warping.

Credit: www.youtube.com
Comparing Stainless Steel To Mild Steel Welding
Many people start by welding mild steel and are surprised by the differences. Here’s a quick comparison:
| Feature | Mild Steel | Stainless Steel |
|---|---|---|
| Heat control | Less critical | Very important |
| Cleaning before welding | Good, but not always needed | Essential |
| Electrodes | E6013, E7018 (common) | E308L, E309L, E316L |
| Risk of rust | High if not protected | Low if done right |
If you treat stainless steel like mild steel, your welds will often fail or rust.
Safety Tips For Arc Welding Stainless Steel
Welding is dangerous without proper safety steps. Take these measures:
- Wear a helmet: Auto-darkening shields your eyes from UV light.
- Use gloves and long sleeves: Protects skin from sparks and UV burns.
- Work in a ventilated area: Stainless steel can release toxic fumes, especially when overheated.
- Never touch hot metal: It stays hot long after welding.
For extra safety, use a respirator if you weld indoors or on thick pieces. Stainless steel fumes can harm your lungs.
Choosing The Right Electrode For Stainless Steel
Picking the correct rod is not just about matching the number. Here’s what matters:
- E308L: Best for most 300 series stainless steel.
- E309L: Used when joining stainless to mild steel.
- E316L: Needed for stainless with added molybdenum (resists chemicals).
Always check the L at the end. It stands for low carbon, which reduces cracking.
| Electrode | Best Use | Main Elements |
|---|---|---|
| E308L | 300 series (most common) | Chromium, Nickel |
| E309L | Joining stainless to other steels | High Chromium, Nickel |
| E316L | Chemical resistance | Chromium, Nickel, Molybdenum |
Using the wrong rod can cause the weld to crack or rust.
Tack Welding: Why It’s Essential
Tack welding means making small welds to hold the pieces before the main weld. This step is easy to skip, but it prevents movement and warping. Here’s how:
- Place a small tack at each end of the joint.
- Add more tacks along long joints.
- Check alignment after tacking.
If you skip this, the pieces may shift during the main weld, leading to poor joints.
How To Avoid Warping And Distortion
Stainless steel expands a lot when heated. Warping happens if you weld long sections without stopping.
- Weld in short sections.
- Alternate sides: For large pieces, weld a bit on one side, then the other.
- Use clamps: Keeps metal straight.
- Let the piece cool often.
A hidden tip: Preheat is rarely needed for stainless steel. Only use it for thick pieces, and then only up to 150°C.
Cleaning Tools: What To Use And What To Avoid
Cleaning tools are critical for stainless steel welding.
- Use: Stainless steel wire brush, flap disc, acetone.
- Avoid: Steel wire brushes, grinding wheels used on carbon steel.
Even using the same grinder on mild and stainless steel can cause rust later. Keep separate tools for each metal.
Credit: weldguru.com
Post-weld Finishing For A Professional Look
If you want your welds to look good and last, finish them properly.
- Grind or sand the welds: Use a flap disc for smooth beads.
- Polish if needed: For food-grade or visible work, use finer grits to shine the metal.
- Passivate: For best corrosion resistance, use a passivating paste or spray.
This step is often missed by beginners, but it makes a big difference in quality and durability.
Welding Thin Vs. Thick Stainless Steel
Welding thin and thick pieces needs different settings.
| Thickness | Amperage | Rod Size | Key Tips |
|---|---|---|---|
| 1–2 mm (thin) | 50–70 A | 2.0 mm | Short welds, cool often |
| 3–5 mm (medium) | 70–110 A | 2.5–3.2 mm | Normal technique |
| 6 mm+ (thick) | 110–130 A | 3.2 mm | May need multiple passes |
For thin stainless steel, use the lowest amperage that still gives a stable arc. Move quickly to prevent burn-through.
Troubleshooting Common Weld Problems
If your welds do not look or perform right, use this quick troubleshooting guide:
- Porosity (holes): Usually from dirty metal or wet rods. Clean and dry everything.
- Cracks: Too much heat or wrong rod. Lower amperage or change electrode.
- Undercut (groove at edge): Moving too fast or high amperage. Slow down and reduce amps.
- Rough bead: Arc too long or rod held at wrong angle. Keep rod close and at 15–20° tilt.
Keep notes on settings that work for your welder and projects. This saves time on future jobs.
Welding Stainless Steel To Mild Steel
Sometimes, you need to join stainless to mild steel. Use these steps:
- Clean both metals well.
- Use E309L electrode: It bridges the different metals.
- Weld with short beads and let cool.
- Clean and inspect the weld.
Never use a regular stainless or mild steel rod for these joints. E309L is made for mixed-metal welds.
Getting Strong, Clean Welds Every Time
To get the best results, always follow these habits:
- Clean everything: Before, during, and after welding.
- Use the correct rod: Match your steel type.
- Control heat: Short beads, low amps, and cool often.
- Finish properly: Remove slag, heat tint, and passivate if needed.
These steps become automatic with practice.
When To Use Tig Or Mig Instead Of Stick Welding
Stick welding is great for repairs and outdoor jobs. But for thin stainless steel or visible welds, TIG and MIG are better.
- TIG welding: Makes clean, precise welds with almost no spatter.
- MIG welding: Fast and good for production, but needs shielding gas.
Stick welding works for most repairs and simple builds, but learn TIG or MIG for advanced work.
Where To Find More Details
If you want deeper knowledge, check guides from welding organizations or textbooks. The Wikipedia: Welding of Stainless Steel page covers advanced topics and other methods.
Frequently Asked Questions
What Is The Best Rod For Welding Stainless Steel With An Arc Welder?
The E308L electrode is best for most 300 series stainless steel. Use E309L if joining stainless to mild steel, and E316L for chemical resistance.
Can I Weld Stainless Steel With A Normal Arc Welder?
Yes, you can use a basic stick (SMAW) arc welder. Use the correct rods and settings. DC is best, but AC works if needed.
Why Does My Stainless Weld Turn Blue Or Brown?
Blue or brown colors mean overheating. This damages the corrosion-resistant layer. Use lower amperage, shorter welds, and let the metal cool often.
How Do I Stop Stainless Steel From Warping When Welding?
Weld short sections, clamp parts, and allow the metal to cool between welds. Avoid too much heat in one area.
Do I Need Special Cleaning Tools For Stainless Steel?
Yes, use stainless steel brushes and flap discs that never touched mild steel. Contamination causes rust, even on stainless steel.
Welding stainless steel with an arc welder takes practice and attention to detail. By following these steps and using the right tools, anyone can get strong, lasting welds. Stay patient, work safely, and your results will improve with every project.