Disclosure: This post contains affiliate links and I will be compensated if you make a purchase after clicking through my links. Learn More
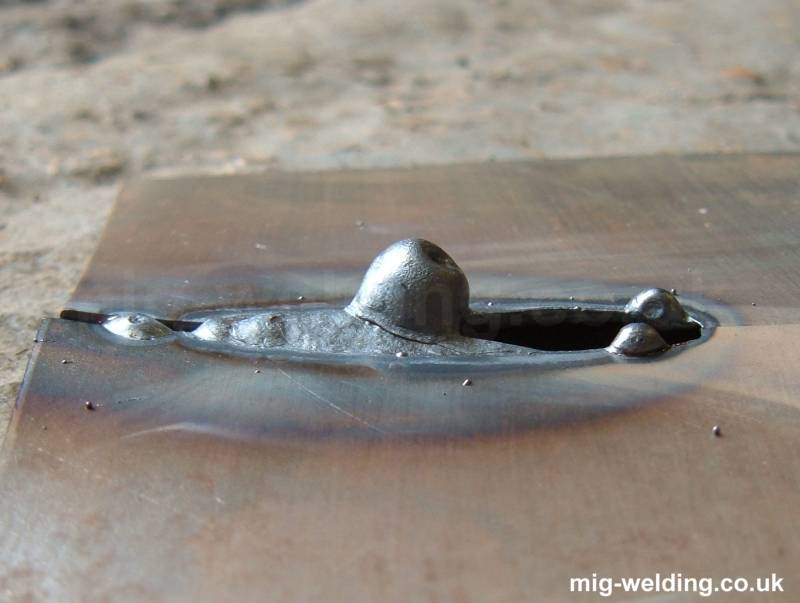
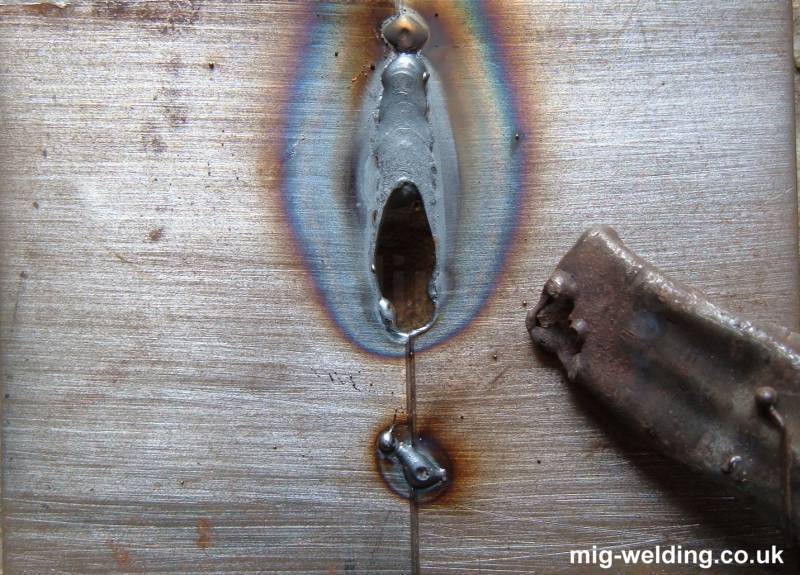
Welding thin metal with a MIG welder often worries beginners and even some experienced welders. Thin metal, like sheet metal, car panels, or ductwork, can melt fast. If you use too much heat or stay in one spot too long, the weld can burn through, leaving holes and weak joints.
But with the right approach, you can weld thin metal cleanly and safely. This article will guide you through every detail of how to MIG weld thin metal without burning through, so your welds stay strong, neat, and reliable.
Why Mig Welding Thin Metal Is Challenging
Thin metal heats up faster than thick steel. If you use too much power or move too slowly, the base metal melts before you finish the weld. This is called burn-through. Common thin metals are between 0.6 mm and 2 mm thick. These include car body panels, galvanized steel sheets, and HVAC ducting. Most people struggle with burn-through, warping, and poor fusion because thin metal does not absorb and spread heat well.
Key challenges:
- Low heat tolerance
- Fast melting point
- Easy warping
- Gaps and holes in the weld bead
Understanding these problems helps you avoid mistakes that can ruin your work.
Choosing The Right Mig Welder And Settings
Not all MIG welders are equal for thin metal jobs. You need a welder that gives you precise control over voltage and wire feed speed.
Important features:
- Adjustable voltage control: Lets you lower the heat for thin materials.
- Smooth wire feed control: Prevents wire stubbing or burning through.
- Low minimum output: A good MIG welder for thin metal should go as low as 30-40 amps.
Check your welder’s manual for the lowest settings. Some industrial machines only work well on thick metal. Home and hobby MIG welders often have better low-end control.
Example Setting Ranges
| Metal Thickness (mm) | Voltage (V) | Wire Speed (m/min) | Amperage (A) |
|---|---|---|---|
| 0.8 | 14–15 | 3–4 | 30–40 |
| 1.0 | 15–16 | 4–5 | 40–50 |
| 1.5 | 16–17 | 4.5–5.5 | 45–60 |
Always test on scrap metal before starting your main weld.
Credit: www.mig-welding.co.uk
Gas And Wire Selection For Thin Metal
Using the right gas and wire is critical when welding thin metal. The wrong choice can cause too much heat or poor weld quality.
Gas Type
- 75% Argon / 25% CO2 (C25) is the best for thin steel. It creates a stable arc and less spatter.
- 100% CO2 works, but it runs hotter and can burn through thin metal.
- For stainless or aluminum, use specific gas mixes (such as 100% Argon for aluminum).
Wire Type And Size
- ER70S-6 is the most common for mild steel.
- Use 0.6 mm (0.023″) or 0.8 mm (0.030″) wire. Thinner wire gives better control and less heat per inch.
Example Comparison
| Wire Size | Best For | Heat Input |
|---|---|---|
| 0.6 mm (0.023″) | Ultra-thin sheet metal | Low |
| 0.8 mm (0.030″) | 1–2 mm steel | Medium |
| 1.0 mm (0.035″) | Thicker steel | High |
Choose the thinnest wire that feeds smoothly in your welder for the best control.
Preparing Thin Metal For Mig Welding
Good preparation makes welding thin metal much easier and reduces the risk of burn-through.
- Clean the Surface: Remove rust, paint, grease, and oil. Use a wire brush, sandpaper, or a grinder. Clean metal gives you a stable arc and prevents porosity.
- Fit-Up and Clamping: Align the metal pieces closely. Gaps make burn-through more likely. Use magnets, clamps, or vise grips to hold your work tight.
- Gap Control: Aim for a zero-gap joint or a gap smaller than the wire diameter.
- Backer Plates: For very thin metal, place a copper or aluminum bar behind the weld area. These metals absorb heat and prevent burn-through, and the weld won’t stick to them.
- Tack Welds: Place small welds every few centimeters to hold the joint together before you finish welding. This also spreads heat and prevents warping.
These steps help you keep control and avoid common problems.
Techniques To Avoid Burn-through
Burn-through happens fast on thin metal. Careful technique is more important than speed or strength.
Stitch Welding
Stitch welding uses short welds (about 10–20 mm) with breaks in between.
- Weld a short section.
- Stop and let it cool for a second.
- Move to another spot away from the first weld and repeat.
- Go back and fill in the gaps.
This spreads heat and reduces burn-through.
Spot Welding (plug Welding)
Spot welding makes small, round welds instead of a long continuous bead.
- Press the trigger for just a second to make a spot.
- Move ahead and repeat.
- This is common for car panels and thin sheets.
Trigger Or Pulse Technique
Instead of holding the trigger, pulse it in short bursts.
- Tap the trigger for a second, then release.
- Move forward and repeat.
- This gives each area time to cool down.
Fast Travel Speed
Move the MIG gun quickly along the joint. The faster you move, the less heat goes into the metal.
Angle And Stick-out
- Keep the gun angle at 15°–20° to the work.
- Use a short stick-out (distance from tip to metal), about 6–10 mm.
- This focuses the arc and reduces heat spread.
Example: Stitch Vs. Continuous Bead
| Technique | Heat Input | Burn-Through Risk |
|---|---|---|
| Stitch Welding | Low | Low |
| Continuous Bead | High | High |
Stitch welding is safer for thin metal.
Controlling Heat Buildup
Too much heat causes warping and holes. Control heat by using the right settings and techniques.
- Lower Voltage and Amperage: Start with the lowest settings that give a stable arc.
- Skip Welding: Move around the joint instead of welding in one line. This lets earlier welds cool.
- Use a Heat Sink: Place a copper bar behind the weld.
- Let the Metal Cool: Pause between welds to let the metal return to room temperature.
- Short Welds: Make small, short welds instead of one long bead.
These steps keep the metal cool and prevent burning through.
Tips For Strong, Clean Welds On Thin Metal
Welding thin metal is not just about avoiding holes. You also want a strong, neat weld.
- Use Both Hands: Steady the gun with both hands for more control.
- Watch the Puddle: Focus on the small pool of melted metal. Move forward as soon as it forms.
- Keep a Steady Speed: Don’t stop in one spot too long.
- Practice on Scrap: Test your settings and technique on leftover pieces before starting your actual project.
- Clean Your Nozzle: Spatter can block gas flow. Clean the nozzle often.
- Check Gas Coverage: Poor coverage creates porous, weak welds.
- Grind Smooth: Use a flap disc to smooth out welds if needed, but don’t over-grind and weaken the joint.
Common Mistakes When Mig Welding Thin Metal
Avoiding common errors saves time and materials.
- Using thick wire: Too much filler metal means too much heat.
- Wrong gas: 100% CO2 runs too hot for thin metal.
- Too slow: Moving too slowly melts the base.
- Welding over gaps: Gaps concentrate heat and cause holes.
- No backer plate: Thin metal can burn through without heat control.
- No cooling time: Rushing causes warping.
Many beginners think more power means a stronger weld. With thin metal, less is more.

Credit: metalfusionpro.com
Advanced Tips For Professionals
Experienced welders use a few extra tricks to make thin metal welding even better.
Use Pulse Mig Welders
Pulse MIG welders control the heat automatically. They give short, controlled bursts of current, which lowers the average heat input. This is very helpful for thin metal but these machines cost more.
Use Back Purging For Stainless Steel
If you weld thin stainless, back purging with argon on the backside of the weld prevents oxidation and keeps the weld shiny and strong.
Pre-tinned Joints
For very thin metal, some welders apply a small amount of solder or tin to the joint before welding. This draws heat away and makes the weld easier to start.
Practice “push” Technique
Push the gun forward (not pull) at a 15° angle. This spreads heat over a wider area and reduces the risk of burn-through.
Check Distortion Often
After every tack or weld, check if the metal is warping. If you notice any distortion, clamp the piece again or use a hammer and dolly to straighten it before continuing.
Real-world Examples: Automotive, Home, And Art Projects
Welding thin metal is common in auto body repair, ductwork, and art.
Automotive Panels
Car body panels are usually 0. 6–1. 0 mm thick. If you use too much heat, you’ll create holes that are hard to fix. Professionals use 0. 6 mm wire, stitch weld, and backer plates. They often grind the weld flat for paint.
Home Repairs
For HVAC ducts or home appliances, thin galvanized steel is common. Use short welds and clean the zinc coating before welding. If you weld over the coating, toxic fumes will form.
Metal Art
Artists often use thin sheet metal to make sculptures or ornaments. They use the pulse technique and sometimes backer plates to keep the shapes clean.
Each type of project demands care, but the basics stay the same.
Safety When Welding Thin Metal
Never ignore safety, especially with thin metal.
- Ventilation: Welding galvanized or painted metal produces toxic fumes. Work in a well-ventilated area or use a fume extractor.
- Eye Protection: Always wear a proper welding helmet with the right shade.
- Gloves and Clothing: Sparks fly off thin metal quickly. Wear flame-resistant gloves and long sleeves.
- Fire Safety: Keep a fire extinguisher nearby. Thin metal heats up fast and can ignite nearby objects.
- Hearing Protection: Grinding and cutting thin metal can be loud.
Many people forget that even a small amount of zinc fume or paint vapor can be dangerous. Always clean your work and stay protected.
How To Fix Burn-throughs In Thin Metal
Even with care, you might burn a hole. Fixing it takes patience.
- Let the area cool completely.
- Use a copper backer behind the hole.
- Tack the edge of the hole, let it cool, and repeat. Don’t try to fill the hole in one go.
- Grind smooth if needed.
- Check for leaks or weak spots by tapping or bending the area gently.
Most professionals expect to fix a few burn-throughs during a project. Fast, careful work is the key.
Essential Tools For Mig Welding Thin Metal
Having the right tools makes thin metal welding easier and safer.
- MIG welder with low amp range
- 0.6–0.8 mm wire
- 75/25 Argon/CO2 gas
- Copper backer or heat sink bar
- Clamps and magnets
- Wire brush and grinder
- Fume extractor
- Safety gear (helmet, gloves, jacket)
Many welders use a dedicated small welder for thin metal jobs and keep a larger machine for heavy steel.
Practical Troubleshooting: Poor Welds, Spatter, And Warping
If your welds do not look good, check these common causes:
- Porosity (holes in the weld): Likely from dirty metal or poor gas coverage. Clean and check gas flow.
- Too much spatter: Voltage too high, wire speed too fast, or dirty surface.
- Warped metal: Too much heat, not enough cooling time, or poor clamping.
- Uneven bead: Inconsistent speed or gun angle.
Careful setup and practice solve most problems.
Cost And Time Estimates
Welding thin metal usually takes longer than thick steel because you must work slowly and carefully.
- Set-up time: 10–20 minutes for cleaning, clamping, and preparing.
- Welding time: 2–5 minutes per linear foot, depending on technique.
- Fixing mistakes: Plan for extra time to repair burn-throughs or warped areas.
For supplies, a small spool of 0. 6 mm wire costs $10–$15. A tank of C25 gas lasts several hours for light work. Copper backers cost $20–$40 but last for years.
Learning Curve: What Beginners Often Miss
Most beginners focus on making a bead, but miss these important details:
- Heat control matters more than bead shape. A smaller, cooler weld is stronger on thin metal.
- Practicing movement without welding helps. Run your gun along the seam with the power off to build muscle memory.
- Tack welds are as important as finish welds. Spread tacks out to control heat from the start.
- Test welds on scrap let you fine-tune settings.
- Backer plates make a huge difference, especially for repairs.
Welding thin metal is a skill that improves quickly with practice and patience.
Frequently Asked Questions
What Is The Best Wire Size For Mig Welding Thin Metal?
The best wire size for thin metal (under 2 mm) is 0.6 mm (0.023″). It melts with less heat, so you have better control. If your welder does not feed 0.6 mm well, use 0.8 mm (0.030″) but lower the power setting.
Can You Mig Weld Thin Aluminum Without Burning Through?
Yes, but it is much harder than steel. Use 100% argon gas, a Teflon liner in your gun, and set the welder to a very low voltage and wire speed. Use the pulse or stitch technique. Practice on scrap aluminum first. Aluminum melts faster and is less forgiving.
Why Do My Welds Have Holes Or Porosity?
Porosity usually means dirty metal or poor gas coverage. Clean the surface with a grinder or wire brush. Make sure your gas flow is at least 15–20 CFH (cubic feet per hour), and check for leaks in your hose.
How Do I Prevent Warping When Welding Thin Sheet Metal?
To prevent warping:
- Weld short sections, not long beads.
- Move around the joint (skip welding).
- Clamp your work tightly.
- Let the metal cool often.
- Use a copper backer if possible.
Where Can I Learn More About Mig Welding Thin Metal?
For more details, you can read the welding guides and tutorials on the Lincoln Electric Education Center. They offer step-by-step videos and charts for all skill levels.
Final Thoughts
MIG welding thin metal is a useful skill for car repair, home projects, and many creative tasks. It takes more patience and care than working with thick steel, but it is very possible with the right tools and knowledge. Always choose the correct settings, wire, and technique for your material.
Practice heat control and use backer plates to help prevent mistakes. As you practice, your confidence and results will improve. Safe welding leads to strong, neat, and long-lasting joints on even the thinnest metal.
Credit: www.mig-welding.co.uk