Disclosure: This post contains affiliate links and I will be compensated if you make a purchase after clicking through my links. Learn More
Welding stainless steel with a MIG (Metal Inert Gas) welder is both practical and widely used. Stainless steel is common in industries like food processing, chemical plants, and construction because it resists corrosion and looks clean. Many people prefer MIG welding for stainless steel because it is easier to learn than TIG welding and offers faster results than stick welding. Still, success depends on understanding the correct MIG welder settings for stainless steel. Small mistakes can cause ugly welds, poor strength, or even damage to the material.
In this guide, you will find everything you need to set up your MIG welder for stainless steel. The settings can seem confusing at first. Wire speed, voltage, gas mix, and torch angle all matter. This article will explain each setting in clear terms, using real examples and data.
You will learn how to avoid common errors, how to pick the right wire and gas, and what numbers to use on your machine. By the end, you will feel confident to weld stainless steel with a MIG welder, whether you are a beginner or have some experience.
Why Stainless Steel Needs Special Mig Settings
Stainless steel acts differently from regular steel. It has a lower thermal conductivity, so it does not spread heat quickly. This means it can overheat or warp if the settings are wrong. Stainless steel also reacts with oxygen, which can make welds look dull or cause rust spots if not protected by the right shielding gas.
Another key difference is expansion and contraction. Stainless steel expands more than mild steel when heated. If you use the same settings as for mild steel, you might see cracks or distortion. That’s why the right MIG settings matter so much.
Choosing The Right Mig Welder For Stainless Steel
Not all MIG welders handle stainless steel well. Some small, hobby welders lack the power or fine controls needed. Here’s what to check:
- Amperage Range: Stainless steel often needs higher amps, especially for thicker material. A welder with at least 140A for light work and 180A or more for thicker pieces works best.
- Voltage Control: Infinite or fine-step voltage control lets you dial in exact settings.
- Wire Feed Control: Smooth, adjustable wire feed prevents burnback and poor starts.
- Spool Gun Compatibility: For some stainless wires, a spool gun helps, but most can use a standard MIG torch.
- Gas Compatibility: Make sure your machine works with argon-based mixes, not just straight CO₂.
A good example: The Miller Millermatic 211 or Lincoln Power MIG 210 both support stainless steel MIG welding, offering enough power and precise controls.
Selecting The Correct Stainless Steel Mig Wire
Wire choice is critical. Stainless steel comes in many grades, but the most common welding wires are:
- ER308L: Best for welding 304 or 304L stainless steel, used in kitchens and food equipment.
- ER309L: Used for joining stainless to mild steel.
- ER316L: Used for 316 stainless, found in chemical and marine uses.
The “L” stands for low carbon, which reduces the risk of carbide precipitation and makes welds less likely to rust.
Diameter matters too. Most welders use 0.030″ (0.8mm) or 0.035″ (0.9mm) wire for sheet and plate under 1/4″ (6mm). Thicker wire (0.045″/1.2mm) is for heavy sections but needs higher amperage.
Example Wire Selection Table
| Base Metal | Recommended Wire | Diameter (in) | Use Case |
|---|---|---|---|
| 304/304L SS | ER308L | 0.030″–0.035″ | General fabrication, food equipment |
| 316/316L SS | ER316L | 0.030″–0.035″ | Chemical, marine |
| Stainless to mild steel | ER309L | 0.030″–0.035″ | Repair, joining different metals |
Picking The Best Shielding Gas For Stainless Mig
Unlike mild steel, where CO₂ is common, stainless steel needs a different gas mix. The wrong gas can cause poor welds or make the stainless steel rust.
The best gases for MIG welding stainless steel are:
- 98% Argon + 2% CO₂: Most common. Provides a smooth, shiny weld with less spatter.
- 98% Argon + 2% Oxygen: Similar to the above, slightly easier arc start.
- Tri-mix (90% Helium, 7.5% Argon, 2.5% CO₂): Used for thin sections or special jobs. Gives a hotter arc.
Straight CO₂ is not recommended for stainless steel because it increases spatter and can make the weld look dull and brown.
Shielding Gas Comparison Table
| Gas Mix | Best For | Weld Quality | Notes |
|---|---|---|---|
| 98% Argon / 2% CO₂ | General stainless MIG | Bright, clean, low spatter | Most common choice |
| 98% Argon / 2% Oxygen | Thin stainless | Good bead shape | More arc stability |
| Tri-mix | Thin gauge, precision | Very smooth, less heat input | Higher cost, special jobs |
Setting Voltage And Wire Feed Speed
The correct voltage and wire feed speed depend on the wire diameter, material thickness, and your welding position. Too much voltage causes a wide, flat bead with poor penetration. Too little voltage makes a tall, rope-like bead that sits on the surface.
Wire feed controls how much filler metal goes into the weld.
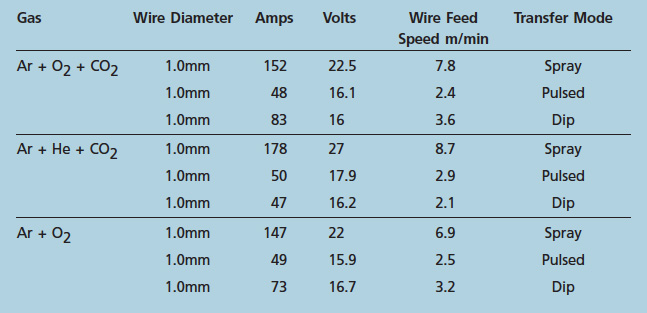
General Voltage And Wire Feed Guidelines
For 0.030″ wire on 1/8″ (3mm) stainless steel:
- Voltage: 17–19V
- Wire Feed: 250–300 inches per minute (ipm)
For 0.035″ wire on 1/4″ (6mm) stainless steel:
- Voltage: 20–22V
- Wire Feed: 300–350 ipm
Remember, these are starting points. Every machine acts a bit differently, and you must fine-tune settings for your own welder.
Quick Settings Table
| Material Thickness | Wire Diameter | Voltage | Wire Feed Speed |
|---|---|---|---|
| 1/16″ (1.6mm) | 0.030″ | 15–16V | 150–200 ipm |
| 1/8″ (3mm) | 0.030″ | 17–19V | 250–300 ipm |
| 1/4″ (6mm) | 0.035″ | 20–22V | 300–350 ipm |
Setting Gas Flow Rate
Gas flow is easy to overlook, but it is important. Too little shielding gas causes porosity and ugly welds. Too much can create turbulence, pulling air into the weld.
A typical range for MIG welding stainless steel is 20–25 cubic feet per hour (CFH) at the torch. If you are welding outside or in a drafty area, increase flow a bit, but never so high that it blows away from the weld.
To check your flow, hold the torch close to your ear and pull the trigger. You should hear a steady hiss, not a roar.
Preparing Stainless Steel For Mig Welding
Clean metal gives the best results. Stainless steel forms a thin, invisible layer of chromium oxide that protects it. Dirt, oil, or rust can ruin the weld.
Steps for preparation:
- Remove oil or grease with acetone or a stainless steel cleaner.
- Brush the area with a dedicated stainless steel wire brush. Never use a brush that has touched carbon steel, or you will cause contamination.
- Degrease again if needed before welding.
- Fit the parts closely. Large gaps make welding harder and can cause burn-through.
Many beginners miss the importance of using separate tools for stainless steel. Even a little carbon from mild steel brushes or grinding wheels can cause the weld to rust later.
Setting The Mig Welder: Step-by-step
Now, let’s walk through the main settings you will use on your MIG welder.
1. Set Polarity
Use DC Electrode Positive (DCEP), also called Reverse Polarity. This is standard for MIG welding and gives a stable arc.
2. Select The Right Program
Some advanced welders have pre-set programs for stainless steel. If yours does, choose the closest match to your wire and gas.
3. Set Wire Diameter
Match the setting to your installed wire. Most machines have a dial or menu for 0. 030″, 0. 035″, etc.
4. Adjust Voltage
Start with the recommended voltage for your wire and thickness (see table above). Increase if the arc is too short, decrease if it is too harsh.
5. Set Wire Feed Speed
Begin at the middle of the recommended range. If the wire “stubs” into the metal, increase speed. If it burns back into the tip, decrease speed.
6. Set Gas Flow
Adjust to 20–25 CFH. Use a flow meter, not a pressure gauge.
7. Test On Scrap
Always do a test weld on scrap stainless steel. Adjust voltage and wire feed until the weld bead is smooth, flat, and has good penetration.
Practical Tips For Better Stainless Steel Mig Welds
Control Heat Input
Stainless steel is sensitive to heat. Too much can cause warping or discoloration. Move the torch steadily and avoid lingering in one spot.
Watch Travel Speed
Go too slow, and you overheat the metal. Too fast, and you get poor fusion. Aim for a steady, moderate pace.
Use The Right Torch Angle
Hold the torch at a 10–15 degree angle from vertical, pushing the weld pool. Do not pull.
Minimize Weaving
A simple straight bead works best. Wide weaving can trap gas, causing porosity.
Backstep Welding
For long welds, weld short sections in the opposite direction to control distortion. This is not always needed, but helps on thin sheet.
Clean Between Passes
If you must make multiple passes, brush the weld with a stainless steel brush between each pass to remove slag and contamination.
Common Problems When Mig Welding Stainless Steel (and How To Fix Them)
Porosity
Tiny holes in the weld bead, caused by poor shielding gas. Check for leaks, increase flow, or reduce drafts.
Brown Or Black Welds
Too much heat or the wrong gas. Use a cleaner gas mix and lower your voltage or travel faster.
Cracking
Can happen if you use the wrong wire or if the part cools too quickly. Preheat thick pieces slightly, or use the correct filler.
Warping
Stainless steel warps easily. Clamp your work, use backstep welding, and keep heat input low.
Rust Spots
Usually from contamination. Only use stainless tools and keep your work area clean.
Advanced Settings And Techniques
Pulse Mig Welding
Some newer machines offer pulse MIG. This alternates between high and low current, reducing heat input and spatter. It is helpful for thin stainless steel or where appearance is critical.
Spot Welding Mode
For sheet metal or thin sections, use the spot weld timer. This lets you make small, clean welds without overheating the metal.
Inductance Control
High-end welders sometimes have an inductance setting. More inductance softens the arc and reduces spatter, which is good for stainless steel.
Safety Tips For Stainless Steel Mig Welding
Stainless steel gives off chromium fumes when welded. These fumes are dangerous if breathed in. Always:
- Weld in a well-ventilated area or use fume extraction.
- Wear a proper respirator if working in a closed space.
- Use gloves, a long-sleeve shirt, and a full welding helmet with at least a shade 10 lens.
- Keep a fire extinguisher nearby. Stainless steel does not catch fire, but nearby materials can.
Real-world Examples Of Stainless Steel Mig Settings
- Kitchen counter (304 SS, 1.5mm thick): ER308L wire, 0.030″, 18V, 260 ipm, 98/2 Argon-CO₂, 22 CFH.
- Marine bracket (316 SS, 3mm thick): ER316L wire, 0.035″, 20V, 320 ipm, 98/2 Argon-CO₂, 24 CFH.
- Repairing railing (304 SS to mild steel): ER309L wire, 0.035″, 19V, 280 ipm, 98/2 Argon-CO₂, 22 CFH.
These are starting points. Always test and adjust for your own machine and setup.
Mistakes Beginners Make With Mig Stainless Steel
- Using the wrong gas: Straight CO₂ or too much oxygen causes brown welds and corrosion.
- Skipping cleaning: Even small dirt or steel dust can lead to rust.
- Wrong wire: Using a mild steel wire will ruin the weld and cause rust.
- High wire speed: Causes spatter and poor bead shape.
- Low voltage: Gives poor fusion and tall, weak beads.
- Reusing brushes or grinders: Cross-contamination leads to rust.
- Not clamping work: Stainless steel moves a lot as it heats. Clamps keep it in place.
Useful Accessories And Tools
- Stainless steel brush: For cleaning before and between welds.
- Dedicated grinder wheels: Mark these for stainless steel use only.
- Auto-darkening helmet: Makes it easier to start and stop welds on shiny stainless.
- Magnetic clamps: Hold parts in place and reduce warping.
Understanding Stainless Steel Grades For Welding
Not all stainless steels weld the same. The most common is 304 stainless, which is easy to weld and very common. 316 stainless is harder and more expensive but gives better corrosion resistance.
Ferritic stainless steels (400 series) are less weldable with MIG. They may crack unless you use special filler wires and settings.
Martensitic stainless steels are even harder to weld and are not recommended for beginners.
Mig Weld Appearance: What To Look For
A good stainless steel MIG weld should:
- Have a smooth, even bead with no undercut.
- Be shiny with minimal discoloration (some gold or blue is normal).
- Show good penetration on the back if you can see it.
- Show no porosity or cracks.
If your weld is dull brown or black, check your gas and settings. If it sits on the surface, increase voltage or slow down your travel.
Stainless Steel Mig Welding Vs. Tig Welding
People often ask if TIG or MIG is better for stainless steel. TIG gives the cleanest, most precise welds, but is slower and harder to learn. MIG is faster and easier for beginners, especially for fabrication or repairs.
MIG can make strong, good-looking stainless welds if you use the right settings, wire, and gas. For very thin or visible welds, TIG is still preferred by professionals. For most practical jobs, MIG works well and is much faster.

Credit: www.youtube.com
Troubleshooting Weld Problems
If you get poor results, check these steps:
- Check gas flow. Leaks or low flow cause porosity.
- Inspect the wire. Old or rusty wire can cause bad welds.
- Clean the metal. Dirt or oil ruins stainless welds.
- Adjust settings. Fine-tune voltage and wire feed.
- Test on scrap. Always try on a test piece first.
If you still have problems, check your ground clamp. Poor connections can make the arc unstable.
Where To Learn More
Stainless steel MIG welding is a big subject. If you want to go deeper, the American Welding Society offers courses and standards. You can also find detailed guides and technical data at sites like Welding Answers.
Frequently Asked Questions
What Is The Best Wire For Mig Welding Stainless Steel?
The most common wire is ER308L for 304 stainless steel. Use ER316L for 316 stainless, and ER309L for joining stainless to mild steel. Always match your wire to your base metal for the best results.
Can I Use Regular Co₂ Gas For Stainless Steel Mig Welding?
No, pure CO₂ is not suitable. It causes lots of spatter and can make the weld look brown or dirty. Use a 98% Argon / 2% CO₂ mix or a tri-mix for best results.
Why Does My Stainless Steel Weld Turn Brown Or Blue?
This is caused by too much heat or the wrong shielding gas. Lower your voltage, travel faster, or switch to a better gas mix. Some blue or gold tint is normal, but brown or black is not.
How Do I Prevent Rust In My Stainless Steel Welds?
Keep everything clean. Use a dedicated brush and grinder for stainless. Avoid touching the weld with bare hands or dirty gloves. Use the right wire and gas.
What Settings Should I Use For 1/8″ Stainless Steel With 0.030″ Wire?
Start with 17–19 volts and 250–300 ipm wire feed speed. Use a 98/2 Argon-CO₂ gas mix at 22–24 CFH. Always test on scrap and fine-tune for your machine.
Welding stainless steel with a MIG welder is easier when you know the right settings. Good preparation, the right wire and gas, and careful adjustment of voltage and wire speed all help you get strong, clean welds. As you practice, you will learn how small changes in settings affect your weld.
With patience and attention, you can get professional results on stainless steel MIG welds.
Credit: www.assda.asn.au