Disclosure: This post contains affiliate links and I will be compensated if you make a purchase after clicking through my links. Learn More
Mig welding is a popular welding process because it is fast, clean, and easy to learn. But to get strong and smooth welds, you need the right settings. Two of the most important are wire speed and voltage. These two factors work together and can make the difference between a perfect weld and a weak, messy one. Many new welders struggle with these settings, but a clear chart and some practical advice can help you weld with confidence.
This article gives a complete guide to MIG welding wire speed and voltage charts. You will learn what these terms mean, how to read and use the charts, and how to adjust for different metals and thicknesses. You will also see examples, common mistakes, and practical tips for better results. Whether you are a hobbyist or a professional, you will find answers to your questions about MIG welding settings.
What Is Mig Welding Wire Speed?
Wire speed in MIG welding means how fast the machine feeds the welding wire into the weld pool. It is usually measured in inches per minute (ipm) or millimeters per minute (mm/min).
A higher wire speed gives you more filler metal, which means a larger weld bead and deeper penetration. A lower speed gives you less filler, resulting in a smaller bead. If the wire speed is too low, the arc becomes unstable, and the wire may burn back into the tip.
If it is too high, the wire will push into the workpiece and cause spatter.
Why Does Wire Speed Matter?
- Penetration: Higher wire speed increases penetration.
- Bead Size: More wire means a wider bead.
- Arc Stability: Correct speed keeps the arc steady.
- Spatter: Wrong speed causes excess spatter.
For beginners, it is easy to set the wire speed too high or too low. The right speed depends on the wire type, wire diameter, metal thickness, and the welding position.
What Is Mig Welding Voltage?
Voltage controls the heat of the welding arc. It is measured in volts (V). Higher voltage creates a wider and flatter bead, while lower voltage gives a narrower and higher bead.
Why Is Voltage Important?
- Arc Length: Voltage sets the distance between the wire and the workpiece.
- Bead Shape: Higher voltage flattens the weld bead.
- Weld Sound: Proper voltage gives a smooth, steady sound.
- Defects: Too low voltage can cause poor fusion, while too high can cause burn-through.
Wire speed and voltage must match. If you change one, you often need to adjust the other. This is where a wire speed and voltage chart becomes useful.
How To Read A Mig Welding Wire Speed And Voltage Chart
A good chart shows the recommended wire speed (ipm) and voltage (V) for different wire sizes, metals, and thicknesses. Most charts use a simple format with metal thickness in one column, and matching wire speed and voltage in others.
Here is a sample chart for .030″ solid wire (ER70S-6) on mild steel using CO2 or 75/25 gas:
| Metal Thickness (inches) | Wire Speed (ipm) | Voltage (V) |
|---|---|---|
| 1/16″ (1.6mm) | 90–110 | 16–17 |
| 1/8″ (3.2mm) | 140–180 | 17–19 |
| 1/4″ (6.4mm) | 200–260 | 20–22 |
| 3/8″ (9.5mm) | 260–320 | 22–24 |
You should use the lower value for thin joints and the higher value for thicker or faster welding. These values are a starting point. Small changes are often needed based on your own welding machine and technique.
Factors That Affect Wire Speed And Voltage
Many things change the best settings. If you do not consider these, you may get poor welds, even if you follow a chart.
1. Wire Diameter
Thicker wires need higher wire speed to carry the same current as thinner wires. Common sizes are .023″, .030″, .035″, and .045″.
2. Type Of Metal
Different metals melt at different temperatures. Mild steel, stainless steel, and aluminum all need different settings. For example, aluminum usually needs higher voltage and wire speed than steel.
3. Gas Type
The shielding gas changes the arc. CO2 gives deeper penetration but more spatter. 75% Argon/25% CO2 (C25) gives a softer arc and smoother weld.
4. Welding Position
Flat welds need less voltage than vertical or overhead welds. Gravity affects the weld pool, so you often use lower wire speed and voltage for out-of-position welding.
5. Joint Type
A butt joint, lap joint, and fillet joint may need slightly different settings, even for the same thickness.
Insight: Many beginners do not realize that changing just one factor, like wire size or gas, means you must adjust both wire speed and voltage. Do not rely only on “universal” charts.
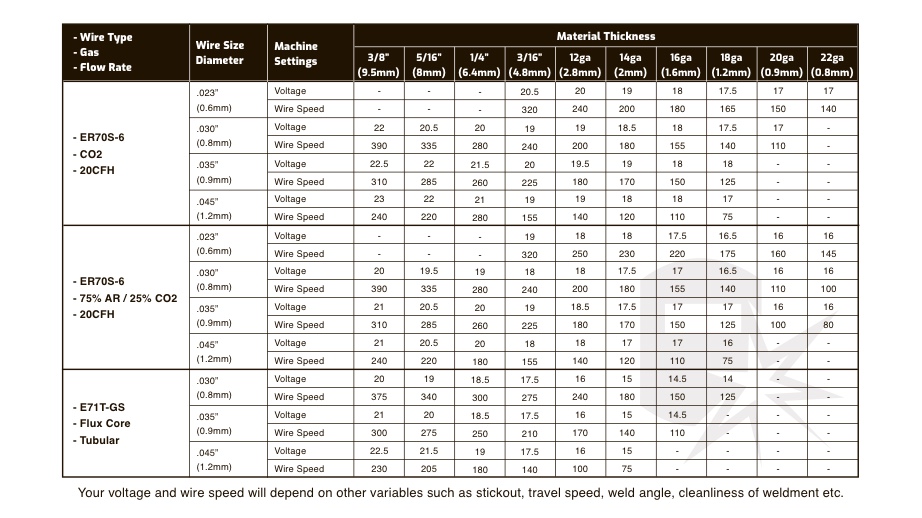
Credit: weldguru.com
Mig Welding Wire Speed And Voltage Chart By Wire Size
Wire size matters more than most people think. Many charts do not show how much difference it makes. Here is a more detailed chart comparing three common wire sizes for mild steel.
| Wire Size | Thickness (inches) | Wire Speed (ipm) | Voltage (V) |
|---|---|---|---|
| .023″ | 18 ga (1.2mm) | 90–140 | 14–16 |
| .030″ | 1/8″ (3.2mm) | 140–180 | 17–19 |
| .035″ | 1/4″ (6.4mm) | 200–300 | 20–23 |
Tip: If you want to weld thin sheet metal, use a thinner wire and lower settings. For thick steel, use a thicker wire and higher settings. If you use thick wire on thin metal, you may burn through.
Setting Up Your Mig Welder: Step-by-step Guide
Many welders find the process of setting wire speed and voltage confusing. Here is a simple approach that works for most machines and projects.
1. Identify Your Metal Type And Thickness
Use a caliper or gauge to check the exact thickness. Guessing often leads to mistakes.
2. Choose The Right Wire And Gas
Pick the correct wire for your metal (steel, stainless, or aluminum) and the right shielding gas.
3. Find The Starting Settings
Use the chart that matches your wire size and metal. Set wire speed and voltage to the middle of the recommended range.
4. Test On Scrap Metal
Make a short weld on a piece of scrap that matches your workpiece. Check the bead shape and listen to the arc.
5. Adjust As Needed
- If the wire pushes into the work, lower the wire speed.
- If the wire burns back, increase wire speed.
- If the bead is too high or narrow, increase voltage.
- If the bead is too flat or wide, lower voltage.
6. Watch For Defects
Look for undercut, lack of fusion, or spatter. Adjust settings until you get a smooth, even bead.
Insight: Many welders skip the scrap test. Even small changes in wire speed or voltage can have a big effect, so always test before starting on your real project.
Detailed Wire Speed And Voltage Chart For Common Metals
Here is a chart for three popular metals: mild steel, stainless steel, and aluminum. These values work for 75/25 gas for steel and pure argon for aluminum.
| Metal | Wire Size | Thickness | Wire Speed (ipm) | Voltage (V) |
|---|---|---|---|---|
| Mild Steel | .030″ | 1/8″ (3.2mm) | 140–180 | 17–19 |
| Stainless Steel | .030″ | 1/8″ (3.2mm) | 130–170 | 18–20 |
| Aluminum | .035″ | 1/8″ (3.2mm) | 260–350 | 18–22 |
Note: Aluminum usually needs a higher wire speed and voltage because it conducts heat very well. Stainless steel needs a bit more voltage than mild steel.
Practical Examples: Adjusting For Real Projects
Charts are useful, but real projects are not always perfect. Here are some example situations:
Example 1: Repairing A Car Body Panel
- Metal: Thin sheet steel (20 gauge)
- Wire: .023″ ER70S-6
- Gas: 75/25
- Chart Setting: Wire speed 80–110 ipm, voltage 14–15 V
You notice the panel starts to warp. Lower the voltage a little and move faster to avoid heat build-up. Use short welds, not long beads.
Example 2: Welding A 1/4″ Steel Bracket
- Metal: 1/4″ mild steel
- Wire: .035″ ER70S-6
- Gas: 75/25
- Chart Setting: Wire speed 220–270 ipm, voltage 20–23 V
The weld pool looks cold and the bead is sitting on top of the steel. Increase voltage and slow your travel speed for better fusion.
Example 3: Building An Aluminum Frame
- Metal: 3/16″ aluminum
- Wire: .035″ 4043
- Gas: 100% Argon
- Chart Setting: Wire speed 320–380 ipm, voltage 20–22 V
The arc feels unstable. Try cleaning the metal better (aluminum needs a clean surface), and check your ground clamp and gas flow. Sometimes you need to bump up the wire speed for a smoother arc.
Common Mig Welding Mistakes With Wire Speed And Voltage
Many welders run into trouble because they do not understand how settings work together. Here are some mistakes and how to fix them:
- Wire Burnback: The wire melts into the tip. Solution: Increase wire speed, or reduce voltage.
- Excess Spatter: Hot metal flies everywhere. Solution: Lower wire speed or adjust voltage.
- Cold Lap (Lack of Fusion): The bead sits on the metal but does not melt in. Solution: Increase voltage and slow down your hand.
- Burn-Through: You make a hole in the metal. Solution: Lower voltage and wire speed, use a thinner wire, or make shorter welds.
- Unstable Arc: The arc pops or crackles. Solution: Reset both wire speed and voltage, and check for correct polarity.
Tip: Always check your wire feed tension and liner condition. A dirty liner or worn tip can cause the wire to slip or jam, making your settings useless.
How To Use A Mig Welding Chart Correctly
Charts are only a starting point. Here’s how to get the best from them:
- Always use the right chart for your wire size and metal.
- Start in the middle of the recommended range.
- Make small changes (one click or 5–10 ipm at a time).
- Test on scrap metal before starting on your project.
- Keep a notebook of settings that work well for you.
Insight: Many welders do not keep track of what works. Writing down your favorite settings saves time and reduces mistakes in future projects.

Credit: www.perfectwelders.com
The Relationship Between Wire Speed, Voltage, And Amperage
Wire speed and voltage are not the only settings. Amperage (current) is also important, but in MIG welding, you set wire speed and voltage, and amperage happens as a result.
- Higher wire speed = higher amperage.
- Higher voltage = longer arc and more heat.
If you set the wire speed too high for the voltage, you get excess spatter and a rough arc. If the voltage is too high for the wire speed, the bead becomes flat and wide with poor fusion.
Practical Example: If you weld thin sheet metal and set the wire speed too high, you burn through. Lower both wire speed and voltage together.
Fine-tuning For Different Welds
Not all joints or positions need the same settings. A butt joint on flat plate is easier than a vertical-up fillet weld.
- Flat position: Use normal chart settings.
- Vertical-up: Lower wire speed and voltage by about 10–15%.
- Vertical-down: Increase wire speed slightly, but keep voltage low to avoid burn-through.
- Overhead: Use lower voltage to keep the weld pool small and manageable.
How To Tell If Your Settings Are Correct
You can learn a lot by looking at the weld and listening to the arc.
- Good weld: Even bead, smooth surface, little spatter, steady “frying bacon” sound.
- Too much wire speed: Ropey bead, spatter, arc stutters.
- Too little wire speed: Narrow bead, wire burns back, arc is weak.
- Too high voltage: Flat, wide bead, undercut edges.
- Too low voltage: High, narrow bead, poor fusion, cold lap.
It takes practice to notice these signs. The chart is a tool, but your eyes and ears are just as important.
Special Situations And Adjustments
Some projects need special care:
Welding Galvanized Steel
Galvanized steel produces dangerous fumes. Use a lower voltage and wire speed to reduce heat, and always grind away the coating before welding.
Welding Painted Or Rusty Metal
Always clean the surface. Paint and rust will cause porosity and weak welds, no matter what the chart says.
Welding Outdoors
Wind can blow away your shielding gas. Increase gas flow, use a larger nozzle, and try to block the wind.
Tip: Many new welders do not realize how much surface prep and environment matter. Even perfect settings will not work if the metal is dirty or the gas is blown away.
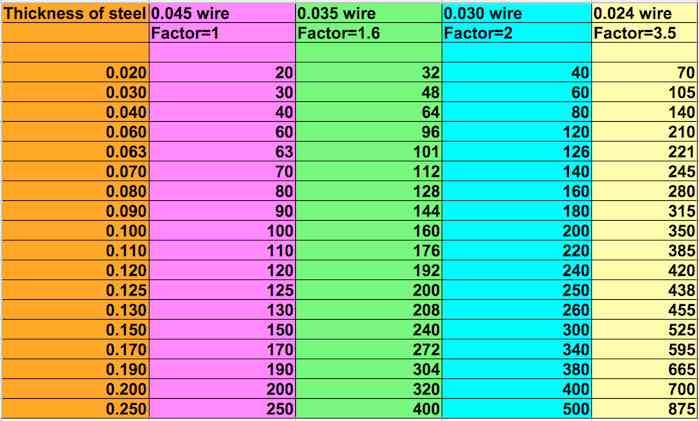
Credit: www.weldingtipsandtricks.com
Advanced Tips: Pulse Mig And Synergic Machines
Some modern MIG machines have “synergic” controls. You set one main value (like wire speed or thickness), and the machine sets voltage and other settings for you.
- These machines are helpful, but you should still check the weld and adjust as needed.
- Pulse MIG allows for better control of heat input, which is useful for thin metals or aluminum.
Insight: Even with advanced machines, understanding the basics of wire speed and voltage helps you troubleshoot and improve your welds.
Keeping A Mig Welding Log
One practice that helps many welders is to keep a simple welding log. Write down:
- Metal type and thickness
- Wire size and type
- Gas
- Wire speed and voltage settings
- Weld results (good, bad, notes)
Over time, you build a personal database. When you face a new project, you have your own chart to reference, based on real experience.
Tip: Many professionals keep a small notebook in their toolbox. It saves hours of guessing and wasted material.
Where To Find Reliable Mig Welding Charts
Most welding machines include a basic chart inside the door. You can also find good charts from:
- Wire manufacturers (like Lincoln Electric, ESAB, Hobart)
- Welding handbooks
- Official websites (for example, Lincoln Electric MIG Welding Guide)
Always check that the chart matches your wire size, gas, and metal type.
Frequently Asked Questions
What Happens If My Wire Speed Is Too High Or Too Low?
If your wire speed is too high, you get excess spatter, a rough arc, and the wire may push into the workpiece. If it is too low, the arc becomes weak, and the wire may burn back into the tip. Both problems can lead to poor quality welds.
Can I Use The Same Voltage For All Metal Thicknesses?
No, you need to adjust voltage for different metal thicknesses. Thicker metal needs higher voltage for good penetration. Thinner metal needs lower voltage to avoid burn-through.
What Is The Best Wire Size For General Mig Welding?
For most home and light shop work, .030″ wire is a good choice for mild steel. It works well on metal from 18 gauge to 1/4″ thick. For thinner metals, use .023″. For thicker, use .035″ or .045″.
Do I Need To Change Wire Speed And Voltage For Different Gases?
Yes. CO2 usually needs higher wire speed and voltage than a 75/25 mix. Always check the chart for your gas, as the arc characteristics change with different gases.
Why Is My Weld Bead Sitting On Top Instead Of Melting In?
This is called cold lap or lack of fusion. The metal is not getting enough heat to melt properly. Increase your voltage and slow down your welding speed for better penetration.
A good MIG welding wire speed and voltage chart is the key to better welds. But no chart is perfect for every situation. Testing, adjusting, and learning from your results will make you a better welder. With practice and attention to detail, you can create strong, neat welds every time.