Disclosure: This post contains affiliate links and I will be compensated if you make a purchase after clicking through my links. Learn More
Learning how to read groove weld symbols starts at the reference line: anything below it applies to the arrow side of the joint, and anything above it applies to the other side. Then read the groove symbol, the depth and weld size to its left, and the root opening and groove angle on the symbol.
These rules come from AWS A2.4, the American Welding Society standard for welding symbols. AWS D1.1 requires welding symbols to follow A2.4, so the same reading method works on most US structural drawings.
We walk through each part of a groove weld symbol, the 7 groove types, and a worked example you can check against your own prints.
Time: a few minutes per symbol | Difficulty: Beginner | Tools: the drawing, its general notes and any section details named in the tail
What You’ll Need
- The shop drawing or print with the welding symbol
- The general notes and any section or detail views
- A copy of AWS A2.4 or your company’s symbol chart for edge cases
Parts of a Groove Weld Symbol
Every groove weld symbol sits on the same frame. Miller Electric lists the parts like this:
- Arrow: points to the joint. For a bevel or J-groove, a break in the arrow points to the member that gets the edge prep.
- Reference line: the horizontal line that carries the instructions. Below it means arrow side, above it means other side.
- Groove symbol: the shape that tells you the joint prep (V, bevel, U, J and so on).
- Dimensions: groove depth and weld size to the left, root opening and groove angle on the symbol.
- Flag: a field weld. A symbol with no flag means the weld is made in the shop.
- Open circle: weld all around the joint.
- Tail: extra notes, such as a process, a detail callout or the weld order.
The 7 Groove Weld Symbols
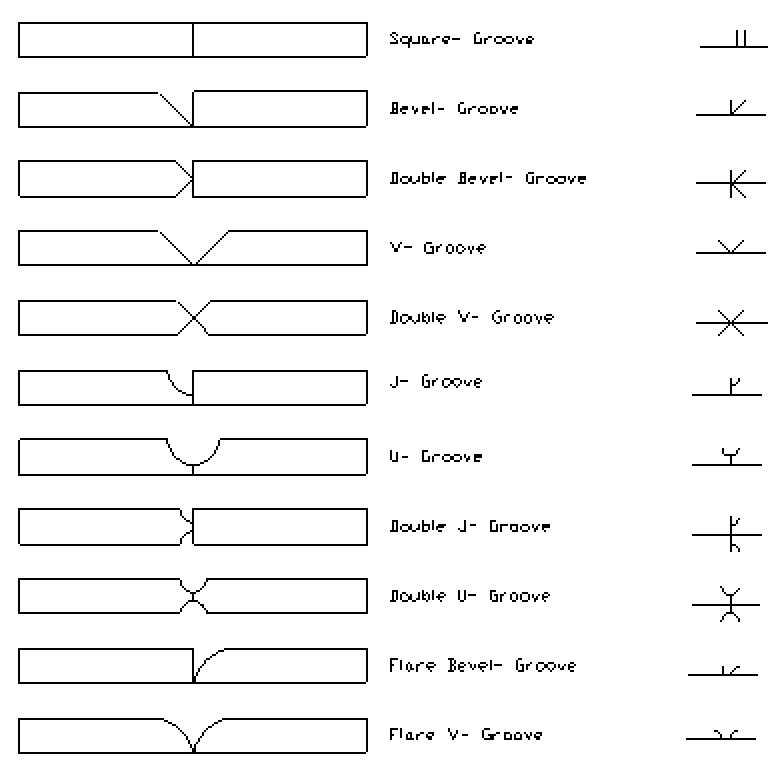
Miller describes each groove type by how the edges are prepared.
| Groove symbol | Edge prep | Typical note |
|---|---|---|
| Square groove | Tight fit or a slight gap, no edge prep | Simplest groove joint |
| V-groove | Both edges chamfered | Depth goes left of the symbol if it is less than full thickness |
| Bevel groove | One edge chamfered, the other square | Arrow points to the chamfered piece, often with a break |
| U-groove | Both edges given a concave shape | Sizes often shown in a detail named in the tail |
| J-groove | One edge concave, the other square | Broken arrow points to the prepared piece |
| Flare-V | 2 round or curved parts | Weld depth in parentheses left of the symbol |
| Flare-bevel | A round or curved part to a flat part | Groove depth and weld depth left of the symbol |
Credit: workforce.libretexts.org (CC BY)
How to Read Groove Weld Symbols: Step by Step
Step 1: Find the Arrow Side
Miller states that the side of the joint the arrow points to is the arrow side, and its instructions go below the reference line. This holds no matter which way the arrow points.
A symbol below the line means weld the arrow side. Above the line means weld the other side. Symbols on both sides mean a double groove weld.
Step 2: Check for a Broken Arrow
On bevel and J-grooves, only one member gets prepared. The LibreTexts welding print text explains that a jog or break in the arrow shows which side of the joint gets the prep.
If there’s no break, the fitter or welder picks which member to prepare.
Step 3: Identify the Groove Type
Match the shape on the reference line to one of the 7 groove types. The shape tells you how to cut or grind the edges before you fit up.
Step 4: Read Groove Depth and Weld Size on the Left
The number to the left of the symbol is the depth of groove preparation. A second number in parentheses is the weld size, also called the effective throat.
Miller explains that when penetration is deeper than the groove, the effective throat appears in parentheses after the groove depth. The LibreTexts text adds that the weld size should not be less than the depth of preparation when no weld size is shown.
Step 5: Read Root Opening and Groove Angle
Miller notes that the groove angle and root separation are written on the symbol. The groove angle is given in degrees and covers the whole groove.
LibreTexts warns not to mix up groove angle and bevel angle. On a V-groove, the bevel angle is only half of the groove angle.
Step 6: Decide CJP or PJP
STRUCTURE magazine explains that a V-groove weld with no throat or depth of prep is assumed to be complete joint penetration (CJP). LibreTexts says the same for single groove welds unless the drawing says otherwise.
Flare-bevel and flare-V welds are always partial joint penetration (PJP), so their effective throat must always appear in parentheses.
Step 7: Check the Supplementary Symbols and Tail
Look across the reference line from the groove symbol for a backing or melt-through symbol. Miller notes that an R in the backing symbol means you remove the backing bar after welding.
LibreTexts points out that a back weld and a backing weld share the same symbol, so read the tail to tell them apart. The tail can also give the weld order, such as other side welded first.
Worked Example: Reading a Single V-Groove Symbol
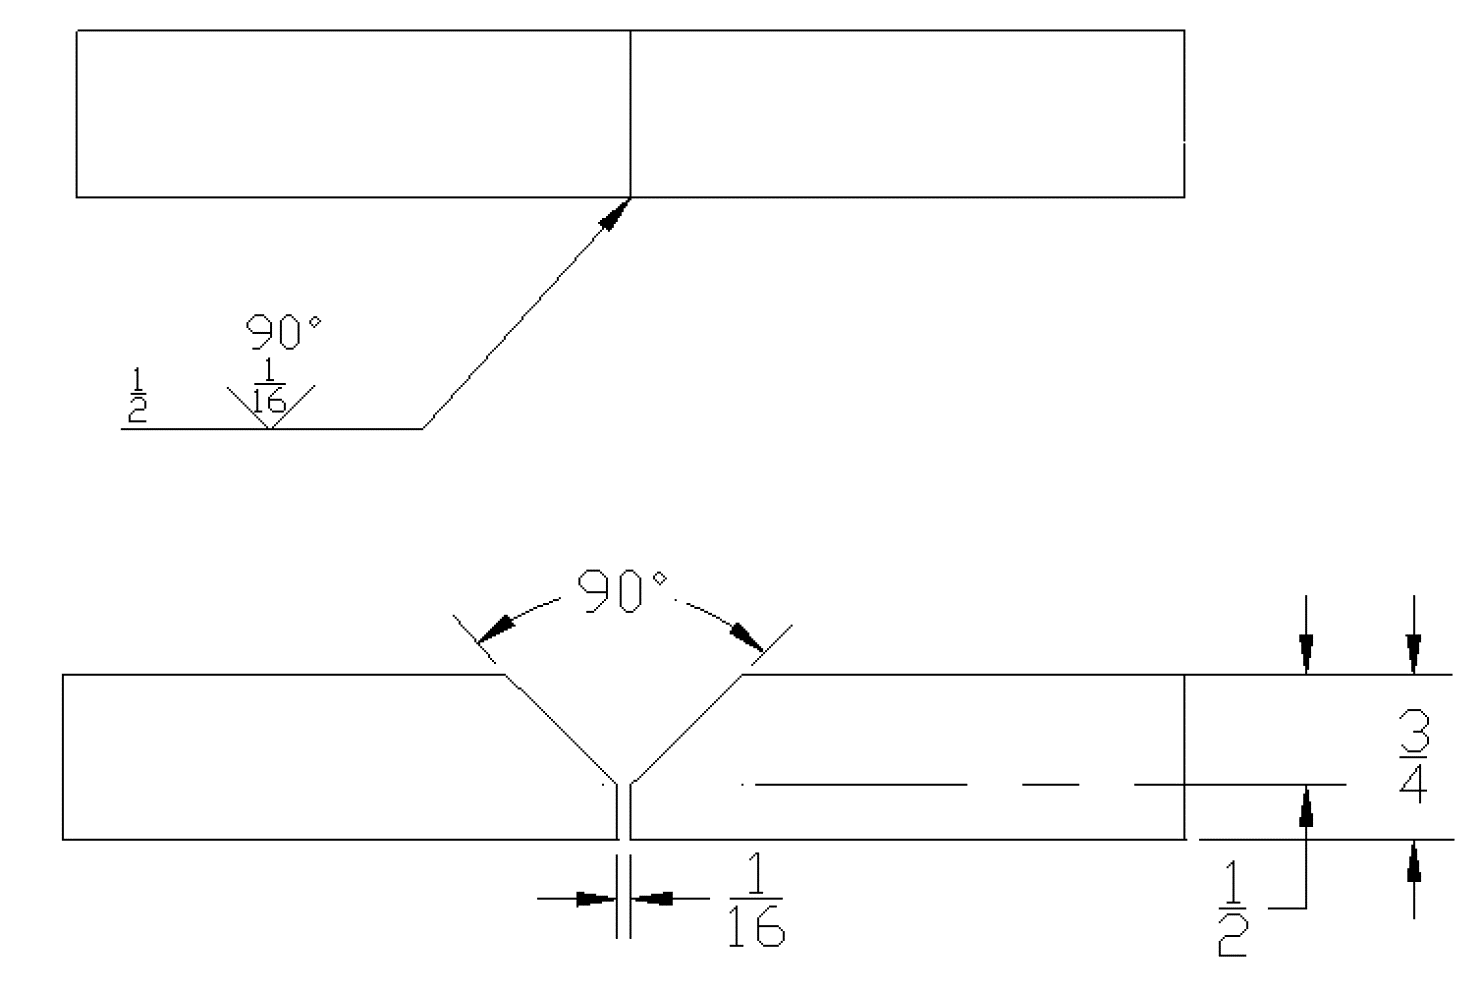
The LibreTexts welding print text gives a clear example of a single V-groove on the other side.
Credit: workforce.libretexts.org (CC BY)
- Groove symbol above the line: weld the other side.
- 1/2 inch groove depth on the left: prep the V 1/2 inch deep.
- 1/16 inch root opening: leave a 1/16 inch gap at fit-up.
- 90 degree groove angle: the full V is 90 degrees, so each bevel is 45 degrees.
On a 3/4 inch plate, a 1/2 inch groove depth leaves a 1/4 inch root face, as the example notes. With no weld size in parentheses, the weld should be at least as deep as the 1/2 inch prep.
Common Mistakes to Avoid
- Reading near side and far side: STRUCTURE notes that arrow side and other side refer to the joint, not to where you stand.
- Mixing up depth and weld size: the number without parentheses is groove depth. The number in parentheses is weld size.
- Confusing groove angle with bevel angle: the groove angle is the full included angle.
- Ignoring the broken arrow: prepping the wrong member on a bevel or J-groove means re-cutting.
- Skipping the tail: it can name a detail, a process or the weld order.
- Guessing on flare welds: the effective throat in parentheses is the size to meet.
Frequently Asked Questions
What does the number in parentheses mean on a groove weld symbol?
The number in parentheses is the weld size, also called the effective throat. The number before it, outside the parentheses, is the depth of groove preparation. Miller notes the effective throat appears in parentheses when penetration goes deeper than the groove depth on the drawing.
What does a groove weld symbol with no dimensions mean?
A single V-groove weld with no depth or throat shown is usually read as a complete joint penetration (CJP) weld, per AWS A2.4 practice described by STRUCTURE magazine. Check the general notes and the tail, because the engineer can call out other requirements there.
What does a broken arrow mean on a bevel weld symbol?
A broken arrow shows which member gets the edge preparation on a bevel or J-groove weld. The arrow points to the piece you chamfer or shape. With no break in the arrow, the fitter or welder can choose which member to prepare.
Where is the groove angle shown on a weld symbol?
The groove angle is written on the weld symbol in degrees, next to the groove shape. It covers the full included angle of the groove. On a V-groove, each bevel is half of that number, so a 60 degree groove angle means two 30 degree bevels.
What is the difference between a groove weld and a fillet weld symbol?
A fillet weld symbol is a right triangle for T, lap and corner joints with no edge prep. Groove weld symbols show a prepared or square groove between members, such as a V, bevel, U or J, and they often carry depth and angle dimensions.
Final Words
Reading groove weld symbols gets simple once you follow the same order every time. Start with the arrow side, check for a broken arrow, then read the groove type, depth, weld size, root opening and angle.
Finish with the supplementary symbols and the tail, and check anything unclear against AWS A2.4 or the engineer’s notes before you cut metal.