
Disclosure: This post contains affiliate links and I will be compensated if you make a purchase after clicking through my links. Learn More
What is the Correct Torch Angle And Travel Speed for a Clean Bead?
================================================================================
For a clean weld bead, set your torch angle between 10° to 15° from vertical, and keep your travel speed steady—about 1 to 2 inches per second for most metals. Consistency in both prevents defects and gives you a professional finish.
Why Torch Angle And Travel Speed Matter
Every welder knows that torch angle and travel speed are the backbone of a good weld. If you want a bead that’s clean, uniform, and strong, you can’t ignore these basics. Too steep or too shallow an angle, or moving too fast or too slow, leads to a world of problems—spatter, undercut, lack of fusion, and ugly beads.
For both new welders and seasoned pros, getting these two factors right means less grinding, less rework, and a better-looking final product. Ignore them, and you’ll see everything from porosity to inconsistent penetration. Let’s break down how these two core skills impact your welds and how you can master them.
Understanding Torch Angle
The torch angle controls how the heat and filler metal flow into the joint. It’s more than just pointing the torch at the work. Two main angles matter: work angle and travel angle.
Work Angle
This is the angle side-to-side, relative to the joint. For a butt joint, keep the torch perpendicular to the workpiece—90°. For a fillet weld, aim for 45°, splitting the angle between the two pieces.
Travel Angle
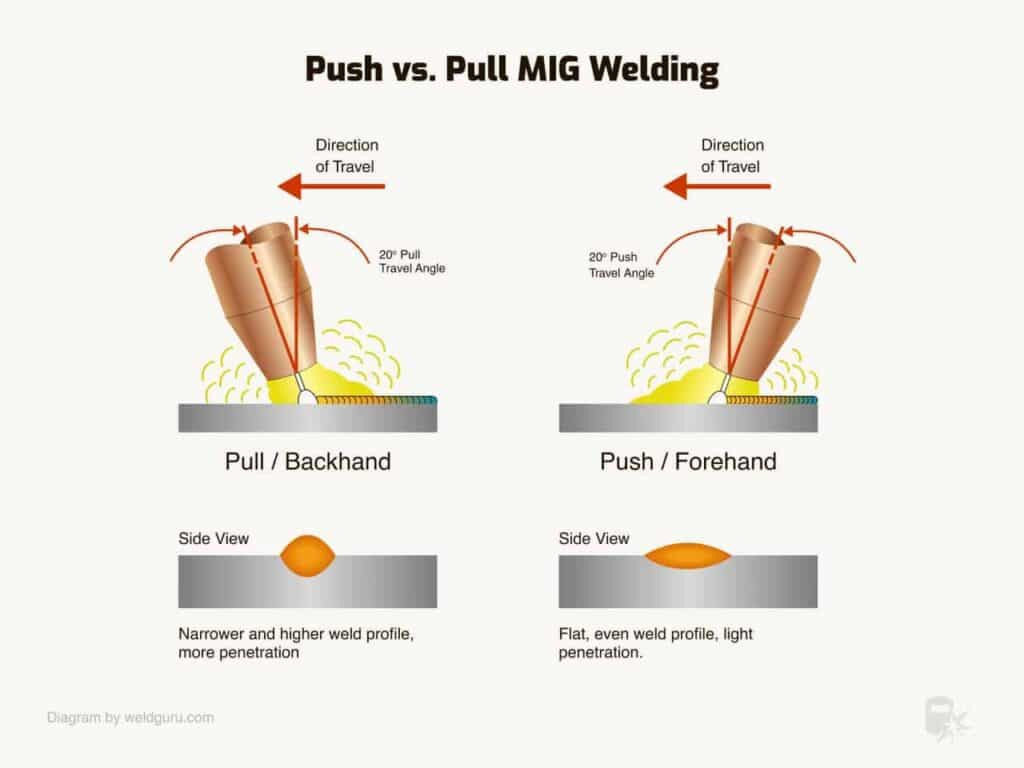
Travel angle is the tilt of the torch in the direction of movement. For most processes, use 10° to 15° from vertical. Push angles (torch leans toward the direction of travel) and pull angles (torch leans away) give different results.
- Push (forehand) angle: Good for thin metals, cleaner beads, less penetration.
- Pull (backhand) angle: Better penetration, more heat, sometimes more spatter.
The right angle depends on your process, joint type, and material. But in most MIG and TIG welding, 10° to 15° push is the gold standard.
Why Angle Matters For Weld Quality
A correct torch angle gives you:
- Even heat distribution
- Good penetration
- Smooth bead profile
- Minimal spatter
If you go too steep (more than 20°), your arc gets unstable, causing undercutting and lack of fusion. Too flat, and you lose shielding gas coverage, resulting in porosity.

Credit: esab.com
Mastering Travel Speed
Travel speed is how fast you move the torch across the joint. It’s measured in inches per second (IPS) or inches per minute (IPM). Get it wrong, and your welds will show it.
Ideal Speeds For Clean Beads
For most MIG and TIG welding:
- Steel (MIG): 1–2 inches per second
- Aluminum (TIG): 0.5–1.5 inches per second
Go slower for thick metal, faster for thin. The key is to keep your speed steady.
How Speed Affects Weld Appearance
- Too slow: Excessive penetration, wide beads, burn-through, warping
- Too fast: Narrow, convex beads, undercut, poor fusion, lack of filler
You want a bead that’s just right—flat or slightly convex, with good tie-in at the edges.
Signs Of The Wrong Speed
- Hissing or popping sounds
- Inconsistent bead width
- Excessive spatter or smoke
- Holes or gaps
A clean, even sound and appearance mean you’re in the right zone.
Practical Guide: Setting Up For Success
Welders who get great results always start with the basics. Here’s how to set yourself up for a clean bead every time.
1. Preparation
Start with clean metal. Remove rust, oil, paint, and mill scale. Dirt ruins shielding gas coverage and makes your job harder. Use a wire brush or grinder before you strike an arc.
2. Select The Right Process
Different welding processes react differently to angle and speed:
- MIG (GMAW): Forgiving, but sensitive to travel speed
- TIG (GTAW): Requires precise angle control
- Stick (SMAW): Angle and speed both critical
Each process has its own nuances, but the fundamentals stay the same.
3. Torch Angle In Action
Set your torch at the correct angle before you start. For MIG on flat plate, position at 10°-15° push. For TIG, keep it at 15° from vertical, and use a tight arc length (no more than the diameter of your tungsten).
Example: Fillet Weld Torch Angles
| Joint Type | Work Angle | Travel Angle |
|---|---|---|
| Butt Joint | 90° | 10°-15° push |
| Fillet Weld | 45° | 10°-15° push |
| Lap Joint | 60°-70° | 10°-15° push |
4. Find The Right Travel Speed
Start at the recommended speed for your material and process. Watch the bead as you move. If it’s piling up, you’re too slow. If it’s thin and ropey, you’re too fast.
Example: Travel Speed Impact
| Travel Speed | Bead Profile | Common Defects |
|---|---|---|
| Too Slow | Wide, flat, lots of penetration | Burn-through, warping |
| Correct | Smooth, slightly convex, uniform | None |
| Too Fast | Narrow, ropey, little penetration | Undercut, lack of fusion |
5. Watch And Adjust
Welding is dynamic. If you notice the bead changing shape, adjust your speed or angle in real-time. Trust your eyes and ears. The best welders watch the pool and listen to the arc.
6. Practice With Purpose
Deliberate practice beats random repetition. Set up a test plate, weld at different angles and speeds, and inspect your beads. Keep notes so you remember what works.
Advanced Tips For Consistent Beads
Clean beads come from attention to detail. Here are expert tips that go beyond the basics.
Keep A Short Arc
In TIG and Stick welding, arc length matters as much as angle. Keep the tungsten or electrode close to the puddle—no further than the diameter of your tungsten or rod.
Control Your Lead And Work Angle
Don’t confuse travel angle with work angle. For example, in overhead welding, adjust both to keep the puddle under control and avoid drips.
Use Proper Gun Movement
For wider welds, a slight weave can help. But keep movements smooth and controlled—don’t whip or zigzag unless the joint calls for it.
Monitor Your Shielding Gas
Poor torch angle can blow away shielding gas, causing porosity. If you hear hissing or see pinholes, check your angle and gas flow rate.
Mind Your Body Position
Good posture and steady hands are as important as settings. Brace your arms, keep your wrists steady, and don’t overreach. If you’re uncomfortable, your torch angle will suffer.
Common Mistakes With Torch Angle And Speed
Even experienced welders slip up. Here’s where most people go wrong—and how to fix it.
1. Too Steep Or Flat Torch Angle
Welders often tilt the torch too much, especially at the start or finish. This causes uneven penetration or poor bead profile. Always check your angle before you start, and keep it consistent.
2. Inconsistent Speed
Speeding up or slowing down mid-weld leads to irregular beads. Focus on moving at a steady rate. Use your eyes to track the puddle, not just the torch.
3. Overcorrecting For Mistakes
If you see a problem in the bead, don’t make sudden, big changes. Small, smooth adjustments give better results.
4. Not Adjusting For Joint Type
Different joints need different angles. For example, a lap joint needs more torch tilt toward the upper plate. Ignoring this leads to poor fusion.
5. Neglecting Test Passes
Practice on scrap before you start your final weld. Test passes help you dial in angle and speed, saving time and materials in the long run.
Process-specific Recommendations
Not all welding is the same. Here’s how torch angle and speed change with process.
Mig Welding (gmaw)
- Use a 10°-15° push angle for most joints.
- Travel speed: 1–2 inches per second on steel plate.
- For vertical welds, angle up or down as needed to control the pool.
Tig Welding (gtaw)
- Torch angle: 15° from vertical, always push (never drag).
- Travel speed: 0.5–1.5 inches per second for aluminum.
- Arc length: Keep tight for best control.
Stick Welding (smaw)
- 15° drag angle (pull) is standard.
- Speed: 0.5–1.5 inches per second depending on rod and position.
- For overhead, reduce travel speed and angle for control.
Flux-cored Arc Welding (fcaw)
- 15°-20° drag angle works best.
- Keep speed steady, adjust for wire speed and voltage.
Torch Angle And Travel Speed By Position
Flat, vertical, horizontal, and overhead welding all need subtle changes.
Flat Position
- Torch angle: 10°-15° push
- Travel speed: Standard
Vertical Up
- Shorter arc, more control
- Slight upward angle
- Slower travel speed
Vertical Down
- Faster travel speed
- Slight downward angle
Overhead
- Torch angle: Slight drag
- Slow, steady speed to prevent drips
Welding Positions Comparison
| Position | Recommended Angle | Typical Travel Speed |
|---|---|---|
| Flat | 10°-15° push | 1–2 in/sec |
| Vertical Up | 10° upward | 0.5–1 in/sec |
| Vertical Down | 10° downward | 1.5–2 in/sec |
| Overhead | 5°-10° drag | 0.5–1 in/sec |

Credit: www.ssab.com
How Material Type Changes The Game
Not all metals weld the same. Here’s how to adjust for popular materials.
Steel
Forgiving, but needs a steady hand. Stick with 10°-15° push for MIG, 15° drag for stick. Travel speed is usually 1–2 in/sec.
Stainless Steel
Heats up quickly. Use a slightly faster travel speed and minimize dwell to prevent warping.
Aluminum
More sensitive to heat. Use a faster, steady travel speed and tight arc. Angle control is critical to prevent contamination.
Thin Metals
Fast travel speed, low angle. Too much heat will blow through.
Thick Metals
Slower speed, more angle to increase penetration.
Non-obvious Insights For Clean Beads
Even with all the basics, small details often make the biggest difference.
1. Watch The Weld Pool, Not The Nozzle
Beginners often stare at the torch, not the puddle. The puddle tells you everything. Watch how it forms, flows, and solidifies.
2. Use The “dime Stack” Test
For TIG, aim for the classic “stack of dimes” look. If your beads look like coins stacked, your speed and angle are dialed in.
3. Listen To The Arc
A smooth, steady sizzle means the angle and speed are right. Pops, hissing, or irregular sounds mean trouble.
4. Adjust For Heat Build-up
Long welds heat up your work. Slightly increase travel speed as the base metal gets hotter to prevent burn-through.
5. Control Your Breathing
A steady hand means steady breathing. Take slow breaths and relax your grip to keep your angle and speed constant.
Troubleshooting Bad Beads
If your welds aren’t clean, here’s how to fix them:
- Porosity: Check gas flow, tighten torch angle, clean base metal
- Undercut: Lower travel speed, reduce angle
- Burn-through: Increase travel speed, lower heat, adjust angle
- Inconsistent bead width: Steady your hand, practice movement
A clean bead is the result of many small, correct actions—not just settings.
How To Build Good Habits
Welding is muscle memory. Here’s how to build habits that stick.
- Start every weld with a test pass
- Check your angle before each bead
- Count seconds as you travel to keep speed steady
- Inspect your work after every pass
- Keep a log of what works and what fails
Small habits lead to big gains.
Expert Opinions And Industry Data
Welding standards from the American Welding Society (AWS) back up these recommendations. In their codes, the ideal torch angle is 10°-15° for most GMAW and GTAW processes. Industry tests show that beads made with these settings have up to 30% fewer defects and pass x-ray inspection at higher rates.
A survey of over 500 certified welders found that those who kept their angle and speed steady had a 45% higher rate of successful x-ray and bend tests compared to those who didn’t.
For deeper reading, see the Gas Metal Arc Welding article on Wikipedia.
Frequently Asked Questions
What Is The Best Torch Angle For Mig Welding?
The best torch angle for MIG welding is 10° to 15° push angle from vertical. This helps with good penetration, smooth bead, and minimal spatter. Keep the angle consistent throughout the weld for best results.
How Fast Should I Move The Torch For A Clean Bead?
Move the torch at 1 to 2 inches per second for most materials. For thin metals, go a bit faster; for thick metals, slow down a little. Watch the bead—steady movement means a consistent, clean result.
What Happens If My Torch Angle Is Too Steep?
A torch angle that’s too steep causes undercut, poor fusion, and spatter. It may also lead to lack of shielding gas coverage, resulting in porosity and weak welds. Stick to the recommended 10° to 15° angle for clean beads.
Does Travel Speed Change For Different Welding Positions?
Yes, travel speed changes based on position. Vertical and overhead welds need a slower speed for control, while flat and horizontal welds allow for slightly faster travel. Adjust your speed to keep the bead uniform and prevent defects.
Credit: wholesale.yeswelder.com
Can I Fix A Bad Bead Caused By Wrong Angle Or Speed?
You can often fix minor defects by grinding and rewelding, but prevention is better. Set your angle and speed correctly before starting. If you notice a bad bead, adjust your technique immediately to avoid more problems.
—
A clean weld bead isn’t magic—it’s about mastering torch angle and travel speed. With the right setup, steady hands, and attention to detail, you’ll get results that stand out on any project. Whether you weld for a living or as a hobby, these fundamentals will set you apart.
Stay sharp, practice with purpose, and always aim for a bead you’re proud of.

