
Disclosure: This post contains affiliate links and I will be compensated if you make a purchase after clicking through my links. Learn More
Wiring a 220 outlet for a welder means following safety codes, using the right wire size, breaker, and tools, and making secure connections. This process isn’t hard, but it demands focus, the right materials, and a step-by-step approach to avoid electrical hazards.
Why 220 Outlets Are Critical For Welders
A welder pulls a lot of power, especially larger models used in garages or workshops. Most home outlets are 110 volts and can’t deliver enough amperage for proper welding. A 220-volt outlet provides double the voltage, which means better performance, smoother welds, and less risk of tripping breakers or damaging equipment. Welders running on 220V also run cooler and more efficiently, which extends the life of your machine.
Safety First: What You Must Know
Working with 220 volts is serious business. Electric shock can kill, and a wiring mistake can cause fires. Turn off the main breaker before starting. Use a non-contact voltage tester to confirm there’s no live power at the wires. Wear insulated gloves, sturdy shoes, and eye protection. If you’re unsure about any step, contact a licensed electrician. Never cut corners with electrical safety.
Tools And Materials: What You Need
Before touching a wire, gather all your tools and materials. It’s frustrating to stop halfway because you’re missing something. Here’s what you’ll need:
- Welder outlet (NEMA 6-50 or 14-50, depending on your welder)
- Double-pole breaker (amperage matches your welder’s requirements)
- Electrical wire (typically 8-gauge or 6-gauge, copper, based on welder amps and run length)
- Wire strippers and cutters
- Screwdrivers (flat and Phillips)
- Drill with bits
- Voltage tester
- Fish tape (for pulling wire through walls)
- Electrical box (metal or plastic, deep enough for heavy wires)
- Cable clamps and wire nuts
Pro tip: Always check your welder’s manual for the recommended outlet and wire size. Some larger welders need 6-gauge wire and a 50-amp breaker.
Understanding Codes And Permits
The National Electrical Code (NEC) requires all permanent electrical work to meet certain standards. Some cities require a permit and inspection. Skipping this step can cause trouble if you sell your house or have an insurance claim. Check with your local building department or visit their website for requirements. Always use materials rated for 220 volts and the correct amperage.
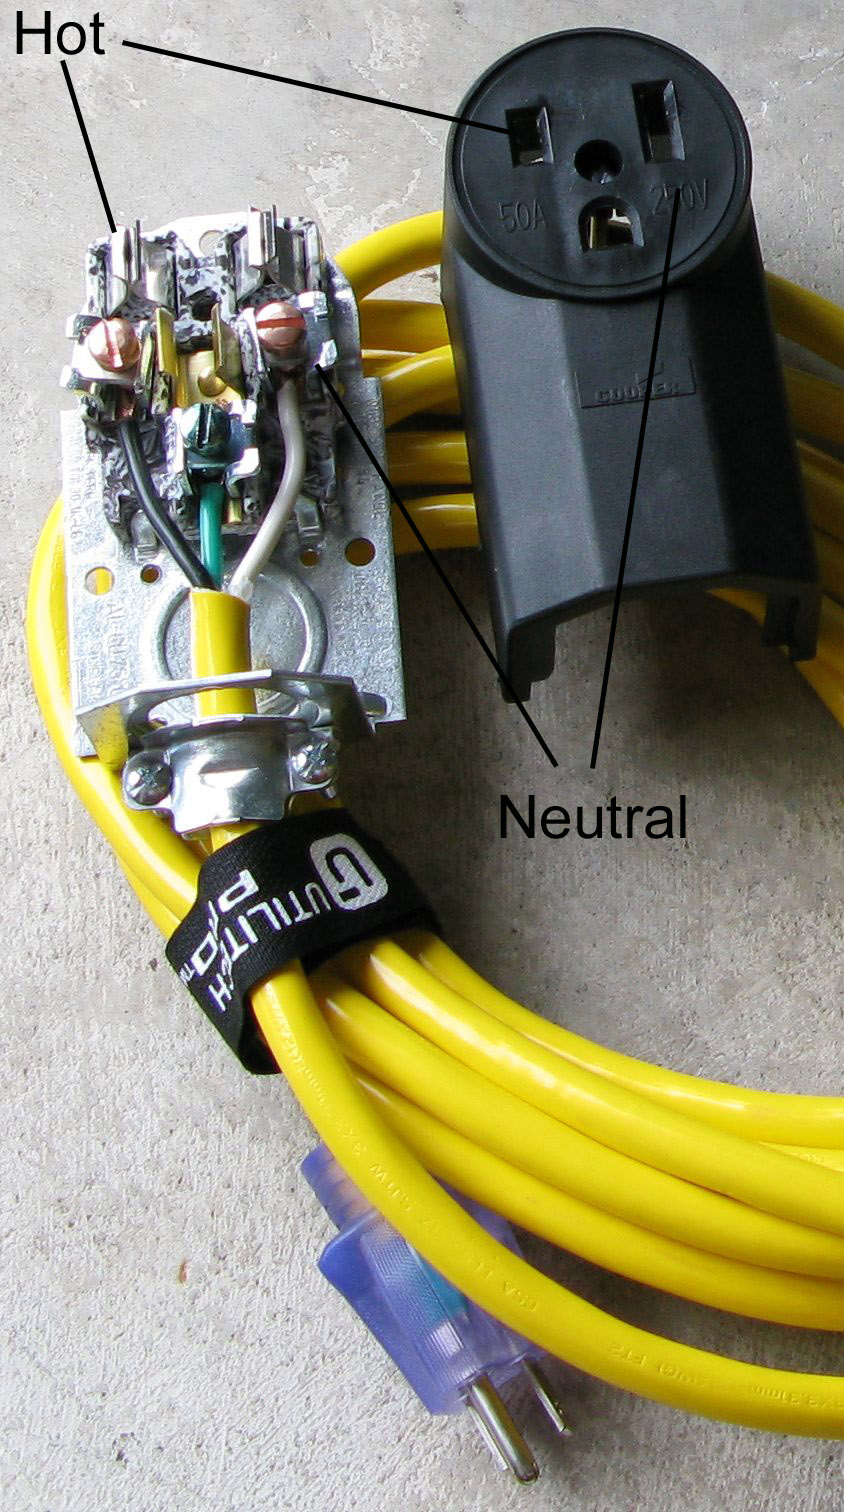
Credit: robrobinette.com
How To Choose The Right Outlet And Breaker
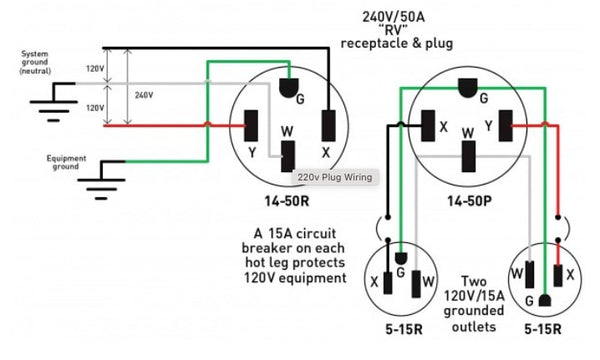
Welder outlets come in a few common types. The most popular are NEMA 6-50 and NEMA 14-50. The 6-50 has two slanted prongs and a round ground. The 14-50 has four prongs (two hots, one neutral, one ground). Match the outlet to your welder’s plug.
The breaker size depends on your welder’s amp draw:
- Up to 40 amps: Use an 8-gauge wire and a 40-amp breaker
- Up to 50 amps: Use a 6-gauge wire and a 50-amp breaker
If your welder draws less, you can use a smaller breaker and wire, but never go smaller than the manufacturer’s recommendation.
Step-by-step: How To Wire A 220 Outlet For A Welder
1. Plan Your Circuit
Find the shortest, safest path from your electrical panel to the outlet location. Fewer bends and shorter runs mean less voltage drop and easier pulls. Avoid water sources and keep wires away from sharp edges.
2. Turn Off Power
Go to your main panel and shut off the main breaker. Use your voltage tester on a known live circuit to verify it’s working, then check the panel and outlet wires to confirm power is off.
3. Install The Outlet Box
Mark the outlet location at least 18 inches above the floor for easy access. Use a stud finder to ensure you’re not drilling into pipes or other wires. Secure the electrical box to a stud. If mounting on concrete or block, use a masonry box and anchors.
4. Run The Wire
Measure the distance from the panel to the outlet box. Add extra for bends and slack. Feed the wire through walls or along the ceiling using fish tape if needed. Secure the wire with staples every 4.5 feet (as required by code).
5. Wire The Outlet
Strip about 3/4 inch of insulation from each wire end. Connect the black and red wires to the brass terminals (these are your “hot” wires). Connect the bare or green wire to the ground terminal. For a NEMA 14-50, connect the white (neutral) wire to the silver terminal. Tighten all screws firmly.
6. Connect To The Breaker Panel
Route the wire into the breaker panel through a knockout hole using a cable clamp. Connect the black and red wires to the double-pole breaker terminals. Connect the ground wire to the ground bus bar. If using a 14-50, connect the neutral to the neutral bus bar.
Pro tip: Always install the breaker last. Don’t snap it into place until all other connections are secure.
7. Mount The Outlet And Cover
Screw the outlet into the box and attach the cover plate. Make sure no wires are pinched or exposed.
8. Install The Breaker
Snap the double-pole breaker into the panel. Double-check all connections. Label the new breaker “Welder Outlet” for clarity.
9. Test Your Work
Restore power at the main breaker. Use a voltage tester at the outlet to confirm 220V across the hot terminals and correct voltage between each hot and ground. Plug in your welder and check for proper operation.
Wire Size And Voltage Drop: Why It Matters
Wire size isn’t just about code—it affects welder performance. Too small a wire causes voltage drop, which can make your welder run hot, trip breakers, or struggle to start an arc. Here’s a quick comparison for common wire sizes and amperage:
| Amps | Copper Wire Size (AWG) | Max Run (Feet) | Common Use |
|---|---|---|---|
| 30A | 10 | 50 | Small welders |
| 40A | 8 | 50 | Mid-size welders |
| 50A | 6 | 50 | Large welders |
If your run is longer than 50 feet, go up one wire size to prevent voltage drop.
Common Wiring Mistakes (and How To Avoid Them)
Wiring mistakes can be costly or dangerous. Here’s what pros see most often:
- Undersized wire – Always use the right gauge for your welder’s amps and run length.
- Loose connections – Tighten all screws firmly. Loose wires cause heat and arcing.
- Wrong outlet type – Match outlet to welder plug. Don’t modify plugs.
- Missing ground – Every 220 outlet needs a solid ground connection for safety.
- Breaker installed before wiring – Install the breaker only after all wires are connected.
- No permit or inspection – Always check local codes to avoid problems later.
Example: Wiring A 50-amp Welder Outlet
Let’s say your welder calls for a 50-amp, 220V circuit. You’ll use a NEMA 6-50 outlet, a 50-amp double-pole breaker, and 6-gauge copper wire. Here’s how that looks:
- Install the box at your desired location.
- Run 6-gauge wire from panel to box.
- Connect black and red to hot terminals, ground to ground.
- At the panel, connect black and red to breaker, ground to bus bar.
- Install outlet and breaker, test voltage.
This setup will handle almost any home shop welder up to 50 amps.
Working With Conduit: When And Why
If your wire runs on the surface (in a garage or shop), code requires conduit. Use EMT (thin-wall metal conduit) for most indoor runs. For outdoor or damp areas, use PVC or liquid-tight conduit. Cut conduit to length, deburr the ends, and use proper connectors. Pull wire through before mounting to save effort.
Comparing Outlet Types For Welders
Here’s a side-by-side look at the two most common welder outlets:
| Outlet Type | Prongs | Neutral? | Typical Use |
|---|---|---|---|
| NEMA 6-50 | 3 (2 hot, 1 ground) | No | Most welders |
| NEMA 14-50 | 4 (2 hot, 1 neutral, 1 ground) | Yes | Some welders, RVs, ranges |
Tip: If your welder doesn’t have a neutral, don’t connect the white wire.
Grounding: Don’t Skip This Step
A good ground connection protects you and your equipment. Connect the bare copper or green wire to the ground terminal in the outlet and to the ground bar in your panel. Never use the neutral as a ground. For older homes, you may need to run a separate ground wire—check code.
Gfci Protection: Is It Needed?
Most codes don’t require GFCI for 220V welder outlets in garages, but it’s becoming more common for added safety. GFCI breakers are more expensive but protect against shock. Check your local code or ask an inspector.
Outdoor And Detached Garage Installations
If installing a 220 outlet in a detached garage, use underground-rated wire (UF-B or THWN in conduit). Bury wire at least 18 inches deep. Seal all boxes against moisture and use weatherproof covers.
Credit: www.arccaptain.com
Testing And Troubleshooting
After installing, use a multimeter to check:
- Voltage across hots: Should be 220–240V
- Hot to ground: Each should read 110–120V
- Ground to neutral: Should be zero (or nearly)
If you get odd readings, re-check your connections. If the breaker trips or the welder won’t start, double-check wire size and breaker rating.
Maintenance And Inspection
Check your outlet and breaker at least yearly. Look for:
- Discoloration (sign of heat)
- Loose screws
- Cracked outlet covers
- Corrosion (especially in damp garages)
Replace any damaged parts right away to prevent failures.
Upgrading Or Adding Circuits
If you plan to run multiple heavy tools, consider adding a subpanel in your garage. This allows more circuits and avoids overloading your main panel. Talk with an electrician if you’re unsure about panel capacity.
Real-world Example: Home Welding Shop
A small fabrication business installed three NEMA 6-50 outlets, each on a dedicated 50-amp circuit with 6-gauge wire in EMT conduit. This setup allows multiple welders, a plasma cutter, and a compressor to run safely, with breakers labeled for each tool.
By planning for growth, they avoided costly upgrades later.
How To Read Your Welder’s Electrical Label
Every welder has a data plate with key info:
- Input voltage (usually 220V or 240V)
- Amperage draw
- Phase (single-phase for most home welders)
- Frequency (60 Hz in USA)
Use this info to choose wire and breaker size. If in doubt, go bigger on wire—it’s safer and future-proofs your shop.
Cost Breakdown: Diy Vs. Electrician
Wiring a 220 outlet yourself typically costs $100–$250 in materials (wire, breaker, outlet, box). Hiring an electrician can add $200–$500 for labor, but ensures code compliance and peace of mind. For complex setups, or if you’re not confident, hiring a pro is smart.
When To Call A Professional
If your panel is full, you need to upgrade service, or don’t understand electrical diagrams, call a licensed electrician. They can assess load, pull permits, and guarantee safe, code-compliant work. DIY saves money but only if done right.
Useful Tips For First-time Installers
- Always double-check wire size and breaker rating before buying materials.
- Use a label maker to mark your new circuit in the panel.
- If your garage is unfinished, run conduit on the wall for easy access later.
- Never use aluminum wire for welder circuits—stick with copper.
- Don’t trust wire colors in old homes; always verify with a tester.
Troubleshooting Common Problems
If your welder outlet isn’t working:
- Check that the breaker is fully snapped in.
- Test voltage at the outlet.
- Inspect for loose wires or poor connections.
- Look for tripped GFCI or upstream breakers.
Common insight: Many issues come from wire insulation nicked during pulling—inspect all wires for cuts or exposed copper.
Nec Code Updates And What They Mean For You
The 2023 NEC update now requires tamper-resistant outlets in some garage situations, and more GFCI protection in outbuildings. Always check the latest code before starting. This avoids expensive rework later.

Credit: www.wcwelding.com
Recommended Brands And Where To Buy
Stick with trusted brands for outlets and breakers, like Leviton, Square D, and Siemens. Buy from home centers, electrical supply houses, or online sources with good reviews. Cheap parts often fail early.
Advanced Options: Switched Outlets And Remote Disconnects
Some welders install a safety disconnect (manual switch) near the outlet for extra safety. This lets you shut off power without opening the panel. Remote disconnects are required in some industrial shops.
Comparing 220v Welder Outlet To 110v
Why not just use 110V? Here’s a direct comparison:
| Feature | 110V Outlet | 220V Outlet |
|---|---|---|
| Max Amps | 20 | 50 |
| Welder Power | Low | High |
| Breaker Trips | Often | Rarely |
| Efficiency | Poor | Excellent |
Key insight: Always use a 220V outlet for welders above 30 amps—don’t risk your safety or equipment on an overloaded 110V line.
Where To Learn More
You can find more details in the National Electrical Code or from your city’s building department. For those who want to study the latest standards, check out the National Electrical Code on Wikipedia.
Final Thoughts
Wiring a 220 outlet for a welder isn’t complicated if you follow the right steps and use quality materials. The most important things are safety, using the correct wire and breaker size, and making secure, code-compliant connections. If you’re ever in doubt, get help from a qualified electrician—your life and property are worth it.
Start with a plan, work methodically, and you’ll have a safe, powerful outlet that makes welding a pleasure for years to come.
Frequently Asked Questions
How Do I Know What Size Breaker My Welder Needs?
Check your welder’s data plate for amp draw. Use a breaker rated just above that. Most home welders need a 40- or 50-amp double-pole breaker. Always follow the manufacturer’s recommendations for safety and performance.
Can I Use A Standard Outlet For My Welder?
No, standard outlets can’t handle the high current welders need. You must use a 220-volt outlet, such as a NEMA 6-50 or 14-50, with the correct wire and breaker size. This ensures safe, reliable operation without tripping breakers.
Is It Safe To Wire A 220 Outlet Myself?
It’s safe if you understand electrical work and follow all codes and safety rules. Always turn off power before starting. If you’re unsure about any part of the job, hire a licensed electrician to avoid hazards and code violations.
What Type Of Wire Should I Use For A 220v Welder Outlet?
Use copper wire, typically 6-gauge for 50 amps or 8-gauge for 40 amps. Never use aluminum wire for welder circuits. Always check your welder’s manual for the right size and upgrade wire size for long runs to prevent voltage drop.
Do I Need A Permit To Install A 220v Outlet For A Welder?
Most cities require a permit and inspection for new circuits. Always check with your local building department before starting. Getting a permit ensures your work meets code and avoids problems when selling your home or dealing with insurance.

