
Disclosure: This post contains affiliate links and I will be compensated if you make a purchase after clicking through my links. Learn More
Fillet welds are everywhere in metalwork, construction, and manufacturing. If you look at bridges, buildings, or even small machines, you will find these simple but strong welds holding parts together. Many people, especially those new to welding, often ask: how thick should a fillet weld be? There are many codes and standards, but sometimes you just need a simple rule that works in most situations. This is where the fillet weld size rule of thumb comes in. It gives welders and engineers a quick way to decide on weld size without complicated math.
This article explains the fillet weld size rule of thumb in detail. It covers why this rule exists, how to use it, and when it works best. You will learn about the basics of fillet welds, see practical examples, and understand common mistakes.
Whether you are a beginner or just want a clear explanation, this guide will help you avoid confusion and make better welding decisions.
What Is A Fillet Weld?
A fillet weld is a triangular weld that connects two metal pieces at a right angle or other angles. You often find it joining plates, beams, and other structural parts. The shape looks like a triangle if you cut through it and look at the end.
Fillet welds are popular because they are easy to make and use less preparation than other welds. They are used in T-joints, lap joints, and corner joints. These welds are strong and reliable when made correctly.
Fillet welds are measured by their “leg size. ” This is the distance from the root of the weld to the toe on each side. Both legs are usually the same length, but in some cases, they can be different.
The throat is the shortest distance from the root to the face of the weld.
Why Fillet Weld Size Matters
Choosing the right size for a fillet weld is important. If the weld is too small, the joint may break under stress. If the weld is too large, you waste material, time, and money. Too much heat can also damage the metal around the weld.
Correct weld size gives the right balance between strength and cost. It also meets safety codes and keeps structures safe. Welding codes like AWS D1. 1 (American Welding Society) and ISO 2553 set minimum sizes, but in many cases, you need a simple rule to follow on the shop floor.
Credit: www.sefindia.org
The Fillet Weld Size Rule Of Thumb Explained
The rule of thumb for fillet weld size is simple: the leg length of the fillet weld should be about 70% to 80% of the thickness of the thinner part being joined. This gives a strong joint without using more weld metal than needed.
For example:
- If you are welding a 10 mm thick plate to a 6 mm thick plate, use the 6 mm thickness for your calculation.
- 70% to 80% of 6 mm is 4.2 mm to 4.8 mm.
- You would choose a 5 mm fillet weld, since standard weld sizes are usually in whole numbers.
This rule works for most situations in light to medium fabrication. It is not meant for every special case, but it gives a safe and quick answer for most welders and engineers.
How To Apply The Rule In Practice
Step-by-step Example
Imagine you need to weld a 12 mm thick beam to an 8 mm thick plate.
- Find the thinner part: 8 mm.
- Calculate 70% to 80%:
- 70% of 8 mm = 5.6 mm
- 80% of 8 mm = 6.4 mm
- Choose the nearest standard size: 6 mm fillet weld.
This is often enough for a strong and cost-effective weld.
Common Standard Sizes
Most welders use the following standard fillet weld sizes:
- 3 mm
- 4 mm
- 5 mm
- 6 mm
- 8 mm
- 10 mm
- 12 mm
You should always round up to the next standard size if your calculation falls between two sizes.
Applying To Different Joint Types
The rule of thumb works best for T-joints and lap joints. For corner joints, you may need to check design codes, as stress can be higher in these areas.
Sample Comparison
Here is a simple comparison of typical fillet weld sizes for different plate thicknesses using the 70–80% rule:
| Thinner Plate Thickness (mm) | 70% Value (mm) | 80% Value (mm) | Recommended Weld Size (mm) |
|---|---|---|---|
| 4 | 2.8 | 3.2 | 3 |
| 6 | 4.2 | 4.8 | 5 |
| 8 | 5.6 | 6.4 | 6 |
| 10 | 7.0 | 8.0 | 8 |
| 12 | 8.4 | 9.6 | 10 |
This table makes it easy to pick the right weld size for common plate thicknesses.
Why 70–80%? The Reason Behind The Rule
You might wonder why not use 100% of the plate thickness. The reason is that a weld larger than 80% usually does not increase the joint strength much. The base metal often becomes the weak point before the weld fails.
A weld smaller than 70% may not develop the full strength of the thinner part. Codes and experienced welders know that 70%–80% gives a good safety margin without waste.
Also, a larger weld means more heat and distortion. This can cause the plates to warp or even crack. The rule helps balance strength, cost, and quality.
When The Rule Of Thumb Does Not Apply
The 70–80% rule is simple, but there are times when you should not use it alone. Some situations need more care:
- Heavily loaded joints: If the joint will carry very high stress, you must follow engineering calculations or design codes.
- Fatigue loading: In structures that see repeated loading and unloading (like bridges or cranes), weld size may need to be larger for safety.
- Special materials: Some metals, like high-strength steels or stainless, may need different weld sizes.
- Access limits: If you cannot reach both sides or cannot weld fully, you may need a different size.
- Corrosive environments: In chemical plants or marine work, design codes may require larger welds for protection.
In these cases, always check codes like AWS D1. 1, EN 1993 (Eurocode 3), or get advice from a professional engineer.
Code Requirements Vs. Rule Of Thumb
Welding codes set minimum and sometimes maximum weld sizes. These are based on research and testing. The rule of thumb is close to these rules for most cases, but you should know the main differences.
Aws D1.1 Example
The AWS D1.1 code gives minimum fillet weld sizes depending on the thickness of the thinner part:
| Thinner Part Thickness (mm) | Minimum Fillet Weld Size (mm) |
|---|---|
| Up to 3 | 2.0 |
| Over 3 to 5 | 3.0 |
| Over 5 to 10 | 5.0 |
| Over 10 to 19 | 6.0 |
| Over 19 | 8.0 |
The rule of thumb fits well with these values but always check code tables if you are unsure.
Maximum Size Limits
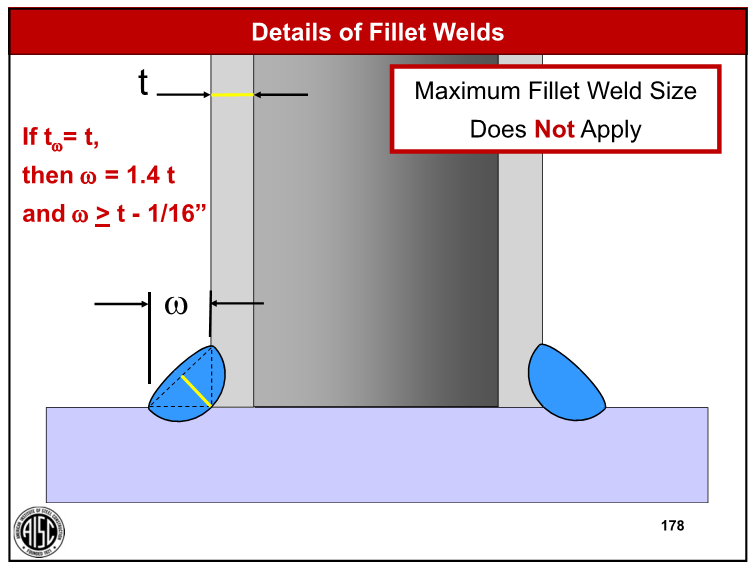
Codes also set maximum weld sizes. For example, AWS D1. 1 says the maximum size for a fillet weld next to an edge is usually the thickness of the base plate minus 1. 5 mm. This stops the weld from melting away the plate edge.
Common Mistakes With Fillet Weld Size
Even with a simple rule, mistakes happen. Some of the most common errors include:
- Basing weld size on the thicker part: Always use the thinner of the two parts.
- Ignoring code requirements: Codes can override the rule of thumb, especially for important structures.
- Making oversized welds: Bigger is not always better. Oversized welds waste time and money and can cause distortion.
- Using non-standard sizes: Welders should use standard weld sizes for easier inspection and quality control.
- Not considering joint access: If you cannot weld the full joint, a larger weld size may not help.
- Missing the effect of position: Welding in different positions (flat, vertical, overhead) can affect the final size and quality.

Credit: weldings-equipment.blogspot.com
Practical Tips For Measuring And Checking Fillet Weld Size
Weld size should always be checked after welding. Here are some ways to measure:
- Fillet weld gauges: These simple tools check the leg length and throat quickly.
- Fillet weld templates: These are handy for checking standard sizes.
- Visual inspection: Check for full fusion, smooth shape, and no undercut or excess.
Inspectors often check both the weld size and the quality. Good welds are free from cracks, porosity, and incomplete fusion.
Quick Guide To Checking Weld Size
- Place the fillet gauge at the weld.
- Check if the weld fills the gauge space.
- Repeat on both legs of the weld.
- If one leg is smaller, report or repair.
Cost And Quality Considerations
Fillet weld size affects both cost and quality. A weld that is too large takes more time, uses more wire or rod, and needs more power. This increases costs and slows production. It can also heat the base metal too much, causing stress and cracks.
A weld that is too small can be dangerous. It may fail during use, causing accidents or expensive repairs.
The rule of thumb helps avoid both extremes. It gives a weld that is strong enough and cost-effective. Good welders use this rule to balance safety and cost.
Real-world Examples
Bridge Construction
In bridge building, fillet welds hold beams and plates together. If the plates are 16 mm thick and the connecting angle is 10 mm, the rule of thumb says:
- Use the 10 mm thickness.
- 70% of 10 mm = 7 mm; 80% = 8 mm.
- A 8 mm fillet weld is common, which matches standard engineering practice.
Machine Frames
A machine frame uses 8 mm and 6 mm plates. The calculation is:
- Use the 6 mm thickness.
- 70% of 6 mm = 4.2 mm; 80% = 4.8 mm.
- A 5 mm weld is standard.
In both cases, the weld is strong enough for most loads.
Comparing Fillet Weld To Other Weld Types
Fillet welds are not the only way to join metals. Sometimes you need groove welds or special designs. Here is a simple comparison:
| Weld Type | Preparation Needed | Strength | Common Use |
|---|---|---|---|
| Fillet Weld | Low | Medium | General fabrication, T-joints |
| Groove Weld | High | High | Heavy structures, full penetration |
| Plug/Slot Weld | Medium | Low-Medium | Overlapping sheets |
Fillet welds are a good choice for speed and ease, but always check if the joint needs a different weld.
Non-obvious Insights For Beginners
Many new welders focus only on the leg size. But two extra points make a big difference:
- Throat size is what gives most of the strength. The throat is the shortest distance from the root to the face of the weld. Even if the legs are long, a narrow throat makes the weld weak. Always check both.
- Weld position and method affect size. Overhead or vertical welding can cause the weld to be smaller than planned due to gravity and technique. Practice helps, but always check your work.
Also, never assume that a bigger weld is always better. Excess weld metal can hide problems like lack of fusion or cracks.
How To Communicate Weld Size On Drawings
Engineers use symbols to show weld size on blueprints. The size is usually shown to the left of the weld symbol. For example, “6” means a 6 mm leg size. If the weld is all around the joint, a circle is added to the symbol.
Learning these symbols helps avoid mistakes in the workshop.
Weld Size And Strength Calculations
While the rule of thumb is useful, sometimes you must calculate the exact strength. For a simple fillet weld, the strength is:
Weld Strength = (Weld Length) × (Throat Size) × (Allowable Stress)
The throat size for a 6 mm leg is about 4. 2 mm (0. 707 × leg size). Allowable stress depends on the metal and welding process.
For critical joints, always use real calculations and check with an engineer or code.
How To Avoid Overwelding
Overwelding is a common problem. It means making the weld larger than needed. This wastes time and money. You can avoid overwelding by:
- Using weld gauges for every joint.
- Training welders on standard sizes.
- Checking welds before and after welding.
A good habit is to check the joint design and weld size before starting. This saves problems later.
When To Ask For Expert Advice
The rule of thumb is good for most everyday jobs. But if you see any of these signs, ask an engineer:
- Very thick plates (over 25 mm)
- Unusual joint shapes
- High-stress or fatigue-prone parts
- Special materials
- Unclear or missing weld sizes in drawings
Experts can check the joint with calculations and make sure it is safe.
Summary Of Key Points
- The fillet weld size rule of thumb recommends a leg size of 70%–80% of the thinner part.
- Use standard weld sizes and round up if needed.
- Always check codes for minimum and maximum sizes.
- Measure welds with gauges after welding.
- Avoid overwelding to save cost and prevent problems.
- Ask for advice for special situations.
You can learn more about welding standards and codes at the American Welding Society.

Credit: www.eng-tips.com
Frequently Asked Questions
What Is The Fillet Weld Size Rule Of Thumb?
The rule of thumb says the fillet weld leg size should be about 70%–80% of the thickness of the thinner part being joined. This gives a strong and cost-effective weld in most cases.
When Should I Not Use The Rule Of Thumb?
Do not use the rule for joints under heavy stress, subject to fatigue, made from special materials, or in cases where codes give specific requirements. Always check with an engineer for these situations.
How Do I Measure A Fillet Weld Size?
Use a fillet weld gauge or template to check the leg length. Place the gauge on the weld and check both legs. Make sure the weld meets or slightly exceeds the required size.
What Happens If The Fillet Weld Is Too Big?
A weld that is too large wastes material and time, and can cause distortion or cracking in the base metal. It also makes inspection harder and may hide defects.
Are There Standard Fillet Weld Sizes?
Yes, common standard sizes are 3, 4, 5, 6, 8, 10, and 12 mm. Always use these sizes and round up your calculation to the next standard size for best results.
Fillet welds are a key part of strong, safe structures. By using the fillet weld size rule of thumb and checking your work, you can make quality welds every time.

