Disclosure: This post contains affiliate links and I will be compensated if you make a purchase after clicking through my links. Learn More
Welding copper is a practical skill for building electrical parts, plumbing systems, sculptures, and even art pieces. Many people think copper is hard to weld because it conducts heat so well. That means it can quickly remove heat from your work area and cause problems for beginners.
But with the right tools, planning, and technique, you can create strong, neat copper welds.
This guide explains everything you need to know, from choosing tools and safety steps, to cleaning and preparing copper, all the way to advanced welding methods. Whether you are a hobbyist, a student, or a professional, this article helps you avoid common mistakes and work with copper safely and effectively.
Why Weld Copper?
Copper is widely used because it resists corrosion, conducts electricity and heat very well, and has a nice color. People weld copper for tasks like fixing pipes, joining electrical parts, creating custom shapes, or building art. Copper is also important in industries such as energy, air conditioning, and shipbuilding.
Joining copper pieces makes repairs and new projects strong and reliable.
Welding copper is not exactly the same as welding steel or aluminum. Because copper pulls heat away fast, the weld area cools quickly. This can make the weld crack, become weak, or not melt enough. So, you need special methods and careful control.
Understanding Copper And Its Properties
Copper is a reddish-brown metal that is soft, easy to shape, and conducts heat and electricity very well. It melts at about 1,085°C (1,984°F). Its main features for welding are:
- High thermal conductivity: Copper carries heat away much faster than steel or aluminum. You must use more heat to keep the weld area hot.
- Good electrical conductivity: This is why copper is used for wires and electrical contacts.
- Corrosion resistance: Copper does not rust like iron or steel.
- Softness and ductility: Copper bends rather than breaks.
Some copper alloys, such as brass (copper + zinc) and bronze (copper + tin), have different properties. Pure copper is harder to weld than most alloys, but the steps are similar.
Tools And Equipment For Welding Copper
Choosing the right tools is the first step. The type of welding you choose depends on your project, skill, and budget. Here are the main tools and equipment:
- Welding Machine
- TIG welder: Best for thin copper and precise work.
- MIG welder: Good for thicker copper, faster than TIG.
- Oxy-acetylene torch: Used for brazing, soldering, and sometimes welding thicker pieces.
- Electrodes and Filler Rods
- Use deoxidized copper electrodes for TIG or MIG.
- Filler rods should match the copper type.
- Shielding Gas
- Argon or helium are common for TIG and MIG welding. Pure argon is easier for beginners.
- Safety Gear
- Welding helmet (auto-darkening is best)
- Gloves and welding jacket
- Respirator (if working indoors)
- Safety glasses
- Preparation Tools
- Wire brush (stainless steel)
- Emery cloth or sandpaper
- Acetone or alcohol for cleaning
- Clamps and Fixtures
- Hold pieces in place while you weld.
- Preheating Equipment
- Propane torch or oven for preheating thick copper.
- Measuring Tools
- Ruler, square, and caliper for precise fit.
Using the right equipment makes your work easier and safer. Always check your machine’s manual for settings and follow all safety guidelines.
Safety Steps For Welding Copper
Welding is dangerous if you do not protect yourself. Copper welding creates bright light, hot metal, fumes, and sometimes toxic gases. Follow these safety tips:
- Work in a well-ventilated space. Copper fumes can irritate your lungs.
- Wear a welding helmet with the correct shade (usually 10 to 13).
- Use gloves and fire-resistant clothing to prevent burns.
- Keep a fire extinguisher nearby in case of sparks.
- Never touch hot metal with bare hands.
- Store gas tanks upright and away from heat sources.
Copper can sometimes contain traces of lead or arsenic, especially in old pipes or recycled material. These can release toxic fumes. If you are unsure, always use a respirator and work outside.
Preparing Copper For Welding
You cannot skip preparation. Clean copper makes strong welds. Any oil, grease, oxide, or dirt will cause weak joints, holes, or cracks.
- Clean the Surface
- Use a wire brush or emery cloth to remove any oxide layer.
- Wipe with acetone or alcohol to remove grease or oil.
- Fit the Pieces
- Make sure the edges fit tightly. Gaps make welding harder and weaker.
- Preheat if Needed
- For thick copper (over 3mm), preheat the joint to 260–370°C (500–700°F) using a torch or oven. This keeps the weld hot enough for proper fusion.
- Clamp Pieces in Place
- Use clamps or fixtures to keep pieces from moving while you work.
- Check for Coatings
- Remove any paint, plating, or insulation in the weld area. These can cause toxic fumes or poor welds.
Many new welders forget to preheat thick copper. This causes cracks and poor fusion because the copper cools too fast.
Main Welding Methods For Copper
There are three main ways to weld copper: TIG welding, MIG welding, and oxy-acetylene welding. Each has strengths and weaknesses.
Tig Welding (gas Tungsten Arc Welding)
TIG welding is the best choice for most copper projects. It uses a non-consumable tungsten electrode and a shielding gas to protect the weld. A filler rod adds extra metal. TIG gives clean, precise welds and is good for thin copper sheets.
Steps:
- Set the TIG welder to DCEN (Direct Current Electrode Negative).
- Use pure argon or an argon-helium mix as the shielding gas.
- Preheat thick copper as needed.
- Hold the torch at a 10–15° angle.
- Start the arc and add filler rod as the joint melts.
- Move slowly to let the metal flow and fill the joint.
- Let the joint cool slowly to avoid cracks.
Advantages:
- Clean, strong welds
- Good for thin copper
- Low spatter
Limitations:
- Slower than MIG
- Needs more skill
Mig Welding (gas Metal Arc Welding)
MIG welding uses a consumable wire electrode that feeds automatically. It works well for thick copper, especially in large projects.
Steps:
- Set the machine for copper wire and pure argon shielding gas.
- Adjust the voltage and feed speed for copper (higher than steel).
- Preheat thick pieces if needed.
- Hold the torch at about 15°.
- Weld slowly and steadily.
Advantages:
- Fast
- Good for thick copper
- Easier than TIG for beginners
Limitations:
- Less precise than TIG
- More spatter
Oxy-acetylene Welding
This method uses a torch flame to melt the copper and filler rod. It is less common today but still useful for repairs, plumbing, and art.
Steps:
- Set the torch to a neutral flame (equal oxygen and acetylene).
- Preheat the joint if needed.
- Use a deoxidized copper filler rod.
- Move the flame in circles until the copper melts.
- Add filler as needed.
- Let the weld cool slowly.
Advantages:
- Simple tools
- Good for field repairs
Limitations:
- Hard to control heat
- Risk of oxidation
Soldering And Brazing Copper
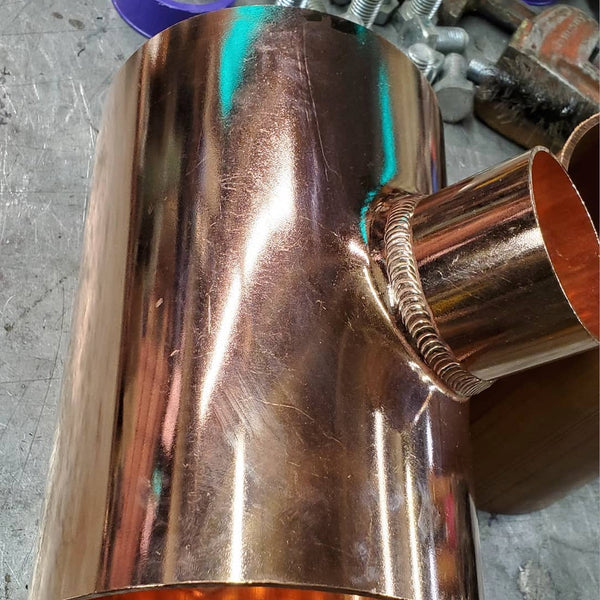
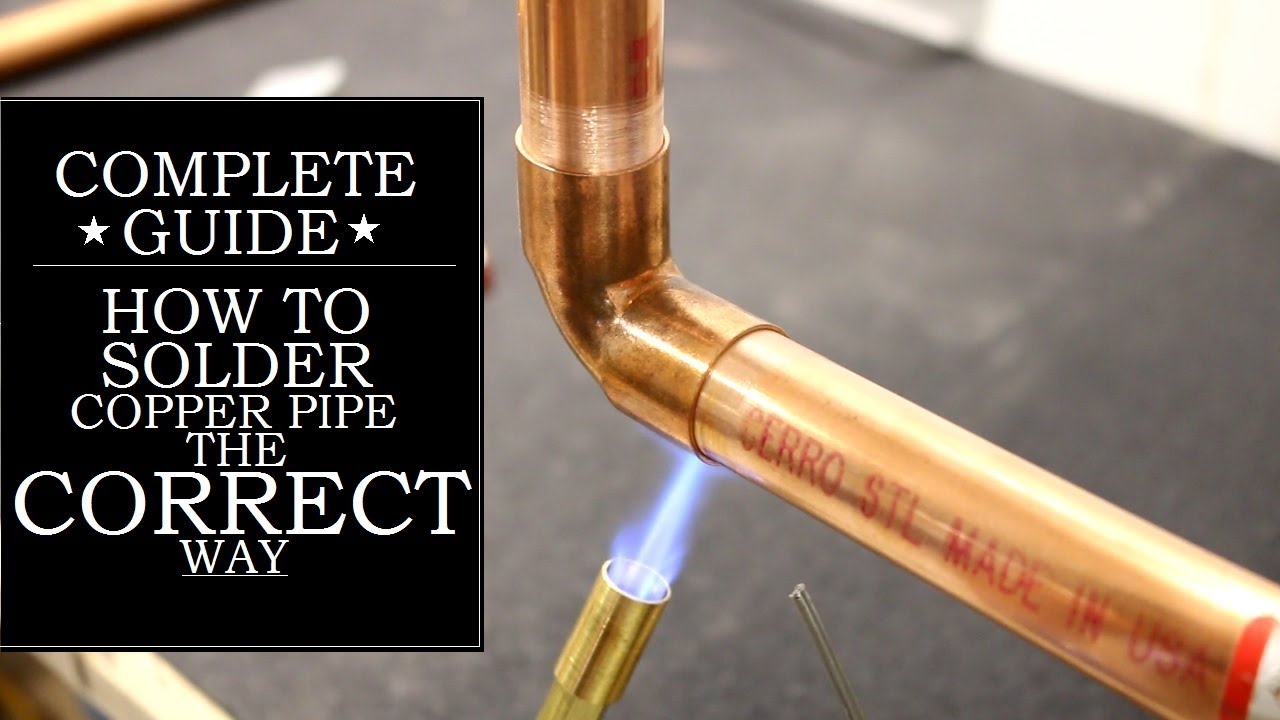
Soldering and brazing are not true welding, but they are common for copper pipes and electronics. They join copper using a lower-melting metal (like tin or silver). Soldering melts below 450°C, while brazing melts above 450°C but below copper’s melting point.
Soldering is best for electronics and small pipes. Brazing is stronger and used for larger joints.
Credit: yeswelder.com
Step-by-step Guide: How To Weld Copper
This section shows how to weld copper using TIG, MIG, and oxy-acetylene. The process is similar for each, but the machine settings and filler rods are different.
1. Plan Your Joint
Decide what type of joint you need: butt, lap, or T-joint. For thick copper, use a V-groove to help the weld penetrate fully.
2. Prepare The Pieces
- Clean all surfaces.
- Fit edges closely.
- Clamp pieces tightly.
3. Preheat (for Thick Copper)
Use a propane torch or oven to preheat the joint to 260–370°C (500–700°F). Use a temperature stick or infrared thermometer to check.
4. Set Up The Welding Machine
- TIG: Use DCEN, pure argon gas, and a deoxidized copper filler rod.
- MIG: Use copper wire, pure argon, and set voltage/feed higher than for steel.
- Oxy-acetylene: Use a neutral flame and deoxidized filler rod.
5. Start Welding
- Hold the torch at a slight angle (10–15°).
- Begin the arc at the start of the joint.
- Move slowly and add filler as the metal melts.
- Watch the puddle. Make sure it is shiny and flows well.
- For long joints, weld in small sections to avoid overheating.
6. Cool The Joint
Let the weld cool slowly. You can cover it with a blanket to slow down cooling. Fast cooling causes cracks.
7. Clean The Weld
Use a wire brush to clean away any slag or oxide.
Example: Welding A Copper Pipe
Suppose you want to weld two 10mm thick copper pipes. You would:
- Clean and fit the ends.
- Preheat to about 300°C.
- Use a TIG welder with pure argon.
- Weld slowly, adding filler rod as needed.
- Allow to cool under a blanket.
This makes a strong, leak-free joint.
Common Problems And How To Avoid Them
Welding copper can cause issues if you do not follow best practices. Here are some typical problems:
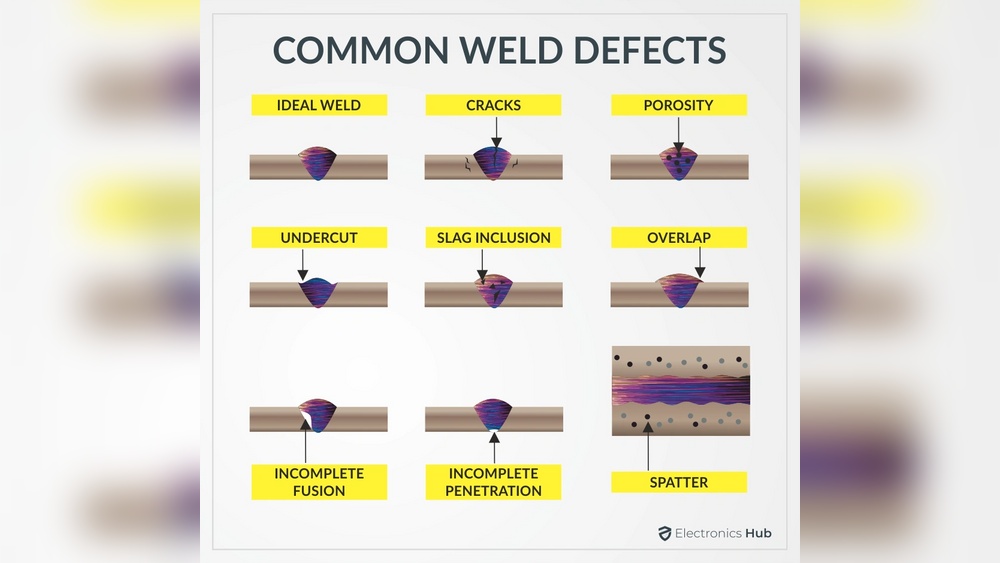
- Cracks in the Weld
- Cause: Not enough heat or cooling too fast.
- Fix: Preheat thick copper and let it cool slowly.
- Poor Fusion
- Cause: Copper cools the weld too quickly.
- Fix: Use higher heat and preheat thick pieces.
- Porosity (Holes in Weld)
- Cause: Dirty metal or wrong shielding gas.
- Fix: Clean thoroughly and use pure argon.
- Distortion
- Cause: Too much heat in a small area.
- Fix: Weld in short sections and move around the joint.
- Oxidation
- Cause: Not enough shielding gas or wrong flame.
- Fix: Check your gas flow and use a neutral flame for oxy-acetylene.
Two mistakes beginners often make are skipping preheating and not cleaning the copper enough. These two steps are essential for strong welds.
How To Choose The Right Welding Method
Your choice depends on your project, tools, and skill. Here’s a simple table comparing the main welding methods for copper:
| Method | Best For | Skill Needed | Typical Thickness | Main Advantage |
|---|---|---|---|---|
| TIG | Thin copper, precise work | High | 0.5–6 mm | Clean, strong welds |
| MIG | Thick copper, large projects | Medium | 3–25 mm | Fast, less skill needed |
| Oxy-Acetylene | Repairs, field work | Medium | 2–15 mm | Simple equipment |
| Soldering/Brazing | Pipes, electronics | Low | <3 mm | Low heat, easy |
If you want neat and strong joints, TIG is usually best. For quick work on thick copper, choose MIG. For plumbing or repairs, oxy-acetylene or brazing are good options.
Filler Rod And Shielding Gas Choices
The right filler rod and shielding gas are vital. Here’s a summary:
| Base Metal | Filler Rod | Shielding Gas | Notes |
|---|---|---|---|
| Pure Copper | Deoxidized copper | Argon or Argon/Helium | Use helium for thick parts |
| Copper Alloys | Matching alloy rod | Argon | Check compatibility |
| Brass/Bronze | Silicon bronze rod | Argon | Braze, not weld |
Using the wrong filler rod can cause cracks or weak joints. Always match the rod to your base metal as closely as possible.
Practical Tips For Better Copper Welding
To get better results, try these tips:
- Preheat thick copper. This is not optional above 3 mm thickness.
- Use the shortest arc possible. This gives more control.
- Do not rush. Move slowly to let the metal flow.
- Use a temperature crayon to check preheat temperature.
- Keep your filler rod clean to avoid contamination.
- Weld in small sections. Let the joint cool a bit between passes.
- Check your shielding gas flow. Too little gas causes oxidation.
- Practice on scrap copper before starting your real project.
Many welders ignore the importance of matching the filler rod to the copper alloy. This often leads to weak spots or joints that fail under stress.
Testing And Inspecting Copper Welds
After welding, check your work for strength and quality. Here are ways to test:
- Visual Inspection: Look for cracks, holes, or uneven welds.
- Bend Test: Gently bend the joint. Good welds will not crack.
- Leak Test: For pipes, fill with water or air and check for leaks.
- Ultrasonic Test: Used in industry to check for hidden flaws.
If you find cracks or leaks, grind out the bad area and re-weld.
Repairing And Reworking Copper Welds
Sometimes welds need repair. Copper allows you to grind away cracks and re-weld, but you must clean and preheat again. Do not try to weld over dirty or oxidized metal. Always use the same filler rod as the original joint.
If a weld has many cracks, it might be from cooling too fast. Slow down the cooling, and try again.
Welding Copper To Other Metals
Welding copper to other metals, such as steel or brass, is possible but harder. You need special filler rods and sometimes a different welding method.
- Copper to Brass/Bronze: Use a silicon bronze filler and TIG or braze.
- Copper to Steel: Use a nickel-based filler and TIG.
- Copper to Aluminum: This is not recommended. Use mechanical fasteners or special adhesives.
The main risk is cracking and weak joints due to different expansion rates and melting points.

Credit: themeshcompany.com
Real-world Uses Of Copper Welding
Welded copper joints are found in many places:
- Electrical busbars: Carry heavy current in power stations and factories.
- Plumbing systems: Joints in water and gas pipes.
- Heat exchangers: In air conditioners and cars.
- Sculptures and art: Custom copper shapes and decorations.
- Marine work: Ships and boats use welded copper for corrosion resistance.
In these fields, strong and reliable copper welds are critical for safety and performance.
Cost And Time Factors In Copper Welding
Welding copper can cost more than welding steel, mainly due to the higher price of copper and the need for special filler rods. TIG welders are also more expensive than stick or MIG machines.
Time depends on the method:
- TIG welding is slow but precise.
- MIG is faster but less clean.
- Oxy-acetylene is cheap but needs skill.
For small home projects, budget for equipment, safety gear, and some practice material. For professional jobs, include the cost of preheating, special rods, and testing.
Environmental And Health Concerns
Copper welding produces fumes that can irritate your lungs or cause health issues. Always use good ventilation or a respirator. Old copper pipes may contain lead or arsenic, so extra care is needed.
Dispose of scrap copper and cleaning chemicals safely. Copper is valuable and recyclable, so collect and recycle any waste.
For more on welding safety, see the OSHA welding safety guide.
Frequently Asked Questions
What Is The Best Way To Weld Copper?
TIG welding is usually the best method for welding copper. It gives clean, strong welds, especially for thin copper. For thicker pieces, MIG welding or oxy-acetylene can also work well. Always preheat thick copper and use a matching filler rod.
Do You Need To Preheat All Copper Before Welding?
You only need to preheat copper if it is thick (over 3 mm). Thin copper does not need preheating. Preheating helps prevent cracks and poor fusion by keeping the weld area hot enough.
Can You Weld Copper To Steel?
Yes, but it is harder than welding copper to copper. You need a nickel-based filler rod and TIG welding is usually best. The joint can be weak because copper and steel expand differently when heated.
Is Brazing Or Soldering Better Than Welding For Copper Pipes?
For most home plumbing, brazing or soldering is easier and strong enough. Welding is used for very high-pressure or special systems. Always choose the method that fits the pipe size, pressure, and safety needs.
What Are Common Mistakes When Welding Copper?
The most common mistakes are not cleaning the copper well, skipping preheating for thick copper, using the wrong filler rod, and moving too fast. Always clean the metal, use the right rod, preheat if needed, and weld slowly for best results.
Copper welding can seem hard at first, but with practice and careful steps, you can make strong, lasting joints. Stay patient, keep your tools and copper clean, and keep safety first. This skill opens many doors for repairs, projects, and professional work.
Credit: www.youtube.com