Disclosure: This post contains affiliate links and I will be compensated if you make a purchase after clicking through my links. Learn More
People often hear about 1G and 2G welding in training or job descriptions, but many do not fully understand what these terms mean. Both are welding positions used in different projects, yet they have unique features and requirements. Knowing the difference can help new welders, project managers, and engineers choose the right process for each task. It can also make a big difference in weld quality, safety, and project cost.
Many beginners think all welding positions are the same if the metal is flat or easy to reach. This is not true. Even small changes in position can affect how the weld looks, how strong it is, and how safe the finished structure will be. In this article, you will learn the real differences between 1G and 2G welding, including the setup, skills needed, common uses, and best practices. You will also see why these differences matter in real jobs, and how small mistakes in choosing or working in the wrong position can lead to problems.
What Are Welding Positions?
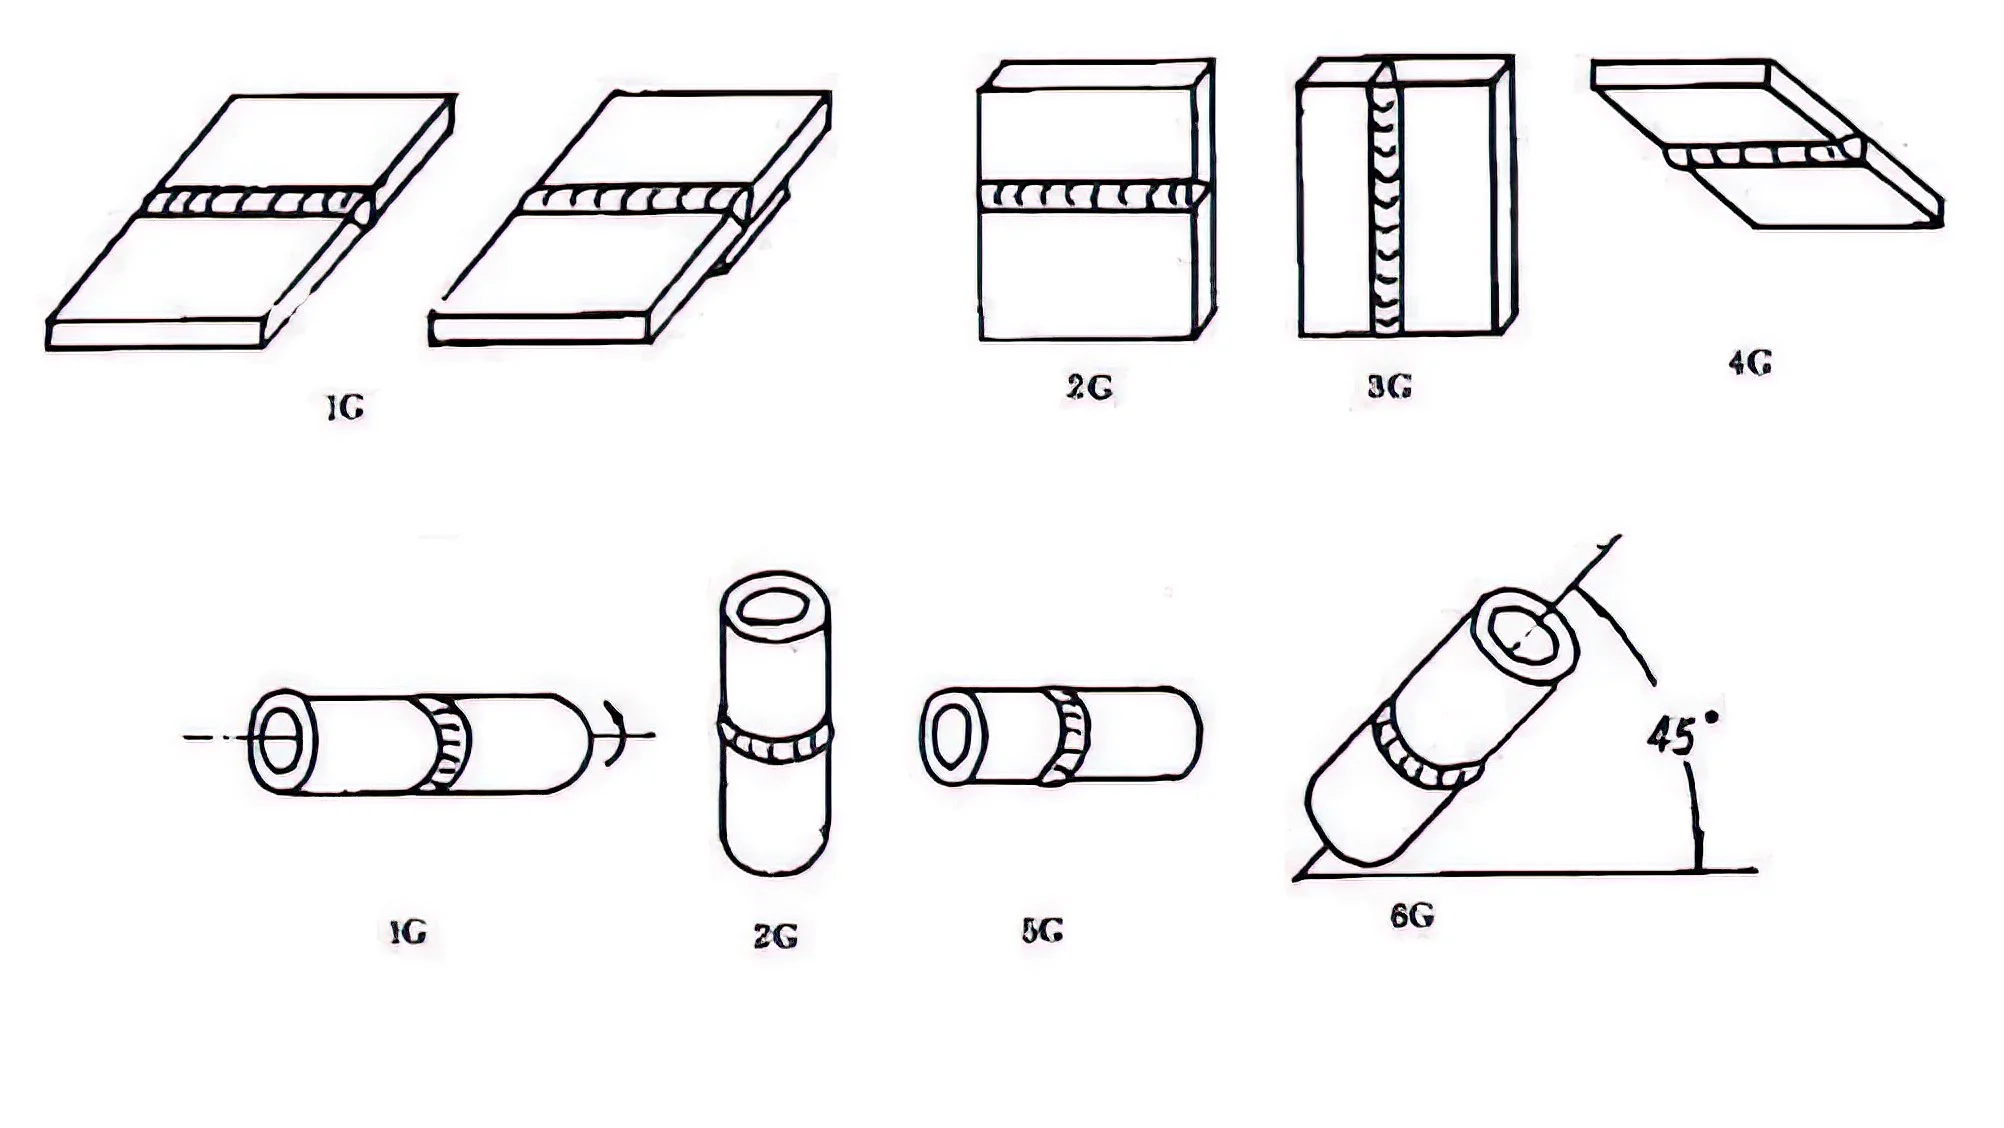
Welding positions describe how the welder places the metal and where the weld is made. These positions have names like 1G, 2G, 3G, and 4G. The “G” stands for “groove,” which means the welder makes a weld in the groove between two pieces of metal.
Each number shows a different direction or angle for the work.
The American Welding Society (AWS) sets the rules for welding positions. These rules help companies and workers use the same language and test welders in a fair way. The 1G and 2G positions are the first two basic groove welding positions, and they are often used for plates and pipes.
Defining 1g Welding
The 1G welding position is the most basic groove welding position. In this setup, the workpiece (a plate or pipe) lies flat. The welder applies the weld from above, so gravity helps the molten metal stay in the joint.
Key Features Of 1g Welding
- The workpiece is horizontal and flat.
- The weld is made from the top side.
- Gravity helps the process, making it easier for beginners.
- It is often used for practice, tests, and large flat surfaces.
Where You See 1g Welding
1G welding appears in many factories, workshops, and construction sites. Workers use it for:
- Joining flat plates in building frames.
- Making large tanks or vessels that can be rotated to keep the seam flat.
- Training new welders because the position is stable and easy to control.
Example
A welder joins two steel plates side by side on a table. The plates do not move, and the welder uses a MIG or stick welder to make a smooth, even bead across the seam. Since the plates are flat, the welder can focus on speed and bead quality.

Credit: www.megmeet-welding.com
Defining 2g Welding
The 2G welding position is a step up in difficulty. Here, the workpiece stands vertical, but the weld is made in a horizontal direction across the vertical surface. Gravity works against the welder more than in 1G, so it takes more skill.
Key Features Of 2g Welding
- The workpiece is vertical (standing up).
- The weld is made across the joint, moving horizontally.
- Gravity can pull the molten metal down, so control is harder.
- Needed for parts that cannot be laid flat or rotated.
Where You See 2g Welding
2G welding is common in fieldwork and repairs. Workers use it for:
- Welding vertical columns in buildings and bridges.
- Joining pipes that cannot be rotated, such as those attached to walls or floors.
- Repairing fixed equipment or structures.
Example
A welder must join two vertical steel plates in a building frame. The plates stand up, and the welder moves the torch from left to right across the seam. The molten metal wants to sag, so the welder uses special techniques to keep the bead even.
Core Differences Between 1g And 2g Welding
Both positions are for groove welds, but they are not the same. The main differences involve setup, difficulty, and common uses.
| Feature | 1G Welding | 2G Welding |
|---|---|---|
| Workpiece Orientation | Flat/Horizontal | Vertical |
| Weld Direction | From above, along the seam | Side to side, across vertical joint |
| Gravity Effect | Helps keep bead in joint | Pulls bead down, harder to control |
| Skill Level | Beginner-friendly | Requires more experience |
| Common Use | Plates, rotatable pipes | Fixed columns, non-rotatable pipes |
Credit: ecoreprap.com
How 1g And 2g Welding Affect Weld Quality
The position of the workpiece changes how the weld metal flows and cools. This affects the final quality of the weld.
- 1G position allows the molten metal to stay in the joint. This usually gives a smooth, even bead with few defects.
- 2G position makes the metal sag or drip if the welder moves too slowly or uses too much heat. This can cause undercut, uneven beads, or weak spots.
Welders must use different techniques and settings in each position to get the best results.
Setup Process For 1g And 2g Welding
Setting up for each position involves more than just placing metal on a table. The setup can affect safety, weld quality, and speed.
1g Welding Setup
- Place the workpiece flat on a table or fixture.
- Clean the metal to remove dirt, oil, or rust.
- Clamp the plates tightly to prevent movement.
- Choose the right welding process (MIG, TIG, Stick).
- Set the correct amperage and voltage.
Since gravity works with the welder, there is less risk of sagging beads or weld defects.
2g Welding Setup
- Stand the workpiece vertical using clamps or fixtures.
- Clean the joint area very well.
- Check that the plates or pipes are square and level.
- Use tacks to hold the pieces before full welding.
- Adjust the welding current to prevent the molten metal from running down.
In 2G, the welder must pay close attention to position and control to keep the weld bead in place.
Required Skills For 1g Vs. 2g Welding
Both positions need good hand-eye coordination, but 2G welding asks more from the welder.
Skills Needed For 1g Welding
- Steady hand movement along the seam.
- Consistent speed and angle.
- Basic understanding of bead shape and penetration.
- Ability to watch the weld pool and adjust.
Skills Needed For 2g Welding
- Good control of the torch to prevent sagging.
- Ability to weld side to side with even motion.
- Quick adjustments to travel speed and angle.
- More practice with starts and stops.
Many companies test new welders in the 2G position to see if they are ready for harder jobs.
Common Problems And Solutions
Both positions have their own problems. Knowing these can help you fix mistakes before they cause bigger issues.
Problems In 1g Welding
- Lack of fusion: If the welder moves too fast, the weld may not join both pieces well.
- Porosity: Dirty metal or wrong settings can trap gas in the weld.
- Excessive spatter: Too much heat or the wrong wire can cause spatter.
Solutions
- Clean the metal.
- Set the right speed and heat.
- Use the correct wire and gas.
Problems In 2g Welding
- Sagging bead: If the welder moves too slowly or uses too much heat, the bead will drip.
- Undercut: Fast movement can cut into the base metal, making the joint weak.
- Poor penetration: Not enough heat or wrong angle can leave the weld shallow.
Solutions
- Use short, controlled welds.
- Lower the amperage if needed.
- Practice moving the torch in a steady, side-to-side motion.
Safety Concerns In 1g And 2g Welding
Welding always carries risks, but some problems are more likely in each position.
1g Welding Safety
- Less risk of burning from dripping metal.
- Easier to see the weld pool and avoid mistakes.
- Main risks are electric shock and fumes.
2g Welding Safety
- Higher chance of hot metal or slag falling.
- More difficult to see the entire joint.
- Risk of poor posture, which can cause back or neck pain.
Welders should always wear gloves, helmets, and protective clothing. Good ventilation is important in both positions.
Tools And Equipment Differences
Most basic welding tools work for both positions. Still, some tools and settings are better for one than the other.
For 1g Welding
- Standard welding table.
- Basic clamps.
- Most common welding machines (MIG, TIG, Stick).
For 2g Welding
- Strong vertical fixtures or pipe stands.
- Tighter clamps to prevent movement.
- Machines with good control over heat and wire feed.
Some jobs may need special torches or nozzles to reach into corners or between pipes.
Certification And Testing In 1g And 2g Welding
Many companies and codes require welders to pass tests in both positions. This proves they can make safe, strong welds in different situations.
1g Test
- Weld two flat plates together.
- Inspect for cracks, porosity, and bead shape.
- Usually for entry-level jobs.
2g Test
- Weld two vertical plates or pipes.
- Check for bead quality, penetration, and evenness.
- Needed for structural and pipe work.
| Test Feature | 1G Position | 2G Position |
|---|---|---|
| Difficulty | Low | Medium |
| Common Jobs | Shop/factory work | Field/structural work |
| Test Method | Flat plate | Vertical plate or pipe |
| Failure Rate | Low | Higher |
Which Position Should You Learn First?
1G welding is best for beginners. It lets you practice basic moves, watch the weld pool, and learn how the machine works. Once you can make a good 1G weld, move to 2G welding. This will teach you to control the bead in harder positions, which is needed for most job sites.
Real-world Examples Of 1g And 2g Welding
Example 1: Building Construction
Workers use 1G welding to join large steel plates on the ground before lifting them into place. This method is fast and gives strong joints.
Later, they use 2G welding to connect vertical columns and beams. The columns cannot be rotated, so the welder must use side-to-side moves to make the weld.
Example 2: Pipe Welding
In a factory, a welder joins pipe sections on a rotating fixture using 1G welding. This makes a neat, strong seam.
In a repair job, a pipe is fixed to a wall and cannot be turned. The welder must use 2G welding to make a safe joint.
Example 3: Shipbuilding
Large ship parts are welded flat using the 1G position in the workshop. When these parts are assembled, workers use 2G welding to join vertical walls and bulkheads.
Mistakes Beginners Make In 1g And 2g Welding
Many new welders think the same settings and speed work for all positions. This is wrong. Here are some common mistakes:
- Using too much heat in 2G: This makes the weld bead drip or sag.
- Moving too fast in 1G: This causes weak joints and poor fusion.
- Ignoring joint cleanliness: Dirt and rust cause porosity and weak welds.
- Poor joint fit-up in 2G: Gaps or misalignment are harder to fix in vertical positions.
Welders should adjust settings for each position and always clean the joint well.
How To Improve Your Skills In Both Positions
Practice is key, but you can also use these tips:
- Watch your weld pool closely. The shape tells you if you are moving too fast or slow.
- Change your angle slightly in 2G to keep the bead from sagging.
- Use short welds (called stringers) in 2G to control heat.
- Ask for feedback from experienced welders.
It helps to keep a notebook of settings and results for each job.
Industry Standards And Codes
Many industries use AWS D1.1 (for structural welding) and ASME IX (for pipe welding) as standards. These codes tell you which welding positions are allowed for each job. They also require welders to pass tests in those positions.
Certification in 1G is usually enough for shop work. 2G certification is needed for field and structural welding. Some jobs require even harder positions like 3G (vertical up) and 4G (overhead).
For more details, see the Welding Wikipedia page.
Comparing Weld Appearance And Strength
The look of the finished weld and its strength can change with each position.
| Feature | 1G Welding | 2G Welding |
|---|---|---|
| Bead Appearance | Smooth, uniform | May show slight sag |
| Defect Rate | Low | Medium |
| Strength | High if done right | High with good control |
| Inspection | Easy | Needs more attention |
A skilled welder can make strong, neat welds in both positions, but 2G requires more attention to detail.
Best Practices For 1g And 2g Welding
- Always clean the joint before welding.
- Use clamps to hold pieces steady.
- Set the right heat, speed, and wire feed for each position.
- In 2G, use a slight weave or stringer bead to keep the metal from running.
- Check your work often for defects.
- Wear proper safety gear.
The Importance Of 1g And 2g Welding In Industry
Most large projects use both positions. Factories use 1G for speed and quality on flat work. Construction and repair crews use 2G when they cannot move or rotate the workpiece. A welder who can work in both positions is more valuable and flexible.
Frequently Asked Questions
What Is The Main Difference Between 1g And 2g Welding?
The main difference is workpiece orientation. In 1G, the metal is flat, and the weld is made from above. In 2G, the metal is vertical, and the weld runs side to side across the joint.
Which Position Is Easier For Beginners?
1G welding is easier for beginners. Gravity helps keep the molten metal in place, and the welder can move smoothly along the seam.
Why Do Some Jobs Require 2g Welding?
Some jobs need 2G welding because the parts cannot be rotated or laid flat. This is common in fieldwork, building columns, and fixed pipes.
Can You Use The Same Welding Machine For Both Positions?
Yes, you can use the same welding machine for both positions. But you may need to change the settings, such as amperage and wire feed speed, for better control in each position.
How Do You Avoid Sagging In 2g Welding?
To avoid sagging in 2G welding, use lower amperage, shorter welds (stringers), and keep a steady hand. Practice helps improve bead control in vertical positions.
Welding positions like 1G and 2G may sound simple, but they shape the quality and safety of every project. Knowing their differences, uses, and challenges helps welders and managers make better choices and avoid costly mistakes. Mastering both positions is a strong step toward a safe and successful welding career.

Credit: www.youtube.com