Disclosure: This post contains affiliate links and I will be compensated if you make a purchase after clicking through my links. Learn More
Spot welding is a popular technique for joining metal sheets. You can see it in car manufacturing, electronics, and even in making kitchen appliances. The process looks simple: two metal sheets are pressed together, and an electric current passes through them. The heat from the current melts the metal at the contact point, creating a strong joint. But getting a good weld is not just about pressing a button. You need to set the right parameters, and these calculations can make the difference between a strong weld and a weak one.
Many beginners think spot welding is always the same. But every material, sheet thickness, and product need a different approach. If you set the wrong values, you can burn through the metal, create weak joints, or even damage your equipment.
That is why understanding spot welding parameters calculations is so important. This article explains everything in clear, simple language. You will learn what parameters matter, how to calculate them, and how to avoid common mistakes. By the end, you will have a full picture of how to get good results from your spot welding projects.
Key Parameters In Spot Welding
Spot welding uses several main parameters that you must control for best results. Each one affects the quality and strength of the weld. Here are the most important parameters:
- Welding current
- Weld time
- Electrode force
- Electrode tip size
- Sheet thickness and material type
- Electrode material
- Hold time and squeeze time
These parameters work together. If you change one, you often need to adjust the others. Let’s look at each in detail.
Welding Current
Welding current is the amount of electric current that flows through the sheets during the weld. It is measured in amperes (A). The current generates heat at the spot, melting the metal and forming the weld nugget. The right current depends on:
- Type of metal
- Thickness of sheets
- Size of electrodes
Too little current makes a weak weld. Too much current can burn holes or make the weld splash. For most steel sheets between 0. 5 mm and 2 mm, the welding current usually ranges from 4,000 to 15,000 A.
Weld Time
Weld time is the time that the current flows through the metal. It is usually measured in cycles (one cycle is 1/60 of a second in countries with 60 Hz power). Weld time affects how much heat goes into the material. Typical weld times are between 5 and 20 cycles. Thin sheets need less time, while thicker sheets need more.
Electrode Force
Electrode force is the pressure applied by the electrodes to hold the sheets together during welding. It is measured in Newtons (N) or kilograms (kg). The right force ensures good contact, helps control the weld size, and reduces splashing. Too little force makes a weak or uneven weld. Too much force can thin the sheets or damage the electrodes.
Electrode Tip Size
The size of the electrode tip affects the area where the current flows. A smaller tip gives more heat in a small area, making a deeper weld. A larger tip spreads the current and heat, making a wider but shallower weld. Most tips are between 5 mm and 8 mm in diameter for common sheet thicknesses.
Sheet Thickness And Material Type
Sheet thickness and material type have a strong effect on all other parameters. Thicker sheets need more current and time. Different metals (like steel, stainless steel, or aluminum) need different settings due to their melting points and electrical resistance.
Electrode Material
Electrode material affects how well the electrode conducts electricity and resists wear. Copper alloys are common because they conduct electricity well and stay strong at high temperatures.
Hold Time And Squeeze Time
- Hold time is the time the electrodes stay pressed together after the current stops. This helps the weld cool and set properly.
- Squeeze time is the time the electrodes press together before current flows, helping create good contact.
Why Spot Welding Calculations Matter
People often skip calculations and use trial-and-error. This wastes time and materials. Calculating the right parameters:
- Improves weld strength and quality
- Reduces defects, splashing, and burns
- Extends electrode life
- Saves energy and costs
For example, in car manufacturing, a single bad weld can make a whole body panel weak. In electronics, a poor weld can cause failure in a device. Calculations help you avoid these problems.
Credit: www.slideshare.net
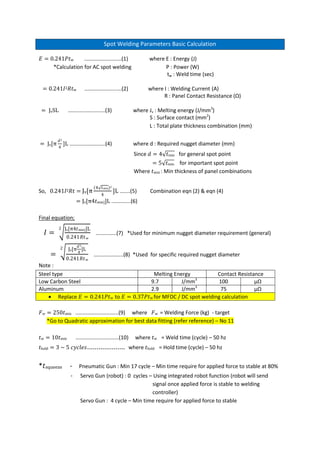
How To Calculate Spot Welding Parameters
Calculating the correct settings is not guesswork. There are formulas and guidelines you can use. Let’s go through the main calculations step by step.
1. Calculating Welding Current
The required current depends on sheet thickness, material, and electrode size. For mild steel, a simple rule is:
Welding current (A) = 5,000 × sheet thickness (mm)
So, for a 1.5 mm thick steel sheet:
Welding Current = 5,000 × 1.5 = 7,500 A
This is a starting point. For stainless steel, you may need about 10% less current. For aluminum, you may need 20–30% more because it conducts heat away faster.
Example Calculation
- Two mild steel sheets, each 2 mm thick
- Electrode tip diameter: 6 mm
Welding Current = 5,000 × 2 = 10,000 A
Adjust this if your welds are too small or too large after testing.
2. Calculating Weld Time
Weld time depends on current, sheet thickness, and material. Too long, and you get overheating or burn-through. Too short, and the weld is weak.
A common starting point:
Weld time (cycles) = 2 × sheet thickness (mm) + 2
So, for 2 mm sheets:
Weld time = 2 × 2 + 2 = 6 cycles
If you see splashing or expulsion, reduce the time. If the weld is weak, increase it a little.
3. Calculating Electrode Force
The electrode force ensures good contact. A good estimate is:
Electrode force (kg) = 2 × sheet thickness (mm) × 100
So, for 2 mm sheets:
Electrode force = 2 × 2 × 100 = 400 kg
In Newtons, multiply kg by 9.81. So, 400 kg = 3,924 N.
The force may need to be higher for harder metals or larger welds.
4. Electrode Tip Diameter
The tip diameter should match the sheet thickness. A simple rule for mild steel:
Tip diameter (mm) = 5 × √sheet thickness (mm)
For 2 mm sheets:
Tip Diameter = 5 × √2 ≈ 7.1 Mm
If the tip is too small, the weld may burn through. Too large, and the weld may be too shallow.
5. Hold Time And Squeeze Time
- Squeeze time: 5–15 cycles, enough for the electrodes to press the sheets fully before welding.
- Hold time: 5–20 cycles, to allow the weld to solidify.
Set these based on test welds. If you see cracks after welding, try increasing the hold time.
Typical Parameter Values For Common Materials
Here is a comparison of common spot welding settings for different sheet materials and thicknesses:
| Material | Sheet Thickness (mm) | Welding Current (A) | Weld Time (cycles) | Electrode Force (N) |
|---|---|---|---|---|
| Mild Steel | 1.0 | 5,000 | 5 | 1,800 |
| Mild Steel | 2.0 | 10,000 | 7 | 3,900 |
| Stainless Steel | 1.0 | 4,500 | 6 | 2,000 |
| Aluminum | 1.0 | 7,000 | 8 | 2,300 |
These are starting points. Always test and adjust for your specific machine and setup.
Effects Of Each Parameter On Weld Quality
Changing one parameter can affect the whole weld. Here is how each one influences results:
Welding Current
- Too low: Weak, small weld
- Too high: Burn-through, splashing, electrode wear
Weld Time
- Too short: Incomplete melting, weak joint
- Too long: Overheating, expulsion, large grain size
Electrode Force
- Too low: Poor contact, splashing, high resistance
- Too high: Thin weld, surface damage, indentation
Electrode Tip Size
- Too small: Deep weld, risk of burn-through
- Too large: Shallow weld, weak joint
Hold And Squeeze Time
- Too short: Cracks, weak weld
- Too long: Slower production, unnecessary electrode wear
How To Choose Parameters For Special Materials
Every material responds differently to spot welding. Here’s what you need to know about some common materials:
Mild Steel
This is the easiest to weld. The standard formulas work well. Use copper alloy electrodes and follow the standard current and time guidelines.
Stainless Steel
Needs a bit less current than mild steel, but longer weld time. Stainless steel resists corrosion but conducts heat less well. Use a slightly higher electrode force to prevent pitting.
Aluminum
Aluminum needs much more current (sometimes double) because it conducts heat away quickly. Use shorter weld times to avoid overheating. Electrode tips wear faster, so check them often.
Galvanized Steel
The zinc coating melts at a lower temperature. Use lower current and shorter weld times. Too much heat can vaporize the zinc, causing blowouts.
High Strength Steel
Needs higher force and careful current control. These steels can become brittle if overheated.

Credit: www.academia.edu
Practical Steps For Setting Parameters
Here is a step-by-step method for setting up your spot welding machine:
- Check material and sheet thickness. Get the exact type and thickness before setting anything else.
- Calculate starting parameters. Use the formulas for current, time, force, and tip size.
- Set up the electrodes. Make sure they are clean, the right size, and made from the correct material.
- Run test welds. Make a few sample welds with your calculated settings.
- Inspect welds. Look for good nugget size, no burn-through, and no cracks.
- Adjust as needed. If the weld is too small, increase current or time a little. If there is splashing, reduce current or force.
- Repeat test and inspection. Check again until you get consistent, strong welds.
- Record the settings. Write down the final values for future reference.
How To Inspect Spot Welds
Good parameter calculations are only useful if you check the results. Here are ways to inspect spot welds:
- Visual check: Look for smooth, even surfaces and no burn marks.
- Weld nugget size: Peel or chisel test to see if the nugget size matches standards (usually 5× sheet thickness in mm).
- Tensile test: Pull the welded sheets apart to check strength.
- Non-destructive testing: Use ultrasound or X-ray for important or hidden welds.
If you find problems, go back and adjust your parameters.
Spot Welding Parameter Example: Car Door Panel
Let’s see a real example. A car door uses two mild steel sheets, each 1. 5 mm thick.
- Calculate welding current:
5,000 × 1.5 = 7,500 A
- Calculate weld time:
2 × 1.5 + 2 = 5 Cycles
- Electrode force:
2 × 1. 5 × 100 = 300 kg = 2,943 N
- Tip diameter:
5 × √1.5 ≈ 6.1 Mm
Set the machine to these values. Run a test weld and inspect. If the weld is strong and clean, use these settings for the rest of the batch.
Advanced Parameter Calculations
Sometimes, you need more precise values. For example, in aerospace or electronics, there is less room for error.
Heat Generated Formula
The basic formula for heat generated (Q) during spot welding is:
Q = I² × R × t
Where:
- Q = heat (in joules)
- I = current (A)
- R = resistance at the weld spot (ohms)
- T = weld time (seconds)
If you increase current, heat goes up much faster because of the square (I²). Doubling the current gives four times the heat. Adjust carefully.
Resistance
Resistance at the weld spot depends on:
- Surface cleanliness (rust or oil increases resistance)
- Sheet material
- Contact area (smaller tip = higher resistance)
Keep surfaces clean for best results.
Example: Adjusting For A Dirty Surface
If you cannot clean the sheets well, resistance goes up. You may need to lower the current or time a little to avoid too much heat.
How Parameter Choices Affect Production
Choosing the right spot welding parameters has big effects on production speed, quality, and costs. Here’s a comparison:
| Parameter | Production Speed | Weld Quality | Electrode Life |
|---|---|---|---|
| High Current | Faster | Risk of defects | Shorter |
| Low Current | Slower | May be weak | Longer |
| Short Weld Time | Faster | Risk of weak weld | Longer |
| Long Weld Time | Slower | Risk of overheating | Shorter |
For best efficiency, find the balance. Do not always choose the fastest settings. Quality and safety come first.
Common Mistakes In Spot Welding Parameter Calculations
Even experienced welders can make mistakes. Here are some to watch out for:
- Ignoring sheet material. Aluminum and steel need very different settings.
- Using the same settings for all thicknesses. Thicker sheets need more current and time.
- Not checking electrode wear. Worn tips change the current and heat.
- Not adjusting for surface condition. Dirty sheets increase resistance.
- Skipping test welds. Never trust a calculation without checking the real weld.
Two insights often missed by beginners:
- Small changes in current make a big difference due to the I² effect. Always adjust in small steps.
- Electrode cooling is crucial. If electrodes get too hot, their tips change shape, ruining your calculations.
Improving Spot Welding With Data And Automation
Modern spot welding machines often include data logging and automatic parameter adjustment. These systems can:
- Record every weld’s current, time, and force
- Alert you when parameters drift from set values
- Adjust settings for small changes in material or thickness
Using this data helps improve quality and reduce waste. For more on smart welding and automation, see this Wikipedia page on resistance spot welding.
Spot Welding Parameter Calculation Tools
You do not need to do all calculations by hand. Many companies use:
- Parameter charts: Quick lookup tables for standard materials and thicknesses
- Software calculators: Input your material, thickness, and machine type to get starting values
- Machine presets: Modern welders often have presets for popular jobs
Still, understanding the calculations helps you know when to adjust.
Comparing Manual And Automatic Parameter Setting
Here is a summary of manual vs. automatic methods:
| Setting Method | Flexibility | Accuracy | Skill Needed |
|---|---|---|---|
| Manual | High | Depends on user | High |
| Automatic | Medium | High, if calibrated | Low |
Manual setting is useful for custom jobs. Automatic is good for high-volume, repeat work.
Tips For Better Spot Welding Results
Here are some proven tips to help you get the best spot welds:
- Always start with clean sheets and electrodes.
- Use the right tip size for your sheet thickness.
- Adjust one parameter at a time when testing.
- Allow electrodes to cool between welds.
- Keep good records of what works for each material and thickness.
These small habits make a big difference in weld quality and consistency.

Credit: www.scribd.com
Frequently Asked Questions
What Happens If The Welding Current Is Too High?
If the welding current is too high, the metal can overheat and burn through. This causes splashing, weakens the weld, and can damage the electrodes. Always increase current in small steps and check the weld quality.
How Do I Know If My Weld Time Is Correct?
Check the weld nugget size and strength. If the nugget is too small or the joint is weak, the weld time may be too short. If there is discoloration, burn-through, or large splashes, the time may be too long.
Can I Use The Same Settings For Steel And Aluminum?
No. Aluminum needs much higher current and shorter weld time than steel. Using steel settings on aluminum will not melt the metal enough for a strong weld.
Why Does Electrode Tip Size Matter?
The tip size controls how much current flows into a small area. A small tip gives more heat in a small spot, while a large tip spreads heat out. The wrong size can cause weak welds or burn-through.
How Often Should I Check And Replace Electrodes?
Check the electrodes after every shift or after making several hundred welds. If the tips are worn or misshaped, replace or reshape them. Worn electrodes change the welding current and heat, making your calculations wrong.
Spot welding works best when you understand how each parameter affects the result. With the right calculations, you get strong, clean welds every time. Keep learning, testing, and adjusting for the best outcomes.