
Disclosure: This post contains affiliate links and I will be compensated if you make a purchase after clicking through my links. Learn More
Weld size is a critical factor in construction, manufacturing, and repair work. If the weld is too small, it may not hold. If it is too large, it wastes material and may even weaken the joint. Many people struggle with how to determine proper weld size because it involves rules, measurements, and sometimes judgment.
This article explains how to find the right weld size for different situations, showing both the basics and the finer points. You will see why weld size matters, what affects it, and how experts choose the correct size for safety and efficiency.
You will also get practical examples, tables, and tips to help you avoid mistakes.
Why Proper Weld Size Matters
The size of a weld directly affects the strength and safety of a joint. When you use the right size, the welded part can carry the load it was designed for. A small weld may break under stress, leading to costly failures or accidents. An over-sized weld wastes material, increases costs, and can cause unwanted distortion. In short, correct weld size saves money, time, and lives.
Key Factors That Affect Weld Size
Several factors influence the right weld size for a job. Understanding these helps you make better decisions:
- Base Metal Thickness: Thicker metals need larger welds.
- Type of Weld: Fillet, groove, or plug welds each have their own sizing rules.
- Load Type: Static (steady), dynamic (changing), or impact loads require different approaches.
- Welding Position: Flat, horizontal, vertical, or overhead positions may affect weld size.
- Joint Design: The way metals are joined influences weld size.
- Codes and Standards: Construction codes often set minimum weld sizes.

Credit: www.welding.org
Basic Types Of Welds And Their Sizing Methods
There are many weld types, but most use a few common sizing rules. Here are the main welds you will see:
Fillet Welds
A fillet weld joins two surfaces at a right angle. It is the most common type in structural steelwork. The size is usually the leg length, measured from the root to the toe of the weld.
- The symbol on drawings shows the required size.
- For example, a “6 mm fillet” means each leg of the triangle is 6 mm.
Groove Welds
A groove weld connects parts in the same plane, often using a V, U, J, or bevel shape. The size is the depth of groove filled with weld metal.
- The symbol on drawings shows the groove and depth.
- A “10 mm groove weld” means 10 mm of the joint thickness must be filled.
Plug And Slot Welds
Plug or slot welds fill holes in one piece, joining it to another. The size depends on the hole’s diameter and thickness.
- Symbols show hole diameter and center-to-center spacing.
How To Read Welding Symbols For Size
Welding drawings use standardized symbols to show what weld is needed. Knowing how to read them is key:
- Fillet Weld Symbol: Size appears to the left of the symbol (e.g., 8 = 8 mm leg).
- Groove Weld Symbol: Size appears inside or above the symbol, showing depth or length.
- Length and Pitch: The length of weld and distance between welds are also noted.
Here is a quick reference for common welding symbols:
| Weld Type | Symbol Example | What it Means |
|---|---|---|
| Fillet Weld | 8 | 8 mm leg length |
| Groove Weld | 10 | 10 mm groove depth |
| Plug Weld | 16-50 | 16 mm hole, 50 mm pitch |
Step-by-step Process To Determine Proper Weld Size
Finding the correct weld size involves several steps. Each step matters for safety and performance.
1. Identify The Type Of Joint
Look at the drawing or part to see if it is a butt, lap, corner, tee, or edge joint. Each has preferred weld types and sizes.
2. Check The Base Metal Thickness
Measure the thickness of each piece to be joined. This often sets the minimum weld size.
3. Review Applicable Codes And Standards
Codes like the American Welding Society (AWS) D1.1 or local building rules often list minimum and maximum weld sizes for each material and joint type. Always start here.
4. Determine Load Requirements
Ask: What forces will the weld see? Will it face tension, compression, shear, or bending? If you are unsure, check with an engineer or refer to design loads on the drawing.
5. Use Weld Size Formulas
Most standards give formulas or tables to select weld size. For example, for fillet welds:
- Minimum size = based on thinnest part
- Maximum size = usually not more than the thickness of the thinner part
Here is a common rule for fillet welds:
| Base Metal Thickness (mm) | Minimum Fillet Weld Size (mm) |
|---|---|
| Up to 10 | 3 |
| 10 to 20 | 5 |
| 20 to 32 | 6 |
| Above 32 | 8 |
6. Consider Joint Design And Fit-up
Gaps, misalignment, or poor fit can require larger welds or special procedures.
7. Check For Special Requirements
Some jobs need oversized welds for fatigue, impact, or corrosion resistance.
8. Review Drawing Notes And Revisions
Always check the latest drawings and notes for updates. Designers may change weld size based on testing or field results.
Common Mistakes When Choosing Weld Size
Many people make errors when selecting weld size. Here are some to avoid:
- Ignoring Codes: Using “rule of thumb” without checking standards often leads to unsafe welds.
- Oversized Welds: Bigger is not always better. Large welds can crack or distort metal.
- Wrong Symbol Reading: Misreading drawing symbols leads to the wrong size.
- Not Allowing for Fit-Up: If parts do not fit well, the weld may not fill the gap safely.
- Forgetting About Welding Position: Overhead or vertical welds can sag if too large.
How To Calculate Fillet Weld Size
Fillet welds are common, but their size calculation can be confusing. Here is a clear method:
Calculation Steps
- Find the Load: How much force will the weld carry? Use design drawings or ask the engineer.
- Calculate Required Throat: The throat is the shortest line from the root to the face. For a flat fillet weld, Throat = 0.707 × leg size.
- Check Allowable Stress: Use code values for maximum stress the weld metal can handle.
- Apply Safety Factor: Codes require a safety margin, usually 1.5 to 2 times.
- Solve for Leg Size: Rearrange the formula to find the minimum leg size.
Example
Suppose a weld must carry a 50,000 N shear load. The allowable weld stress is 140 MPa. The weld is 100 mm long.
- Required weld area = 50,000 N / 140,000,000 N/m² = 0.000357 m² = 357 mm²
- Throat area = length × throat = 100 mm × throat
- Throat = 357 mm² / 100 mm = 3.57 mm
- Leg size = Throat / 0.707 = 3.57 / 0.707 ≈ 5 mm
So, a 5 mm fillet weld is needed.
How To Calculate Groove Weld Size
Groove welds are used for butt joints. Their size is the depth of weld metal filling the groove.
Steps To Calculate
- Check Joint Preparation: How deep is the groove? Is it single or double sided?
- Find Required Strength: Use the load and allowable stress as in fillet welds.
- Calculate Weld Area: Area = thickness × length for full penetration.
- Check Code Requirements: Some codes require full penetration for certain joints.
Example
Two 10 mm thick plates in a butt joint need to carry a 60,000 N tensile load. The allowable stress is 150 MPa. The weld is 80 mm long.
- Required area = 60,000 / 150,000,000 = 0.0004 m² = 400 mm²
- Area = thickness × length, so thickness = area / length = 400 mm² / 80 mm = 5 mm
So, at least 5 mm of weld thickness is needed. If the groove is 10 mm deep, a full penetration weld will be enough.
Influence Of Welding Position On Weld Size
Welding position affects the maximum practical size of a weld. Gravity can cause large welds to sag or lose shape in vertical or overhead positions.
- Flat Position: Easiest, allows larger welds.
- Horizontal Position: Moderate difficulty, welds may sag if too large.
- Vertical/Overhead: Hardest, usually need smaller, multi-pass welds.
For example, AWS D1. 1 limits the maximum single-pass fillet weld size in vertical position to 6 mm.
The Effect Of Heat Input And Distortion
Large welds mean more heat. Too much heat can warp or distort metal, making parts fit poorly. This is why weld size must balance strength and distortion.
- For thin sheets, use the smallest size allowed.
- For thick plates, use multiple smaller passes instead of one large weld.
Choosing Weld Size For Different Materials
Material type affects weld size selection.
Steel
Steel is strong and welds easily. Standard code tables work well.
Aluminum
Aluminum melts at lower temperatures and expands more. Use slightly larger welds, and control heat to prevent burn-through.
Stainless Steel
Stainless steel is tough but may crack if cooled too fast. Use weld sizes at the higher end of code limits.
Other Metals
Metals like copper or titanium need special procedures. Always check manufacturer or code guidelines.
Comparing Fillet And Groove Weld Sizing
Choosing between fillet and groove welds depends on joint design, load, and cost. Here is a comparison:
| Feature | Fillet Weld | Groove Weld |
|---|---|---|
| Common Use | Tee, lap, corner joints | Butt joints |
| Strength | Good for shear | Good for tension/compression |
| Sizing | Leg length (triangle) | Groove depth |
| Cost | Lower | Higher (more prep) |
How Codes And Standards Guide Weld Size
Industry standards exist to ensure welds are safe. The most used are:
- AWS D1.1: Common in structural steel.
- ASME Section IX: Used in boilers and pressure vessels.
- ISO 2553: Global standard for welding symbols.
These codes set minimum and maximum weld sizes, joint details, and test methods. Always check the latest version for your region or industry.
Using Engineering Judgment
Not every situation is in the code. Sometimes, you must use experience to adjust weld size:
- For dynamic loads (like cranes), use larger welds or extra passes.
- For corrosive environments, larger welds reduce crevice corrosion.
- For repair welds, match the original weld size unless a problem was found.
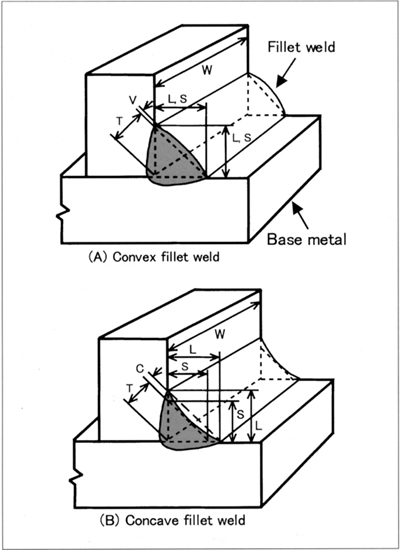
Credit: www.kobelco-welding.jp
Tools And Gauges For Checking Weld Size
After welding, you must verify the size is correct. Use these tools:
- Fillet Weld Gauges: Measure leg length and throat.
- Weld Size Gauges: For groove depth and bead width.
- Calipers or Rulers: For quick checks.
Always check several points along the weld. If you find under-sized welds, repair them before use.
Non-obvious Insights For Proper Weld Sizing
- Weld Size Affects Cooling Rate: Large welds cool slower, which may cause cracks in some alloys. Sometimes, a smaller multi-pass weld is safer.
- Weld Profile Matters: A convex fillet (slightly rounded) can be stronger than a flat or concave shape, even with the same leg size. Codes often limit how convex the weld can be.
Case Study: Selecting Weld Size For A Simple Structure
Suppose you are building a steel frame for a small platform. The main beams are 12 mm thick, and the supports are 8 mm thick. The frame must hold 800 kg of equipment.
- Joint Type: Tee joint, fillet weld.
- Base Metal Thickness: 8 mm (thinner part controls weld size).
- Code Reference: AWS D1.1 says minimum fillet weld for 8 mm is 5 mm.
- Load Check: Calculate expected load on the weld. If the code minimum gives enough strength, use it. If not, increase size or length.
- Drawing Symbol: Show “5 mm fillet, both sides, 100 mm long”.
Practical Tips For Choosing Weld Size
- Start with the code minimum. Increase only if needed for special loads or environments.
- Measure base metal at the weld site. Sometimes parts are not as thick as the drawings show.
- Do not oversize to “play it safe.” This can lead to cracking or distortion.
- Check with an engineer if the weld will carry critical loads.
Welding Size And Cost
Weld size affects cost:
- Material Use: A 10 mm fillet weld uses about four times more metal than a 5 mm weld of the same length.
- Labor Time: Larger welds take longer to make and may need more passes.
- Distortion Risk: Bigger welds can warp thin parts, leading to rework.
Always balance safety and cost.
How To Communicate Weld Size Clearly
Welders need clear instructions. On drawings:
- Use correct symbols and sizes.
- Show length, pitch, and both/all sides if needed.
- Add notes for special welds (e.g., “grind smooth” or “multi-pass”).
Poor communication is a common cause of wrong weld size.
Credit: weldguru.com
How To Adjust Weld Size In The Field
Sometimes, the planned weld size does not fit the situation. Maybe the joint is wider, or the metal is thinner. Here’s what to do:
- Stop and check the reason. Do not guess.
- Ask for guidance. Talk to your supervisor or engineer.
- Do not make the weld bigger or smaller without approval. This can create safety risks or code violations.
Visual Inspection And Quality Control
After welding, inspect for:
- Correct size (use gauges).
- Uniform shape and smooth finish.
- No cracks, undercut, or porosity.
If the weld is too small or has defects, repair before use.
Training And Experience
Welders and inspectors need training to judge weld size. Practice with real gauges and samples helps you get better. Over time, you learn to spot problems before they become serious.
Reference To Authoritative Standards
For more details, see the AWS D1.1 Structural Welding Code available at AWS.org. This official source explains all rules, symbols, and formulas.
Frequently Asked Questions
What Happens If A Weld Is Too Small?
A too-small weld may not carry the load. This can lead to cracks, breaks, or collapse, especially in critical structures.
Is A Larger Weld Always Better?
No. Oversized welds waste material, cost more, and may cause distortion or cracking in the metal. The correct size balances strength and efficiency.
How Do I Check Weld Size After Welding?
Use a fillet weld gauge or weld size gauge. Measure several points along the weld to make sure it matches the drawing.
Which Code Should I Follow For Weld Size?
Most jobs use AWS D1.1 for steel structures. For pressure vessels, use ASME Section IX. Always check project documents for the required code.
Can I Change Weld Size During Welding If Fit-up Is Poor?
No, do not change weld size without approval. Talk to your supervisor or engineer for instructions. Changing size can create safety risks.
Proper weld sizing is both a science and a skill. By following codes, using careful measurements, and applying good judgment, you can achieve safe, strong, and cost-effective welds. Always keep learning and check your work for the best results.

