
Disclosure: This post contains affiliate links and I will be compensated if you make a purchase after clicking through my links. Learn More
Fillet welds connect two pieces of metal, usually at a right angle. You often see these welds in structural steel, pipelines, machinery, and even small projects like metal frames. Calculating the right fillet weld size is crucial. If you guess or use the wrong size, the joint may fail—sometimes dangerously.
But many people, especially beginners, find weld sizing confusing. This guide will explain how to calculate fillet weld size step by step, covering everything you need to know, with examples and simple explanations.
What Is Fillet Weld Size?
Fillet weld size is the measurement that shows the strength of the weld. Usually, it is the length of the sides of the largest triangle that can fit inside the weld’s cross-section. In other words, it is the leg length of the triangle, not the thickness of the weld itself. The standard symbol for fillet weld size on drawings is a number (in millimeters or inches) next to the weld symbol. For example, a “6” means a 6 mm leg length.
The size of the weld affects how much force the joint can handle. Too small, and the weld may crack. Too large, and you waste materials, time, and money. That’s why standards exist to help you choose the correct size.
Why Fillet Weld Size Matters
Using the correct fillet weld size gives you several key benefits:
- Safety: The right size ensures the joint will not break under normal loads.
- Cost Efficiency: Oversized welds waste metal and gas, increasing expenses.
- Code Compliance: Many industries follow rules such as the American Welding Society (AWS) D1.1 or ISO standards. These codes specify minimum sizes for different applications.
- Quality: The correct size prevents weak joints and improves the overall look of the weld.
Many beginners make the mistake of guessing or just copying what they see. This can lead to unsafe or wasteful welds. Knowing how to calculate the right size is a skill every welder or engineer should master.
Key Terms In Fillet Weld Sizing
Before you calculate fillet weld size, you need to know some important terms:
- Leg length (a or z): The length of the two sides of the triangle that touch the metal pieces.
- Throat thickness (t): The shortest distance from the root of the weld to the face (the hypotenuse of the triangle).
- Effective throat: The minimum distance that actually resists the force.
- Weld length: How long the weld runs along the joint.
Understanding these terms will help you interpret drawings and apply the right formulas.
Fillet Weld Symbols And Drawings
When you look at engineering drawings, you will see fillet weld symbols. These symbols tell you:
- Where to place the weld (arrow side, other side, or both)
- The leg length (size)
- Weld length and spacing (if not continuous)
A typical symbol looks like a triangle with a number (for size) and sometimes a number to the right (for length). For example:
6 —> (triangle symbol) ————————
This means a 6 mm fillet weld along the length of the joint. Reading and understanding these symbols is the first step in sizing welds correctly.
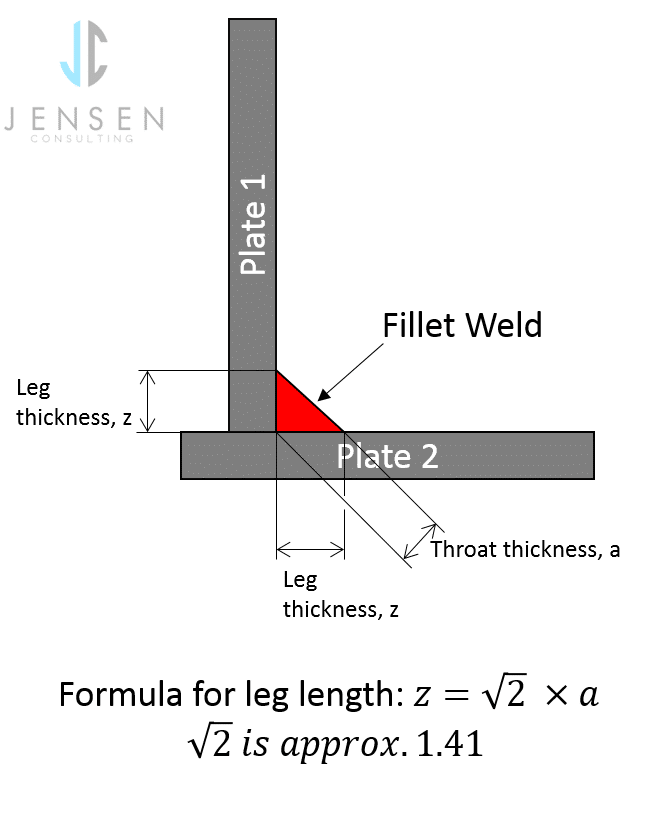
Credit: restoric.co.uk
How To Calculate Fillet Weld Size: Step-by-step
Calculating fillet weld size is not just about picking a number. It involves analyzing the joint, understanding the loads, checking codes, and using formulas. Here’s a step-by-step approach.
1. Determine The Loads And Forces
Start by understanding what the weld must hold. Is it a static structure, a bridge, a pipeline, or a machine part? You need to know the type of load:
- Shear load (forces trying to slide the plates apart)
- Tensile load (forces pulling the plates apart)
- Fatigue load (repeated loading and unloading)
Get the values for these loads from your project requirements or engineering calculations.
2. Check The Material Properties
The strength of your base metal and welding electrode matters. Look up the yield strength and ultimate tensile strength for both. Use the lower value for safe design.
For example, if your base metal is mild steel with a yield strength of 250 MPa and your electrode is 410 MPa, use 250 MPa in your calculations.
3. Refer To Codes And Standards
Most countries or industries use codes to set minimum weld sizes. The most common are:
- AWS D1.1 (structural steel)
- ISO 2553 (international weld symbols)
- BS EN 1011 (Europe)
These codes give charts for minimum and maximum weld sizes based on plate thickness. Always check the code relevant to your project.
4. Calculate Required Throat Thickness
The throat thickness is where the weld resists the force. For a simple fillet weld, the formula is:
Throat thickness (t) = leg length (a) × 0.707
The number 0.707 comes from the geometry of a right triangle (sin 45°). To find the required throat, use:
Required throat = Force / (Weld length × Allowable stress)
Example:
Suppose you have a static load of 50,000 N, and the allowable stress for your weld is 150 MPa. Your joint length is 200 mm.
- Required throat = 50,000 / (200 × 150) = 1.67 mm
5. Find The Required Leg Length
Once you have the required throat, divide by 0.707 to get the leg length:
Leg length (a) = Required throat / 0.707
From the example above:
- Leg length = 1.67 / 0.707 ≈ 2.36 mm
6. Check Minimum And Maximum Sizes
Now, check your code’s minimum and maximum weld size for your plate thickness. For example, AWS D1.1 gives:
| Plate Thickness (mm) | Minimum Weld Size (mm) | Maximum Weld Size (mm) |
|---|---|---|
| Up to 3 | 2 | 3 |
| 3-6 | 3 | 6 |
| 6-12 | 5 | 10 |
If your calculated size is less than the minimum, use the minimum allowed by code. If it’s more than the maximum, you may need to change your joint design.
7. Round Up To Standard Sizes
Welds are usually made in standard sizes (like 3 mm, 5 mm, 6 mm, etc. ). Round your answer up to the next standard size.
In the example above, 2. 36 mm would round up to 3 mm.
8. Double-check Edge Conditions
If one plate is much thinner than the other, codes may require you to limit the weld size to avoid burning through the thinner plate. AWS D1.1 recommends:
- Maximum fillet weld size = thickness of thinner plate – 1.5 mm
Always review these edge cases to avoid weak or faulty welds.
Practical Example: Step-by-step Fillet Weld Size Calculation
Let’s work through a real example with all steps.
Project: Joining two steel plates at a 90-degree angle for a support bracket.
- Plate thickness: 8 mm
- Joint length: 250 mm
- Applied load: 80,000 N (shear)
- Base metal yield strength: 250 MPa
- Electrode strength: 350 MPa
- Welding code: AWS D1.1
Step 1: Find allowable stress. Use 0.3 × yield strength for safety (common rule).
- Allowable stress = 0.3 × 250 = 75 MPa
Step 2: Calculate required throat.
- Required throat = 80,000 / (250 × 75) = 80,000 / 18,750 = 4.27 mm
Step 3: Calculate leg length.
- Leg length = 4.27 / 0.707 ≈ 6.04 mm
Step 4: Check AWS D1.1 for minimum/maximum sizes for 8 mm plate.
From the earlier table:
- Minimum = 5 mm, Maximum = 10 mm
- 04 mm is fine. Round up to a standard size: Use 7 mm.
Step 5: Check edge conditions. The weld size should not be greater than the plate thickness minus 1.5 mm:
- 8 – 1.5 = 6.5 mm
So, use 6 mm fillet weld size.
Result: Specify a 6 mm fillet weld on the drawing.
Common Mistakes In Fillet Weld Sizing
Many people make errors that reduce weld quality or safety. Here are some common mistakes to avoid:
- Ignoring Code Minimums: Codes exist for a reason. Never use a weld size below the minimum, even if your calculation says you can.
- Oversizing Welds: Bigger is not always better. Oversized welds waste material and can cause distortion.
- Forgetting Thinner Plate Limits: Always check the thinner plate’s thickness. Too big a weld can burn through or weaken the joint.
- Wrong Units: Mixing up millimeters and inches leads to big mistakes. Check your units at every step.
- Not Considering Fatigue: If your weld will see repeated loading, use lower allowable stress.
- Not Checking All Joints: Each joint may need a different weld size based on load and plate thickness.
Important Insights For Accurate Fillet Weld Sizing
Some details often get missed, especially by new welders and engineers.
1. Effective Throat Vs. Theoretical Throat
The effective throat is the part of the weld that actually resists force. Poor welding technique, bad fit-up, or wrong settings can reduce the effective throat. Always inspect welds and use quality control to ensure you get the strength you expect.
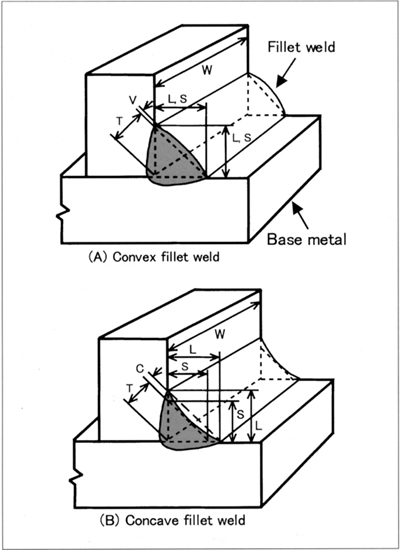
2. Weld Shape (convex, Flat, Concave)
The shape of the weld face affects strength and appearance. A convex weld can be stronger but may waste metal. A concave weld may be weaker if the throat is too small. Most codes recommend a flat or slightly convex profile.
Too much convexity can make inspection hard and may hide defects.
3. Intermittent Welds
You do not always need to weld the full length of a joint. Intermittent welds (short welds with gaps) save material and reduce distortion. Codes provide minimum and maximum spacing for these welds. But you must calculate size and spacing based on the total load.
4. Multiple Pass Welds
If the weld size is larger than what you can make in one pass, you must use multiple passes. Each pass should be the correct size for your equipment and material. Do not try to make a huge weld in one go—this often leads to poor quality and defects.
5. Effect Of Position
Welds made overhead or vertically are harder to control, and sometimes require smaller sizes or more passes. Always consider weld position when planning the job.
How Codes Set Minimum And Maximum Fillet Weld Sizes
Codes like AWS D1.1 and ISO 2553 use tables and formulas to set minimum and maximum fillet weld sizes, mainly based on plate thickness. Here is a simple summary for common plate thicknesses:
| Plate Thickness (mm) | Minimum Fillet Size (mm) | Maximum Fillet Size (mm) |
|---|---|---|
| 3 – 5 | 3 | 5 |
| 5 – 10 | 5 | 10 |
| 10 – 16 | 8 | 16 |
These numbers can change based on the code and the type of joint. Always consult the latest version of your code.
Tools For Measuring Fillet Weld Size
Welders and inspectors use special gauges to check weld size on finished work. The most common is the fillet weld gauge. This tool has notches or steps for different sizes. You place it against the weld to see if the leg length matches the specified size.
Using the right gauge helps maintain quality and pass inspections. Do not guess or use a ruler—fillet weld gauges are more accurate and easier to use.
Fillet Weld Size In Different Joint Types
Fillet welds appear in various joint types. Each type can affect how you calculate the weld size.
1. T-joint
This is the most common fillet weld joint. The plates meet at a 90-degree angle. Calculate weld size as described above.
2. Lap Joint
One plate overlaps the other. The weld is usually on both sides. The thinner plate limits the maximum weld size.
3. Corner Joint
Plates meet at the edge. These are less strong than T-joints and may require larger welds for the same strength.
4. Edge Joint
Plates are side by side and joined along the edge. Fillet welds in edge joints are less common and usually need careful calculation to avoid weak joints.
Fillet Weld Size For Different Materials
Different metals have different strengths and welding behaviors. For example:
- Mild steel: Common and easy to weld. Use standard codes.
- Stainless steel: Needs more control to avoid warping. Sometimes needs larger welds due to lower heat conductivity.
- Aluminum: Soft and conducts heat quickly. Use lower current and check codes for minimum sizes.
- Cast iron: Hard to weld and brittle. Fillet welds are rarely used except for repairs.
Always check the specific welding code and recommendations for the material you are using.
Credit: www.kobelco-welding.jp
Calculating Fillet Weld Size For Dynamic And Fatigue Loads
If your joint will see dynamic or cyclic (fatigue) loads, such as in bridges, cranes, or moving machinery, you must use a lower allowable stress. Fatigue cracks start at weld toes, so codes often require larger welds or better profiles (smooth, not underfilled or overfilled).
For fatigue-prone welds:
- Use a smooth transition between weld and plate.
- Avoid sharp corners or undercuts.
- Use allowable stress values from fatigue tables in the code.
- Consider post-weld treatments like grinding to remove stress risers.
How To Specify Fillet Weld Size On Drawings
To communicate clearly with welders and inspectors, use the standard symbols and notation.
- Write the leg length next to the weld symbol.
- Show the weld length if not continuous.
- Use a leader arrow to point to the joint.
- If both sides need welding, show two triangles (one above, one below the reference line).
Example:
6 (triangle symbol above and below line) ————
This means a 6 mm fillet weld on both sides of the joint, along the full length.

Credit: www.weldingandndt.com
Real-world Example: Comparing Different Fillet Weld Sizes
Suppose you must choose between a 5 mm and 8 mm fillet weld for a 200 mm joint, using steel with 250 MPa yield strength and a 100,000 N shear load. Here’s how the capacity changes:
| Leg Length (mm) | Throat (mm) | Weld Area (mm²) | Allowable Load (N) |
|---|---|---|---|
| 5 | 3.54 | 708 | 53,100 |
| 8 | 5.66 | 1,132 | 84,900 |
You see that increasing the weld size from 5 mm to 8 mm almost doubles the strength, but also uses more material. Select the smallest size that meets your load and code requirements.
Tips For Accurate Fillet Weld Sizing
- Always check the code: Codes change and have specific rules for every situation.
- Measure plate thickness: Do not guess—use a caliper for accuracy.
- Consider access and welding position: If you cannot reach the joint easily, adjust your plan or weld size.
- Account for distortion: Large welds can cause plates to warp.
- Check your math: Small mistakes in units or formulas can lead to big problems.
Useful Resources
For more detailed tables and code information, you can visit Wikipedia: Weld, which includes links to global standards and technical details.
Frequently Asked Questions
What Is The Difference Between Leg Length And Throat Thickness In A Fillet Weld?
Leg length is the length of the two sides of the triangular weld that touch the plates. Throat thickness is the shortest distance from the root to the face of the weld. The throat is what resists the force, and is always smaller than the leg length.
How Do I Measure The Fillet Weld Size On A Finished Weld?
Use a fillet weld gauge. Place it against the weld to check if the leg length matches the specified size. Do not rely on visual guesswork or rulers, as these are less accurate.
What Happens If My Fillet Weld Is Too Small?
A weld that is too small may not handle the design load and can fail. This can cause safety hazards, equipment damage, or project failure. Always meet or exceed the minimum code size.
Can I Use A Larger Fillet Weld Than Required?
Larger welds may seem stronger, but they waste material, take more time, and can cause distortion. Codes also set maximum sizes to prevent overheating or weakening the joint.
Why Do Codes Set A Maximum Fillet Weld Size?
The maximum size ensures you do not overheat or weaken the plate, especially the thinner member. Too much heat can cause warping or burn-through, reducing the joint’s strength.
Fillet weld sizing is not just about numbers. It is about understanding loads, materials, codes, and proper techniques. By following these steps and using the right tools, you can achieve strong, safe, and cost-effective welds every time.

