
Disclosure: This post contains affiliate links and I will be compensated if you make a purchase after clicking through my links. Learn More
Stick welding, also known as Shielded Metal Arc Welding (SMAW), is a popular method for joining metal. Many people choose stick welding because it works well on different metals and in outdoor conditions. One important factor for a successful weld is setting the correct amperage.
The right amperage depends mainly on the thickness of the metal. If you use too little current, the electrode sticks or the weld is weak. If you use too much, you burn through the metal or make a poor joint.
This guide explains how to match amperage to metal thickness for stick welding. You will learn why it matters, how to find the right settings, and common mistakes to avoid. You will also see real examples, data tables, and expert tips for better results.
Why Amperage Is Important In Stick Welding
The amperage controls how much electrical current flows through the welding electrode. This affects the heat at the tip of the electrode and how well the metal melts. If you use the correct amperage, you get a strong, smooth weld bead.
If your amperage is too low, the arc may not stay lit, and the metal does not fuse well. If it is too high, the weld pool becomes hard to control and may cause holes.
The correct amperage also changes how deep the weld goes into the metal. Deeper penetration is good for thick metal, but it can cause burn-through on thin pieces. Getting this balance right is key for safe, long-lasting joints.
How Metal Thickness Affects Amperage
Thicker metal needs more heat to melt. This means you need to use higher amperage. Thin metals need less heat, so you use lower amperage to avoid warping or burning through the workpiece.
As a simple rule, most welders start with 1 amp for every 0. 001 inch of metal thickness. For example, if the steel is 1/8 inch (0. 125″), you start with about 125 amps.
But this is just a starting point. Other factors like electrode size, welding position, and type of metal also matter. Let’s look at these in more detail.

Credit: bakersgas.com
How Electrode Size And Type Affect Amperage
The electrode acts as both the filler material and the arc carrier in stick welding. Each electrode type and size has a recommended amperage range. A larger diameter electrode needs higher amperage to melt properly.
For example:
- A 3/32″ (2.4mm) E6013 rod works well at 70-100 amps.
- A 1/8″ (3.2mm) E6011 rod needs 75-125 amps.
- A 5/32″ (4.0mm) E7018 rod runs best at 120-180 amps.
Electrodes also have different coatings. Some, like E6010, work well with deeper penetration at higher amps. Others, like E7018, need a stable arc, and their range is narrower.
You must always check the electrode box for the recommended range, then adjust based on your metal thickness.
Matching Amperage To Metal Thickness: Practical Guide
Welders often follow basic guidelines, but real-world conditions can change the ideal setting. Here is a detailed guide for common metal thicknesses and popular electrode sizes.
| Metal Thickness (inches) | Electrode Size (inches) | Recommended Amperage | Common Electrode Types |
|---|---|---|---|
| 1/16″ (1.6 mm) | 3/32″ | 40-70 | E6013, E7014 |
| 1/8″ (3.2 mm) | 1/8″ | 90-125 | E6011, E6013, E7018 |
| 1/4″ (6.4 mm) | 5/32″ | 120-180 | E6011, E7018 |
| 3/8″ (9.5 mm) | 3/16″ | 160-210 | E7018 |
| 1/2″ (12.7 mm) | 1/4″ | 210-315 | E7018 |
These values give you a safe starting point. Always do a test weld on scrap before working on your real project. Adjust slightly up or down based on how the weld looks and feels.
Key Factors That Affect Amperage Selection
Several factors influence your final amperage choice. Ignoring these can lead to weak joints or wasted time.
1. Joint Type
A butt joint (two flat pieces joined edge to edge) needs less amperage than a T-joint or a fillet weld (two pieces at an angle). This is because the heat spreads more in complex joints. Increase your amperage slightly for fillet or T-joints.
2. Welding Position
Flat position (work piece lying flat) is easier and allows higher amperage. Vertical or overhead welding needs a lower amperage because gravity can make the molten metal drip. If you weld vertical-up, reduce your amperage by 10-15% to control the puddle.
3. Type Of Metal
Mild steel is common and melts at a lower temperature. Stainless steel and cast iron need different amperage and sometimes special electrodes. Aluminum is rarely stick welded because it needs high heat and special rods. Always check the electrode box for guidance.
4. Condition Of The Metal
Rust, paint, and oil change how the arc behaves. Dirty metal may need a slightly higher amperage or a special rod like E6010, which cuts through contaminants.
5. Machine Type And Power Source
Some machines do not provide a stable arc at the low or high end of their range. Older machines may need a higher setting for the same result. Always test and adjust.
How To Set Amperage On Your Stick Welder
Most stick welders have a simple dial to set amperage. Look for the numbers near the knob. Some digital machines show the exact value. Follow these steps:
- Choose your electrode size and type.
- Find the recommended range on the electrode box or use the guide above.
- Set the dial to the middle of the range for your metal thickness.
- Strike an arc on a scrap piece.
- Watch the weld pool. If the rod sticks, increase amperage. If it burns through or the arc is wild, reduce amperage.
- Listen for a steady “buzz” or “crackle” sound. This often means you have the right setting.
Tip: Never guess your amperage. Always check your settings each time you change electrode size or metal thickness.
Amperage Settings For Popular Electrodes
Different electrodes are made for different jobs. Here is a comparison of the most popular rods and their typical amperage ranges by size.
| Electrode | Diameter (inches) | Amperage Range | Best For |
|---|---|---|---|
| E6010 | 1/8″ | 75-125 | Deep penetration, pipe, rusty steel |
| E6013 | 3/32″ | 40-90 | Thin sheet metal, smooth bead |
| E7018 | 1/8″ | 90-150 | Structural steel, bridges, strong welds |
| E7014 | 1/8″ | 100-150 | High-speed welds, fillet welds |
Non-obvious insight: Each electrode type has a unique arc behavior. For example, E7018 needs a very stable arc, so too much amperage can cause spatter and poor bead shape. E6010 tolerates higher amperage but is harder for beginners.
What Happens If You Use The Wrong Amperage
Many beginners struggle with this step. The signs are clear if you pay attention:
- Low amperage: The rod sticks, the arc keeps breaking, or the bead sits on top of the metal (cold lap).
- High amperage: The rod melts too fast, the arc is too wide, the bead is flat and wide, or you burn through the workpiece.
Non-obvious insight: Consistent rod sticking often points to low amperage or poor workpiece grounding. Check your ground clamp before adjusting the amperage. Many new welders miss this easy fix.
Step-by-step Example: Welding 1/8” Steel Plate
Here is a real example to show how to set amperage for a common job.
- Select electrode: 1/8″ E6011, good for all positions and mild steel.
- Check recommended range: 75-125 amps.
- Set machine: Start at 100 amps (middle of range).
- Prepare metal: Clean with a wire brush, clamp the ground.
- Test arc: Strike an arc on scrap. If the rod sticks, raise to 110 amps. If you see burn-through, lower to 90 amps.
- Check bead: The weld should be smooth, with a steady crackling sound, no sticking, and no holes.
If you change to a 3/32″ rod on the same steel, set your machine to 70-90 amps and repeat your test.
Common Mistakes And How To Avoid Them
Many welders, especially beginners, make the same errors. Knowing them saves time and money.
1. Ignoring Electrode Size
A big rod on thin metal creates holes. A small rod on thick metal cannot make a strong joint. Always match rod size to your project.
2. Not Adjusting For Welding Position
Using the same amperage for flat and vertical welds leads to drips or poor fusion. Lower amperage for overhead or vertical positions.
3. Skipping Test Welds
Even experts make a quick test weld. Metal composition, humidity, and machine age all affect the arc. A test bead lets you fine-tune.
4. Forgetting Clean Metal
Paint, oil, and rust change the arc. Clean your joint area well. If you must weld dirty metal, use rods like E6010 or E6011.
5. Changing Only Amperage When Bead Looks Wrong
Problems like porosity, undercut, or spatter may come from travel speed, arc length, or rod angle—not only amperage. Adjust your technique too.
Amperage Settings For Thin Vs. Thick Metal
Welding thin metal (under 1/8″) needs care. Use low amperage, small electrodes, and fast travel speed to avoid burn-through. For thick metal (over 1/4″), use larger electrodes and higher amperage. You may need to make multiple passes to fill the joint.
Here is a comparison for thin and thick steel:
| Thickness | Electrode Size | Amperage | Welding Tip |
|---|---|---|---|
| 18 gauge (1.2 mm) | 1/16″ | 20-40 | Short arc, fast travel, avoid pause |
| 1/4″ (6.4 mm) | 5/32″ | 120-180 | Multiple passes, preheat if needed |
Tip: For very thin metal, use a “stitch weld” (short beads with gaps) to limit heat input and prevent warping.
How To Read And Adjust Your Weld Bead
The weld bead tells you a lot about your settings.
- Good bead: Uniform width, smooth surface, slight crown.
- Narrow, high bead: Amperage too low.
- Flat, wide bead: Amperage too high.
- Porous bead: Dirty metal or bad technique.
- Excess spatter: Arc length too long or amperage too high.
Always look at the bead and adjust before continuing. It is better to change settings early than to fix problems later.
Rod Angle And Travel Speed
While amperage is key, rod angle and speed also matter. Hold the rod at about 15-20 degrees from vertical, tilted in the direction of travel. Move at a steady pace. If you go too slow, you build up too much heat and risk burn-through.
If you go too fast, the weld is weak and narrow.
Non-obvious insight: Many beginners blame settings when their welds look bad. Often, the real cause is moving the rod too slowly or holding the wrong angle. Practice both your settings and your hand movement.
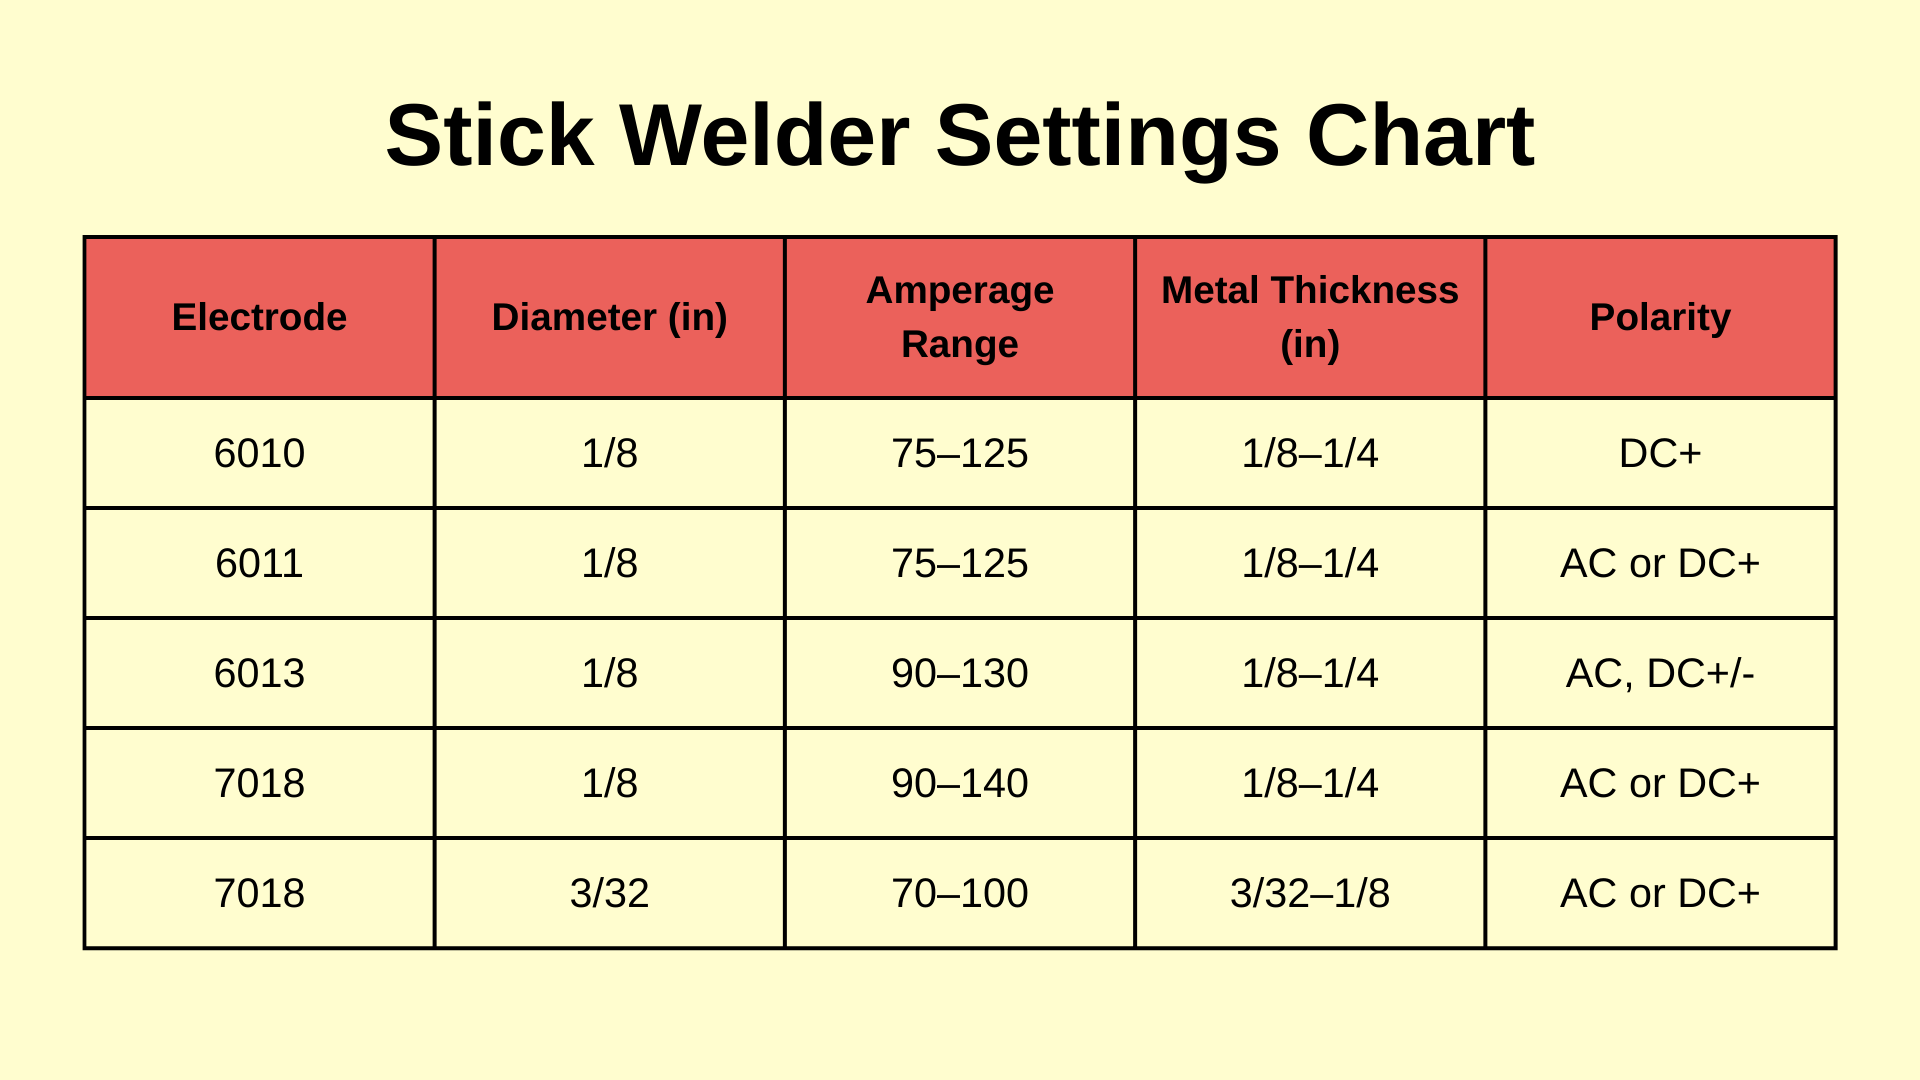
Quick Reference: Amperage By Metal Thickness
Here is a summary you can use in your workshop:
- Up to 1/16″ (1.6 mm): 35-70 amps, 3/32″ or smaller rod
- 1/8″ (3.2 mm): 90-125 amps, 1/8″ rod
- 1/4″ (6.4 mm): 120-180 amps, 5/32″ rod
- 3/8″ (9.5 mm): 160-210 amps, 3/16″ rod
- 1/2″ (12.7 mm): 210-315 amps, 1/4″ rod
Always check electrode box suggestions and adjust for position and joint type.
Credit: www.arccaptain.com
How Weather And Environment Can Affect Amperage Needs
Stick welding works well outside, but cold or windy weather can change your results. Cold metal draws away heat, so you may need to increase amperage by 5-10%. Wind can blow away the protective gas from the rod’s coating, making the weld brittle.
Use windbreaks or weld indoors when possible.
Preheating Thick Metal
For steel over 3/8″ thick, preheating the metal to about 150-200°F (65-93°C) helps prevent cracking. Preheating is not a substitute for high enough amperage, but it makes the weld pool flow better. Use a propane torch or special heater for this.
Practical tip: Always wear gloves when checking preheated metal. Even a few seconds of contact can cause burns.
Amperage And Duty Cycle
Welding machines have a “duty cycle”—how long they can run at a set amperage before overheating. For example, a 140A welder with a 30% duty cycle can weld for 3 minutes out of every 10 at 140 amps. If you exceed this, the machine may shut off or get damaged.
If you need to weld thick steel at high amps, choose a machine with a high duty cycle. For short jobs or thin metal, a small machine is fine.
Amperage Guidelines For Different Metals
While most home welders join mild steel, other metals need special care.
- Stainless steel: Use a lower amperage (about 10% less) than for mild steel, and a rod like E308L.
- Cast iron: Use a nickel rod, low amperage, and short welds to avoid cracking.
- Aluminum: Stick welding is rare but possible with special rods and very high amperage (above 200 amps). Most welders use MIG or TIG for aluminum.
Non-obvious insight: For stainless and cast iron, always let the weld cool slowly. Fast cooling causes cracks. Cover with a welding blanket to hold in heat.
Common Questions Beginners Have About Amperage
Many beginners wonder if they can just “set and forget” their welder. The truth is, each job needs small adjustments. Here are answers to common worries:
- Can I use the same amperage for every job? No. Change amperage for metal thickness, position, and rod size.
- My rod keeps sticking—should I always turn up the amps? Not always. First check your ground clamp, rod angle, and technique.
- How do I know if my amperage is right? The rod should not stick, the bead should be smooth, and there should be little spatter.
Expert Tips For Better Stick Welding
- Start in the middle of the recommended amperage range, then adjust up or down after a test weld.
- Use short beads when learning, so you can check and adjust often.
- Keep rods dry. Damp electrodes cause bad arcs and weak welds.
- Use a tight ground clamp. Poor ground causes arc problems that look like bad amperage settings.
- Practice on scrap. This saves metal and helps you learn faster.
Troubleshooting: When Your Welds Go Wrong
Welds can fail for many reasons. Here’s how to fix the most common amperage-related problems.
Rod Sticks Often
- Amperage too low
- Poor ground
- Rod too cold (old machines)
Solution: Raise amperage, clean clamp, try a new rod.
Arc Is Out Of Control
- Amperage too high
- Rod too large for metal
- Arc length too long
Solution: Lower amperage, use smaller rod, hold arc closer.
Weld Bead Porosity
- Dirty metal
- Damp rods
- Wrong rod type
Solution: Clean metal, dry rods in oven, check rod box.
Safety Tips When Adjusting Amperage
High amperage means more heat and more risk. Always wear proper safety gear: helmet, gloves, long sleeves. Never touch the electrode or workpiece with bare hands during or right after welding. Keep water away from your welding area to avoid electric shock.
If you weld for long periods at high amperage, watch for overheating. Let your machine cool if it feels hot or if the fan runs often.
Where To Find Reliable Amperage Charts
Good amperage charts are printed on electrode boxes and in welder manuals. Some websites, like Lincoln Electric, provide reliable guides for different rods and metals. Always trust manufacturer data over random online advice.
Frequently Asked Questions
What Happens If I Use Too Low Amperage For Stick Welding?
Low amperage makes the rod stick often and causes a weak, high bead that does not fuse well to the base metal. The arc can also keep breaking, which leads to poor joint strength.
How Do I Know If My Amperage Is Too High?
If your amperage is too high, the rod melts too fast, the arc is wide, and you may see holes or a flat, wide bead. Excess spatter and undercut at the edge of the bead are also signs.
Can I Use The Same Amperage For All Electrode Types?
No, each electrode has a different coating and needs a specific amperage range. Always check the box or a trusted chart for the right settings.
Why Does My Rod Keep Sticking Even At The Right Amperage?
Rod sticking can also come from poor technique, too short an arc, dirty metal, or a bad ground clamp. Try cleaning the metal, adjusting your angle, or checking your equipment.
Do I Need To Change Amperage For Vertical Or Overhead Welding?
Yes, reduce amperage by 10-15% for vertical or overhead welding. This helps control the weld pool and prevents drips or sagging beads.
Stick welding is easy to start but takes practice to master. The right amperage for your metal thickness makes a big difference in weld quality. Always check electrode guides, use test welds, and adjust for your project. Over time, you will learn to “read” the bead and set amperage by feel and sound.
Stay safe, keep your rods dry, and enjoy building strong, lasting metalwork.

Credit: www.perfectwelders.com

