Disclosure: This post contains affiliate links and I will be compensated if you make a purchase after clicking through my links. Learn More
Welding is a skill that shapes buildings, machines, and vehicles. The way a welder moves the torch or electrode can change the quality and strength of a weld. Two of the most common techniques are weaving and stringer beads. Each has a purpose, and using the right one can make a project successful or cause problems later. Many welders wonder: when should you use weaving instead of stringer beads? The answer depends on materials, position, joint type, and the results you want.
This article will give clear guidance for both new and experienced welders. You will learn the difference between weaving and stringer beads, when to choose each method, and how each affects the finished weld. We will cover practical examples, common mistakes, and tips that help you work faster and safer.
If you want to build strong, clean welds, understanding when to use weaving instead of stringer beads is essential.
What Are Weaving And Stringer Beads?
Before you know when to use weaving, you need to understand both methods. Both are ways to move the welding electrode or torch, but they produce different results.
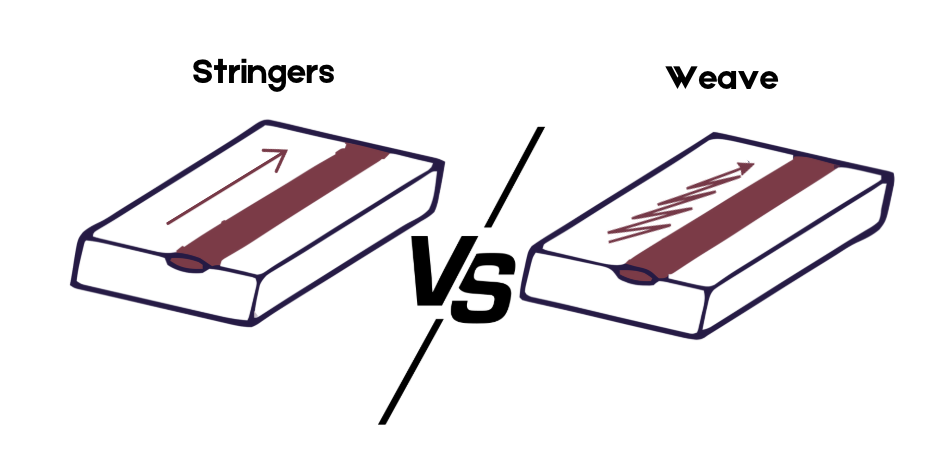
Stringer beads are straight, narrow passes. The welder moves the electrode in a straight line, keeping the bead thin and focused. This method gives good penetration and control.
Weaving means moving the electrode side to side as you move forward. This makes the bead wider and allows the welder to cover more area in one pass.
Key Differences
| Feature | Stringer Beads | Weaving |
|---|---|---|
| Bead Width | Narrow | Wide |
| Movement | Straight | Side-to-side |
| Heat Input | Lower | Higher |
| Penetration | Deeper | More even across width |
| Speed | Faster | Slower |
| Best for | Thin materials, root passes | Wide joints, filling gaps |
Understanding these differences is the first step. Now, let’s see when weaving is the better choice.
Advantages Of Weaving
Weaving is popular because it solves several welding problems. Here are the main benefits:
- Covers wide joints: Weaving can fill a joint that is too wide for a single stringer bead.
- Controls heat: Moving side to side spreads heat, which can prevent burn-through on some metals.
- Mixes the puddle: Weaving helps mix the weld pool, which can help remove slag or impurities.
- Smooth surface: A wider bead often looks smoother, which reduces grinding and finishing later.
- Strong tie-in: Weaving helps tie the weld into both sides of a joint, making a stronger connection.
These advantages make weaving the best choice in many situations. But it’s not always the answer. Next, we look at when weaving should be your main technique.

Credit: smooth-robotics.com
When To Use Weaving Instead Of Stringer Beads
Choosing weaving over stringer beads depends on several factors. You must look at the joint type, material thickness, welding position, and the type of electrode. Here’s a detailed guide for each situation.
1. Welding Wide Joints
If the gap between the pieces of metal is wide, a stringer bead will not fill it in one pass. Using weaving allows you to move side to side and fill the joint completely. For example, in groove welds where the joint is large, a weaving technique can cover the area without leaving holes.
Example: When welding a V-groove in a 10 mm thick steel plate, the gap is too wide for stringer beads alone. Weaving helps fill the groove in fewer passes and saves time.
2. Filling Multiple Passes
In heavy fabrication, you often need to fill a joint with several layers of weld. The first layer (root pass) is usually a stringer bead for deep penetration. The following layers (fill and cap) can use weaving. This technique spreads the heat and makes each layer strong and smooth.
Non-obvious insight: If you use stringer beads for every layer, you might get poor fusion between the layers. Weaving can help fuse the layers better, especially in thick sections.
3. Welding In Vertical And Overhead Positions
Weaving gives more control over the weld pool when you weld vertical up or overhead. The side-to-side movement helps support the molten metal, so it doesn’t drip or sag. This is important when gravity can cause the weld puddle to fall out of the joint.
Example: In vertical-up welding (3G position), using a triangle or zig-zag weaving pattern lets you build up the weld bead without it falling. Stringer beads often run out of control in these positions.
4. Using Certain Electrodes
Some electrodes are designed for weaving. For example, the E7018 low-hydrogen electrode works well with weaving because it produces a stable arc and smooth bead. The flux coating helps keep the puddle in place during weaving.
Practical tip: Check the manufacturer’s instructions for the electrode. Some rods (like E6010) work better with stringer beads, while others (like E7018 or E7016) can handle weaving.
5. Building Up Worn Surfaces
In repair work, you often need to add metal to worn parts, such as shafts or rollers. Weaving lets you deposit more metal in each pass, rebuilding the surface quickly and evenly.
Example: If a steel shaft is worn down by 3 mm, weaving can add the needed material in fewer passes, reducing time and cost.
6. Welding Thick Materials
Thick plates need more filler metal to make a strong joint. Weaving can deposit more weld metal in each pass, which helps with productivity and reduces the number of layers needed.
Non-obvious insight: Weaving also helps control the heat input in thick materials, which reduces the risk of internal cracks. Stringer beads may not produce enough heat to avoid lack of fusion in thick joints.
7. Improving Bead Appearance
A wide, smooth bead often looks better and needs less grinding. Weaving creates a flatter, more even surface, which is important for visible welds or those that must pass inspection.
Example: Welds on structures like bridges or pressure vessels often use weaving for the cap pass to create a neat finish.
8. Tying Into Both Sides Of A Joint
When you want to make sure the weld fuses with both sides of a joint (like a T-joint or corner), weaving helps move the arc from one side to the other, ensuring strong fusion.
Practical tip: Use weaving for the cap or cover pass in a T-joint to make sure you don’t miss the edges.
9. Overcoming Poor Fit-up
In the real world, metal pieces are not always cut or prepared perfectly. If you have gaps, mismatched edges, or irregular joints, weaving can help bridge these problems and fill the gaps.
Example: If a pipeline has a large root gap, a welder may use weaving to fill the space and avoid defects.
10. Preventing Defects
Some common weld defects, like lack of fusion or slag inclusion, can be reduced by weaving. The side-to-side movement stirs the puddle and mixes the weld pool, which helps release trapped slag and ensures the metal bonds well.
Non-obvious insight: Weaving also helps gas bubbles escape from the weld pool, reducing porosity in the finished weld.
When To Avoid Weaving (stick To Stringer Beads)
Weaving is not always best. There are situations where stringer beads are safer and stronger.
- Thin materials: High heat from weaving can burn through thin metal.
- Root passes: The first pass in a deep joint needs deep penetration, which is easier with stringer beads.
- Certain electrodes: Fast-freeze electrodes like E6010 and E6011 are designed for stringer beads and can create defects if you weave too much.
- Heat-sensitive metals: Stainless steel and some alloys can suffer from too much heat. Stringer beads keep the heat input low.
Practical example: On a 2 mm sheet metal panel, weaving will likely melt through the metal or warp it badly. Stringer beads are safer.
Credit: www.arccaptain.com
Weaving Patterns And Techniques
There are several weaving patterns. The right one depends on the position and the joint type.
Common Weaving Patterns
| Pattern | Best for | Description |
|---|---|---|
| Zig-zag | Vertical, overhead | Move side to side in a zig-zag, pausing at each edge. |
| Crescent | Flat, fillet welds | Make a series of small half-moons as you move forward. |
| Triangle | Vertical up | Move up and out to the sides, then back to the center, forming a triangle. |
| Box | Wide joints | Move along the bottom, up the side, along the top, and down the other side (like a box). |
Practical tip: Pause briefly at the edges to ensure good tie-in. Don’t weave too wide—keep the width about three times the electrode diameter.
Key Factors When Deciding Between Weaving And Stringer Beads
You should consider these key factors before choosing your technique.
Joint Type
- Butt joints: Wide joints may need weaving for full coverage.
- Fillet joints: Weaving helps tie the weld into both sides of the joint.
- T-joints: Weaving can help ensure fusion at the root.
Material Thickness
- Thin metal (under 3 mm): Use stringer beads to avoid burn-through.
- Medium to thick metal (over 6 mm): Weaving is often better for filling.
Welding Position
- Flat: Both methods work, but weaving is better for wide joints.
- Vertical or overhead: Weaving gives better control.
Electrode Type
- Fast-freeze electrodes (E6010, E6011): Use stringer beads.
- Low-hydrogen electrodes (E7018): Can use weaving.
Required Weld Quality
- Critical welds: Stringer beads may give better penetration in root passes.
- Appearance: Weaving gives a neater finish.
Non-obvious insight: Welding codes (like AWS D1.1) may limit how wide you can weave. Always check the code for maximum bead width.
Step-by-step: How To Weave Correctly
If you decide weaving is right, follow these steps for a strong weld:
- Set correct amperage: Too much heat will cause undercutting; too little will not fuse the metal.
- Hold the correct angle: Keep the electrode at about 10-15° from vertical.
- Choose a pattern: Zig-zag or crescent are good for most jobs.
- Move steadily: Do not pause too long in the center or at the edges.
- Keep arc length short: A long arc makes the bead uneven and causes spatter.
- Watch the puddle: Adjust your speed to keep the weld pool the right size.
- Pause at edges: This ensures good tie-in with both sides of the joint.
Practical example: When welding a 12 mm plate in the vertical position, use a triangle pattern. Pause at the edges for a second, then move up and repeat.
Common Mistakes With Weaving
Welders often make the same mistakes with weaving. Here’s how to avoid them:
- Weaving too wide: This can cause undercutting and poor fusion.
- Moving too fast: The bead will be uneven and may have gaps.
- Pausing too long: You can create craters or burn the edges.
- Ignoring electrode type: Some rods do not perform well with weaving.
- Not cleaning slag: Always clean slag between passes, especially with weaving.
Non-obvious insight: If you weave too slowly, the weld can crack due to too much heat input. Try to keep the weave width within three times the rod diameter.
Real-world Examples: Weaving Vs Stringer Beads
Structural Steel Welding
In construction, thick steel beams need strong welds. For a 20 mm thick I-beam, stringer beads are used for the root pass. The welder then uses weaving for the fill and cap passes to build up the weld and create a smooth, solid connection.
Pipe Welding
Pipeline welders often use stringer beads for the root and hot passes. This gives deep penetration and avoids internal defects. For fill and cap passes, they often switch to weaving, which helps fill the joint and makes a neat finish.
Pressure Vessel Fabrication
Pressure vessels must pass strict tests. Welders use stringer beads for root passes to avoid lack of fusion. They use weaving for cover passes, creating a wide, smooth bead that passes inspection.
Automotive Repairs
For thin car panels (1-2 mm), welders stick to stringer beads. Weaving would melt the metal or cause warping. For thicker frame repairs, weaving can be used to fill gaps or build up metal.
Shipbuilding
Ship hulls use thick steel plates. Welders use stringer beads for the first pass, then weaving for the multiple fill passes needed to create a strong, watertight joint.
How Weaving Affects Weld Quality
The way you weave can affect several qualities:
- Strength: Proper weaving fuses the weld well and avoids weak points.
- Toughness: Spreads heat, reducing the risk of cracks in thick steel.
- Appearance: Makes a smooth, even bead.
- Defect rate: Reduces slag inclusion and lack of fusion, if done right.
Stat: In a study by the American Welding Society, welds with proper weaving had 25% fewer defects in thick steel joints compared to stringer-only techniques.
Best Practices For Weaving
- Practice on scrap: Try weaving on scrap material before working on the real joint.
- Keep the pattern consistent: Do not change speed or pattern mid-weld.
- Monitor heat input: Too much heat can weaken the weld.
- Clean between passes: Remove all slag to prevent defects.
- Stay within code limits: If you are working on certified jobs, do not weave wider than allowed.
External source: For more technical details, see the Wikipedia page on Welding.
Comparison Table: Weaving Vs Stringer Beads In Common Applications
| Application | Weaving | Stringer Beads |
|---|---|---|
| Thick plate (over 10 mm) | Best for fill and cap passes | Good for root passes |
| Thin sheet (under 3 mm) | Risk of burn-through | Best choice |
| Vertical position | Better control | Harder to control |
| Fast-freeze electrodes | Not recommended | Best choice |
| Low-hydrogen electrodes | Works well | Also works |
| High-appearance welds | Smoother bead | Can be uneven |
Safety Tips When Using Weaving
- Wear proper gear: Gloves, helmet, and jacket are essential.
- Ventilate the area: Weaving produces more fumes due to higher heat.
- Watch for slag: Hot slag can fly off during weaving.
- Keep work area clean: Remove flammable materials near your work.
Practical insight: Weaving often means more heat and more spatter. Check your surroundings to prevent accidents.
Frequently Asked Questions
What Is The Main Advantage Of Weaving In Welding?
The main advantage is that weaving allows you to fill wide joints and tie the weld into both sides in one pass. It also creates a smooth surface and helps avoid defects like lack of fusion.
When Should I Use Stringer Beads Instead Of Weaving?
Use stringer beads for thin materials, root passes, and when using fast-freeze electrodes. They keep heat low and give deep penetration where needed.
Can I Use Weaving With All Types Of Electrodes?
No. Not all electrodes are suitable for weaving. Low-hydrogen rods like E7018 are good for weaving, but fast-freeze rods like E6010 and E6011 should be used with stringer beads.
How Wide Should I Weave The Electrode?
Do not weave wider than three times the electrode diameter. Going wider can weaken the weld or cause defects.
Does Weaving Make The Weld Stronger?
Weaving can make a weld stronger and smoother if done correctly and in the right situation. But if overused or done with the wrong electrode, it can weaken the joint.

Credit: www.youtube.com
Final Thoughts
The choice between weaving and stringer beads can make a big difference in your welding results. Weaving is best for wide joints, thick materials, and positions where you need control. It can fill gaps, improve appearance, and reduce some defects.
But it is not always the answer. For thin metals, root passes, and some electrode types, stringer beads are safer.
Always consider the joint, material, position, and electrode before you decide. Practice both methods and learn where each works best. This will make you a better welder and help you create strong, reliable welds every time.

