Disclosure: This post contains affiliate links and I will be compensated if you make a purchase after clicking through my links. Learn More
Welding a corner joint on thin sheet metal is an essential skill in auto repair, home projects, and light fabrication. Thin metal is common in many products, but it is also easy to damage with too much heat or the wrong technique.
Many beginners struggle with burnt holes, weak welds, or ugly seams. A strong, clean corner weld requires careful preparation, the right tools, and attention to detail. This guide will show you how to weld a corner joint on thin sheet metal from start to finish, so you get reliable results every time.
Understanding Thin Sheet Metal And Corner Joints
Thin sheet metal usually means material between 0.5 mm and 3 mm thick. Common metals are mild steel, galvanized steel, aluminum, and stainless steel. Thin metal can warp or burn through quickly because it cannot absorb much heat. A corner joint is where two sheets meet at a right angle, forming an “L” shape. This type of joint is important for making boxes, frames, and enclosures.
Thin sheet metal welding is different from thick plate welding. The metal will melt or distort with too much heat. The weld must be strong but not bulky, or it will not look good or fit well.
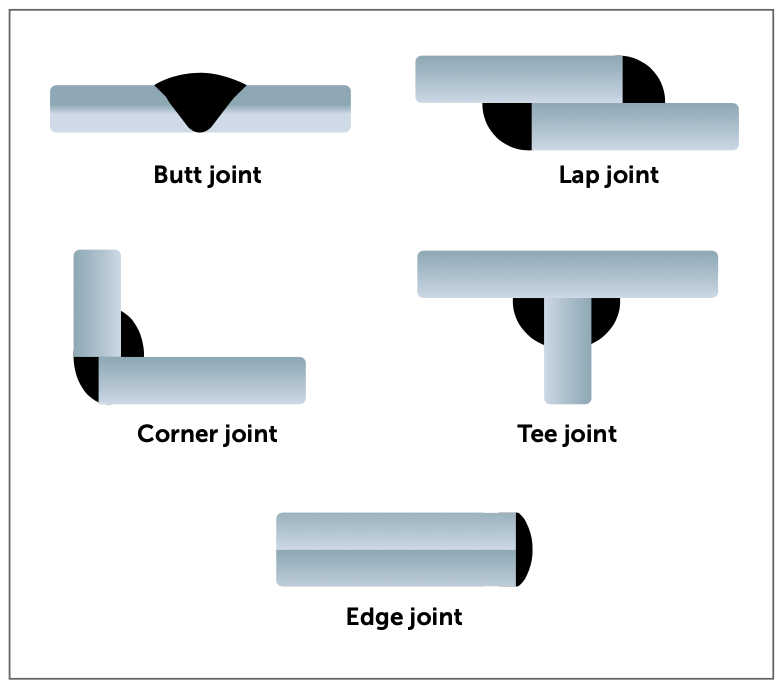
Types Of Corner Joints
There are two main types of corner joints for sheet metal:
- Closed corner joint: The two edges touch fully along the seam.
- Open corner joint: The two edges meet at just one point, leaving a small gap.
Closed corners are stronger and look better, but open corners are easier for beginners because you can see the weld pool.
Choosing The Right Welding Process
The three most common methods for welding thin sheet metal are MIG, TIG, and stick welding. Each has benefits and drawbacks. Here is a comparison to help you choose the best for your project.
| Method | Strength | Ease of Use | Finish Quality | Best For |
|---|---|---|---|---|
| MIG (GMAW) | Good | Easy | Smooth | Beginners, fast work |
| TIG (GTAW) | Best | Harder | Very clean | Thin aluminum, fine finish |
| Stick (SMAW) | Strong | Hard on thin metal | Rough | Repairs, thick sheet |
For most thin sheet metal, MIG welding is the easiest and quickest. TIG welding gives the most control and the nicest looking welds, but it takes more skill. Stick welding is not recommended for thin sheets because it is hard to control the heat and avoid burning holes.
Tools And Materials You Will Need
Gather all tools before you start. Missing items will slow you down or cause mistakes.
- Welding machine (MIG or TIG, depending on your choice)
- Welding wire or rods (ER70S-6 for MIG, ER70S-2 for TIG, depending on your metal)
- Shielding gas (Argon or Argon/CO2 mix for MIG; pure Argon for TIG)
- Sheet metal pieces (same type and thickness)
- Clamps (to hold metal steady)
- Angle grinder (with flap disc or wire brush)
- Wire brush (for cleaning)
- Measuring tape and marker
- Protective gear (welding helmet, gloves, jacket, safety glasses)
- Metal file (for finishing edges)
- Backing bar (copper or aluminum, optional but very helpful)
Why Each Tool Matters
- Clamps keep the sheets from moving. Even small slips can ruin a corner weld.
- Backing bar absorbs heat and prevents burn-through. Copper or aluminum works best because they do not stick to steel.
- Grinder and wire brush clean the metal for a strong weld. Dirty metal causes weak, spattery welds.
Preparing The Metal
Good results begin with careful preparation. Most beginners skip this step, but clean, well-fit metal is much easier to weld.
- Clean the edges. Use the grinder or a wire brush to remove rust, paint, oil, and dirt at least 2 cm from the edge.
- Cut the pieces. Make sure both sheets have clean, straight edges. Poor fit causes gaps and weak welds.
- Test fit the joint. Place the sheets at a right angle and check for gaps. Less than 1 mm is best for a closed corner. For an open corner, a small gap (about 1 mm) is normal.
- Mark your position. Use a marker to draw a line where the joint will be. It helps you keep the pieces aligned during welding.
- Clamp the pieces. Use strong clamps to hold the sheets at 90°. Add a backing bar if you have one under the joint for extra support.
Non-obvious tip: Wipe the metal with a little acetone or alcohol before welding. Even fingerprints can cause contamination and weak welds.
Setting Up Your Welder
Welding thin metal is about control, not power. High settings will burn holes. Set your machine for low amperage and wire speed.
Mig Welder Settings
- Amperage: 30–80 amps (check your metal thickness and wire)
- Wire type: ER70S-6, 0.6 mm or 0.8 mm (smaller is better for thin metal)
- Wire speed: Start low, increase until the wire feeds smoothly without pushing the gun back
- Voltage: 14–18 volts for most thin sheets
- Shielding gas: 75% Argon / 25% CO2 mix
Tig Welder Settings
- Amperage: 20–60 amps
- Electrode: 1.0 mm or 1.6 mm 2% thoriated tungsten
- Filler rod: ER70S-2, 1.0 mm or 1.6 mm
- Shielding gas: 100% Argon
- Pulse feature: Use if available, helps reduce heat input
How To Avoid Burn-through
- Use short welds (tacks or stitches, not long beads).
- Let metal cool between welds.
- Use a backing bar.
- Keep the torch moving; do not stay in one spot.
Non-obvious tip: Test your settings on a scrap piece of the same metal before welding the real joint.
Positioning And Tack Welding
Holding the sheets steady at 90 degrees is critical. Even tiny movements will make the joint crooked.
- Align the sheets. Double-check the angle.
- Place a backing bar under the joint if possible.
- Tack weld at both ends and the middle. Each tack should be about 5 mm long. Wait a few seconds between tacks.
- Check the angle after tacking. If the joint moved, tap it gently to fix, then add more tacks.
Tack welds keep the joint from warping when you do the final weld. For thin sheet, more tacks (every 2–3 cm) are better.
Welding The Corner Joint
Now you are ready for the main weld. Move slowly and keep control. The goal is a smooth, even bead with full fusion but no burn-through.
Mig Welding Technique
- Hold the torch at a 45° angle to the corner.
- Keep the nozzle about 6–8 mm from the metal.
- Move in short bursts (called “stitch” or “pulse” welding). Weld for 1–2 seconds, then stop and let cool for 2–3 seconds.
- Start at one end and work to the other, overlapping each stitch by half.
- Listen for a steady “sizzling” sound. If you hear popping or the wire is pushing back, adjust your settings.
Tig Welding Technique
- Hold the torch at 45° to the joint.
- Use your other hand to feed filler rod slowly into the weld pool.
- Work in small sections, letting the metal cool between welds.
- Keep the torch moving; never hold in one spot.
- Watch for a small, shiny weld pool and add filler until it covers the seam.
Common mistake: Trying to weld the whole joint in one go. Always use short welds on thin metal and allow cooling time.
Dealing With Distortion And Warping
Thin sheet metal changes shape easily from heat. Warping ruins the look and strength of your joint. Here are ways to stop it:
- Use many small tacks before welding the full seam.
- Alternate your welds. Weld a short section at one end, then switch to the other end.
- Clamp tightly. Use extra clamps if the sheets want to move.
- Use a backing bar to draw heat away from the weld.
- Let metal cool between welds. Do not rush.
If you see the metal start to pull or twist, stop and let it cool before adding more heat.
Cleaning And Finishing The Weld
A strong weld is not always a pretty weld. Clean up the joint so it looks good and fits well.
- Remove slag if you used stick welding (not needed for MIG or TIG).
- Grind the bead with a flap disc if you want a flush finish.
- Use a file for tight spots.
- Brush the weld with a wire brush to remove soot and oxidation.
- Inspect for holes or cracks. If you see any, add a small tack or two to fill them.
Welding thin metal sometimes leaves tiny pinholes. These can let water or air pass through, so seal them with extra tacks and grind smooth.
Non-obvious tip: Use a metal scribe or marker to check for undercut (a groove next to the weld). This weakens the joint. Add a little filler if needed.
Testing The Weld Strength
Testing is the only way to know if your weld will hold. Thin metal can look fine but be weak inside.
- Bend test: Try to bend the welded joint by hand. If it cracks or breaks, the weld did not fuse well.
- Visual check: Look for full penetration (the weld shows on the back side).
- Tap with a hammer: A strong weld gives a solid “ring,” not a dull “thud.”
- Check for leaks: If you are making something watertight, spray the seam with soapy water and blow air on the other side.
If the weld fails any test, clean and re-weld the area.
Credit: www.fictiv.com
Common Problems And How To Fix Them
Welding thin sheet metal is not easy at first. Here are problems most beginners face and how to solve them.
Burn-through
- Problem: Hole forms in the metal while welding.
- Fix: Lower amperage, move faster, use a backing bar, or use smaller wire/rod.
Warping
- Problem: Metal pulls or twists.
- Fix: Use more tacks, weld in short sections, allow cooling, clamp tightly.
Weak Welds
- Problem: Weld breaks or cracks.
- Fix: Clean metal better, increase tacks, check settings, make sure you have good fusion.
Ugly Bead
- Problem: Weld looks rough or uneven.
- Fix: Adjust your torch angle, wire speed, or travel speed. Practice on scrap.
Porosity (bubbles)
- Problem: Small holes in the weld from trapped gas.
- Fix: Clean metal, check gas flow, avoid drafts, use fresh filler wire.
Table: Quick Troubleshooting Guide
Here is a quick reference for the most common sheet metal welding issues.
| Problem | Causes | Solution |
|---|---|---|
| Burn-through | Too much heat, slow travel, large wire | Lower amps, faster movement, use smaller wire |
| Warping | Too much heat, few tacks, long welds | Short welds, more tacks, cool between welds |
| Porosity | Dirty metal, wrong gas, drafts | Clean thoroughly, check gas, shield from wind |
| Weak joint | Poor fit, dirty metal, too little heat | Better prep, adjust settings, check fit-up |
Credit: www.fictiv.com
Safety Tips For Welding Thin Sheet Metal
Welding is dangerous without the right precautions. Thin metal work creates sharp edges and flying sparks.
- Wear a welding helmet with the correct shade (10–12 for MIG/TIG).
- Use fireproof gloves and a jacket. Sparks can burn skin fast.
- Keep a fire extinguisher nearby.
- Work in a well-ventilated area. Shielding gas and fumes are dangerous.
- Check for hidden flammable materials under your work area.
- Keep your workspace tidy. Loose tools and scraps can cause accidents.
Non-obvious tip: Thin metal heats up fast. Always let it cool before touching or handling.
Advanced Tips For Clean, Strong Corner Joints
If you want your welds to stand out, use these advanced tricks:
- Back-step welding: Weld a short section, then start the next weld a few centimeters away and work back toward the last weld. This spreads heat and reduces warping.
- Double backing bars: Place a backing bar on both sides for very thin or valuable pieces.
- Use chill blocks: Special blocks you can cool with water to absorb heat even faster.
- Practice with different wire/rod sizes: Try 0.6 mm wire for the thinnest metal.
- Preheat the metal in cold shops to prevent quick cooling and cracking (just warm to the touch, not hot).
Non-obvious insight: For very tight corners, you can use a “corner clamp” that holds the joint at exactly 90°, leaving both hands free for welding.
Credit: www.approvedsheetmetal.com
Real-world Example: Welding A Corner Joint For A Sheet Metal Box
Suppose you want to build a simple box from 1 mm thick mild steel for a DIY project.
- Cut your four sides to size with a metal shear.
- Clean all edges with a wire brush and grinder.
- Clamp two sides at 90°, using a backing bar under the corner.
- Tack weld every 2 cm along the seam.
- Weld the corner in 2 cm stitches, letting cool between passes.
- Repeat for all corners.
- Grind and brush the welds for a smooth finish.
- Test by tapping and bending gently.
This method gives you a strong, neat box with clean corners.
Table: Ideal Settings For Common Sheet Metal Thicknesses
Here is a guide to help you set your welder for different thicknesses of mild steel.
| Thickness (mm) | MIG Amps | MIG Wire Size (mm) | TIG Amps | TIG Rod Size (mm) |
|---|---|---|---|---|
| 0.8 | 30–40 | 0.6 | 15–30 | 1.0 |
| 1.0 | 40–60 | 0.8 | 20–35 | 1.0–1.6 |
| 1.6 | 60–80 | 0.8 | 30–45 | 1.6 |
| 2.0 | 70–90 | 0.8 | 35–55 | 1.6 |
Always test on scrap to fine-tune your settings.
Frequently Asked Questions
How Do I Stop Burning Holes In Thin Sheet Metal?
Burn-through happens when you use too much heat or weld in one spot for too long. Use the lowest amp setting that gives a stable arc. Move the torch quickly in short welds, letting the metal cool between them. A copper backing bar helps absorb extra heat and prevents holes.
What Is The Best Welding Method For Thin Sheet Metal Corner Joints?
MIG welding is easiest for most beginners because it allows fast, clean welds with less skill. TIG welding gives the nicest finish and the most control but takes practice. Stick welding is not good for thin metal because it is hard to control the heat.
Can I Weld Galvanized Sheet Metal?
Yes, but welding galvanized steel creates toxic fumes. Always grind off the zinc coating from the weld area and work in a well-ventilated space. Wear a respirator for extra safety. After welding, treat the area to prevent rust.
Why Is My Weld Bead Ugly Or Uneven?
Common reasons are incorrect wire speed, torch angle, dirty metal, or moving too slowly. Make sure the metal is clean, set the right wire speed and voltage, and keep a steady hand. Practice on scrap helps you improve.
How Do I Know If My Weld Is Strong Enough?
Check for full fusion by looking at the back of the joint. A good weld will show signs of penetration. Try bending or tapping the joint to see if it holds. For air or water-tight joints, check for leaks with soapy water and air pressure.
Welding a corner joint on thin sheet metal is a skill that improves with practice. Careful preparation, the right tools, and patience make a big difference. Small steps—like cleaning the metal well and using a backing bar—help you avoid common problems. Start with scrap, go slow, and check your work. Soon, you will get strong, neat corner welds that last. For more on welding processes and safety, visit the Wikipedia Welding page.

