Disclosure: This post contains affiliate links and I will be compensated if you make a purchase after clicking through my links. Learn More
Welding is a skill that needs steady hands and sharp eyes. For beginners, straight stringer beads are one of the best ways to build a strong foundation. Practicing these welds teaches you how to control the torch, keep a steady travel speed, and maintain a consistent arc length. Whether you use MIG, TIG, or stick welding, mastering straight stringer beads will help you improve your technique faster and avoid bad habits. This guide gives you everything you need to know about running straight stringer beads for practice. You will learn what they are, why they matter, how to set up your equipment, and how to troubleshoot common problems. You will also find tips that many beginners often overlook, plus detailed answers to common questions.
What Are Straight Stringer Beads?
A stringer bead is a simple, straight line of weld. It runs from one point to another without weaving or moving the torch side to side. You use it to join two pieces of metal or to lay down a practice bead on flat plate. These beads help welders learn control and consistency.
Most welding schools start with stringer beads. They help students focus on the basics: holding the torch at the right angle, keeping a steady hand, and watching the weld pool. Unlike weave beads, stringer beads are narrow and straight. This makes it easier to spot mistakes and improve your form.
Stringer beads work well for all welding processes. Whether you use SMAW (stick welding), GMAW (MIG welding), or GTAW (TIG welding), the basic movement is the same. You move the electrode or torch in a straight line. The result should be a clean, even bead with uniform width and height.
Why Practice Straight Stringer Beads?
Many people want to jump straight to fancy welds, but skipping the basics causes more problems later. Practicing straight stringer beads gives you several key benefits:
- Better hand-eye coordination: You learn to keep your movements steady and repeatable.
- Consistent travel speed: A uniform bead shows you are moving at the right speed.
- Good arc control: You learn how far to hold the electrode from the metal.
- Cleaner welds: Stringer beads help you avoid defects like slag inclusions and undercut.
- Confidence: Once you master straight beads, more complex welds become much easier.
Skipping this step often leads to bad habits that are hard to fix. Even experienced welders sometimes go back to stringer beads to sharpen their skills.
Tools And Equipment Needed
Before you start, make sure you have the right tools. Using the correct equipment makes practice safer and more effective.
Welding Machine
Choose a machine that matches your process:
- For stick welding: A simple AC/DC stick welder works well for most practice.
- For MIG welding: A basic MIG machine with adjustable voltage and wire speed.
- For TIG welding: A TIG welder with a foot pedal is best for beginners.
Electrodes Or Filler Wire
Pick the right type and size for your metal:
- Stick: E6010, E6011, or E7018 rods (commonly 1/8” or 3/32”)
- MIG: Mild steel wire (usually ER70S-6, 0.030” or 0.035”)
- TIG: Filler rod to match your base metal, usually 1/16” or 3/32”
Safety Gear
Never weld without proper protection:
- Auto-darkening helmet
- Welding gloves
- Flame-resistant jacket
- Safety glasses
- Closed-toe shoes
Metal Coupons
Use clean, flat pieces of mild steel. Plates around 3/16” to 1/4” thick are ideal for practice. Avoid very thin or very thick metal at first.
Cleaning Tools
A wire brush or grinder helps clean your metal before welding. Clean metal gives better results and prevents contamination.
Setting Up Your Workspace
A good setup makes practice easier and safer. Arrange your workspace before you strike an arc.
- Work on a sturdy, non-flammable table.
- Clamp your workpiece tightly to prevent movement.
- Make sure your ground clamp is attached to clean metal.
- Keep your cables untangled and out of the way.
- Set up good lighting to see the weld puddle clearly.
Keep your work area free from flammable materials. Have a fire extinguisher nearby. Good ventilation helps remove fumes.
Preparing The Metal
Clean metal welds better. Even small amounts of rust, oil, or paint cause problems.
- Use a wire brush or grinder to remove rust and scale.
- Wipe the metal with a clean cloth to remove dust and oil.
- If welding aluminum, use a stainless steel brush.
Poorly cleaned metal leads to weak welds and more spatter. Take time to prepare your metal before every session.
Setting The Correct Welding Parameters
Many beginners struggle because their settings are off. The right settings depend on your process, metal thickness, and electrode.
Stick Welding
- Amperage: Set based on rod size. For 1/8” E7018, use 110–130 amps.
- Polarity: Most rods work best on DCEP (electrode positive).
- Arc length: Keep it about the same as the rod diameter.
Mig Welding
- Voltage: Around 16–19 volts for 1/8” steel.
- Wire speed: Start at 200–300 inches per minute for 0.030” wire.
- Gas: Use 75% argon/25% CO2 for mild steel.
- Stick-out: Keep the wire about 3/8” from the tip to the work.
Tig Welding
- Amperage: 70–110 amps for 1/8” steel.
- Electrode: Use 2% thoriated tungsten, 1/16” or 3/32”.
- Gas: 100% argon at 15–20 cubic feet per hour.
- Cup size: #6 or #7 is a good starting point.
Write down your settings. If the bead looks wrong, change one thing at a time and note the results.
How To Hold The Torch Or Electrode
Your grip and angle affect every weld. Hold the torch or electrode firmly but not too tight. Keep your wrist relaxed.
- For stick welding: Hold the stinger like a pencil or hammer. Angle it 10–15° away from the direction you travel.
- For MIG welding: Hold the gun at 10–15° push or pull angle.
- For TIG welding: Hold the torch like a pencil. Keep it close to vertical, with a slight tilt (5–10°).
Support your arm or hand on the work table if possible. This reduces shaking and helps you move smoothly.
Laying Down Your First Straight Stringer Bead
Start with flat plate practice. Here are the steps:
- Strike the arc: For stick, tap or scratch the rod to start. For MIG or TIG, press the trigger or foot pedal.
- Set your angle: Hold the torch or rod at the correct angle.
- Watch the puddle: Focus on the small pool of molten metal, not the arc.
- Move steadily: Slide your hand in a straight line. Use your other hand for support if needed.
- Maintain arc length: Keep the electrode or wire at the right distance from the metal.
- Finish cleanly: At the end, break the arc smoothly to avoid craters.
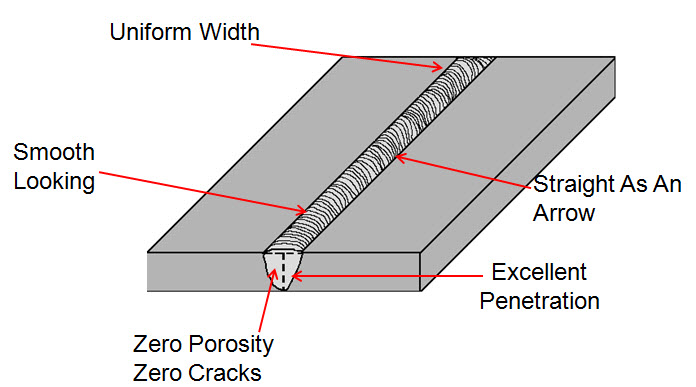
The bead should look straight, even, and smooth. If it is crooked, too tall, or too flat, adjust your speed or angle.
Common Mistakes And How To Fix Them
Even experienced welders make mistakes. Here are some common problems and simple fixes:
- Wavy or crooked bead: Slow down. Use both hands for better control.
- Too much spatter: Lower your voltage or wire speed (MIG), or clean the metal better.
- Undercut (groove at the edge): Move slower and keep the arc on the leading edge of the puddle.
- Porosity (holes in bead): Clean the metal better and check your gas flow.
- Bead too high or narrow: Move a bit faster or increase heat.
If your bead does not look right, stop and adjust one thing at a time. Take photos of your welds to track your progress.
Practicing For Consistency
Consistency is more important than speed. Try to lay down several beads side by side, each as straight and even as the last.
- Start by drawing straight lines on the metal with a soapstone marker.
- Use these lines as guides for your beads.
- Space each bead about 1/4” apart.
- Aim for the same width and height every time.
After several practice runs, your hand will feel steadier. When you can make five or more straight beads in a row, move to different positions (vertical, overhead) to challenge yourself.
Differences Between Mig, Tig, And Stick Stringer Beads
Each welding process has its own feel and technique. Here is a quick look at the main differences:
| Process | Main Advantage | Main Challenge | Typical Uses |
|---|---|---|---|
| Stick (SMAW) | Works outdoors, handles dirty metal | More slag, harder arc control | Heavy steel, repairs |
| MIG (GMAW) | Fast, easy for beginners | Needs clean metal, gas coverage | Light fabrication, auto repair |
| TIG (GTAW) | Precise, clean welds | Slower, more skill needed | Thin metals, stainless, aluminum |
Stick welding is forgiving but takes practice to control slag and arc length. MIG is quick and easy for beginners, but needs clean metal. TIG is slowest but gives the best-looking beads when you master it.
Key Factors That Affect Your Beads
Several things make a big difference in how your stringer beads turn out:
Travel Speed
If you move too fast, the bead is thin and has poor fusion. If you go too slow, the bead piles up and may burn through. A steady speed makes the bead even.
Arc Length
Too short, and the rod sticks or the torch snuffs out. Too long, and you get spatter, porosity, or weak welds. Aim for a gap equal to the rod or wire diameter.
Electrode Angle
A consistent angle helps you control penetration and bead shape. For most stringer beads, a slight push or drag angle (10–15°) works well.
Heat Input
If the weld looks gray or cracked, increase heat. If you burn through, turn it down or move faster.
Cleanliness
Dirty metal causes defects. Always clean your base metal before each practice run.

Credit: www.arccaptain.com
Troubleshooting Your Welds
Sometimes even your best effort produces a bad bead. Use these signs to diagnose and fix common issues:
| Bead Problem | Possible Cause | Solution |
|---|---|---|
| Cracks | Too little heat, dirty metal | Increase amperage, clean better |
| Porosity | Poor shielding gas, dirty metal | Check gas flow, clean metal |
| Undercut | High heat, fast travel | Lower heat, move slower |
| Spatter | Arc too long, wrong polarity | Shorten arc, check polarity |
| Uneven bead | Inconsistent speed or angle | Practice steadier hand movement |
If you keep having the same problem, ask a more experienced welder to watch and give feedback.
Practicing Different Positions
After you can make good beads on flat plate, practice in other positions:
- Horizontal: Place the plate on edge. Use the same technique, but watch for gravity pulling the puddle down.
- Vertical up: Start at the bottom and move up. Use a slight weave to hold the puddle.
- Vertical down: Start at the top and move down. Go faster to prevent too much heat.
- Overhead: Hold the torch or rod above your head. Use short arc and fast movement to prevent drips.
Start with short beads, 2–3 inches long. As you get better, weld longer beads in each position.
Recording And Tracking Your Progress
Many beginners improve faster if they keep a welding journal. After each practice session, write down:
- The date
- The welding process and settings you used
- What went well
- What went wrong
- Photos of your beads
This helps you spot trends and fix problems over time. You will also see how much you have improved.
Two Insights Beginners Often Miss
- Hand Position Matters More Than You Think: Many new welders focus on settings and forget about how they hold the torch or rod. Even a small change in wrist position changes the bead shape. Try resting your hand or pinky on the work surface for more control.
- Lighting Makes a Big Difference: Poor lighting makes it hard to see the puddle. Even a small lamp near your work can help you spot defects and keep your bead straight.
Practical Tips For Better Practice
- Practice with short beads before trying long ones.
- Clean your metal after every bead to prevent buildup.
- Switch between processes (stick, MIG, TIG) to see how each feels.
- Ask others to watch your technique.
- Take breaks if your hands get tired; fatigue leads to sloppy beads.
- Use thicker gloves if you feel too much heat, but keep your fingers flexible.
Common Beginner Questions
New welders have many questions about practice. Here are some quick answers:
- How many beads should I practice each day? Aim for at least 10–15 beads per session.
- Should I practice on scrap or new metal? Use scrap for practice, but make sure it is clean and flat.
- How do I know if my bead is good? Look for even width, height, and no holes or undercut.
- Should I chip slag after every bead (stick welding)? Yes, always clean the slag before starting a new bead.
- Can I reuse the same plate? Yes, grind the surface flat between beads and use again.

Credit: www.youtube.com
Safety Tips For Welding Practice
Welding is safe if you use the right gear and good habits.
- Always wear your helmet and gloves.
- Keep your work area clean and dry.
- Do not weld near flammable materials.
- Make sure your cables and machine are in good shape.
- Take breaks to avoid fatigue and mistakes.
How Straight Stringer Bead Practice Builds Confidence
Many beginners worry about making mistakes. Practicing straight stringer beads lets you focus on the basics without pressure. The more you practice, the less you worry about settings or equipment. You start to notice small details, like puddle shape and bead texture.
Over time, your hands move more naturally, and your welds look cleaner.
This type of practice also makes it easier to learn advanced techniques. Once you can run a perfect straight bead, you can add weaving, change positions, or try different materials with less frustration.
How To Challenge Yourself As You Improve
As you get better, try these ideas to keep learning:
- Weld beads in different positions (vertical, overhead).
- Use thinner or thicker metal.
- Try different electrodes or filler wires.
- Practice on joints, not just flat plate (lap, T, or butt joints).
- Time yourself and aim for steady speed, not just looks.
If you want more advanced tips and demonstrations, sites like the American Welding Society have excellent guides.
Frequently Asked Questions
How Long Does It Take To Master Straight Stringer Beads?
It varies, but most people see clear improvement after 10–15 hours of focused practice. Some need more time, especially if they practice only once or twice a week.
What Is The Ideal Metal Thickness For Practice?
3/16” to 1/4” mild steel is best for beginners. Thinner metal is easy to burn through, while thicker metal needs more heat and skill.
Should I Practice With Or Without A Guide Line?
Using a soapstone line helps at first. Once you can make straight beads, try welding without a guide to improve your control.
Why Do My Beads Have Holes Or Bubbles?
This is called porosity. Common causes are dirty metal, too long arc, or poor shielding gas. Clean the metal well and check your gas flow.
How Do I Know If My Settings Are Correct?
A good bead looks even, with no holes or deep grooves. If the bead is too tall or wide, adjust your speed or heat. If you are unsure, look up recommended settings for your electrode and metal thickness, or ask an experienced welder for help.
Practicing straight stringer beads is simple, but it is the key to becoming a skilled welder. Each session brings you closer to strong, clean, and reliable welds. Focus on the basics, fix your mistakes, and you will see real progress every time you pick up the torch.
Credit: www.wcwelding.com

