Disclosure: This post contains affiliate links and I will be compensated if you make a purchase after clicking through my links. Learn More
Welding can change the shape of metal. This happens because heat causes the metal to expand and then shrink as it cools. This process often creates distortion in the final product. Distortion can ruin the look and function of welded parts. It can also make it hard to fit pieces together later. For this reason, controlling distortion is a key skill for welders, fabricators, and engineers.
One practical way to limit distortion is to use a tack weld sequence. Tack welding means placing small, temporary welds to hold parts in place before making the final welds. The order and placement of these tacks matter a lot. If you use the wrong sequence, you can actually make distortion worse.
This article explains how distortion happens, why tack weld sequence is important, and how you can use the right steps to prevent problems. You will learn about the types of distortion, the science behind it, and proven tack weld sequences.
There are also real examples, tables for quick reference, and clear answers to common questions at the end.
What Is Distortion In Welding?
Distortion means the metal changes shape during or after welding. It can twist, bend, or shrink. This can affect how well parts fit or if they stay straight. Distortion can make parts weak or cause them to fail.
The main cause is heat. Welding heats metal above 1,400°C in some cases. Hot metal expands. When it cools, it contracts. If this happens unevenly, the metal moves in unexpected ways.
There are three main types of distortion:
- Angular distortion – The welded joint bends at an angle.
- Longitudinal distortion – The part shrinks or stretches along its length.
- Transverse distortion – The part shrinks or stretches across its width.
Distortion is not always visible at first. Sometimes you see it only after the metal cools or after later steps like machining.
Why Tack Weld Sequence Matters
A tack weld is a small spot weld made to hold parts in place. These tacks are not final welds. They are meant to keep the parts from moving when you finish welding.
The order in which you place tack welds is called the tack weld sequence. This sequence can reduce or increase distortion.
If you tack one end and then the other, the middle can bow or twist. If you tack in a planned pattern, you spread the shrinkage and stress. This keeps parts straight and avoids gaps.
The right tack weld sequence:
- Locks parts in position before final welding
- Spreads heat and stress more evenly
- Reduces the chance of gaps, misalignment, and warping
Many beginners skip planning their tack welds. They think tacks are just to hold parts together, but the sequence is just as important as the weld size or location.
How Distortion Happens: The Science
When you weld, the heat creates a small molten pool. The metal around the weld also gets hot. The hot area expands, but cooler metal around it stops it from moving freely. When the weld cools, the metal wants to shrink back, but the surrounding metal resists.
This creates stress and pulls the weld area out of shape.
The key factors that affect distortion are:
- Heat input: Higher heat causes more expansion and shrinkage.
- Material type: Some metals like stainless steel distort more than others.
- Joint design: Wide gaps or poor fit-up make distortion worse.
- Weld sequence: Where and in what order you weld changes how the part moves.
These factors are connected. You cannot control everything, but you can plan your tack weld sequence to limit distortion.
Planning For Minimum Distortion
Before you start welding, you need a plan. This includes:
- Inspecting parts for flatness and fit
- Choosing the right number of tacks
- Deciding where to place tacks
- Planning the welding sequence
Here are steps for planning:
- Check fit-up. Parts must touch with no big gaps. Gaps cause more distortion.
- Clean surfaces. Remove rust, paint, and oil. This helps tacks hold better.
- Mark tack points. Use chalk or scribe to mark tack locations.
- Choose sequence. Decide the order you will place each tack.
You can use a drawing or simple sketch. For complex shapes, label each tack point.
Types Of Tack Weld Sequences
Different jobs need different tack weld sequences. The best sequence depends on the shape, length, and thickness of the parts.
Below are some common sequences:
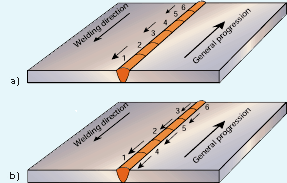
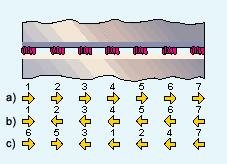
Opposite Tack Sequence
Place one tack at one end of the joint, then the next tack at the other end. Continue tacking at points opposite the previous tack.
This sequence spreads stress and keeps the part from pulling in one direction.
Staggered Tack Sequence
Place tacks in a pattern that jumps along the joint. For example, tack at the middle, then go to one quarter, then the other quarter.
This method helps balance shrinkage across the length.
Diagonal Tack Sequence
Used on frames or square shapes. Place a tack at one corner, then move to the opposite corner, and so on.
This keeps frames or boxes square and reduces twisting.
Progressive Tack Sequence
Start at one end and place tacks along the joint in order. This method is common for curved parts or when you must keep a specific shape.
Each sequence has a use. The wrong sequence can cause distortion or make it worse.
Key Factors When Choosing A Tack Weld Sequence
Choosing the right sequence is not guesswork. Think about:
- Part size: Long parts need more tacks.
- Material thickness: Thinner metal distorts more easily.
- Joint type: Butt joints, T-joints, or lap joints behave differently.
- Welding position: Overhead, flat, or vertical.
A good rule is to use more, smaller tacks for thin or long parts. For thick parts, fewer tacks may be enough.
Step-by-step Guide: How To Prevent Distortion With Tack Weld Sequence
1. Prepare The Parts
Make sure surfaces are clean and flat. Clamp parts if needed. Good fit-up is key.
2. Mark The Tack Weld Locations
Use a ruler or tape measure to space tacks evenly. For long joints, every 100–200 mm is common.
3. Choose The Right Sequence
Use opposite or staggered sequence for straight joints. Use diagonal for frames.
4. Place The First Tack Weld
Use the lowest heat needed. Small tacks are best; too much heat causes distortion.
5. Move To The Next Tack Location
Follow your planned sequence. Let the previous tack cool before the next.
6. Check Alignment After Every Tack
Use a straightedge or square. Fix any movement before adding more tacks.
7. Complete All Tacks Before Final Welding
Do not skip tacks. Missing tacks can let parts move during welding.
8. Start Final Welding In Small Steps
Weld a short length, let it cool, then move to another area. This reduces heat buildup.
9. Back-step Welding
Weld short sections in the opposite direction to the main weld. This helps balance stress.
10. Remove Clamps Only After Welding Cools
If you remove clamps early, parts may move and distort.
Example: Tack Weld Sequence For A 1-meter Butt Joint
Suppose you need to weld two flat bars, each 1 meter long and 5 mm thick.
- Mark tack points every 200 mm (so 6 tacks).
- Use the opposite sequence: First tack at one end, next at the other, then in the center, then between center and ends.
- Check straightness after each tack.
- After all tacks, weld in short sections, skipping along the joint.
This method keeps the joint straight and controls distortion.
Comparison: Tack Weld Sequences For Common Joint Types
The table below shows how different sequences work for common joints:
| Joint Type | Best Tack Sequence | Typical Spacing | Distortion Risk |
|---|---|---|---|
| Butt Joint | Opposite / Staggered | 100–200 mm | Medium |
| T-Joint | Staggered | 80–150 mm | High |
| Corner Joint | Diagonal | 80–120 mm | High |
| Lap Joint | Opposite | 100–150 mm | Medium |
Insight: T-Joints and Corner Joints distort more than Butt Joints due to uneven shrinkage. Use more tacks and check alignment often.
Credit: www.twi-global.com
Mistakes To Avoid With Tack Weld Sequences
Many welders make the same mistakes when tacking. These errors can increase distortion instead of preventing it.
1. Placing All Tacks At One End First
This causes the rest of the joint to move and creates large gaps.
2. Using Too Few Tacks
Long joints need more tacks. Too few tacks let parts move.
3. Ignoring Sequence
Random tacking does not spread stress. Always follow a plan.
4. Too Much Heat In Tacks
Large tacks cause more distortion. Use the lowest heat and shortest time possible.
5. Not Checking Alignment
Small movements add up. Check after each tack.
6. Removing Clamps Too Soon
Parts can spring out of shape if you unclamp before the weld cools.
7. Skipping Cleaning
Dirty surfaces make weak tacks that can break during welding.
Pro tip: If a part starts to move out of alignment, stop and fix it before adding more tacks. Do not hope the final weld will pull it back.
How Many Tack Welds Are Enough?
The number of tacks depends on the length, type, and thickness of the joint. As a general guide:
- For thin sheet metal (1–2 mm): Tacks every 50–100 mm
- For medium thickness (3–6 mm): Tacks every 100–200 mm
- For thick plate (over 6 mm): Tacks every 150–300 mm
Longer joints need more tacks. If you see gaps or movement, add extra tacks as needed.
Non-obvious insight: Tacks should be strong enough to hold but small enough to grind off if needed. Do not make them so large that they become part of the final weld unless the design allows it.

Credit: www.researchgate.net
Using Clamps And Fixtures With Tack Welds
Clamps and fixtures are common tools for holding parts together. They help reduce movement during tacking and welding.
- Use clamps at both ends and, if possible, in the middle for long joints.
- Check clamp pressure. Too much pressure can bend the part. Too little, and parts may move.
- Remove clamps only after the joint has cooled.
For some projects, you can use jigs that hold many parts in place at once. This is common in factories where every part must be the same.
Table: Tack Weld Size And Placement Guide
Choosing the right tack size matters. Too small and they break. Too large and they cause distortion.
| Metal Thickness | Tack Size (mm) | Spacing (mm) | Recommended Clamp |
|---|---|---|---|
| 1–2 mm | 3–4 | 50–100 | Sheet Metal Clamp |
| 3–6 mm | 5–6 | 100–200 | Bar Clamp |
| Over 6 mm | 7–8 | 150–300 | Heavy-Duty Clamp |
Tip: On thin metal, use smaller tacks and closer spacing. On thick metal, tacks can be larger and further apart.
Tack Weld Removal And Cleanup
After final welding, you may need to remove tacks, especially if they are not part of the finished weld. Use a grinder or chisel. Be careful not to damage the joint.
- Grind carefully to avoid gouging the base metal.
- Check for cracks at tack spots. Cracks can start at tacks if they were too big or had poor fusion.
- Clean up all tack spots before painting or coating.
Some projects allow you to leave tacks in place if they are small and do not affect the look or strength.
Tack Weld Sequence For Different Welding Processes
The tack weld sequence can change depending on the welding process you use.
Stick Welding (smaw)
Stick welding uses higher heat and makes larger tacks. Use fewer tacks but make sure they hold well. Let tacks cool between steps.
Mig Welding (gmaw)
MIG welding allows smaller, faster tacks. Use more tacks, especially on thin metal. Sequence is very important due to fast heat input.
Tig Welding (gtaw)
TIG makes small, precise tacks. Use a staggered or opposite sequence for best results. Let tacks cool to avoid pulling the joint.
Spot Welding
Spot welding is common for sheet metal. The sequence is less important, but still tack from the center outwards for large sheets.
Using Backing Bars And Heat Sinks
A backing bar is a strip of copper or steel placed behind the weld. It absorbs heat and supports the weld pool. A heat sink is similar; it draws heat away from the weld.
Using these tools with a planned tack sequence can:
- Reduce distortion by cooling the weld quickly
- Prevent burn-through on thin metal
- Support the joint for better alignment
Non-obvious insight: Backing bars are often overlooked in small workshops, but they make a big difference for thin or complex shapes.
Real Examples: Tack Weld Sequence In Action
Example 1: Welding A Frame
A square frame made from 25 mm steel tube needs to stay square. Use the diagonal sequence:
- Tack at one corner, then the opposite.
- Move to the other pair of corners.
- Use a square to check after each tack.
This keeps the frame from twisting.
Example 2: Long Butt Joint
For a 2-meter-long butt joint, use the opposite sequence:
- Place tacks at both ends first.
- Then put tacks at the center, then between ends and center.
- Use clamps and check with a straightedge.
This prevents the joint from bowing.
Example 3: Sheet Metal Patch
When patching a car panel, use a staggered sequence:
- Tack at the center of the patch.
- Move to the edges, then fill in between.
- Use a wet cloth to cool tacks quickly and reduce heat spread.
This keeps the panel flat and avoids waves.
Table: Common Problems And Solutions
Below is a quick reference for common tack weld sequence problems:
| Problem | Cause | Solution |
|---|---|---|
| Part bows or curves | Tacks all at one end | Use opposite sequence, add tacks in center |
| Gaps open up | Too few tacks, poor fit-up | Add more tacks, improve fit |
| Parts twist out of square | No diagonal tacks | Use diagonal sequence, clamp corners |
| Tacks break during welding | Tacks too small or dirty surface | Clean better, use slightly larger tacks |
Advanced Tips For Large Or Complex Structures
Large weldments need more planning.
- Use temporary braces: These hold parts in place and can be removed after welding.
- Pre-bend or pre-set parts: Bend parts slightly the opposite way before welding. They will straighten as they cool.
- Weld in sections: For very large parts, break the job into smaller weldments, tack and weld each, then join together.
- Monitor temperature: Use a temp marker or infrared thermometer to check heat spread.
Fact: In shipbuilding, workers use tack welds and sequence planning to keep huge plates flat. Without this, ships would have warped hulls and poor fit-up.
Checking Your Work
After tacking and welding, always check:
- Straightness: Use a straightedge or laser.
- Squareness: Use a carpenter’s square for frames.
- Gaps: Look for open or closed gaps that may show distortion.
- Fit-up with other parts: Check if the assembly fits with the next parts.
If you find distortion, you can sometimes fix it by applying heat on the opposite side or using clamps and gentle force.
When To Use Heat Control Instead Of Tack Sequence
Sometimes, even a perfect tack sequence is not enough. You may need to:
- Use short weld runs and let the joint cool between passes.
- Use skip welding (weld short sections, skip, then return).
- Use chill bars or wet rags to draw heat away.
These methods work best together with a good tack sequence.
For more information on welding distortion, you can read the related page at Wikipedia.
Credit: www.twi-global.com
Frequently Asked Questions
What Is The Main Cause Of Distortion In Welding?
The main cause is uneven heating and cooling. The weld zone expands with heat and shrinks as it cools. This pulls the metal out of shape.
How Does Tack Weld Sequence Reduce Distortion?
A planned tack weld sequence spreads stress and shrinkage across the joint. This keeps parts in place and reduces warping.
How Many Tack Welds Do I Need For A 1-meter Joint?
Use 6–10 tacks, spaced about every 100–200 mm, depending on the metal thickness. Add more if the part moves or gaps appear.
Can I Leave Tack Welds In The Finished Joint?
You can leave tacks if they are small, strong, and do not cause cracks. For cosmetic work, grind them off for a clean look.
What Should I Do If Distortion Happens After Tacking?
Stop and realign the parts. Add extra tacks, adjust clamps, or use gentle heat to bring the part back. Do not continue welding if the parts are out of shape.
Controlling distortion is a skill that takes planning and attention. With the right tack weld sequence, you can make strong, straight, and accurate welds every time. Use these steps and tables as a guide for your next project. Good planning saves time and leads to better results.

