Disclosure: This post contains affiliate links and I will be compensated if you make a purchase after clicking through my links. Learn More
Welding is a skill that shapes bridges, cars, ships, pipelines, and even art. Many people think welding is only about melting and joining metal. But the real strength of a weld comes from small details. One of the most important details is travel angle. If you ignore travel angle, your welds may look weak, have holes, or break under pressure. If you control it, your welds become strong, clean, and professional.
Travel angle is not just a number on a chart. It is a habit that every good welder builds over time. It decides how the arc hits the metal, how the filler melts, and how the weld bead forms. A small change in angle can change everything in the weld.
Many beginners make mistakes with travel angle, often without knowing. Even experienced welders can forget about it when they rush.
This article explains, step by step, how to control travel angle in welding. You will learn what travel angle means, why it matters, and how to set it for different welding types. You will also get tips that experienced welders use and answers to common questions.
If you want to improve your welding, or help someone else, this guide will cover what you need.
What Is Travel Angle In Welding?
Travel angle is the angle between the welding gun, torch, or electrode and the direction you move as you weld. Imagine you push a broom forward. The angle between the handle and the floor is like the travel angle. In welding, this angle affects how heat, filler metal, and gas hit the joint.
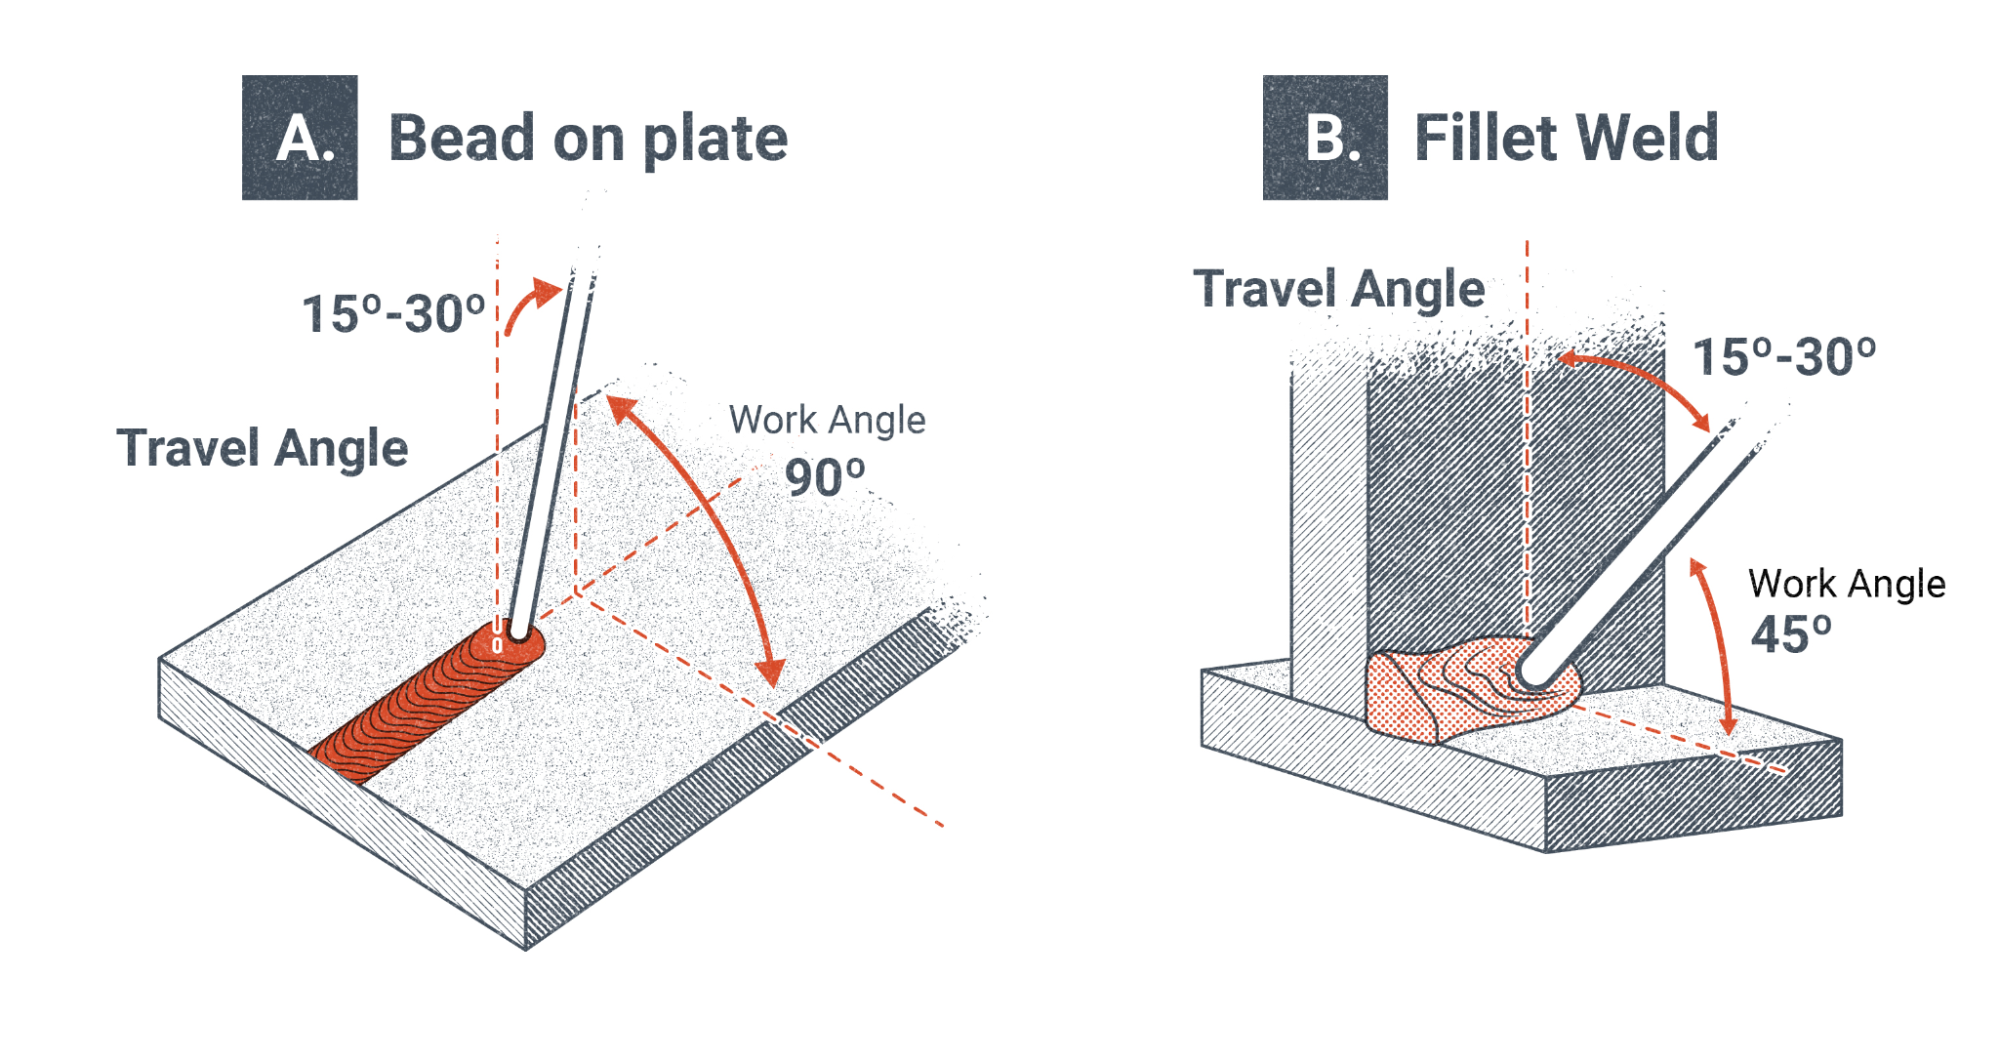
There are two main angles in welding:
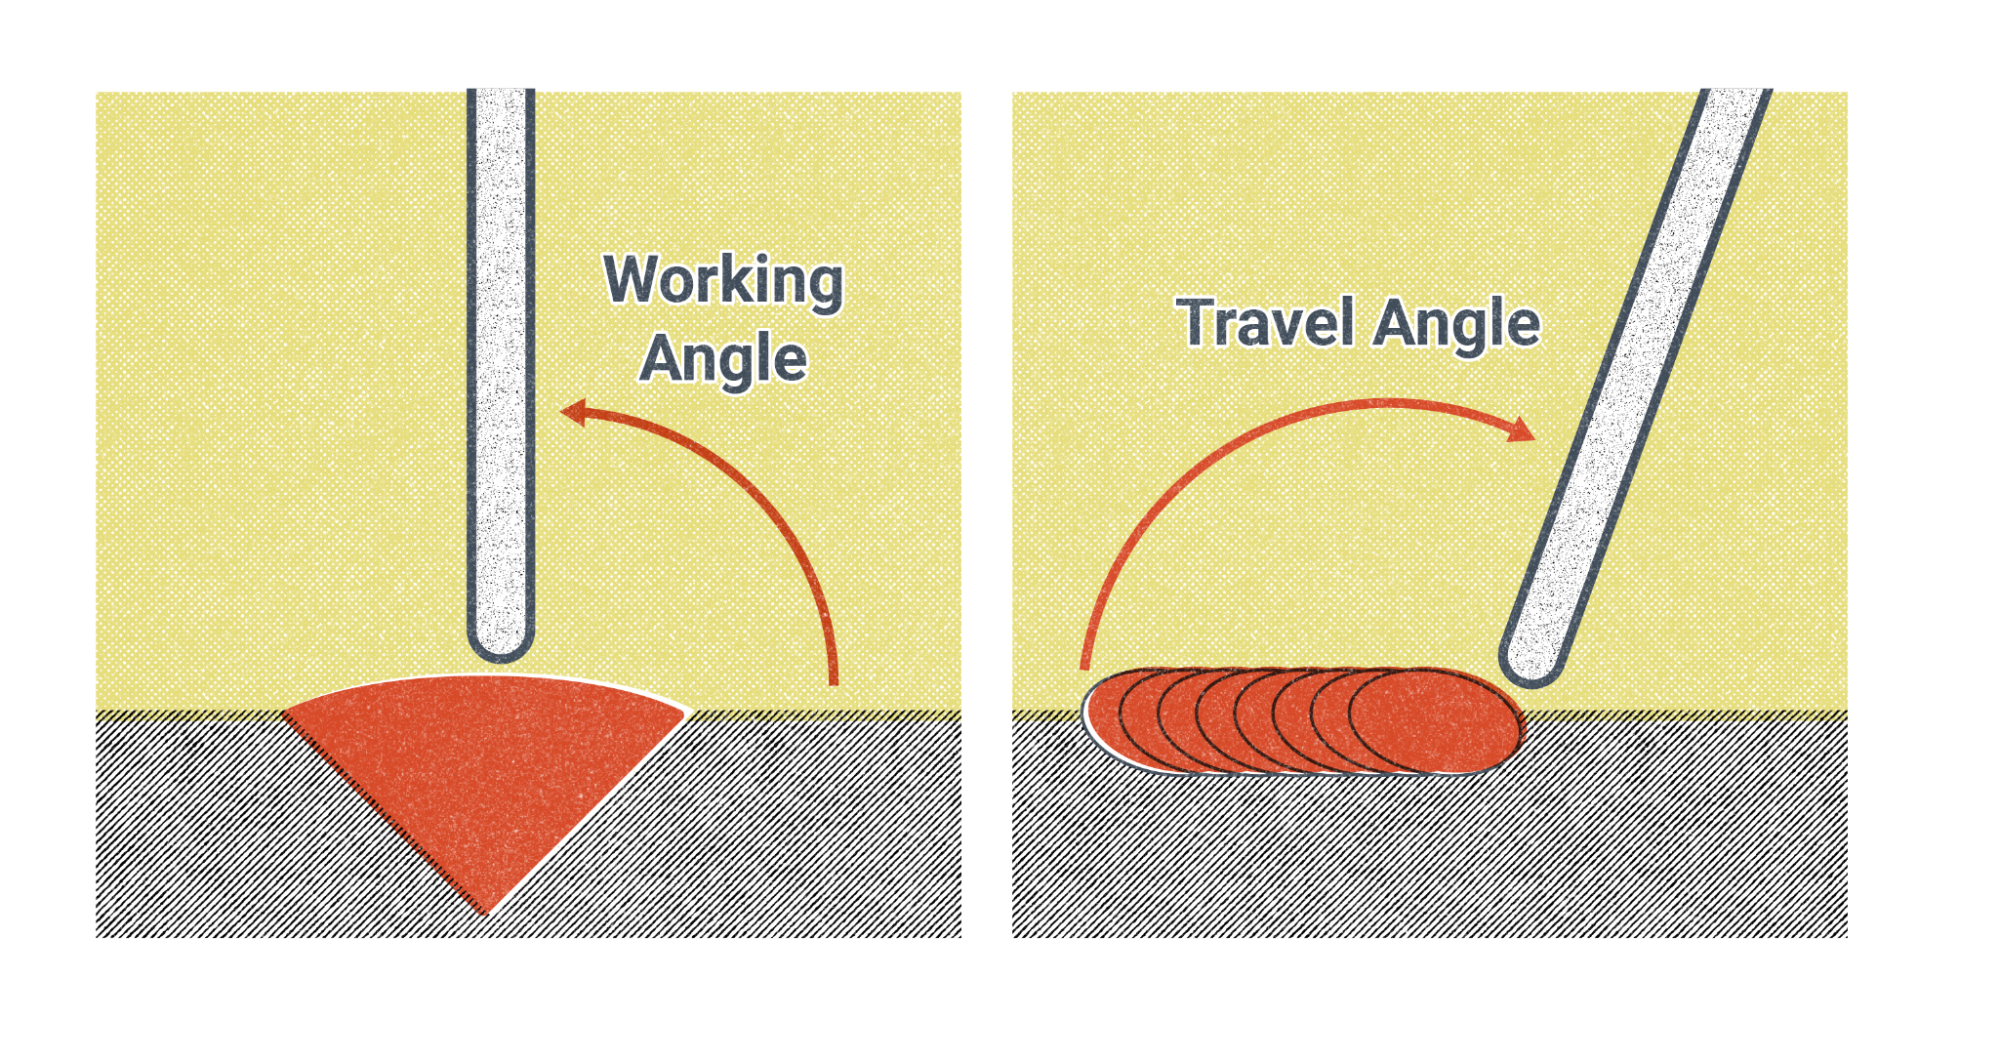
- Work angle: The angle between the gun and the workpiece surface, measured across the joint.
- Travel angle: The angle between the gun and the line of welding travel, measured in the direction you move.
Travel angle is usually measured from a straight line, which is 90 degrees to the metal. Most welds use a travel angle between 5 and 25 degrees. The exact angle depends on the welding process, position, and joint type.
Why Travel Angle Matters
A small change in travel angle can change the entire weld. Here is why it matters:
- Penetration: The right angle helps the weld metal go deep enough into the joint. Too much or too little angle can cause poor fusion or weak welds.
- Bead shape: The angle controls how the weld bead looks. A wrong angle can make the bead too flat, too high, or uneven.
- Porosity and defects: Bad angle can trap gas, cause holes, or leave slag in the weld.
- Spatter and cleanup: The right angle reduces spatter, making cleanup easier.
- Weld speed: A good angle lets you move at a steady speed, avoiding stops and starts.
Experienced welders know that the travel angle is a top reason for failed welds or ugly beads. It is one of the first things welding inspectors check if they see problems.
The Ideal Travel Angle For Different Welding Processes
Each welding process has its own best travel angle. These angles are not random—they are tested and used by welders worldwide. Here is a guide for the main welding types.
Shielded Metal Arc Welding (smaw Or Stick)
For stick welding, the electrode sticks out from the holder. You drag or push it as you move. The best travel angle:
- Flat and horizontal positions: 10 to 15 degrees from vertical, dragging (pulling) the rod.
- Vertical up: Hold the rod at 0 to 5 degrees, pointing slightly upward.
- Vertical down: Use a slight downward angle, but vertical down is rare for stick.
Too much angle can make the slag run ahead of the arc, trapping it inside the weld.
Gas Metal Arc Welding (gmaw Or Mig)
MIG welding uses a gun with a wire that feeds automatically. The best travel angle:
- Flat and horizontal positions: 10 to 15 degrees, usually pushing (gun leans in the direction of travel).
- Vertical up: 5 to 10 degrees upward.
- Vertical down: 10 to 15 degrees downward.
Too steep an angle can cause undercut or make the bead thin.
Flux-cored Arc Welding (fcaw)
This process is like MIG but with a flux core wire. The travel angle is similar:
- Flat and horizontal: 10 to 15 degrees, either push or drag depending on the wire type.
- Vertical up: 5 to 10 degrees upward.
- Vertical down: 10 to 15 degrees downward.
Know your wire type—some need a drag angle, others a push.
Gas Tungsten Arc Welding (gtaw Or Tig)
TIG welding uses a torch and a separate filler rod. The best travel angle:
- Torch: 10 to 15 degrees from vertical, pushing the torch ahead.
- Filler rod: Enter at about 10 to 15 degrees from the work surface.
A poor angle can block your view or contaminate the weld.
Submerged Arc Welding (saw)
This uses a heavy flux layer. Best angles:
- Gun: 0 to 15 degrees from vertical, usually drag (pull).
- Flat position: Keep angle low to avoid flux ahead of the arc.
Too much angle can expose the arc or cause poor bead shape.
How To Set And Hold The Travel Angle
Getting the right travel angle is part of your welding setup. Here are steps to help you set and keep the right angle during welding.
1. Prepare Your Workspace
A clean, stable workspace helps you control the angle. Make sure:
- The table is flat and at the right height.
- Your body has space to move.
- You have good light on the joint.
A shaky table or poor lighting can make you lose your angle.
2. Position Your Body And Hands
Your body is your base. Stand or sit so you can move smoothly along the joint. Keep your arms close to your body for stability. Hold the gun or rod firmly, but not stiff. Use your other hand to steady or guide if possible.
Many welders rest their pinky finger or wrist on the table for extra control. This small trick makes a big difference, especially for long welds.
3. Set The Initial Angle
Before you start, set the gun or rod at the right angle. Use a protractor or angle gauge if you are new. Look at the angle from the side, not just from above.
Start with the recommended angle (for example, 10-15 degrees for MIG). Do a dry run without striking an arc to check your position.
4. Start The Weld
Strike the arc or start feeding wire. Move slowly at first. Watch the arc and the pool, not just the tip of the gun. Adjust your angle as you move along curves or corners.
5. Keep The Angle Consistent
As you move, keep the angle steady. This is where many people struggle. If your wrist or elbow drifts, the angle changes. Practice moving your whole arm, not just your wrist.
If you must stop, reset your angle before you restart.
6. Adjust For Joints And Positions
Some joints (like T-joints or corners) need small angle changes. For example, in a fillet weld, you may tilt the gun slightly to favor one plate or the other. Always check the weld pool and bead shape as you go.
7. Use Mirrors Or Cameras For Hard-to-see Spots
If you cannot see the angle, use a small mirror or a welding camera. This is common in pipe welding or tight spaces.
Common Travel Angle Mistakes (and How To Fix Them)
Many welders make the same travel angle mistakes. Here are the top problems and solutions.
Holding Too Steep An Angle
A steep angle (over 30 degrees) can cause:
- Undercut (grooves along the bead edge)
- Poor penetration
- Excess spatter
How to fix: Lower the angle. Practice holding at 10-15 degrees. Use guides or supports if needed.
Holding Too Shallow An Angle
If the angle is too low (close to 0 degrees), you may get:
- Poor gas coverage (for MIG/TIG)
- Slag trapped in the weld (for stick/flux core)
- Excessive bead buildup
How to fix: Raise the gun/rod slightly. Aim for the recommended range.
Inconsistent Angle
Changing the angle as you move causes:
- Wavy or uneven beads
- Pockets or holes
- Incomplete fusion
How to fix: Practice moving your arm as one unit. Mark your path before welding.
Wrong Push Or Pull Technique
Pushing when you should pull (or the other way) causes:
- Wrong bead shape
- More spatter (for flux core)
- Poor penetration
How to fix: Learn which technique to use for your process and wire type.
Ignoring Joint Type Or Position
Different joints need small changes in angle. For example, overhead welds often need a flatter angle to stop the pool from dripping.
How to fix: Study each joint and test angles before welding.
Examples Of Good And Bad Travel Angles
To show how travel angle changes the weld, see the examples below.
| Angle | Weld Appearance | Common Problems |
|---|---|---|
| 10-15° (Correct) | Even bead, good penetration, little spatter | None |
| 0° (Too Flat) | Thick bead, poor gas coverage, possible porosity | Gas holes, trapped slag |
| 30°+ (Too Steep) | Undercut, thin bead, high spatter | Grooves, weak weld |
Use these examples to check your own welds. If your bead matches the “too steep” row, change your angle next time.
Credit: openwa.pressbooks.pub
Tools To Help Control Travel Angle
You do not need expensive tools, but a few simple items can help.
Angle Gauges
Small metal or plastic gauges help you set your gun or rod at the right angle before you weld. Some attach to the gun for real-time feedback.
Welding Cameras
Small cameras can show the angle and arc in hard-to-see places. Pipe welders often use these.
Welding Simulators
Training simulators show your travel angle on a screen as you practice. These are great for students or new welders.
Mirrors
A small mirror can help in tight corners or behind objects.
Guides And Supports
Simple metal guides or wrist supports can help keep your angle steady, especially for long welds.
Travel Angle And Weld Position
Welds are not always flat on a table. Each position—flat, horizontal, vertical, overhead—needs a small change in travel angle.
| Weld Position | Suggested Travel Angle | Notes |
|---|---|---|
| Flat | 10-15° | Standard for most welding |
| Horizontal | 10-15° | Keep angle up to avoid sagging |
| Vertical Up | 5-10° upward | Controls molten pool, prevents sag |
| Vertical Down | 10-15° downward | Use lower current, quick travel |
| Overhead | 0-10° | Keep pool small, avoid drops |
Changing your angle for each position helps you get a strong, clean weld.
How Travel Angle Affects Weld Quality
Travel angle does not just change how a weld looks. It changes its strength, safety, and life.
- Too steep: Weakens the joint, makes grooves, and causes cracks.
- Too flat: Makes the bead thick, traps gas, and stops full fusion.
- Wrong push/pull: Changes penetration and gas coverage.
A study from the American Welding Society shows that a 20-degree angle error can cut weld strength by up to 30%. This is the difference between a safe bridge and a dangerous one.
Many welding codes, like AWS D1. 1, give strict angle rules. If you ignore them, your weld may fail inspection—even if it looks good.
Practical Tips For Better Travel Angle Control
Welders often share tips that help in the workshop or on the job. Here are some that are proven to work.
1. Mark Your Path
Use a soapstone or marker to draw your weld line. This helps keep your angle steady, especially on long joints.
2. Practice Dry Runs
Before starting, run your gun or rod along the joint without welding. Focus on holding the angle and moving smoothly.
3. Watch The Weld Pool
Many beginners watch only the tip. Focus on the molten pool and the edges of the bead. Adjust your angle if you see the pool getting too wide or narrow.
4. Adjust For Heat And Speed
If the metal gets too hot, your hand may drift. Slow down and reset your angle. If you need to speed up, check that your angle does not get too steep.
5. Keep Your Wrist Relaxed
A tight wrist causes jerky movement and changes your angle. Stay relaxed and use your arm, not just your wrist.
6. Use Both Hands
For better control, use your second hand to steady the gun or rod. Even experienced welders do this for tricky welds.
7. Record And Review
Take photos or videos of your welds. Compare the bead shape and defects to the travel angle you used. Over time, you will spot patterns and improve.
8. Ask For Feedback
If possible, ask another welder or instructor to watch your technique. Sometimes, you cannot see your own angle mistakes.
Adjusting Travel Angle For Different Joints
Weld joints are not all the same. Each type needs a small tweak in angle.
Butt Joint
This is two pieces edge to edge. Use the standard travel angle (10-15 degrees). Make sure the angle is consistent along the whole joint.
T-joint
One piece meets another at a 90-degree angle. Tilt the gun 45 degrees from the vertical plate, with a 10-15 degree travel angle.
Corner Joint
Two pieces meet at the edge. Set the angle so the arc hits both plates evenly.
Lap Joint
One plate overlaps another. Angle the gun slightly toward the lower plate for better fusion.
Pipe Or Round Joints
As you move around the pipe, your wrist and arm must rotate to keep the angle steady. Many welders break the weld into sections to reset their position.
How Travel Angle Interacts With Other Welding Variables
Travel angle works with other settings. If you change one, you may need to adjust the others.
Welding Speed
If you move too fast, the bead gets thin and undercut. If you move too slow, it gets thick and piles up. Travel angle can help balance this.
Voltage And Current
Higher current or voltage may need a flatter angle to avoid burning through. Lower settings may need a steeper angle to get enough fusion.
Wire Feed Speed (for Mig/fcaw)
If you feed wire too fast, you may need to change your angle to avoid spatter.
Gas Flow
For MIG and TIG, a wrong angle can blow away the shielding gas, causing porosity. Adjust gas flow and angle together.
Credit: openwa.pressbooks.pub
Practice Exercises For Travel Angle Control
Improving travel angle is about practice. Here are simple exercises:
- Angle tracing: Lay a ruler or rod at 10, 15, and 20 degrees. Hold your gun to match it. Repeat until you can do it by eye.
- Dry weld runs: Move along a joint without striking an arc. Focus on your arm and wrist.
- Short welds: Weld short beads, stop, and check your angle. Correct and repeat.
- Mirror welding: Weld in front of a small mirror to check your angle.
- Timed welds: Set a timer and weld at a steady speed, keeping your angle fixed.
Over time, these drills build muscle memory.
Real-world Example: Welding A Structural Beam
Suppose you must weld a steel beam for a building. The code requires a strong, even weld with no undercut. You choose MIG welding.
- Set up: Clean the beam and mark the weld line.
- Angle: Set your gun at 10 degrees push.
- Dry run: Move along the joint, checking your arm position.
- Weld: Start at one end, keep the angle steady, and watch the pool.
- Check: Inspect the bead for undercut or spatter. If you see problems, check your angle and adjust.
Most failed welds in construction come from angle mistakes, not from lack of skill.
Data: How Travel Angle Affects Weld Strength
Engineers have tested how travel angle changes weld quality. The results are clear.
| Travel Angle | Tensile Strength (psi) | Common Defects |
|---|---|---|
| 10° | 62,000 | None |
| 25° | 56,000 | Slight undercut |
| 35° | 48,000 | Porosity, severe undercut |
The data shows that even a 15-degree error can cut strength by over 10,000 psi. For safety-critical jobs, this is not a small risk.
Non-obvious Insights For Controlling Travel Angle
Some tips are not obvious to beginners, but they make a real difference.
- Weld bead tells the truth: Even if you feel your angle is perfect, the weld bead shape and defects show what really happened. Trust the results, not your feeling.
- Temperature affects angle: As you weld, the workpiece heats up. This changes how the metal flows. You may need to adjust your angle slightly as you go, especially on long welds.
Learning From Mistakes: Why Travel Angle Is Often Overlooked
Many new welders focus on settings—current, voltage, wire speed. They forget that travel angle is just as important. In welding schools, instructors often see students with perfect settings but poor welds. The problem is almost always angle or speed.
Some welders think angle does not matter for small jobs. But even a small weld can fail if the angle is wrong. Once you build the habit of checking and adjusting angle, your welds improve in all situations.
Travel Angle In Automated And Robotic Welding
In factories, robots weld thousands of parts. Even here, engineers must set the travel angle for each job. A small programming error can cause every weld to fail. Many robotic welding systems use sensors to check and correct travel angle in real time.
This shows that controlling angle is not just for beginners—it matters at every level of welding.
Where To Learn More
Welding is a deep skill. Many websites and training centers offer guides, videos, and classes. The American Welding Society is a trusted source for technical standards and tips. You can learn more at American Welding Society.
Frequently Asked Questions
What Is The Best Travel Angle For Beginners?
For most flat welds, start with a 10-15 degree angle from vertical, pushing or pulling as recommended for your process. This is the safest range for good results.
Can I Weld With A Straight (0 Degree) Travel Angle?
You can, but it is not ideal. A straight angle often causes poor gas coverage, thick beads, and trapped slag. Always use a slight angle for better results.
How Do I Know If My Travel Angle Is Wrong?
Check your weld bead. If you see undercut, lots of spatter, holes, or uneven shape, your angle may be off. Compare your weld to guides or ask an experienced welder.
Does Travel Angle Matter For All Welding Processes?
Yes. Even in TIG, stick, MIG, flux core, and robotic welding, travel angle affects bead shape, penetration, and defects. Always check the recommended angle for your process.
Is It Better To Push Or Pull In Welding?
It depends on your process and wire type. For MIG, pushing is common. For stick and many flux core wires, dragging (pulling) is better. Always check manufacturer guidance.
Controlling travel angle is a skill you build with practice. It is the secret to strong, clean, and safe welds. Pay attention to your angle on every weld, and your results will improve. Skilled welders know that small changes make a big difference—travel angle is one of the most important.

Credit: esab.com

