Disclosure: This post contains affiliate links and I will be compensated if you make a purchase after clicking through my links. Learn More
Choosing the right duty cycle for a welder is one of the most important decisions you will make before buying a welding machine. Many people focus only on the power or brand, but the duty cycle can affect your welding results, machine lifespan, and even your safety.
If you want to get clean welds without overheating your equipment, you need to understand how duty cycle works and how to select the best one for your needs.
This article explains duty cycle in simple terms, shows its real impact on welding jobs, and guides you step-by-step on choosing the right duty cycle for different welding tasks. You will also find practical tips, examples, and answers to common questions at the end.
What Is Duty Cycle In Welding?
Duty cycle is a technical term, but it is quite simple. It shows how long a welder can work in a 10-minute period before it must cool down. Usually, it is given as a percentage.
For example, a 60% duty cycle at 200 amps means the welder can run at 200 amps for 6 minutes. Then, it needs to rest for 4 minutes. If you use the machine at a lower setting, the duty cycle might increase. If you use more amps, it will decrease.
Manufacturers always give the duty cycle at a specific amperage and temperature, often at 40°C (104°F). This is because higher heat makes machines overheat faster.
Key points about duty cycle:
- It prevents overheating.
- It shows the safe work-rest time for the welder.
- It changes with amperage and room temperature.
Why Duty Cycle Matters
Some people ignore duty cycle and just look at maximum power or price. This can lead to frustration, wasted time, and even broken machines. Here’s why duty cycle is so important:
- Prevents overheating: If you go over the duty cycle, the welder may shut down or its internal parts may get damaged.
- Affects workflow: A low duty cycle means you must stop often. This slows down big jobs.
- Impacts weld quality: Rushing during rest periods or pushing the machine can cause poor welds.
- Safety: Overheated welders can cause burns or fires.
Imagine you have a project that needs long, continuous welds. If your machine needs to cool down every few minutes, your work will take much longer.
How Duty Cycle Is Calculated
Manufacturers test welders under set conditions. They run the machine at a certain amperage and room temperature for up to 10 minutes. They count how many minutes the welder can work safely.
Example:
A welder runs for 4 minutes at 200 amps and then needs a 6-minute rest. Its duty cycle is 40% at 200 amps.
Here is a simple formula:
Duty Cycle (%) = (Minutes welding / 10) x 100
So if you weld for 7 minutes and rest for 3, the duty cycle is 70%.
Duty Cycle Ratings Explained
You will often see labels like:
- 60% @ 150A
- 40% @ 200A
This means:
- At 150 amps, you can weld for 6 minutes out of 10.
- At 200 amps, you can weld for 4 minutes out of 10.
It’s important to match the duty cycle to your usual welding amperage, not just the machine’s maximum.
Credit: smartbuy.alibaba.com
How Duty Cycle Changes With Amperage
As you increase the amps, the duty cycle drops. At lower settings, the duty cycle goes up. This is because welding at higher amps produces more heat.
Here is a simple comparison:
| Amperage | Duty Cycle (%) |
|---|---|
| 100A | 100% |
| 150A | 60% |
| 200A | 40% |
| 250A | 25% |
If you usually weld at 100A, you can work non-stop with most machines. If you need more power, you must pay attention to the duty cycle.
Types Of Welders And Typical Duty Cycles
Different welding machines have different duty cycles. The type of welder you use (MIG, TIG, Stick, etc. ) Affects what duty cycles are common.
| Welder Type | Common Duty Cycle Range | Typical Use |
|---|---|---|
| MIG | 20% – 60% | Light to medium fabrication |
| TIG | 20% – 60% | Precise, clean welding |
| Stick | 20% – 60% | Outdoor, rough work |
| Industrial MIG/TIG | 60% – 100% | Heavy fabrication, long runs |
| Engine-Driven | 100% | Continuous, field work |
For home or hobby welders, a 20% to 40% duty cycle is common. For serious shop or industrial use, you want 60% or higher.
How To Read And Compare Duty Cycle On Welder Specs
Every welder has a label or manual with its duty cycle. But different brands may show it in different ways. Here’s how to compare:
- Always check the amperage: Duty cycle is only useful if you know the amps. A 60% duty cycle at 100A is not the same as 60% at 200A.
- Check the temperature: Some companies test at 25°C (77°F), others at 40°C (104°F). Duty cycles are lower at higher temperatures.
- Look for charts: Some manuals include a chart or graph. This shows how duty cycle changes as you increase amps.
Non-obvious insight:
Some brands use optimistic numbers. Always check reviews and look for independent tests if possible.
Choosing The Right Duty Cycle For Your Needs
Selecting the right duty cycle depends on how you plan to use your welder. Here’s how you can match your needs to a suitable machine.
1. Identify Your Welding Tasks
Ask yourself:
- How long do I need to weld without stopping?
- What thickness and type of metal will I work on?
- What amperage do my typical jobs need?
Example:
If you weld thin sheet metal for car repairs, you use lower amps and can manage with a lower duty cycle. If you weld thick beams or long seams, you need more amperage and a higher duty cycle.
2. Match Duty Cycle To Your Work Time
Estimate how long you want to weld before taking a break. Most people do not weld non-stop for 10 minutes. But for some jobs, long runs are needed.
- Short welds and repairs: 20-30% duty cycle is enough.
- Medium fabrication: 40-60% is better.
- Heavy or production work: 60% or higher is needed.
Real-world tip:
If you often weld for 4 minutes, rest for 2, then weld again, a 60% duty cycle is perfect.
3. Consider Your Power Needs
Duty cycle drops at higher amps. Always check the duty cycle at the amps you actually use.
- If you need 200 amps for your job, don’t look at the 60% duty cycle at 100 amps.
- Ask the seller for a chart or real test results if the manual is unclear.
4. Factor In Climate And Workshop Temperature
Duty cycle ratings use a set room temperature. If you work in a hot shop, the welder will heat up faster and the duty cycle will drop.
Example:
A welder with a 60% duty cycle at 25°C (77°F) may only reach 40% at 40°C (104°F).
If you live in a warm place or your workshop gets hot, choose a machine with a higher rated duty cycle.
5. Think About Breaks And Workflow
Most welding jobs have natural pauses for:
- Setting up parts
- Adjusting clamps
- Checking fit
If your workflow includes many stops, you can use a lower duty cycle. If you must weld long seams without stopping, get a higher duty cycle.
6. Budget Vs. Duty Cycle
Higher duty cycle welders cost more. But buying too small a machine leads to frustration and possible repair costs.
Non-obvious insight:
If you often push your welder to its limit, it will wear out faster. Spending a bit more for a higher duty cycle can save money over time.
7. Future Needs
Think about what you might weld in the future. If you plan bigger projects, buy a welder with a higher duty cycle than you need now.

Credit: www.millerwelds.com
Common Mistakes When Choosing Duty Cycle
Many beginners make the same mistakes with duty cycle. Avoid these to save time and money:
- Ignoring the amperage: Only looking at the percentage, not the amps.
- Believing marketing claims: Some brands round up or use best-case numbers.
- Forgetting about temperature: Ratings in cool rooms may not match your shop.
- Not thinking about work time: Overestimating how long you actually weld without breaks.
- Buying too small: Choosing a cheap welder with a low duty cycle, then needing to upgrade soon after.
How To Calculate The Duty Cycle You Need
Here’s a simple way to estimate the duty cycle you should look for:
- Estimate how many minutes you weld in a 10-minute period.
- Estimate the average amps you use.
- Find a welder with a duty cycle at or above your welding minutes at those amps.
Example:
You weld 4 minutes at 140 amps, then rest 6 minutes. You need at least a 40% duty cycle at 140 amps.
Duty Cycle And Welder Lifespan
Running a welder above its duty cycle does not just risk overheating. It can damage the internal parts, shorten machine life, and even void warranties.
If you keep to the duty cycle, you will:
- Get more years from your welder
- Have fewer breakdowns
- Weld more safely
Non-obvious insight:
Some welders have built-in thermal protection. This helps, but it’s still better to follow the duty cycle than to rely on automatic shut-off.
How Duty Cycle Impacts Weld Quality
A welder that overheats or is pushed past its duty cycle may:
- Produce weak or inconsistent welds
- Cause arc instability
- Lead to spatter or poor penetration
If you pause to let the machine cool, you get better, more even welds.
Duty Cycle And Different Welding Processes
Each welding process uses the welder differently.
Mig Welding
MIG welders often run at medium duty cycles. For car body work or repairs, a 20-40% duty cycle is fine. For longer runs, choose 60% or more.
Tig Welding
TIG often uses lower amps for longer times. But for thicker metal, higher duty cycles help. Precision jobs benefit from a stable, cool-running machine.
Stick Welding
Stick welders can get very hot, especially at high amps. For farm or outdoor work, a higher duty cycle helps you work faster.
Industrial And Engine-driven Welders
These are made for heavy use, often with 100% duty cycle. They can weld as long as you need, making them good for big projects or field repairs.
Duty Cycle And Portable Welders
Small, portable welders are popular for home use. But they often have lower duty cycles. If you only do short repairs or hobby work, this is not a problem. For bigger jobs, you may need to rest often.
Here’s a quick comparison of portable vs industrial duty cycles:
| Welder Type | Typical Duty Cycle | Best For |
|---|---|---|
| Portable (110V) | 20% – 35% | Light repairs, hobby |
| Industrial (220V+) | 60% – 100% | Production, heavy use |
How To Extend Your Welder’s Duty Cycle
If you want to get more from your welder, here are some simple tips:
- Lower the amperage: Use the lowest setting that does the job.
- Improve cooling: Keep fans and vents clear. Some welders allow external cooling fans.
- Work in a cooler place: Avoid welding in hot shops or outdoors in the sun.
- Add rest periods: Even short breaks help the welder cool down.
- Keep the welder clean: Dust and dirt block cooling.
Pro tip:
Some welders let you upgrade cooling fans or add water-cooling for TIG welding. This can increase the duty cycle, especially for long jobs.
Signs That You Are Exceeding Duty Cycle
Many welders have warning lights or shut down if they overheat. But you should still watch for:
- Hot case or handle
- Unusual smells
- Arc instability
- Frequent shutdowns
If you notice any of these, stop and let the welder cool.
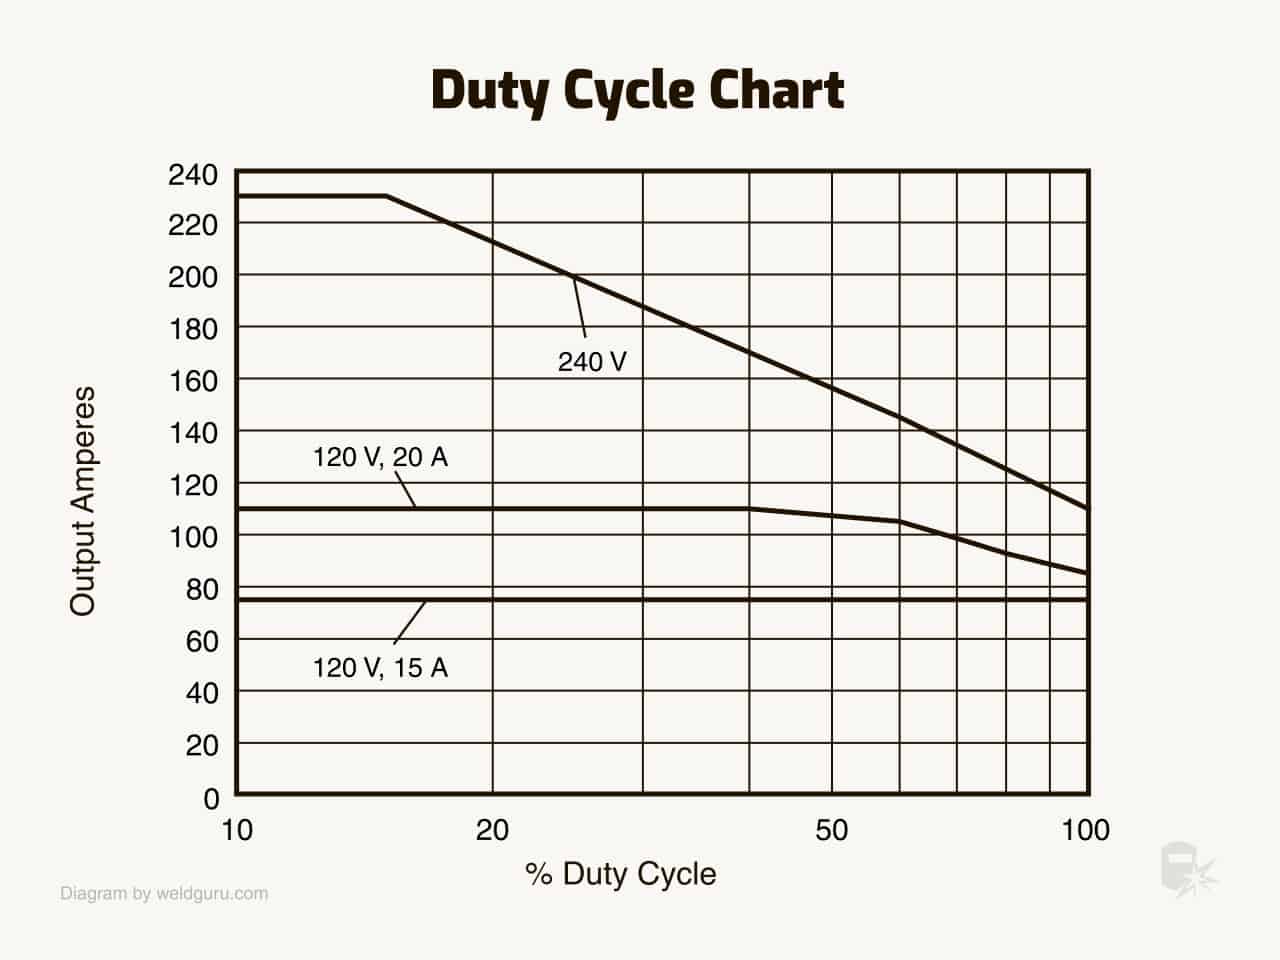
Credit: weldguru.com
Comparing Duty Cycle In Real Welders
Let’s look at two real-world welder specs:
- Welder A: 140A, 20% duty cycle at 120V
- Welder B: 200A, 60% duty cycle at 220V
Which is better? It depends on your use:
- For short, light jobs, Welder A is cheaper and portable.
- For longer, stronger welds, Welder B lets you work more without stopping.
Don’t just buy the highest duty cycle. Buy what fits your real needs and budget.
Duty Cycle And Safety
Ignoring the duty cycle can cause:
- Overheating
- Electrical fires
- Burns from hot machines
- Early machine failure
Always follow the manual. Do not block vents or remove covers while the machine runs.
Duty Cycle And Warranty
Some companies void the warranty if you run the welder above its rated duty cycle. Always keep your receipt and follow the instructions.
If you need reliable, detailed duty cycle data, check manufacturer websites or this Wikipedia article on duty cycle.
Summary: Steps To Choose The Right Duty Cycle
- Decide what type of welding you do most (short repairs, medium jobs, or heavy fabrication).
- Estimate how many minutes you weld in a 10-minute period at your usual amps.
- Check the duty cycle at those amps, not just the maximum.
- Consider your shop temperature and future projects.
- Choose a welder that meets your needs, with a bit of extra capacity for safety.
Frequently Asked Questions
What Happens If I Exceed My Welder’s Duty Cycle?
If you go over the duty cycle, the welder may overheat. Some machines shut down automatically, but others can suffer damage. Overheating can reduce machine life and cause poor welds.
Can I Increase My Welder’s Duty Cycle?
You can improve it by using lower amps, keeping the welder cool, and working in a cooler place. Some machines allow extra cooling fans or water-cooling for TIG. But you cannot change the basic design limit.
Is A Higher Duty Cycle Always Better?
A higher duty cycle gives more work time without stopping, but it costs more. Choose a duty cycle that matches your real needs. Buying more than you use is not always worth the extra money.
Why Do Duty Cycle Ratings Use 10 Minutes?
The 10-minute cycle is a standard for easy comparison. It shows how many minutes you can weld and how many minutes you must rest. It makes it easier to compare different brands and models.
Does Duty Cycle Affect Weld Quality?
Yes. If you push the machine beyond its duty cycle, it may overheat, causing arc instability, weak welds, or even machine damage. Keeping within the duty cycle helps produce strong, consistent welds.
Choosing the right duty cycle is about balancing your work time, power needs, and budget. By understanding how duty cycle works, you can pick a welder that gives reliable results, lasts longer, and keeps you safe. Always read the manual, follow the ratings, and think about your typical welding tasks before making a decision.