Disclosure: This post contains affiliate links and I will be compensated if you make a purchase after clicking through my links. Learn More
Welders face many challenges during fabrication, but lack of fusion in groove welds can cause serious problems for both safety and performance. This issue appears when the base metal and the weld metal do not join completely. Cracks, weak joints, or even sudden failure may result. Many new welders worry about lack of fusion, and even experienced workers sometimes miss small details that prevent it. If you want strong, reliable groove welds, you must understand why lack of fusion happens and how to avoid it. This article explains everything you need to know, with clear steps, real examples, and practical advice.
What Is Lack Of Fusion In Groove Welds?
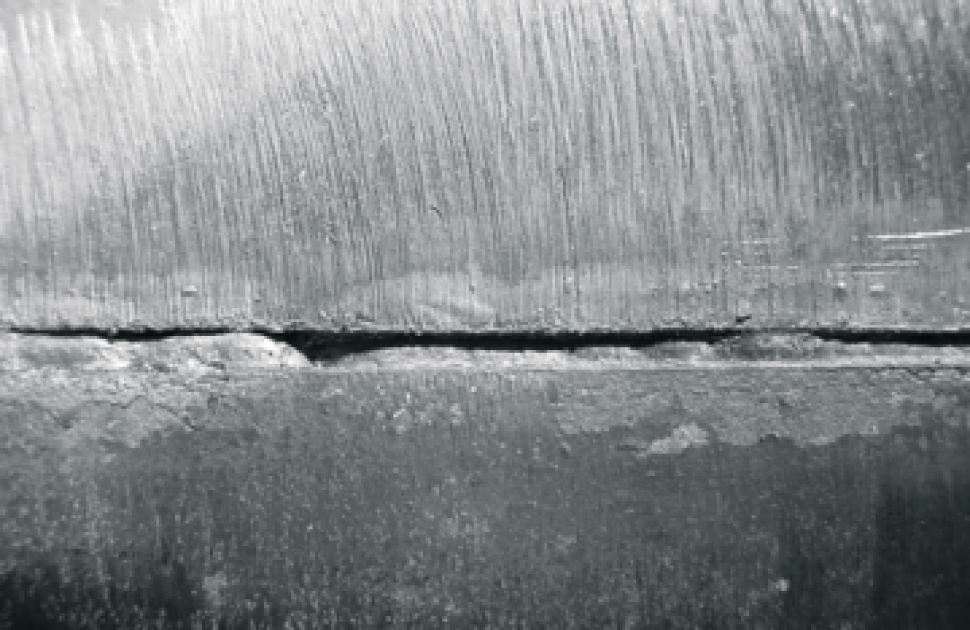
Lack of fusion means the weld metal does not completely melt into the base metal or between weld passes. In groove welds, this problem can hide inside the joint, making it hard to see from the outside. Groove welds connect two pieces of metal edge-to-edge, often in critical structures like bridges, pressure vessels, and pipelines.
Types Of Lack Of Fusion
- Sidewall lack of fusion – The weld metal does not bond with the groove sidewalls.
- Root lack of fusion – The weld does not penetrate to the bottom (root) of the groove.
- Interpass lack of fusion – Layers of weld metal do not join properly with each other.
Each type weakens the joint and can cause failure under load or stress.
Why Does Lack Of Fusion Happen?
Many factors cause lack of fusion in groove welds. Knowing these reasons helps you prevent them.
- Low heat input – Not enough heat to melt both the base and filler metal.
- Improper welding technique – Incorrect angle, travel speed, or weave.
- Poor joint preparation – Dirty, rusty, or poorly shaped groove.
- Wrong electrode or filler – Mismatch between materials or unsuitable filler.
- Insufficient access – Blocked view or tight space prevents proper torch or electrode movement.
Often, more than one reason causes the problem. For example, low heat and poor joint prep together make lack of fusion more likely.
How To Identify Lack Of Fusion
Detecting lack of fusion early saves time and money. But it is not always easy.
Visual Inspection
Surface cracks, uneven beads, or undercut edges may suggest lack of fusion. But these signs do not always appear. Many cases are hidden below the surface.
Non-destructive Testing (ndt)
Welding inspectors use special methods to find hidden flaws:
- Ultrasonic testing (UT) – Sound waves detect gaps or poor bonding.
- Radiographic testing (RT) – X-rays show internal flaws.
- Magnetic particle testing (MT) – Finds surface and near-surface defects.
While NDT is reliable, it costs money and takes skill. Small shops may not always have access to these tools, so good technique is the first line of defense.
Key Steps To Avoid Lack Of Fusion In Groove Welds
Now, let’s look at clear, practical steps you can follow to prevent lack of fusion. Each step matters, and missing even one can create problems.
1. Clean And Prepare The Joint
Dirt, oil, rust, paint, or even moisture can block fusion. Always clean the metal before welding. Use a wire brush, grinder, or solvent as needed. For thick plates, grind or cut the groove to the right shape and size.
Non-obvious tip: Many welders forget to clean the groove sidewalls deep inside the joint, not just the surface. Use a small grinder or file to reach these areas. Even a thin layer of scale can cause lack of fusion.
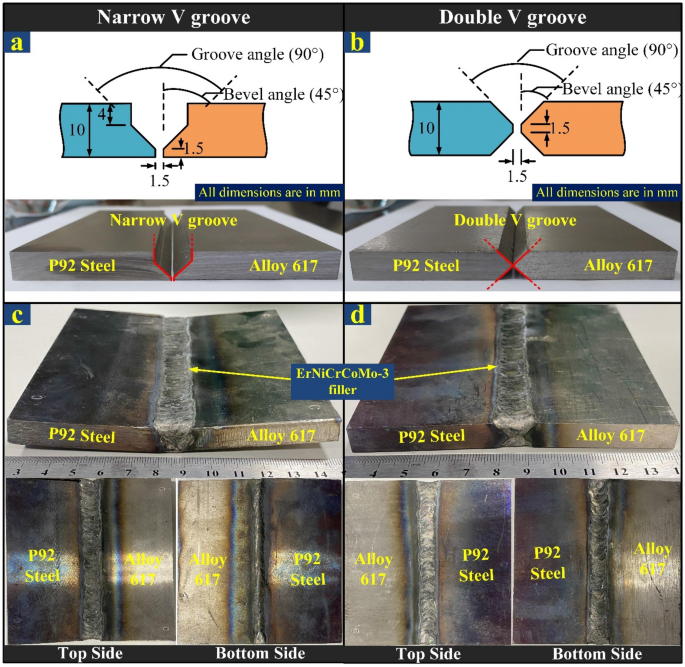
2. Choose The Right Groove Design
The groove angle and root opening affect heat flow and access. Too narrow, and the torch or electrode cannot reach the sidewalls. Too wide, and the weld may sag or take too much filler.
Common groove types:
- Single V-groove – Simple and strong, but needs proper angle.
- Double V-groove – Used for thick plates, weld from both sides.
- U-groove – Saves filler metal, but harder to prepare.
Best practice: For most groove welds, a groove angle of 60–70° and a root gap of 2–3 mm works well. Adjust based on plate thickness.
3. Use Correct Welding Parameters
Welding needs enough heat to melt both metals fully. The main parameters are:
- Current (amperage)
- Voltage
- Travel speed
If the current is too low, the weld pools will not fuse with the base metal. Too high, and you get excessive spatter or burn-through.
Example Table: Effect Of Parameters On Fusion
| Parameter | Too Low | Correct | Too High |
|---|---|---|---|
| Current (A) | Lack of fusion | Good fusion | Excessive penetration |
| Voltage (V) | Poor wetting | Stable arc | Wide bead, spatter |
| Travel Speed | Cold lap, lack of fusion | Uniform bead | Undercut, porosity |
Practical insight: Always check the welding procedure specification (WPS) for recommended parameters. Do not guess or use “what worked last time” without checking.
4. Select The Right Electrode Or Filler Metal
The electrode or filler must match the base metal and the welding process. Some electrodes give deeper penetration, which helps fusion.
- For SMAW (stick welding), use E6010 or E7018 for good penetration.
- For GMAW (MIG welding), ER70S-6 is common for steel.
Non-obvious tip: Store electrodes in a dry, heated container. Moisture can cause hydrogen cracking and poor fusion.
5. Control Welding Technique
Your hand movement, angle, and speed affect fusion more than you think. Hold the torch or electrode at the correct angle (usually 10–15° from vertical). Move steadily, not too fast or slow.
Common mistake: Many new welders focus only on the center of the groove. Always direct the arc to both sidewalls and pause slightly on each side to ensure full fusion.
6. Layer Welds Correctly
Multi-pass welds need each layer to fuse with the previous one. Clean slag between passes. Chip or brush off any residue.
- Make sure the next pass melts slightly into the previous bead.
- Avoid rushing; let each pass cool slightly, but not fully.
7. Control Heat Input
Too little heat causes lack of fusion, but too much creates other problems. Adjust current and travel speed for each joint.
- For thick plates, preheat the base metal to 50–150°C (check the material type).
- Monitor interpass temperature for multi-pass welds.
Non-obvious tip: Use a temperature stick or infrared thermometer to check preheat and interpass temperature. Guessing by hand is not accurate enough.
8. Position The Workpiece Properly
Flat, horizontal, vertical, or overhead positions all affect fusion. Flat position is easiest for full fusion. Overhead welding is most difficult—gravity pulls the molten metal down.
Advice: If possible, rotate the workpiece so you can weld in the flat position. If not, slow your travel speed and use slightly higher current for overhead welds.
9. Use Back Gouging Or Backing Strips
For thick groove welds, weld from one side first, then grind or gouge out the root from the other side and weld again. This ensures full fusion at the root.
- Backing strips (temporary or permanent) help maintain root opening and improve fusion.
- Back gouging removes slag and incomplete fusion at the root.
10. Inspect Each Pass
After each layer, inspect the weld bead and groove. Look for undercut, lack of fill, or uneven fusion. Fix problems before adding the next layer.
Practical insight: Use a small mirror and flashlight to check the root and sidewalls in deep grooves.
11. Follow The Approved Welding Procedure
WPS documents give tested parameters for each job. Follow them strictly. Do not change current, voltage, filler, or position without approval.
- Many welders try to “save time” by going faster or using less filler. This often leads to lack of fusion and failed inspections.
12. Train And Qualify Welders
Welders need hands-on practice to master fusion. Training should cover:
- Proper cleaning and joint prep
- Correct technique for each welding process
- Reading and following WPS
Non-obvious tip: Set up test plates and cut-and-etch them to see fusion quality inside the joint.
13. Control Environmental Factors
Wind, cold, humidity, or even poor lighting can affect welding. Wind can blow away shielding gas in MIG or TIG welding, causing porosity and poor fusion.
- Use screens or barriers in windy conditions.
- Warm the work area if welding outside in winter.
14. Use Proper Equipment And Maintenance
Old or worn equipment can cause unstable arcs, poor penetration, and lack of fusion.
- Check cables, connections, and gas flow.
- Clean the torch or gun regularly.
15. Document And Monitor All Steps
Keep records of parameters, materials, and inspections. Review them if problems appear.
- Traceability helps find and fix issues quickly.
- Use checklists or quality control logs.

Credit: yeswelder.com
Common Mistakes That Cause Lack Of Fusion
Even skilled welders sometimes repeat these errors. Avoid them for better results.
- Welding too fast – Rushing creates cold beads that do not fuse.
- Not pausing on sidewalls – Focusing only on the center misses the groove edges.
- Ignoring joint fit-up – Misaligned parts or gaps cause incomplete fusion.
- Skipping cleaning between passes – Slag or spatter blocks fusion.
- Using wrong polarity – Electrode polarity affects heat and penetration.
Practical Examples And Case Studies
Case Study 1: Pipeline Weld Failure
A pipeline joint failed after only six months in service. Investigation showed lack of fusion at the root. The cause was a dirty groove with oil residue and low current. The repair cost over $100,000 and caused a two-week shutdown.
Lesson: Always clean joints and verify current.
Case Study 2: Bridge Plate Test
A bridge contractor tested groove welds on thick steel plates. Ultrasonic testing found lack of fusion on 20% of welds. The main problem was fast travel speed and no pause on sidewalls. Retraining and adjusted procedures fixed the issue.
Lesson: Slow down and focus on technique.
Data Table: Impact Of Common Errors
| Error | Defect Rate (%) | Repair Cost Increase |
|---|---|---|
| Poor cleaning | 27 | 3x |
| Low current | 18 | 2x |
| Fast travel speed | 22 | 2.5x |
Comparing Welding Processes For Groove Weld Fusion
Some welding processes are better for fusion in groove welds than others. Here is a comparison.
| Process | Fusion Quality | Common Issues |
|---|---|---|
| SMAW (Stick) | Good with proper parameters | Slag inclusion, low current |
| GMAW (MIG) | High with correct settings | Poor sidewall fusion if rushed |
| GTAW (TIG) | Excellent for thin materials | Slow, may lack root fusion on thick plates |
| SAW (Submerged Arc) | Very good for heavy plates | Slag coverage hides defects |
Practical advice: Choose the process based on material, joint design, and required strength.
The Role Of Standards And Codes
Welding codes, such as those from the American Welding Society (AWS) or ASME, set rules for groove weld quality. They define:
- Minimum fusion requirements
- Allowed defect sizes
- Testing and inspection methods
Always follow the code for your project. Code-compliant welds pass inspection and last longer.
For more detailed standards, see the American Welding Society.
Credit: www.onestopndt.com
How To Train And Qualify Welders To Prevent Lack Of Fusion
Training is more than reading manuals. Good training includes:
- Hands-on practice with real joints and defects.
- Visual aids like cut-and-etch samples showing good and bad fusion.
- Supervised welding under an experienced instructor.
- Testing and certification to national or company standards.
Extra tip: Use destructive testing (bend tests, macro-etching) to see inside welds and spot lack of fusion.
How To Fix Lack Of Fusion If It Happens
Sometimes, you find lack of fusion after welding. Do not ignore it.
- Gouge or grind out the defective area fully.
- Re-weld with correct parameters and technique.
- Retest the repaired area.
Shortcuts or “covering up” with more weld metal will not solve the problem and may cause failure later.
The Cost Of Lack Of Fusion
Lack of fusion increases repair costs, inspection time, and risk of failure. In critical industries (oil, bridges, ships), a single bad weld can cost millions or cause injury.
Data: Studies show that lack of fusion is the most common weld defect in groove welds, making up 30–40% of all failures found in inspection.
Prevention is always cheaper than repair. Investing time in good preparation, training, and inspection pays off.
Frequently Asked Questions
What Is The Main Cause Of Lack Of Fusion In Groove Welds?
The main cause is insufficient heat input from using low current or welding too fast. Other common causes are poor joint cleaning, incorrect groove shape, and improper welding technique.
How Can I Check For Lack Of Fusion If I Do Not Have Advanced Testing Tools?
You can check by visual inspection for surface signs (cracks, undercut), but these are not always reliable. For more confidence, use a bend test or cut-and-etch test on a sample joint to see inside the weld.
Does The Welding Position Affect Lack Of Fusion?
Yes. Flat position makes it easier to achieve full fusion. Vertical and overhead positions are harder, especially for the root and sidewalls. Adjust technique and parameters as needed for each position.
What Happens If I Ignore Lack Of Fusion?
Ignoring lack of fusion can lead to joint failure, leaks, or cracks. In critical projects, it may cause accidents, lost production, or expensive repairs. Always fix it before moving on.
Which Welding Process Is Best For Avoiding Lack Of Fusion In Groove Welds?
GMAW (MIG) and SMAW (Stick), when used with correct parameters and technique, give good fusion in most groove welds. TIG is best for thin materials, while SAW is used for thick plates. The best process depends on the job’s needs.
Credit: www.nature.com
Final Thoughts
Avoiding lack of fusion in groove welds requires attention to every step: from joint preparation to welding technique and inspection. Small mistakes can lead to large problems, but careful work prevents most defects. Clean the metal, choose the right parameters, and use correct technique every time. Train welders well and check every weld before moving to the next stage. By focusing on these basics, you can make groove welds strong, safe, and reliable—every time.

