Disclosure: This post contains affiliate links and I will be compensated if you make a purchase after clicking through my links. Learn More
To clean a welding helmet lens, slide out the clear outer cover lens, wash it in lukewarm water with a drop of mild dish soap, and pat it dry with a microfiber cloth. Wipe the auto-darkening filter and its sensors with a damp, soapy cloth only, since you should never soak the filter cartridge.
Most “dirty lens” problems are really a spattered or scratched cover lens. That part is a cheap consumable, and Lincoln Electric’s own helmet manual says to replace it right away once spatter or dirt builds up. Cleaning keeps it usable longer; replacing it is the fix when the view stays hazy.
A clear lens belongs on the same checklist as your gloves and jacket.
| Time | 5 to 10 minutes |
| Difficulty | Easy |
| Tools needed | Microfiber cloth, mild dish soap, lukewarm water, lint-free towel, spare cover lenses |
The 3 Layers You’re Cleaning
A welding helmet lens is a stack of parts, and each one gets a different kind of cleaning. Pull the stack apart before you start so you know what you’re holding.
| Part | What it does | How to clean it |
|---|---|---|
| Outer cover lens | Clear plastic shield that takes spatter and grinding grit | Rinse, soap and water, microfiber; replace when pitted |
| Auto-darkening filter (ADF) or fixed shade lens | Blocks UV and IR and darkens to your shade number | Damp soapy cloth, then dry with a lint-free cloth; never submerge an ADF |
| Inside cover lens | Thin plastic sheet between the filter and your face | Soap and water; replace when fogged or scratched |
Passive helmets swap the ADF for a fixed glass shade lens. You can rinse a glass shade lens under warm water like a cover lens, since there are no electronics inside it.
What You’ll Need
- 2 microfiber cloths: one damp for washing, one dry for drying
- Mild dish soap or a lens cleaning solution your helmet manual approves
- Lukewarm water in a bowl or from the tap
- Lint-free towel for the filter and sensors
- Spare outer and inside cover lenses made for your helmet model
- Soft brush or a few blasts of canned air for the sensor windows (optional)
How to Clean a Welding Helmet Lens: Step by Step
Clean a welding helmet lens by washing the 2 cover lenses with soap and water and wiping the filter with a damp cloth. The full job takes about 10 minutes.
Step 1: Let the Helmet Cool and Find a Clean Spot
Work on a clean bench, away from the grinder. Grit on the bench ends up on the cloth, and grit on the cloth scratches the lens.
Step 2: Take the Lens Stack Apart
Pop the front lens holder or retaining frame per your helmet manual. Remove the outer cover lens, the filter and the inside cover lens, and note which way each piece faces.
Step 3: Rinse the Cover Lenses First
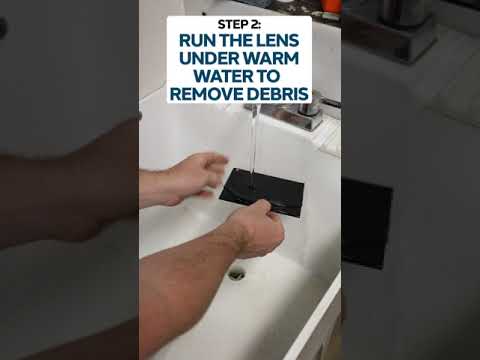
Run each cover lens under lukewarm water before you touch it with a cloth. Phillips Safety recommends this pre-rinse because it floats off loose grit that would scratch the plastic during wiping.
Step 4: Wash With Mild Soap
Put a drop of dish soap on the damp microfiber and wipe in small circles with light pressure. 3M’s Speedglas care guide calls for a cloth dampened with a mild detergent and lukewarm water, so you don’t need anything stronger.
Credit: www.youtube.com
Step 5: Rinse and Dry
Rinse off all the soap, then blot the lens dry with the clean microfiber. Pat instead of scrubbing, since dragging a dry cloth across plastic leaves fine swirl marks.
Step 6: Wipe the Filter and Sensors
Wipe both faces of the auto-darkening filter with a damp, soapy cloth, then dry it with a lint-free cloth. Clean the arc sensor windows and the solar cell the same way. Dirty sensors can slow or stop the lens from darkening.
Step 7: Check It Against a Light
Hold each part up to a bright light. If you still see haze, pits or spatter dots, clean it once more or swap in a new cover lens.
Step 8: Reassemble in the Same Order
Put the inside cover lens, filter and outer cover lens back the way they came out. Lincoln’s manual says to seat the cover lens and gasket into the shell the same way you removed them, so the seal stays tight against spatter.
Cleaning an Auto-Darkening Filter Without Damaging It
An auto-darkening filter takes a wipe, never a bath. The Lincoln VIKING TM1840 manual (IM10284) is direct about it: do not submerge the shade cartridge in water or any other solution, and do not use solvents or abrasive detergents.
- Wring the cloth until it’s barely damp before it touches the filter.
- Keep water away from the battery compartment and the control knobs.
- Clean the sensor windows with the same damp cloth, then dry them.
- Let the filter air-dry for a few minutes before you reinstall it.
If the filter still flickers or stays light after cleaning, the problem is the battery, the sensors or the cartridge itself. That’s a test-and-replace job.
When to Replace the Cover Lens Instead of Cleaning It
Replace a cover lens when it’s pitted, cracked, scratched or carries spatter that won’t wash off. 3M tells Speedglas users to check the inside and outside protection plates before each use and replace them if they’re cracked, pitted or scratched.
- Spatter dots melted into the plastic: replace. Soap can’t lift them out.
- Cloudy haze after washing: replace. That haze is surface wear on the plastic.
- Cracks or warping: replace now, since spatter can reach the filter.
- Fog on the inside cover lens: clean first, replace if it comes back hazy.
Buy replacement lenses by your helmet’s model and part number. Miller, Lincoln and 3M all sell outside and inside cover lenses cut for each helmet line, and a lens of the wrong size can leave gaps around the filter.

Credit: www.youtube.com
A worn lens also makes you lean in closer to see the puddle. That puts your face nearer the arc and the fumes. If your eyes feel gritty after a session, see our guide on how to prevent arc eye.
Common Mistakes to Avoid
Several popular cleaning tips online come from car detailing, and they don’t match what helmet makers say. Skip these.
- Rubbing compound or a buffing wheel: some guides suggest them for scratches. Lincoln’s manual rules out abrasive cleaners, and on a cheap cover lens a new lens is faster and clearer.
- Solvents: acetone, lacquer thinner and brake cleaner can cloud or craze polycarbonate. Lincoln’s manual says no solvents.
- Furniture polish or car wax on the filter: it leaves a film that smears under arc light. Keep it off the ADF and inside lens.
- Your shirt or a shop rag: both carry metal dust that scratches the plastic.
- Running the tap over an ADF: water can get into the cartridge and the battery area.
- Welding with the outer cover lens removed: the filter then takes the spatter, and a filter costs far more than a cover lens.
A dirty lens can also trick you into picking the wrong shade, since the view looks darker than it is. Clean the lens first, then set your shade.
How to Keep Your Welding Helmet Lens Cleaner Longer
- Store the helmet in a bag: a helmet bag keeps grinder dust off the lens between jobs.
- Flip the helmet away from the grinder: use a face shield and safety glasses for heavy grinding so the cover lens isn’t sandblasted.
- Keep your head out of the plume: smoke film builds up fastest when you weld with your face right over the puddle.
- Wipe the outer lens at the end of each day: a quick damp wipe stops grime from baking on.
- Keep a pack of spare cover lenses: swapping one takes under a minute.
Safety Note
Never strike an arc with a cracked filter or a missing cover lens. UV and IR from the arc can burn your eyes fast, and a damaged filter may not block them.
Don’t open the filter cartridge to clean inside it. If the ADF fails after cleaning, replace it with the part your helmet maker lists.
Frequently Asked Questions
Can I Use Windex on a Welding Helmet Lens?
Skip it on the auto-darkening filter and coated lenses. Helmet makers like Lincoln and 3M call for a mild detergent and water and warn against strong cleaning solutions. Soap and water cleans a plain outer cover lens just as well, so there’s no reason to reach for glass cleaner.
Can You Clean an Auto-Darkening Welding Lens With Water?
Yes, with a damp cloth only. Wipe the filter with a cloth wrung out in soapy water, then dry it with a lint-free cloth. Lincoln’s manual says never to submerge the shade cartridge, so keep it away from running taps and bowls of water.
How Often Should You Clean a Welding Helmet Lens?
Give the outer cover lens a quick wipe after each welding day and a full soap-and-water clean once a week if you weld often. Inspect both cover lenses before each use, as 3M advises, and swap any lens that stays hazy after cleaning.
How Do You Get Spatter Off a Welding Lens?
You usually can’t, because hot spatter melts into the plastic cover lens. Scraping or sanding it leaves a scratched, cloudy spot. Replace the spattered cover lens instead; Lincoln’s helmet manual says to swap a spattered or dirty cover lens immediately to protect the filter behind it.
Why Is My Welding Lens Cloudy After Cleaning?
Cloudiness that survives a soap-and-water wash is usually surface wear on the cover lens: fine scratches, pitting or a film from heat. Cleaning won’t remove that. Fit a new outer or inside cover lens made for your helmet model, and the view should clear up right away.
Final Words
Knowing how to clean a welding helmet lens comes down to 2 rules: soap and water for the cover lenses, and only a damp wipe for the auto-darkening filter. Skip solvents, abrasives and shop rags.
When a cover lens stays cloudy or spattered, replace it. It’s the cheapest part of the helmet and the one designed to wear out. New to the trade?