Disclosure: This post contains affiliate links and I will be compensated if you make a purchase after clicking through my links. Learn More
Learning stick welding can feel challenging at the start, especially if you have never struck an arc before. Many beginners struggle with getting the arc started, holding it steady, and understanding what exactly they should see, hear, and feel. Striking the arc is a key skill in stick welding (also called Shielded Metal Arc Welding or SMAW). Without a good arc, your welds will not be strong or neat. This article explains how to strike an arc in stick welding for beginners. You will learn every step with clear explanations, examples, and practical tips. By the end, you will know what to do, what to avoid, and how to practice safely.
Understanding Stick Welding And Arc Striking
Stick welding uses an electric arc to melt a metal rod (the “stick” or electrode) and the metal pieces you want to join. The arc forms when electricity jumps across a small gap between the electrode tip and the metal workpiece. This arc creates intense heat—over 6,000°C (10,800°F)—enough to melt metal in seconds.
Striking an arc means starting this electric arc. Many compare it to lighting a match. You touch the electrode to the work, then pull it away slightly to make a small gap. If you do it right, the arc starts and you can begin welding. If you do it wrong, the electrode can stick, or the arc will not form.
Why Arc Striking Matters
Good arc striking is the first step to a strong weld. If you struggle with starting the arc, you will waste time, ruin electrodes, and make poor welds. Bad arc starts can also damage the metal surface and make it harder to continue welding. Practicing good arc striking helps you:
- Save time and materials
- Make clean, neat welds
- Avoid frustration and mistakes
- Build confidence with your welder
Many beginners do not realize how much practice it takes to strike a good arc. Even experienced welders sometimes need a few tries in tough conditions.
Credit: weldguru.com
What You Need For Stick Welding
Before you start, gather all the right equipment. Using the correct tools and safety gear makes learning easier and keeps you safe.
Essential Equipment
- Stick Welder (SMAW machine): Choose a machine with adjustable current (amperage).
- Electrodes: E6013 or E6011 rods are beginner-friendly. The size (diameter) should match your metal thickness and welder.
- Electrode Holder: This clamps the electrode securely.
- Ground Clamp (Work Clamp): Connects the workpiece to complete the electrical circuit.
- Welding Helmet: Auto-darkening helmets are easiest for beginners.
- Protective Clothing: Wear flame-resistant jacket, gloves, long pants, and closed shoes.
- Wire Brush/Chipping Hammer: Clean slag and prepare the metal.
- Angle Grinder: For cleaning and prepping workpieces.
- Safety Glasses and Ear Protection: Protects from sparks and noise.
Setting Up Your Workspace
- Work in a well-ventilated area to avoid breathing harmful fumes.
- Remove any flammable items from your workspace.
- Make sure all cables are untangled and not under your feet.
- Keep a fire extinguisher nearby.
Preparing To Strike An Arc
Preparation is key. Many new welders skip steps and have problems later.
Cleaning The Metal
Dirty, rusty, painted, or oily surfaces make arc striking harder. Use a wire brush or angle grinder to remove rust, paint, and dirt. The cleaner the metal, the easier the arc will start. Even a thin layer of rust can cause the electrode to stick.
Setting The Machine
- Plug in and turn on your welder.
- Set the amperage based on your electrode size and metal thickness.
Below is a simple guide for common electrodes:
| Electrode Size | Amperage Range (A) | Metal Thickness (mm) |
|---|---|---|
| 2.5 mm (3/32″) | 70–100 | 2–4 |
| 3.2 mm (1/8″) | 90–130 | 3–6 |
| 4.0 mm (5/32″) | 130–180 | 4–10 |
If you are not sure, start at the lower end and increase slowly until you get a smooth arc.
Connecting Cables
- Attach the ground clamp to the metal workpiece or metal table.
- Insert the electrode into the holder, leaving about 30–50 mm (1–2 inches) exposed.
Check all connections are tight. Loose connections can cause weak or unstable arcs.
Choosing The Right Electrode
- E6013 electrodes are easier to start and smoother for beginners.
- E6011 works better on dirty or rusty metal but can be harder to use.
- Do not use large diameter rods on thin metal; they need more current and make arc striking harder.
The Two Main Arc Striking Methods
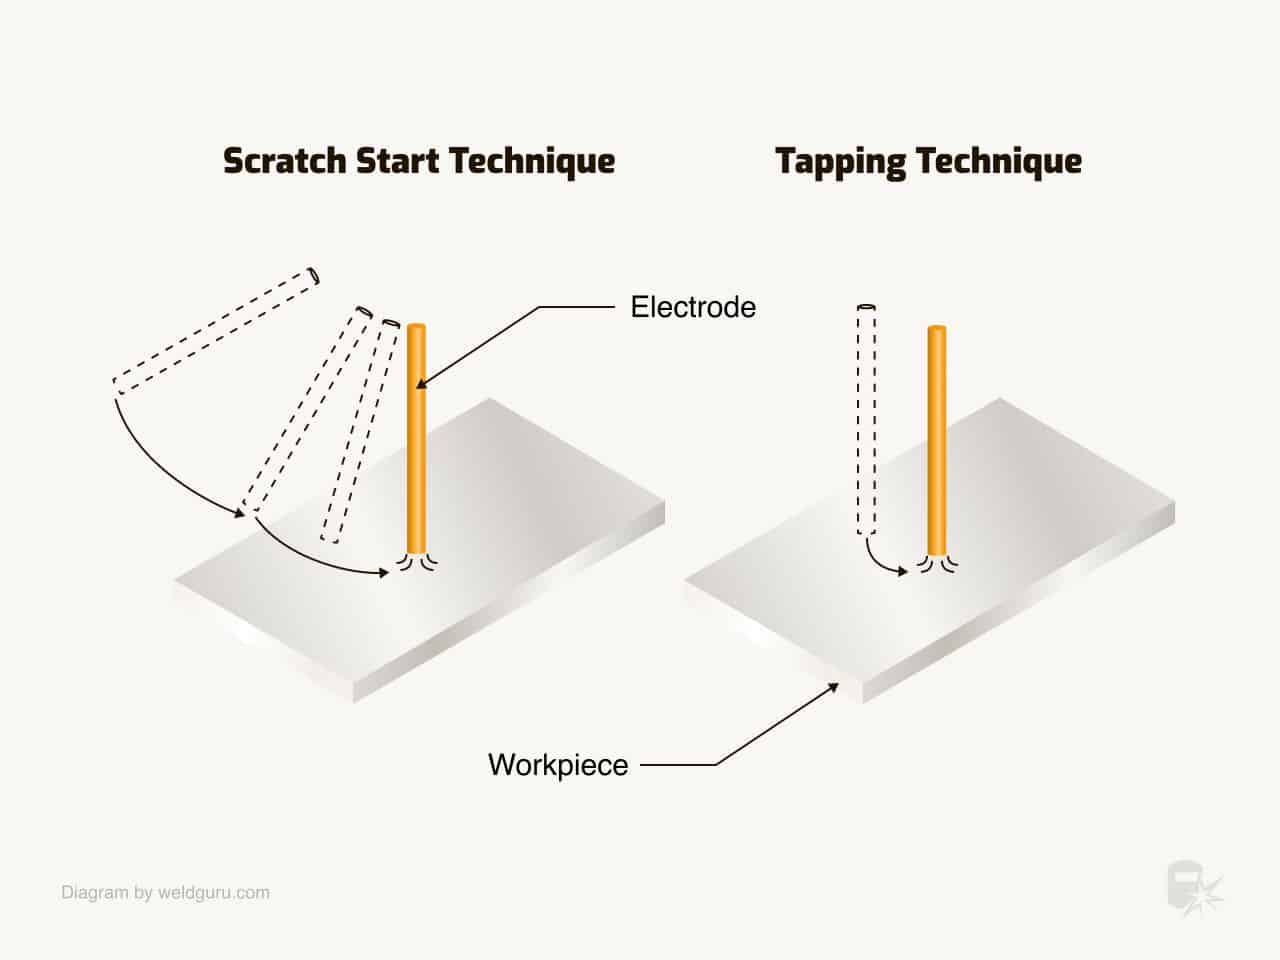
There are two common ways to strike an arc in stick welding:
- Scratch Method (most popular for beginners)
- Tap Method
Both methods work, but one may suit you better.
Scratch Method
This method is like lighting a match.
- Hold the electrode at a 15–30° angle to the workpiece.
- Press the tip gently to the metal.
- Drag the tip about 1–2 cm (½–1 inch) quickly, then lift it slightly (about 1–2 mm).
If done right, the arc starts and you see bright light. Move the electrode back to the correct welding angle and distance.
Why it works: The scratching movement helps break through any oxide layer and avoids sticking.
Common mistakes:
- Scratching too slowly (the electrode sticks)
- Lifting too high (arc breaks)
- Not enough pressure (no contact)
Tap Method
This method is like turning a light switch on.
- Hold the electrode above the workpiece at a 15–30° angle.
- Lower the electrode tip straight onto the metal.
- Tap quickly and lift it about 1–2 mm.
The arc starts if you lift just enough to keep the gap.
Why it works: The quick tap completes the circuit and the arc starts.
Common mistakes:
- Holding the tip on the metal too long (sticks)
- Lifting too high (arc breaks)
- Not tapping hard enough (no contact)
Step-by-step: How To Strike An Arc Safely
Follow these steps each time you strike an arc. Practicing them will build good habits.
1. Wear Your Safety Gear
- Put on your helmet, gloves, and protective clothing.
- Lower your helmet before starting—never look at the arc with bare eyes.
2. Check Your Setup
- Make sure the electrode is clean and straight.
- Check your welder settings and all cable connections.
- Place your workpiece on a stable, grounded surface.
3. Position Your Body
- Stand comfortably, feet apart for balance.
- Rest your arms on the table or use your body to steady your hands.
- Keep your head away from the arc but close enough to see your work.
4. Hold The Electrode Correctly
- Grip the holder firmly but not too tight.
- Hold the electrode at a 15–30° angle from vertical, leaning in the direction you want to weld.
5. Strike The Arc
- Choose either the scratch or tap method.
- Try to start the arc at the weld joint, not far from where you plan to weld.
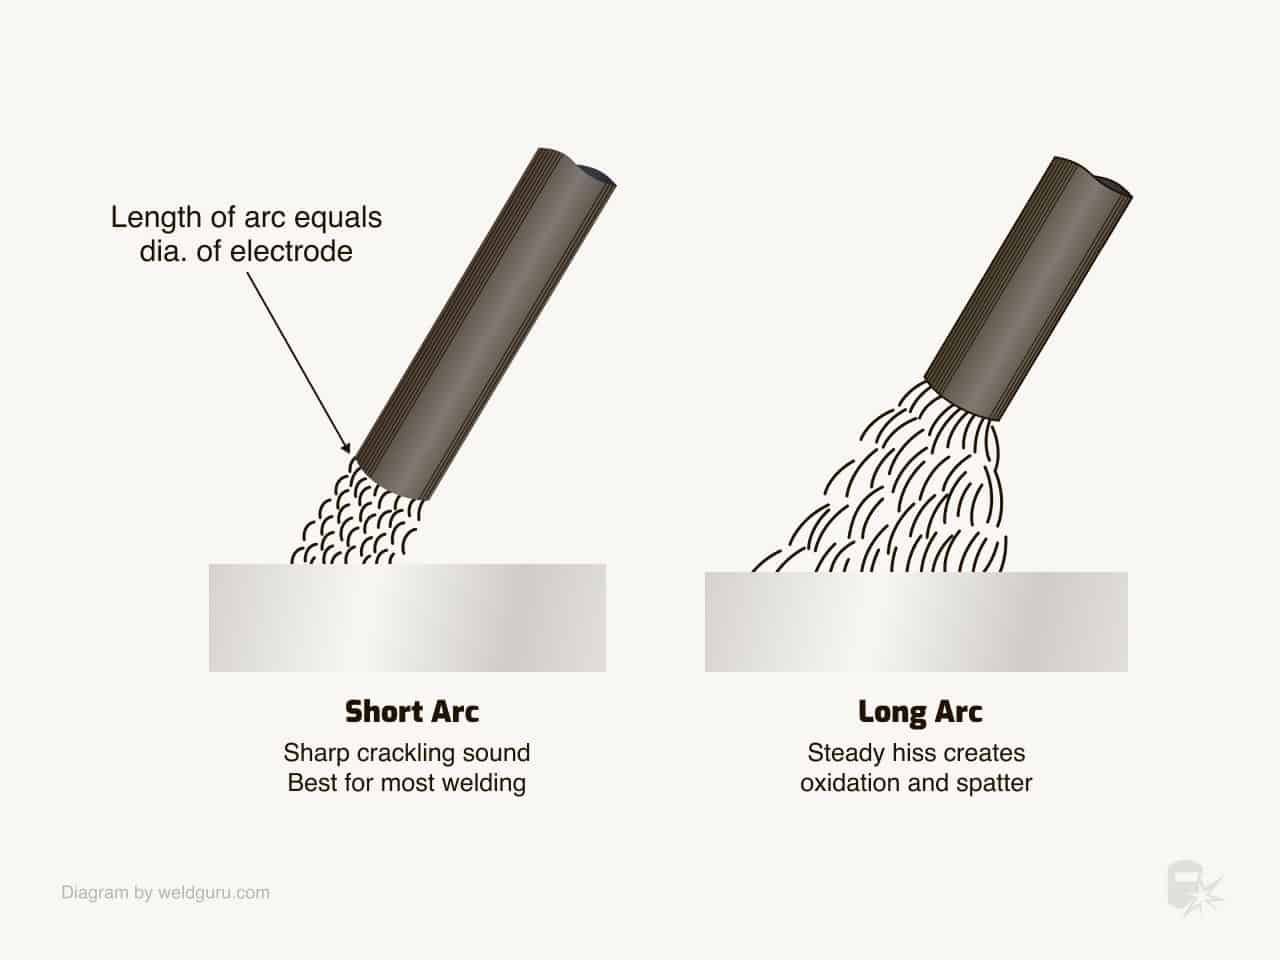
6. Adjust The Arc Length
- After the arc starts, keep the electrode tip about 2–3 mm (about the thickness of the rod coating) from the metal.
- If the arc is too long, it will sputter and make a weak weld.
- If the arc is too short, the electrode may stick.
7. Move Smoothly Into Welding
- Once the arc is stable, move the electrode along the joint at a steady speed.
- Listen for a steady “crackling” sound—like frying bacon.
Pro tip: If the arc keeps going out, you may be moving too fast or lifting the electrode too high.
Credit: weldguru.com
What You Should See, Hear, And Feel
Many beginners do not know what a good arc looks and sounds like.
A good arc:
- Produces a bright, steady light
- Makes a consistent crackling or hissing sound
- Feels smooth to guide; not jerky or sticky
- Creates a small, even pool of molten metal
A bad arc:
- Flickers or goes out often
- Makes popping or sputtering noises
- Causes the electrode to stick or jump
Arc length matters: Too long makes spatter and weak welds. Too short makes sticking and poor fusion.
Common Problems And How To Fix Them
Everyone struggles with arc striking at first. Here are the main problems and how to solve them.
1. Electrode Sticks To Metal
Why it happens:
- Arc length is too short
- Current is too low
- Dirty workpiece
- Moving too slowly
How to fix:
- Increase amperage
- Clean the metal again
- Try a faster scratch or tap
- Use a new electrode if the tip is covered in slag
2. Arc Will Not Start
Why it happens:
- Not enough contact
- Amperage too low
- Bad ground connection
- Coating on the electrode tip
How to fix:
- Check and tighten all cables
- Clean both workpiece and electrode tip
- Increase amperage slightly
3. Arc Breaks Or Flickers
Why it happens:
- Lifting the electrode too high
- Moving too fast
- Inconsistent hand movement
How to fix:
- Practice holding a steady hand
- Keep the arc length consistent
4. Too Much Spatter
Why it happens:
- Arc too long
- Amperage too high
How to fix:
- Lower the amperage
- Hold the electrode closer
Quick Reference: Troubleshooting Table
Below is a quick look-up for common arc striking problems and solutions.
| Problem | Possible Cause | Solution |
|---|---|---|
| Electrode sticks | Low amperage, dirty metal, too slow | Increase amperage, clean metal, move faster |
| No arc | Poor contact, low amperage, bad ground | Check connections, clean tip, increase amperage |
| Arc breaks | Arc length too long, unsteady hand | Hold steady, keep arc short |
| Too much spatter | High amperage, arc too long | Lower amperage, shorten arc |
Practicing Arc Striking: Building Skill
You will not master arc striking in one session. Plan to practice on scrap metal before you try real projects.
Good Practice Exercises
- Striking and holding the arc: Try to start the arc and hold it in one spot for 3–5 seconds. Repeat 10–20 times.
- Running short beads: Strike the arc, then move the electrode a short distance (2–5 cm). Try to make straight, even weld beads.
- Varying angles: Practice striking the arc at different angles and positions (horizontal, vertical, overhead).
- Using both methods: Switch between scratch and tap to see which feels better.
Pro tip: If your electrode sticks, twist the holder gently to break it loose. Do not pull hard—you may break the rod or damage the machine.
Safety Tips For Beginners
Stick welding creates hot sparks, UV light, and fumes. Take these safety steps seriously.
- Always wear a welding helmet with the correct shade (usually shade 10–12 for stick welding).
- Use flame-resistant gloves, sleeves, and pants. Do not weld in shorts or sandals.
- Keep your workspace free of clutter and flammable materials.
- Work in a space with good airflow.
- Let metal cool before touching it or moving it.
- Store electrodes in a dry place—moisture can cause bad arc starts.
Non-obvious insight: Many beginners forget to protect their neck and ears. Sparks can burn through small gaps in clothing, so cover all skin.
How Electrode Types And Amperage Affect Arc Striking
Different electrodes have different coatings and cores. This changes how easy they are to start and control.
Electrode Comparison
| Electrode Type | Arc Starting Ease | Best For |
|---|---|---|
| E6013 | Very easy | Clean, thin metal; beginners |
| E6011 | Moderate | Dirty or rusty metal; outdoor |
| E7018 | Harder for beginners | Structural, strong welds |
Non-obvious insight: If you keep sticking electrodes, try E6013. If you must weld through paint or rust, use E6011, but expect a rougher arc.
Amperage matters: Too little current makes sticking and hard starts. Too much makes spatter and burns through thin metal. Always match your rod and metal thickness to your amperage.
How To Know You Struck A Good Arc
You know you struck a good arc if:
- The electrode does not stick at the start.
- The arc keeps going without flickering or going out.
- The sound is steady, not popping or silent.
- The molten pool is even, not jumping or spreading.
- You can move the electrode smoothly along the joint.
If you get these results, you are ready to start making real welds.
Beginner Mistakes To Avoid
Many beginners repeat the same mistakes. Learn from them to save time and frustration.
- Not cleaning the metal: Even small amounts of rust or paint can cause sticking.
- Using wrong amperage: Too low makes starting hard, too high makes a mess.
- Poor body position: Shaky hands or bad posture make arc control harder.
- Watching the electrode, not the weld pool: Focus on where the metal is melting, not just the rod.
- Lifting the helmet too early: Wait until the arc is out and the metal cools.
- Ignoring safety gear: Even a quick weld can cause burns or eye damage.
- Not practicing enough: Arc striking is a skill, not just a step. Set aside time to practice only arc striking.
Practical tip: If you feel nervous, practice just striking and holding the arc without trying to weld a joint. You will get more comfortable with the machine and the light.
Improving Your Arc Striking Over Time
As you practice, pay attention to:
- How different rods start and run
- How metal thickness changes arc starting
- How your hand position affects control
Some welders mark their best amperage settings for each rod and metal type. Keep notes as you learn—this saves time and helps you repeat good results.
Challenge yourself: Try striking an arc with both your left and right hand. Even if you are right-handed, some jobs require awkward positions.
When To Replace Electrodes
If your electrode keeps sticking or will not start an arc, check the tip. If it is covered in melted metal or the coating is burned away, replace it. Using damaged or wet electrodes makes arc starting almost impossible.
Store your electrodes in a dry place. Moisture makes the coating crumbly and ruins arc starting.
Final Tips For Success
- Take your time. Do not rush learning arc striking.
- Start with short practice sessions—10–15 minutes at a time.
- Watch videos or ask an experienced welder to show you their technique.
- Use fresh, high-quality electrodes. Old or damp rods are much harder to start.
- Keep your workspace bright and clear.
- Review your welds and arc starts—look for improvements each time.
If you want to read more about welding basics and safety, visit Wikipedia: Shielded Metal Arc Welding for extra detail.

Credit: www.youtube.com
Frequently Asked Questions
Why Does My Electrode Keep Sticking When I Try To Start An Arc?
This happens because the arc length is too short, the amperage is too low, or the metal is dirty. Increase your current, clean the metal, and try a faster strike.
How Do I Know Which Electrode To Use For Arc Striking Practice?
E6013 is best for beginners because it starts easily and gives smooth welds. Choose the rod size based on your metal thickness and welder.
Is It Safer To Use The Scratch Or Tap Method For Striking An Arc?
Both methods are safe if you use proper gear and technique. The scratch method is usually easier for beginners because it avoids sticking.
What Should I Do If My Arc Keeps Breaking Or Flickering?
Check your amperage and ground clamp. Keep the arc length steady and do not move the electrode too high off the metal.
Can I Practice Arc Striking On Any Metal?
Practice on clean, mild steel. Avoid galvanized or painted steel, as they produce dangerous fumes and make arc starting harder.
—
Learning how to strike an arc in stick welding takes practice and patience. Focus on good preparation, clean metal, the right settings, and safe habits. Try both the scratch and tap methods to see which works for you. Do not worry about mistakes; every welder was a beginner once. With steady practice, you will gain confidence and start making strong, neat welds.