Disclosure: This post contains affiliate links and I will be compensated if you make a purchase after clicking through my links. Learn More
Welding feels rewarding when everything goes right. But many welders—especially beginners—get frustrated by one stubborn problem: the welding rod keeps sticking. This issue interrupts the work, wastes rods, and can even damage your equipment. If you face this problem, you are not alone. Many people struggle with rods that stick to their workpiece, and often, the reason is not obvious.
You might wonder, “Is my machine broken? Am I doing something wrong? ” The answer is usually simpler than you think. Stick welding (also called Shielded Metal Arc Welding, or SMAW) is a process that demands attention to settings, technique, and preparation.
Even small mistakes can make rods stick again and again.
This article explains the main causes of rod sticking, how to fix each one, and offers detailed guidance on preventing it. Whether you are new or have some experience, you will find practical solutions and less-known tips that many guides ignore.
What Does “sticking” Mean In Welding?
When you touch a welding rod to the metal, it should create an electric arc. This arc melts the rod and the base metal, creating the weld. Sometimes, instead of starting the arc, the rod fuses to the metal surface.
It gets stuck. You might pull it away, but the rod often breaks or leaves a mess behind.
Rod sticking wastes time and materials. It can also damage the rod and even the tip of your electrode holder. If it happens often, it becomes frustrating and discourages beginners from learning further. Knowing what causes sticking is the first step toward solving it.
Main Reasons Why Welding Rods Stick
Several factors lead to rod sticking. Each one needs a different solution.
1. Wrong Amperage Setting
The most common reason for sticking is too low amperage. If your machine is not set high enough, the arc will not form properly. The rod will touch the metal, but there is not enough current to melt it. It fuses instead.
- Low amperage makes starting the arc harder.
- High amperage causes the rod to burn too quickly, but it rarely leads to sticking.
Each welding rod type and size needs a specific amperage range. For example, a 2. 5 mm (3/32 inch) E6013 rod works well between 90–120 amps. Using 60 amps with this rod almost always makes it stick.
Example
A new welder uses a 3. 2 mm rod (1/8 inch) at 80 amps. The rod keeps sticking. The recommended range is 110–150 amps. After increasing the amperage to 120, the rod runs smoothly.
2. Poor Ground Clamp Connection
The ground clamp (also called the work clamp) must have a solid connection to the workpiece. If it is loose, dirty, or not making good contact, the current cannot flow. This makes the arc weak or impossible to start. The rod will stick almost every time.
Signs Of Poor Ground
- You see sparks at the clamp instead of the rod tip.
- The metal under the clamp is rusty or painted.
- The clamp feels warm or hot.
3. Dirty Workpiece Or Rod
The arc does not form well if the metal is covered with rust, paint, oil, or dirt. The same goes for the rod. If the flux coating is damaged, wet, or oily, it will not start a clean arc.
Fix
- Clean the metal with a wire brush or grinder before welding.
- Store rods in a dry place.
- If rods are damp, dry them in a rod oven or on a hot plate (below 250°F / 120°C).
4. Wrong Angle Or Arc Length
Stick welding demands the right rod angle and arc length.
- Rod Angle: Hold the rod at about a 15-degree angle from vertical.
- Arc Length: The gap between the rod tip and the metal should be about the rod’s diameter.
Too short an arc length (touching the metal) will make the rod stick. Too long a gap causes the arc to break.
Practical Tip
Keep your hand steady. Rest your pinky on the workpiece if possible to guide the rod better.
5. Incorrect Rod Type
Some rods are easier for beginners. Others need more skill or a special machine. For example, E6010 and E7018 rods are less forgiving with low amperage or poor technique. E6013 rods are more user-friendly.
Comparison Of Popular Stick Welding Rods
| Rod Type | Best Use | Ease of Use | Amperage Range (3.2mm) |
|---|---|---|---|
| E6013 | General, light work | Easy | 90–140A |
| E7018 | Structural, critical welds | Medium | 110–160A |
| E6011 | Dirty/rusty metal | Medium | 80–130A |
| E6010 | Pipelines, deep penetration | Hard | 70–130A |
If you are learning, start with E6013 or E6011.
6. Faulty Or Low-quality Equipment
Sometimes, the problem is not your skill. Cheap or faulty welding machines do not deliver steady current. Worn-out leads, damaged electrode holders, or poor-quality rods can also cause sticking.
Signs Of Equipment Issues
- The machine hums, but the arc is weak.
- Cables are cracked or very hot.
- The electrode holder is loose or broken.
7. Moisture In Rods
Many rods, especially E7018, absorb moisture from the air. Wet rods form a poor arc and stick often. They also make weak welds.
Prevention
- Store rods in a sealed container.
- Use a rod oven for E7018 types.
- If you do not have an oven, keep rods in their original sealed package and use quickly after opening.
8. Too Slow Travel Speed
Moving the rod too slowly causes the arc to shorten or extinguish. The rod tip may touch the puddle, which makes it stick.
Tip
Practice moving the rod at a steady, even pace. Watch the puddle—not just the rod tip.
9. Trying To Weld With The Wrong Polarity
Welding machines allow you to use DCEN (Direct Current Electrode Negative), DCEP (Direct Current Electrode Positive), or AC (Alternating Current). Each rod type needs a certain polarity.
If you use the wrong polarity, the rod may not start properly or will stick.
Example
E7018 rods need DCEP (reverse polarity). If you use DCEN, the rod will not perform well and may stick often.
10. Using Too Large A Rod For The Metal Thickness
A thick rod on thin metal needs more amperage. If you set the amperage high, you risk burning through the metal. If you set it low, the arc will not form, and the rod sticks.
Guidance
- For 2 mm sheet, use a 2 mm rod at 60–80 amps.
- For 6 mm plate, use a 3.2 mm rod at 110–130 amps.
11. Not Striking The Arc Properly
Starting the arc is a skill. You must either “scratch” or “tap” the rod on the metal to start. If you press too hard or hold it too long, it will stick.
Tip
Practice the motion. Do not press the rod into the metal. Touch lightly and pull back as the arc forms.
12. Loose Or Damaged Electrode Holder
A loose holder cannot grip the rod tightly. It may cause poor electrical contact, resulting in sticking.
What To Check
- The clamp springs are strong.
- The jaws are clean and not burned.
- The cable connection is tight.
13. Welding In Windy Or Damp Conditions
Wind blows away the protective gas created by the rod’s flux. This makes the arc unstable and more likely to stick. Moisture on the metal or in the air can also reduce arc quality.
Advice
- Weld indoors if possible.
- Shield your work if you must weld outside.
- Dry the workpiece before welding.
14. Overheating Or Overusing The Rod
If you hold the arc too long in one spot, the rod overheats. The flux may melt unevenly, and the rod can stick.
Solution
- Keep the rod moving.
- Let the rod cool between welds if it feels too hot.

Credit: www.youtube.com
How To Fix Rod Sticking While Welding
Knowing the cause is important, but you also need clear steps to fix the issue. Here’s a guide to solving each problem.
Step 1: Set The Correct Amperage
Check the rod size and type. Adjust the machine to the recommended range. If you are unsure, start a bit higher and lower it if the rod burns too fast.
Example Amperage Settings
| Rod Diameter (mm) | Recommended Amperage |
|---|---|
| 2.0 | 50–70 |
| 2.5 | 70–110 |
| 3.2 | 90–140 |
| 4.0 | 130–180 |
Step 2: Clean Everything
- Remove rust, oil, and paint from the workpiece.
- Store rods in a dry place; use fresh rods if possible.
- Wipe the rod with a dry cloth before use if you suspect moisture.
Step 3: Secure The Ground Clamp
Attach the clamp to clean, bare metal. Tighten it well. If the clamp is old or damaged, replace it.
Step 4: Use The Right Rod For The Job
If you are new, pick E6013 or E6011. Save E7018 for later, as it needs more skill and dry storage.
Step 5: Hold The Rod Correctly
- Keep a steady angle (10–20 degrees).
- Maintain the right arc length (about the diameter of the rod).
- Use both hands for better control if needed.
Step 6: Check Your Equipment
Inspect cables, holders, and the machine itself. Replace worn parts. Do not use cracked or frayed leads.
Step 7: Practice Arc Striking
Use scrap metal to practice starting the arc. Try both the scratch and tap methods. Develop a light, quick motion.
Step 8: Adjust For Environment
If welding outside, block the wind. Keep the area dry and warm if possible.
Step 9: Choose The Proper Polarity
Check your rod’s requirements. Set the machine to DCEN, DCEP, or AC as needed.
Step 10: Use The Right Rod Size
Pick a rod that matches your metal thickness and the power of your machine.
Advanced Tips That Beginners Miss
Most guides cover the basics, but a few advanced points can make a big difference.
1. Rod Storage And Baking
Many rods, especially E7018, absorb water from the air. Even if the rod looks dry, a small amount of moisture can ruin the arc. Industrial welders store rods in ovens at 250°F (120°C) and only remove what they will use in an hour.
If you do not have a rod oven, keep rods in sealed bags with silica gel packs. If rods get wet, you can “bake” them on a hot plate or in a kitchen oven (not recommended for food use after) at 250°F for 1–2 hours.
2. Machine Duty Cycle
Welding machines have a duty cycle—the time they can weld at a certain amperage before overheating. Cheap machines may drop current if they get too hot, causing rods to stick. If your machine starts well but then arcs get weak, let it cool down for 10–15 minutes.
3. Cable Size And Length
Long or thin welding cables can drop voltage and current. For home welding, keep cables under 10 meters (33 feet) and use cables at least 25 mm² (2 AWG) thick for up to 150A. If you use long cables, increase the thickness.
4. Avoid Cheap Rods
Low-cost rods often have poor-quality flux. This makes starting the arc hard and causes sticking. Use reputable brands if possible.
5. Preheat For Thick Or Cold Metal
Thick or cold metal absorbs heat quickly, making it harder to start an arc. Preheat the workpiece with a propane torch if needed, especially in winter or with heavy plates.
Credit: www.youtube.com
Common Myths About Welding Rods Sticking
Many myths confuse beginners. Here are the facts:
- “Only beginners have this problem.” Even experienced welders face sticking with wrong settings or poor rods.
- “Higher amperage always solves sticking.” Too high can make the rod splatter or burn through metal.
- “All rods work with any polarity.” Not true. Check the packaging for the right setting.
- “Any ground connection will do.” No. Clean, tight ground is essential.
- “Welding outside is the same as inside.” Wind and moisture make arc control much harder.
Preventing Rod Sticking In The Future
You can avoid most sticking by following a routine:
- Check machine settings before every weld.
- Clean your workpiece and rods.
- Use the right rod for your project and skill level.
- Practice arc striking on scrap before starting.
- Keep your equipment in good shape.
- Store rods dry and warm.

Credit: www.arccaptain.com
Why Sticking Matters: Safety And Weld Quality
A sticking rod is not just a nuisance. It affects safety and weld quality.
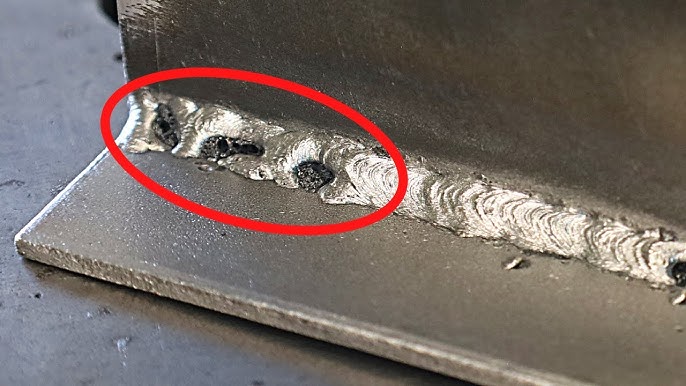
- Safety: Forcing a stuck rod loose can snap it, sending hot pieces flying. A stuck rod can also overheat your holder, increasing fire risk.
- Weld Quality: Sticking interrupts the weld, causing cold starts and weak spots.
Good technique, preparation, and equipment protect both your safety and the strength of your welds.
Troubleshooting Table: Quick Solutions For Sticking Rods
Here’s a summary table for quick reference:
| Problem | Likely Cause | Solution |
|---|---|---|
| Rod sticks at start | Low amperage, dirty metal, poor arc strike | Increase amps, clean metal, practice arc start |
| Rod sticks during weld | Too slow, arc length too short, wrong angle | Move faster, increase arc length, correct angle |
| Rod sticks after a few welds | Wet rods, hot machine, poor ground | Dry rods, cool machine, clean/tighten ground |
| Rod sticks only with certain rods | Wrong polarity or low-quality rods | Check settings, try different brand or type |
Frequently Asked Questions
Why Does My Welding Rod Stick As Soon As I Touch The Metal?
Usually, amperage is too low or the metal is dirty. Increase your machine setting to match the rod size and clean the workpiece. Also, check that your ground clamp is tight and on bare metal.
What Is The Best Rod For Beginners To Avoid Sticking?
E6013 rods are easiest for most beginners. They work well on AC and DC, start easily, and are forgiving with arc length. If you must weld rusty metal, try E6011.
Can A Bad Ground Cause A Welding Rod To Stick?
Yes. A poor ground connection causes low current and weak arc, which makes rods stick. Always clamp to clean, bare metal and check the clamp for damage.
How Can I Tell If My Rods Are Too Wet?
If rods hiss, bubble, or stick often, they may be damp. Good rods strike a clean arc and burn evenly. Store rods dry and warm. If in doubt, heat them in a rod oven before use.
Should I Always Use The Highest Amperage To Stop Rods From Sticking?
No. Too high amperage makes the rod burn too fast, causing spatter and poor control. Always check the rod’s recommended range and adjust for your metal thickness and position.
For more details about welding basics and recommended practices, you can check the Shielded Metal Arc Welding page.
Welding gets easier with practice and the right knowledge. Rod sticking will soon be just a small hurdle as your skills improve. Take care of your equipment, use quality materials, and keep learning—your welds will thank you.