
Disclosure: This post contains affiliate links and I will be compensated if you make a purchase after clicking through my links. Learn More
A welder often suggests increasing amperage to achieve better arc stability, deeper penetration, and improved weld quality—especially when the current setting is too low for the material thickness or electrode size. Proper amperage directly impacts fusion, bead appearance, and overall joint strength.
Welding is both an art and a science. A single setting can make or break the weld. If you’ve ever watched a skilled welder, you know they constantly adjust their machine. One of the most important controls is amperage. Why would a welder suggest turning it up? The answer isn’t just about “more heat.” It’s about making the weld stronger, safer, and more reliable. This article explains the most important reason for increasing amperage—and explores how it impacts everything from penetration and bead shape to overall weld quality. You’ll learn how amperage interacts with electrode size, metal thickness, and welding technique, with clear examples for every skill level.
Understanding Amperage In Welding
Amperage, often called welding current, is the flow of electric charge that melts the electrode and base metal. In arc welding, amperage determines how much heat reaches the weld area. Higher amperage means more heat, deeper penetration, and faster melting. Too little amperage, and the arc sputters or fails to fuse the metal. Too much, and you risk burning through or weakening the joint.
The Relationship Between Amperage And Weld Quality
Weld quality depends on the right balance. Too low, the arc is unstable and the weld sits on top, not fusing properly. Too high, the metal pools excessively, causing a wide, shallow bead or even burning holes. The right amperage ensures full penetration and a consistent, strong weld.
The Main Reason To Increase Amperage: Better Fusion And Penetration
Most welders suggest raising amperage for deeper penetration. Penetration means how far the weld melts into the base metal. Good penetration fuses both pieces completely, making a strong joint. If amperage is too low, the arc barely melts the surface. The bead looks okay on top but doesn’t hold under stress.
When a welder sees poor fusion or a “cold lap”—where the weld metal sits on the surface without bonding—they know amperage is too low. Increasing it melts both the base and electrode, blending them together for a weld that holds.
Example:
Welding 1/4 inch mild steel with a 3/32 inch E6013 rod at 70 amps might produce a weak bead. Raising to 90–100 amps ensures the bead melts deep into the joint, creating a stronger weld.
Key Takeaways:
- Low amperage causes weak, shallow welds.
- Higher amperage gives deep, strong fusion.
- Proper settings depend on material thickness and electrode size.
Other Important Reasons To Increase Amperage
While deep penetration is the main reason, welders have several other practical reasons for suggesting a higher amperage.
1. Improving Arc Stability
An unstable arc makes welding difficult. If the current is too low, the arc flickers or goes out. This causes poor bead shape and lots of spatter. Increasing amperage stabilizes the arc, making it easier to maintain a smooth, steady bead.
2. Matching Electrode Size
Each electrode has a recommended amperage range. Using a large rod at low current makes the arc sputter and the electrode stick. Boosting amperage helps the rod burn smoothly, laying a proper bead without sticking.
3. Speeding Up The Welding Process
Higher amperage allows for faster travel speed. This is useful when welding long joints or working on thick material. You cover more area in less time, increasing productivity without sacrificing quality.
4. Reducing Cold Starts
A “cold start” is when the weld doesn’t fuse at the beginning. This happens at low amperage, especially in SMAW (Stick) welding. Turning up the current helps the arc start hot and strong, producing a clean, fused bead from the start.
5. Handling Contaminants And Coatings
Rust, paint, or scale on steel can block the arc. More amperage helps burn through light surface contaminants, making welding more forgiving in less-than-perfect conditions.
How Amperage Affects Different Welding Processes
Not every welding process responds to amperage the same way. Here’s how amperage plays a role in the most common methods:
Smaw (stick Welding)
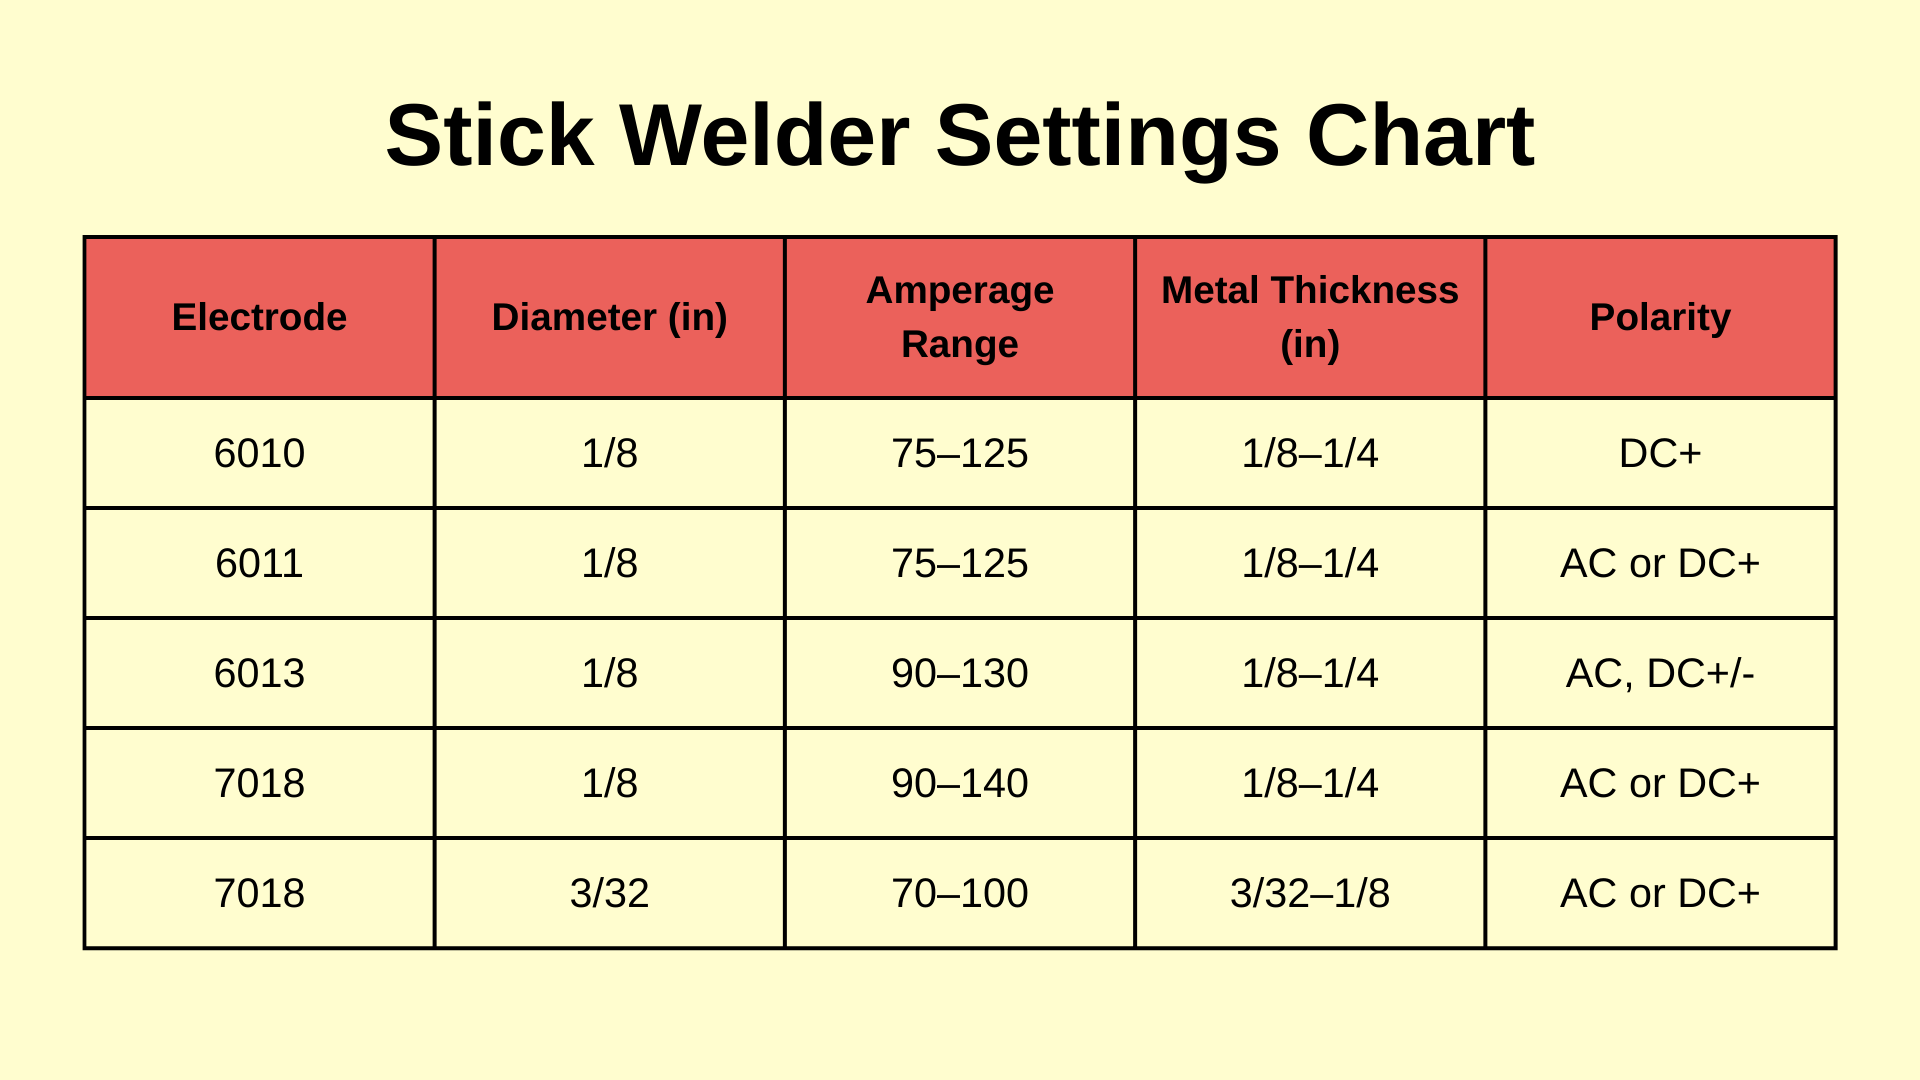
Stick welding relies heavily on the right amperage. Each rod type and diameter requires a specific current range. Too little, and the rod sticks or the arc is rough. Too much, and the bead is wide with excess spatter.
Typical Amperage Ranges For Stick Electrodes
| Electrode Size (inches) | Low Amps | High Amps | Common Materials |
|---|---|---|---|
| 1/16 | 20 | 40 | Thin sheet, auto body |
| 3/32 | 40 | 90 | Light structural |
| 1/8 | 75 | 125 | General steel |
| 5/32 | 110 | 165 | Heavy plate |
Gmaw (mig Welding)
In MIG welding, amperage is set by wire feed speed. Too low, the wire piles up and doesn’t penetrate. Too high, the wire burns back or creates too much spatter. Adjusting amperage (by changing wire speed) is key for each joint and metal thickness.
Gtaw (tig Welding)
TIG welding uses precise amperage control. For thin materials, low amperage prevents burn-through. For thicker metals, higher amperage ensures deep fusion. TIG welders often use a foot pedal to adjust current instantly.
Fcaw (flux-cored Arc Welding)
Flux-cored welding benefits from higher amperage. It produces a hotter arc and deeper penetration, especially with self-shielded wires on structural steel.
Signs That You Need To Increase Amperage
Welders don’t always have a chart in hand. They watch and listen to the weld. Here’s what tells them amperage is too low:
- Arc is unstable: Sputtering, hard to maintain.
- Electrode sticks: Rod keeps freezing to the metal.
- Cold lap or lack of fusion: Bead sits on top, doesn’t melt in.
- Narrow, high bead: Tall bead with little width.
- Porosity or slag inclusion: Gas pockets or trapped slag from poor fusion.
If you notice these signs, it’s time to consider turning up the amps.
Dangers Of Using Too Much Amperage
Just as low amperage causes problems, so does too much. Welders must balance the setting for best results.
Risks of excessive amperage:
- Burn-through: Melting holes in thin metal.
- Wide, shallow beads: Weak joints, poor appearance.
- Excessive spatter: More cleanup, wasted material.
- Distortion: Warping of the workpiece.
- Undercut: Groove along the weld toe, reducing strength.
Always increase amperage gradually and check the results before continuing.
How To Select The Right Amperage
Choosing the right amperage is part science, part experience. Here’s how professionals do it:
1. Check Electrode And Manufacturer Charts
Every electrode package lists recommended amperage. Use this as a starting point, especially for new materials or rod types.
2. Consider Material Thickness
Thicker metal needs more amperage for deep fusion. For most mild steel, a good rule is about 1 amp per 0. 001 inch of thickness.
3. Adjust For Position
Welds made overhead or vertical need less amperage to avoid excess pooling and sagging. Flat position can handle more current.
4. Test And Observe
Run a test bead on scrap. Listen for a smooth crackle, look for a flat, even bead with good penetration. Adjust as needed.
5. Use Welding Machine Features
Modern welders often have digital controls, memory presets, and even auto-sensing for material thickness. Use these tools, but always confirm results visually.
Comparing Low Vs. High Amperage Welds
See how different amperage settings affect the weld:
| Setting | Weld Appearance | Strength | Common Problems |
|---|---|---|---|
| Too Low | High, narrow bead | Weak, poor fusion | Arc instability, sticking |
| Correct | Flat, smooth, even width | Strong, deep fusion | None |
| Too High | Wide, shallow bead | Possible burn-through | Spatter, undercut |

Credit: esab.com
Practical Tips For Adjusting Amperage
Experienced welders use more than charts—they trust their senses. Here’s what works in real shops:
Listen To The Arc
A smooth, steady “bacon frying” sound means the amperage is close. Loud pops or silence signal a problem.
Watch The Bead
A good bead lays flat with gentle edges. If it’s tall and thin, turn up the amps. If it’s wide and sunk, lower the setting.
Check Penetration
After welding, chip off the slag and look at the weld cross-section. Good fusion means both the bead and base metal are melted together.
Use Test Joints
On critical jobs, weld a test joint and cut it to check penetration. This ensures the settings are right before starting production work.
Adjust For Environment
Outdoor welding in wind or cold may need slightly more amperage to maintain arc stability.
Real-world Examples: Why Amperage Changes Everything
Structural Steel Construction
In building construction, welds must pass strict inspection. Using too little amperage risks “cold lap,” a leading cause of weld failure. Inspectors often reject welds that don’t show full penetration. Increasing amperage solves this by ensuring the bead melts deep into the joint.
Automotive Repair
Thin auto body panels require low amperage to prevent burn-through. But for thicker frame repairs, higher amperage is essential for strength and safety.
Pipe Welding
Oil and gas pipelines must have complete fusion for leak-free joints. Welders often start at a lower amperage for the root pass, then increase for fill and cap passes to achieve proper penetration and strength.
Common Mistakes When Adjusting Amperage
Even experienced welders sometimes misjudge amperage. Here’s what to watch for:
- Ignoring electrode recommendations: Always start with the manufacturer’s range.
- Not adjusting for position: Overhead and vertical welds need less current.
- Forgetting about joint fit-up: Gaps require slightly more amperage for full fusion.
- Changing travel speed instead of current: Don’t try to “fix” poor penetration by moving slower—set the right amperage first.
The Science Behind Amperage And Heat Input
Heat input is the energy delivered to the workpiece. It’s calculated as:
Heat Input (Joules) = (Volts × Amps × 60) / Travel Speed (mm/min)
Higher amperage increases heat input, but so does slower travel. Welders must balance both for the best result.
High heat input: Better for thick metal, but can cause warping or grain growth.
Low heat input: Safer for thin or delicate pieces, but risks lack of fusion.
Credit: www.arccaptain.com
Welding Codes And Amperage Requirements
Many industries follow codes from organizations like American Welding Society (AWS) or American Society of Mechanical Engineers (ASME). These codes specify amperage ranges for each process and joint. Following them reduces risk and ensures welds pass inspection.
Example:
AWS D1. 1 for structural steel lists amperage ranges for each electrode and joint type. Welders must document their settings and pass qualification tests.
Innovations In Amperage Control
Modern welders offer more control than ever. Inverter machines, digital displays, and programmable memory let users fine-tune amperage for each job. Some machines even auto-adjust based on arc feedback, making good welds more repeatable.
Faq: Industry Data And Statistics
Welding isn’t guesswork. Industry data backs up the importance of proper amperage:
- Over 60% of weld failures in structural steel are due to lack of fusion, often caused by low amperage.
- AWS studies show that welds with proper penetration are up to 35% stronger than those with surface-only fusion.
- In pipeline work, X-ray inspection often rejects up to 20% of welds for penetration issues linked to low amperage.
Comparing Amperage Across Welding Processes
Amperage recommendations depend on the process and electrode type. Here’s a quick reference:
| Process | Typical Amperage Range | Best Use |
|---|---|---|
| SMAW (Stick) | 30–200 A | General steel, outdoors |
| GMAW (MIG) | 40–350 A | Thin to thick steel, aluminum |
| GTAW (TIG) | 5–250 A | Thin sheet, precise work |
| FCAW | 75–400 A | Heavy plate, construction |

Credit: www.ebay.com
The Bottom Line: Why Amperage Matters
Every welder’s goal is a safe, strong, and visually appealing joint. Amperage is the most important setting for achieving this. When a welder suggests increasing amperage, it’s not just a guess—it’s based on years of experience, industry standards, and a deep understanding of how metal fuses. Proper amperage gives you:
- Deep penetration for strong welds
- Stable arc and smooth bead
- Fewer defects and less rework
Trust the advice to turn up the amps—your welds and your safety depend on it.
For more technical standards, visit the American Welding Society D1.1 Code.
Frequently Asked Questions
What Happens If I Use Too Low Amperage For Welding?
If amperage is too low, the weld will not penetrate the base metal, causing weak joints and poor fusion. The arc may be unstable, and the electrode can stick. Always check for proper bead shape and fusion to ensure strength.
How Do I Know If My Amperage Setting Is Correct?
A correct amperage setting produces a flat, even bead with good penetration and a steady, crackling arc sound. If the bead is tall or the arc sputters, adjust the amperage and test until results improve.
Can Higher Amperage Improve Welding Speed?
Yes, higher amperage allows for faster travel speed, which increases productivity. But you must balance speed with control to avoid burning through or creating shallow welds. Always test for quality before increasing speed.
Is It Safe To Always Increase Amperage For Thicker Materials?
Generally, thicker materials need more amperage for deep penetration. But too much current can cause burn-through or warping. Follow electrode guidelines and use test welds on scrap material to find the safest setting.
Why Do Different Electrodes Need Different Amperage?
Each electrode type and size melts at a specific rate and is designed for a certain current range. Using the correct amperage ensures proper arc stability, bead appearance, and weld strength for each application.

