Disclosure: This post contains affiliate links and I will be compensated if you make a purchase after clicking through my links. Learn More
Welding is a skill that shapes buildings, cars, machines, and even art. The right tools matter, but understanding your welding machine’s amperage is key for strong, safe welds. For many, amperage sounds technical and confusing. But if you get this part wrong, you can damage metal, create weak joints, or even risk your safety.
This guide explains welding machine amperage in simple language. You will learn how to choose the correct amps for your job, how different factors affect your settings, and how to avoid mistakes that most beginners make.
What Is Welding Machine Amperage?
Amperage in welding is the measure of electric current that flows through the welding machine and the workpiece. Think of amps as the “strength” of the electricity. Higher amps create more heat, which melts metal faster and deeper. Lower amps make a smaller, cooler arc. The right amperage helps you control penetration, bead shape, and the strength of the weld.
Every welding machine has a range of amperage it can deliver. You set this using a dial, button, or digital control. The correct setting depends on the welding process, material thickness, and the electrode or wire you use.
Why Is Amperage So Important In Welding?
If you use the wrong amperage, even the best technique cannot save your weld. Too much heat can burn through thin metal or make the weld too wide and weak. Too little heat can result in poor fusion, a high bead, or a weld that breaks under stress.
Correct amperage makes the weld bead look good, hold strong, and resist cracks. It also helps you work faster and reduces defects. Many new welders focus on technique but ignore the amperage, which often leads to frustration.
Factors That Affect Welding Amperage Choice
Several things influence the amperage you need for welding. Missing any of these can create problems.
1. Material Type
Steel, stainless steel, and aluminum each conduct heat differently. Steel holds heat well, so it needs less amperage than aluminum, which loses heat quickly. Stainless steel sits between the two, requiring careful control to avoid warping or burn-through.
2. Material Thickness
Thicker metal needs higher amperage to melt through. Thin sheets require lower amps to avoid burning holes. A rule many welders use is “1 amp per 0. 001 inch (0. 025 mm) of steel thickness. ” For example, for a 1/8″ (0.
125″) steel plate, you would set roughly 125 amps.
3. Welding Process
Different processes need different amperage ranges:
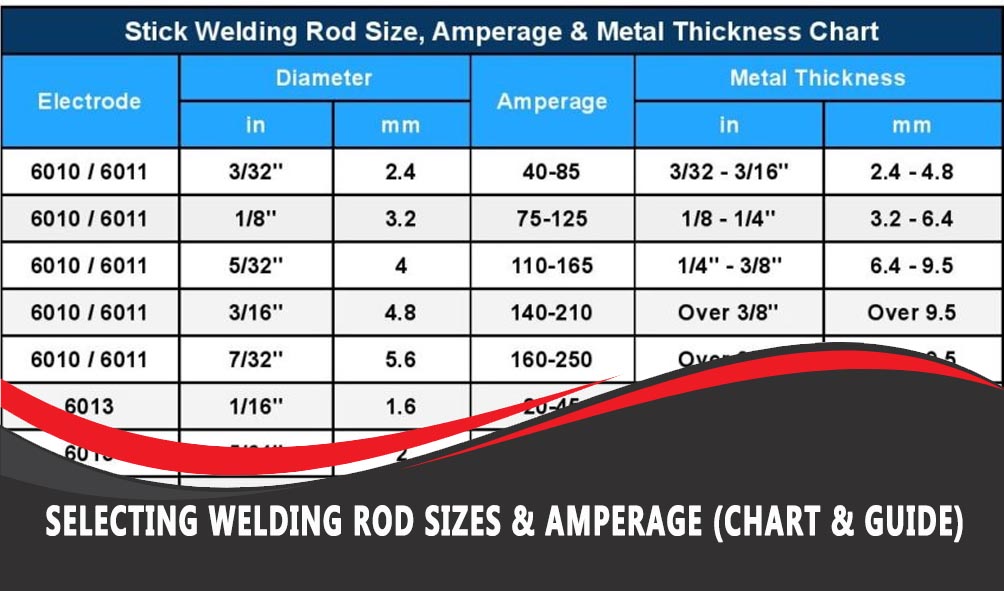
- Stick welding (SMAW): 40–300 amps, depending on rod and metal
- MIG welding (GMAW): 30–400 amps, depending on wire and metal
- TIG welding (GTAW): 5–250 amps, often lower for thin metals
4. Electrode Or Wire Size
A thicker electrode or wire can carry more current. Using a rod that is too thin for your amperage can cause it to overheat or burn away. Always match the size to the amps.
5. Joint Type And Position
Welding overhead or vertical joints often needs less amperage to avoid drips. Flat joints can handle more heat because gravity helps control the molten pool.
6. Desired Penetration
Deeper penetration means stronger welds but increases the risk of burning through. Shallow penetration may not join the metals well. Adjust amperage to balance these needs.
How To Set Welding Machine Amperage
Setting the amperage correctly is a practical skill. Here are steps you can use:
- Check the machine’s range. Find the minimum and maximum amps your machine provides.
- Read the electrode or wire label. Manufacturers often print the best amperage range.
- Measure the material thickness. Use a caliper, gauge, or chart.
- Use a guide chart. Most machines include one for common materials and rods.
- Start in the middle. Set your amps to the center of the recommended range.
- Test on scrap metal. Weld a short bead and check the results.
- Adjust as needed. Increase amps if you lack penetration or the arc sticks. Decrease if you burn through or the bead is too wide.
Typical Amperage Ranges For Common Welding Processes
You can use reference ranges for most everyday welding. The following table compares some common processes, electrodes, and their typical amperage needs.
| Welding Process | Electrode/Wire Size | Material Thickness | Amperage Range |
|---|---|---|---|
| Stick (E6013) | 2.5 mm (3/32″) | 2–5 mm | 80–110 A |
| Stick (E6011) | 3.2 mm (1/8″) | 3–8 mm | 90–140 A |
| MIG (Solid Wire) | 0.8 mm (0.030″) | 1–4 mm | 70–150 A |
| TIG (Tungsten) | 1.6 mm (1/16″) | 1–3 mm | 30–80 A |
These are starting points. Always test before working on your final piece.
How To Match Amperage To Electrode Or Wire Size
Electrodes and wires come in different sizes. Each size has a safe current range. Using the wrong amps can cause poor welding or damage your tools. Below is a simple reference for some common stick electrodes.
| Electrode Size (mm/inch) | Recommended Amps (A) |
|---|---|
| 2.0 mm (5/64″) | 40–70 |
| 2.5 mm (3/32″) | 60–90 |
| 3.2 mm (1/8″) | 100–130 |
| 4.0 mm (5/32″) | 120–160 |
| 5.0 mm (3/16″) | 140–200 |
Always check the packaging or the manufacturer’s guide, as some special electrodes need different settings.
Amperage And Material Thickness: Quick Guide
Choosing the right amperage for metal thickness is one of the most common questions. Here’s a quick overview for mild steel with MIG welding:
| Material Thickness (mm/inch) | MIG Wire Size (mm/inch) | Recommended Amps (A) |
|---|---|---|
| 1.0 mm (0.040″) | 0.6 mm (0.023″) | 40–60 |
| 2.0 mm (0.080″) | 0.8 mm (0.030″) | 70–100 |
| 3.0 mm (0.120″) | 0.9 mm (0.035″) | 90–140 |
| 6.0 mm (0.240″) | 1.2 mm (0.045″) | 160–200 |
This helps you set up quickly, but always adjust based on your own tests.
Common Mistakes With Welding Machine Amperage
Beginners often make similar mistakes. Avoiding these helps you improve faster.
Setting Amps Too High
Many think more amps mean stronger welds. But too much current can:
- Burn through thin metal
- Cause large, ugly beads
- Increase spatter
- Weaken the weld with excess heat
Setting Amps Too Low
Too little current can also cause problems:
- Rod sticks to metal
- Poor penetration
- High, narrow beads
- Weak joints that break easily
Ignoring The Electrode Or Wire Type
Some rods, like E7018, need more amps than E6013 of the same size. Check the data sheet, not just the size.
Not Testing On Scrap
Always test your settings on a similar piece of scrap. This helps you adjust for fit-up, position, and power supply changes.
Not Adjusting For Position
Welding overhead or vertical? Lower your amps by 10–15% to avoid drips and sagging beads.
Forgetting About Duty Cycle
Welding machines have a duty cycle—how long they can weld at a certain amperage before overheating. For example, a 60% duty cycle at 150A means you can weld for 6 minutes in a 10-minute period. Exceeding this can damage your machine or cause shutdowns.
How To Calculate The Right Amperage
You do not always need a calculator, but some simple rules help.
- Stick Welding (SMAW): 1 amp per 0.001″ (0.025 mm) of electrode diameter. For a 1/8″ (0.125″) rod, start at 125 amps.
- MIG Welding (GMAW): 1 amp per 0.001″ (0.025 mm) of material thickness.
- TIG Welding (GTAW): 1 amp per 0.001″ (0.025 mm) of tungsten diameter, but often set lower for thin metals.
These are starting points. Always adjust based on your results.
Practical Examples For Setting Amperage
Example 1: Welding A 3 Mm Mild Steel Plate With Stick (e6013)
- Electrode: 2.5 mm (3/32″)
- Material: 3 mm (0.12″) mild steel
- Start at 90 amps
- Test on scrap: If the rod sticks, increase to 100A; if you burn through, drop to 80A.
Example 2: Mig Welding 1.5 Mm Car Body Panel
- Wire: 0.8 mm (0.030″) solid
- Material: 1.5 mm (0.060″) steel
- Start at 60 amps
- Test and adjust for good bead and penetration
Example 3: Tig Welding Thin Stainless Steel
- Tungsten: 1.6 mm (1/16″)
- Material: 1 mm (0.040″) stainless
- Start at 30 amps
- Use a short arc to avoid overheating
Amperage Settings For Different Metals
Different metals need different settings due to their conductivity and melting points.
Mild Steel
Most forgiving. Use standard guides and adjust as needed.
Stainless Steel
Requires careful heat control. Too much heat causes warping and discoloration. Lower amps and shorter welds help.
Aluminum
Needs higher amps because it dissipates heat quickly. Often, AC machines with high-frequency start are used.
How Amperage Affects Weld Quality
Amperage changes:
- Penetration: Higher amps melt deeper into the metal.
- Bead Shape: Low amps create high, narrow beads; high amps create wide, flat beads.
- Spatter: Too much amperage can increase spatter, especially with MIG.
- Porosity: Incorrect amps can create holes in the weld, especially with improper technique.
You can spot amperage mistakes by looking at your finished welds. Practice helps you recognize good signs—a smooth, even bead with good fusion.

Credit: bakersgas.com
Safety And Amperage
High amperage means more heat and higher risks. Always:
- Wear proper safety gear (gloves, helmet, jacket)
- Keep the work area dry and clean
- Never touch the electrode or wire while welding
- Let your machine cool if you reach its duty cycle
How To Choose A Welding Machine By Amperage
Before you buy, consider these points:
- Maximum Metal Thickness: Choose a machine with enough amps for your thickest job.
- Welding Process: Stick, MIG, and TIG have different amperage needs.
- Power Supply: 110V machines offer up to 140A—good for thin steel. 220V machines go higher and handle thicker work.
- Duty Cycle: A higher duty cycle is better for long welds or production work.
- Portability: Small machines with lower amps are easier to move but have limits.
If you mostly weld car panels or thin steel, a 140A machine is enough. For farm repairs or heavy steel, consider 200A or more.
Credit: www.perfectwelders.com
Amperage Myths And Non-obvious Insights
Many believe “more amps = better welds. ” This is wrong. The right amperage is about matching your metal, electrode, and position.
Another common oversight: Voltage also matters. Amperage controls heat, but voltage affects arc length and bead shape. For MIG, you must balance both. Many new welders set one and ignore the other, causing poor results.
A third overlooked detail: Extension cords reduce amperage. Long or thin cords cause voltage drop, which lowers the amps your machine gets. Always use thick, short cords for full power.
Tips For Finding The Best Amperage
- Start low, increase slowly. It’s easier to add heat than fix a burnt part.
- Keep notes. Write down successful settings for future reference.
- Ask experienced welders. Many have personal tips for your machine or material.
- Watch and listen. A smooth, steady arc usually means good amperage.
- Clean your metal. Dirt or rust can change the way your arc behaves.
How To Read Amperage On Digital And Analog Machines
Modern machines often have digital displays. These show the exact amps. Older machines use a dial and a scale. For best results:
- Set the dial to the recommended value.
- Weld a test bead.
- Adjust until you get a smooth, even arc and the right bead shape.
If you hear the arc sputter or see the electrode stick, raise the amps a little. If the bead is too wide, lower them.
Troubleshooting Common Amperage Problems
Arc Keeps Going Out
- Increase amperage
- Check for poor ground or dirty metal
Electrode Sticks
- Raise amperage
- Use correct rod angle and movement
Burn-through
- Lower amperage
- Move faster or use a thicker rod
Bead Too Narrow Or High
- Raise amperage slightly
- Slow down your travel speed
Practical Table: Quick Amperage Reference For Popular Jobs
| Job Type | Material | Electrode/Wire | Amps |
|---|---|---|---|
| Car body repair | 1 mm steel | 0.8 mm MIG | 40–60 |
| Farm gate repair | 3 mm steel | 2.5 mm stick | 80–100 |
| Heavy machinery | 10 mm steel | 4.0 mm stick | 140–160 |
| Pipe welding | 6 mm steel | 3.2 mm stick | 110–140 |
Advanced Amperage Control: Pulse And Synergic Welding
Some modern machines have pulse or synergic modes. These automatically adjust amperage to match voltage, wire speed, or material. This makes welding easier for thin metals or aluminum. If your machine offers this, read the manual and use the presets—they can save time and reduce errors.

Credit: www.arccaptain.com
Using Amperage Charts And Calculators
Many manufacturers offer free amperage charts or calculators. These help you match your machine, electrode, and metal. You can find reliable guides on official welding websites or in your machine’s manual. For more details, see this Wikipedia article on arc welding.
Final Thoughts
Mastering welding machine amperage is one of the most important skills for strong, clean welds. It is not about guessing or luck. Start with manufacturer recommendations, test on scrap, and adjust based on your results. Pay attention to material, process, and position.
With practice, you will recognize the right amperage by the way the arc sounds and the bead looks. Understanding these basics helps you avoid mistakes and work safely. The right amperage makes every weld better, saves time, and protects your tools.
Frequently Asked Questions
What Happens If I Use Too Much Amperage When Welding?
Too much amperage can burn through thin metal, create wide and weak welds, and increase spatter. It can also overheat your electrode or wire, causing poor weld quality. Always start with the recommended range and adjust as needed.
How Do I Know What Amperage To Set For My Welding Job?
Check the electrode or wire packaging for recommended settings. Use the “1 amp per 0. 001 inch of thickness” rule as a starting point. Test your settings on scrap and adjust for a smooth arc and good bead.
Does The Voltage Setting Affect Amperage?
Yes, especially in MIG and TIG welding. Voltage controls arc length and bead shape, while amperage controls heat. Both must be balanced for good results. For stick welding, voltage is less adjustable and mainly set by the machine.
Can I Weld Thick Metal With A Low Amperage Machine?
You can weld thin metal with a high-amperage machine by turning down the settings. But you cannot weld thick metal with a low-amperage machine. The current will not be enough to melt the metal deeply and create a strong joint.
Why Does My Welding Machine Keep Shutting Off During Use?
Your machine is likely reaching its duty cycle. This is a built-in safety feature to prevent overheating. Let the machine cool down before restarting, or reduce the amperage to stay within the safe time limit.