Disclosure: This post contains affiliate links and I will be compensated if you make a purchase after clicking through my links. Learn More
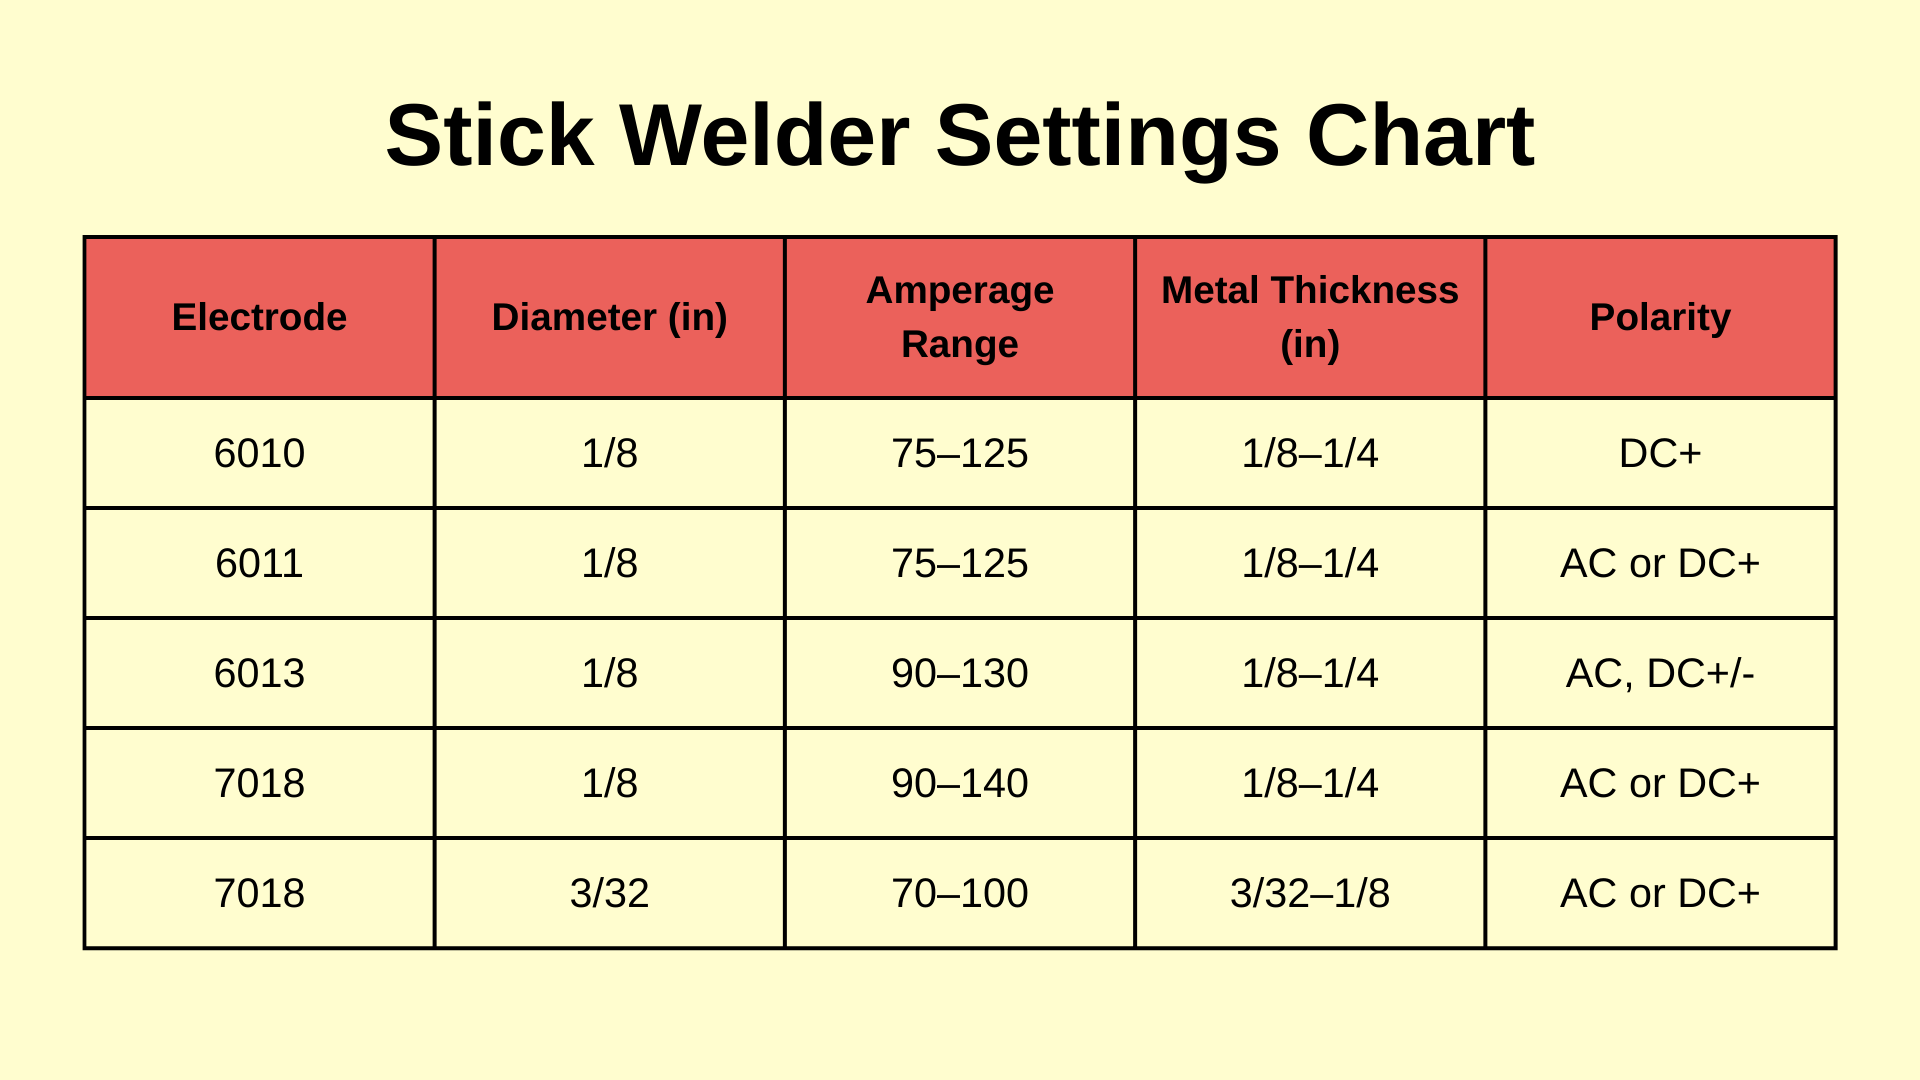
Welding is a skill that often looks simple but relies on many technical details. One of the most important details in stick welding—also called Shielded Metal Arc Welding (SMAW)—is choosing the right amperage for the metal thickness you are working with. The amperage you set on your welder affects not only how deep the weld penetrates but also how smooth and strong the weld will be. Too little amperage, and your weld sits on the surface. Too much, and you risk burning holes in your workpiece. For beginners, the relationship between metal thickness, electrode size, and amperage can be confusing, especially when you see so many charts and numbers. This article will guide you through the key points and give you a practical metal thickness stick welding amperage chart. You will learn how to use it, why it matters, and how to make better welds every time.
What Is Stick Welding And Why Amperage Matters
Stick welding is a popular method for joining metals. It uses a stick-shaped electrode covered with flux, which melts and protects the weld from air. The process is flexible and works well outdoors or on rusty or painted metal. But there is one thing you must control carefully: the amperage.
Amperage is the electric current that passes through the welding circuit. It controls how much heat is created at the weld point. More amperage means more heat. Less amperage means less heat. The right setting depends on three main things:
- Metal thickness
- Electrode size and type
- Welding position
If your amperage is too low, you get a cold weld with poor penetration. If it is too high, you can burn through the metal, create excess spatter, or damage the electrode. Both extremes make weak or ugly welds.
The Relationship Between Metal Thickness And Amperage
The thickness of the metal directly affects the amperage you need. Thin metal heats up quickly and can melt or warp if you use too much current. Thick metal needs more heat to reach the right temperature for a solid weld.
As a general rule:
- Thin metal (under 1/8 inch): Use lower amperage.
- Medium thickness (1/8 to 1/4 inch): Use moderate amperage.
- Thick metal (over 1/4 inch): Use higher amperage.
But this rule is not enough on its own. You must also choose the right electrode size for the thickness and match your amperage to that. Each electrode type and size has a recommended amperage range.
How To Read And Use A Metal Thickness Stick Welding Amperage Chart
A metal thickness stick welding amperage chart is a simple tool. It shows you the right range of amperage for different electrode sizes and metal thicknesses. Here is how to use it:
- Find the thickness of the metal you want to weld.
- Choose the electrode size that matches the metal thickness.
- Set your welder to an amperage in the recommended range.
Let’s look at a sample chart. This will help you see the relationship between these variables.
| Metal Thickness (inches) | Electrode Size (inches) | Recommended Amperage (amps) |
|---|---|---|
| 1/16 | 3/32 | 40-70 |
| 1/8 | 1/8 | 90-150 |
| 1/4 | 5/32 | 110-180 |
| 3/8 | 3/16 | 140-210 |
| 1/2 | 1/4 | 200-275 |
You can see that as the metal thickness increases, both the electrode size and amperage increase. Always check the packaging of your electrodes for the recommended amperage range, as different brands or types can vary.
Common Stick Welding Electrodes And Their Amperage Ranges
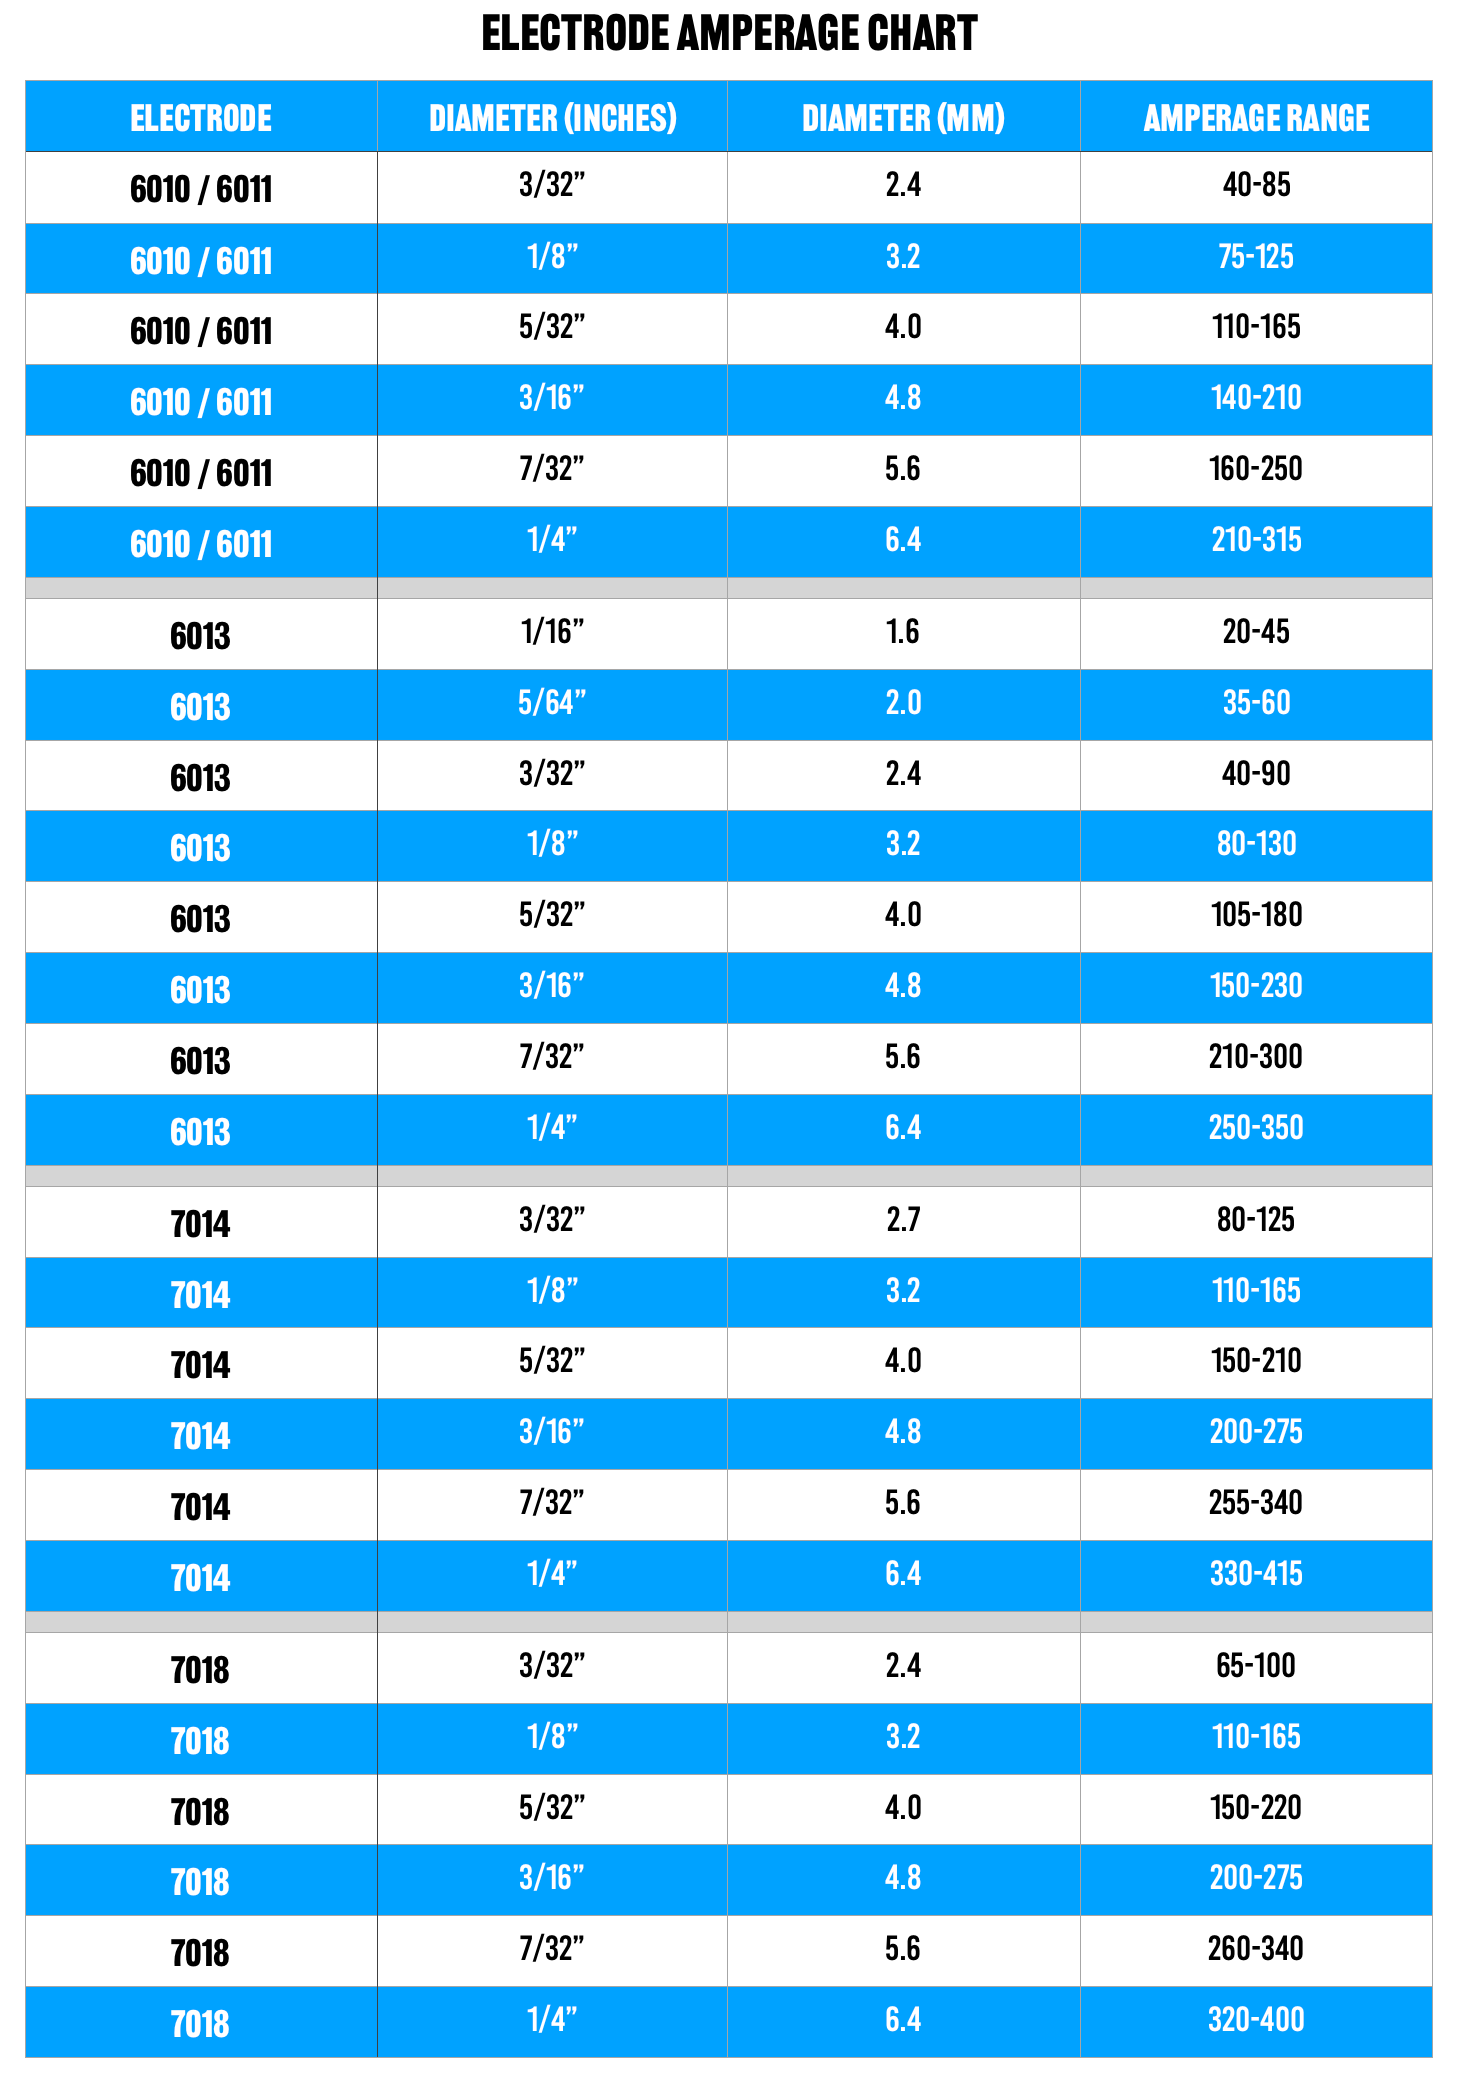
Stick welding uses several types of electrodes, but the most popular ones are E6010, E6011, E6013, and E7018. Each has its own best uses and amperage settings.
| Electrode Type | Common Sizes (in) | Amperage Range (amps) | Best Use |
|---|---|---|---|
| E6010 | 1/8, 5/32 | 75-160 | Pipes, deep penetration |
| E6011 | 1/8, 5/32 | 75-140 | Rusty or dirty metal |
| E6013 | 1/16, 3/32, 1/8 | 40-130 | Thin metal, smooth finish |
| E7018 | 3/32, 1/8, 5/32 | 80-180 | Structural steel, high strength |
Choosing the right electrode is as important as choosing the right amperage. For example, E6013 works well on thin, clean metal and at lower amperage. E7018 gives strong welds on thicker, structural steel and needs higher amperage.
Practical Steps For Setting The Right Amperage
Getting the right settings is not only about reading a chart. Real welding conditions often change. Here are steps to help you find the best amperage for your job:
- Check your electrode packaging. It lists the recommended amperage range.
- Set your welder to the middle of the range. This is usually a good starting point.
- Strike an arc and observe. If the arc is hard to start or the weld sits on the metal, turn up the amperage. If the electrode burns too fast, spatter increases, or the metal burns through, lower the amperage.
- Listen to the sound. A good setting produces a steady, crisp sound (like frying bacon). Too low, and the arc is weak. Too high, and it crackles or hisses.
- Check the weld bead. It should be smooth, not too wide or too thin, and should penetrate the metal without burning through.
Pro tip: Weld a few practice beads on scrap metal of the same thickness before working on your real project.
Amperage Chart For Different Metal Thicknesses
While the earlier table gave you a basic idea, here’s a more detailed chart covering a wider range of thicknesses, electrode sizes, and recommended amperages. This chart is based on common electrode types like E6013 and E7018.
| Metal Thickness (inches) | Electrode Size (inches) | Recommended Amperage (amps) |
|---|---|---|
| 1/16 (1.6mm) | 1/16 | 20-40 |
| 3/32 (2.4mm) | 3/32 | 40-90 |
| 1/8 (3.2mm) | 1/8 | 90-140 |
| 5/32 (4.0mm) | 5/32 | 110-180 |
| 3/16 (4.8mm) | 3/16 | 140-210 |
| 1/4 (6.4mm) | 1/4 | 200-275 |
Beginner insight: Many new welders use too much amperage on thin metal, causing burn-through. If you are unsure, start on the lower end of the range and increase slowly.
Factors That Affect Amperage Choice
Charts are very helpful, but real-life welding often requires adjusting settings. Here are some factors that can change your amperage needs:
Type Of Metal
- Mild steel is the most common and works well with standard settings.
- Stainless steel usually needs a bit less amperage because it heats up faster.
- Cast iron and aluminum require special electrodes and different settings.
Welding Position
- Flat position (on a bench): You can use the full recommended amperage.
- Vertical or overhead: Lower the amperage by 10–15% to prevent the molten metal from dripping.
Electrode Type And Brand
Different electrode brands or types (for example, low hydrogen vs. rutile) may need slightly different amperage. Always check the specific recommendation for your electrodes.
Power Supply
Some welders use AC (alternating current), and others use DC (direct current). DC usually gives a smoother arc and may let you use slightly lower amperage.
Joint Design
If you are welding a tight joint, you may need less amperage. If there is a gap, you may need more to fill it.
Welding Speed
A faster travel speed means less heat input, so you might need more amperage. Slower speed puts in more heat, so less amperage can work.
Non-obvious tip: Temperature and humidity in your workspace can also affect how the metal responds to heat. Cold metal takes more energy to heat up, so you might need to increase your amperage in winter.
Step-by-step Guide: Matching Metal Thickness To Amperage
Let’s put theory into practice. Here is a step-by-step method you can follow for any stick welding project.
- Measure the metal thickness. Use a caliper or metal gauge if you are unsure.
- Select the electrode type. Use E6013 or E7018 for most mild steel jobs.
- Check the chart for electrode size and amperage range. Match the electrode size to the metal thickness.
- Set your welder to the starting amperage. Use the middle of the recommended range.
- Weld a test bead. Observe the arc, sound, and weld bead.
- Adjust as needed. If the arc is weak, increase amperage. If there is too much spatter or burning, decrease it.
- Repeat on scrap until satisfied. Only start your real weld when the test bead looks right.
This method works for most jobs, whether you are patching a fence, repairing farm equipment, or building a trailer.
Credit: bakersgas.com
Example: Welding 1/8 Inch Mild Steel With E6013
Suppose you have a piece of 1/8 inch (3.2mm) mild steel and want to weld with E6013 electrodes.
- Electrode size: 1/8 inch (3.2mm)
- Recommended amperage: 90–140 amps
Set your machine to about 115 amps. Weld a short bead. If the arc feels sluggish or sticks, turn it up to 125 amps. If the bead becomes too wide or you see a lot of spatter, drop back to 110 amps.
In most cases, you will find the best setting within 10 amps of the middle value.
Matching Electrode Size To Metal Thickness
Choosing the right electrode size is as important as setting the correct amperage. Here are some guidelines for matching electrode size to metal thickness:
- For metal less than 1/8 inch (3.2mm), use a 3/32 inch (2.4mm) electrode.
- For 1/8 inch (3.2mm) to 1/4 inch (6.4mm) metal, use a 1/8 inch (3.2mm) or 5/32 inch (4.0mm) electrode.
- For over 1/4 inch (6.4mm), use 5/32 inch (4.0mm) or larger.
Using a too-large electrode on thin metal makes it hard to control the weld and increases the risk of burn-through. A too-small electrode on thick metal cannot deliver enough heat for proper penetration.

Credit: www.arccaptain.com
Amperage Settings For Common Stick Welding Electrodes
Here is a quick guide to popular electrode sizes and their typical amperage ranges:
| Electrode Size (inches) | E6010 (amps) | E6011 (amps) | E6013 (amps) | E7018 (amps) |
|---|---|---|---|---|
| 1/16 | 20-40 | 20-40 | 20-40 | Not common |
| 3/32 | 40-85 | 40-90 | 40-90 | 70-110 |
| 1/8 | 75-125 | 75-125 | 90-140 | 90-160 |
| 5/32 | 110-170 | 110-170 | 110-180 | 120-200 |
| 3/16 | 140-210 | 140-210 | 140-210 | 150-250 |
Always check the packaging for your specific electrode, as recommendations may vary. If you are unsure, use the lower end of the range and adjust upward.
Special Cases: Thin Metal And Critical Welds
Welding thin metal (under 1/8 inch or 3mm) is challenging. Too much amperage will burn holes. Too little, and the weld will sit on top without fusing.
Tips for thin metal:
- Use smaller electrodes (1/16 or 3/32 inch).
- Set your machine to the lowest amperage that will keep the arc going.
- Use short welds (“tack welds”) to avoid overheating the metal.
- Let the metal cool between passes.
For critical welds (like structural supports), always weld a test piece, cut it open, and inspect the penetration. Good penetration means the weld goes deep into both pieces of metal, not just sitting on the surface.
Beginner insight: Many new welders forget to let the metal cool between passes on thin work. This causes warping or burn-through. Short welds and patience give better results.
Common Mistakes When Matching Amperage To Metal Thickness
Even with a chart, mistakes happen. Here are the most common errors:
- Using the wrong electrode size for the metal thickness. Too big causes burn-through, too small means poor fusion.
- Ignoring the position. Overhead and vertical welding need less amperage.
- Not adjusting for joint gaps. Open joints need more heat.
- Forgetting electrode brand differences. Always check packaging.
- Skipping test welds. Always weld a test bead on scrap metal first.
Non-obvious tip: Sometimes, new welders blame their skills when the real problem is simply the wrong amperage setting. Always check your settings if you struggle.
Signs Your Amperage Is Too High Or Too Low
It is easy to spot amperage problems once you know the signs.
Too low amperage:
- Arc is hard to start or keeps going out.
- Electrode sticks to the metal.
- Weld bead is high and narrow (sits on the surface).
- Poor penetration.
Too high amperage:
- Excessive spatter.
- Weld bead is too wide and flat.
- Metal burns through or holes form.
- Electrode melts too fast or becomes red hot.
If you see these signs, stop and adjust your amperage.
Adapting To Different Welders And Power Sources
Not all welders are the same. Some older machines may not have fine amperage adjustment, while newer digital inverters allow very precise control. Always use the best settings for your machine.
- Transformer welders are less precise but very durable.
- Inverter welders are lighter, more efficient, and allow finer amperage adjustment.
If you use a generator or extension cord, make sure your power supply is stable. Low voltage can affect amperage and weld quality.
Safety First: Why Proper Amperage Prevents Accidents
Using the right amperage is not just about good welds; it is about safety. Too much heat can cause sparks, flying molten metal, and even fires. Too little heat can make weak welds that break when stressed.
Always wear proper safety gear: welding helmet, gloves, and long sleeves. Keep a fire extinguisher nearby.
Credit: www.arccaptain.com
Recommended Resources
If you want to go deeper, check out the American Welding Society guidelines on amperage and electrode selection. You can also find more technical details from Lincoln Electric, a trusted name in welding.
Frequently Asked Questions
What Happens If I Use Too High An Amperage For Thin Metal?
If you use too much amperage on thin metal, you will likely burn holes through the workpiece. The weld may also become too wide and flat, and you will see a lot of spatter. This weakens the joint and can ruin your project.
Always use the lowest possible amperage that still allows a stable arc.
Can I Use The Same Amperage For All Electrode Types?
No, different electrode types need different amperage settings, even if they are the same size. For example, E6010 and E7018 both come in 1/8 inch size, but E6010 usually needs less amperage. Always check the recommended range for your specific electrode.
How Do I Know If My Amperage Is Set Correctly?
You will know your amperage is correct if the arc starts easily, the electrode does not stick, and the weld bead is smooth with good penetration. Listen for a steady “frying” sound. If you see too much spatter or burn-through, lower the amperage.
If the arc is weak or the bead is too high, increase it.
Do I Need To Change Amperage For Vertical Or Overhead Welding?
Yes, you should reduce your amperage by about 10–15% when welding in vertical or overhead positions. This helps control the molten metal and prevents it from dripping out of the joint.
Is It Better To Start At The High Or Low End Of The Amperage Range?
It is safer to start at the low end of the recommended range and increase as needed. This prevents damage to the metal and allows you to find the best setting for your project. Always test on scrap metal first.
Welding is both an art and a science. Using the right amperage for your metal thickness is one of the simplest ways to improve your results. With practice, you will get a feel for the right settings and produce stronger, cleaner welds every time.