Disclosure: This post contains affiliate links and I will be compensated if you make a purchase after clicking through my links. Learn More
To wire a 4 prong generator plug, connect the four wires to the corresponding terminals: L1, L2, Neutral, and Ground. Ensure each wire is securely fastened and properly insulated.
Wiring a 4 prong generator plug is essential for safely connecting your generator to your home or appliances. This process involves connecting four distinct wires to their respective terminals: L1 (hot), L2 (hot), Neutral, and Ground. Each terminal has a specific function, which ensures the safe and effective transfer of electricity.
Proper wiring is crucial to avoid electrical hazards and ensure the generator operates efficiently. Always use the correct tools and follow safety guidelines to complete the task. Consulting a professional electrician can also be beneficial if you are unsure about the process.

Tools And Materials
Before wiring a 4-prong generator plug, gather the required tools and necessary materials. Being prepared ensures a smoother and safer process.
Required Tools
- Screwdrivers – Both flathead and Phillips screwdrivers.
- Wire Strippers – For removing insulation from wires.
- Voltage Tester – To check electrical connections.
- Pliers – For gripping and bending wires.
- Utility Knife – For precise cutting of wire sheathing.
Necessary Materials
- 4-Prong Generator Plug – The plug to connect to the generator.
- Electrical Wire – Ensure it matches your generator’s specifications.
- Electrical Tape – For securing wire connections.
- Wire Nuts – To safely cap wire ends.
- Cable Clamps – For holding wires in place.
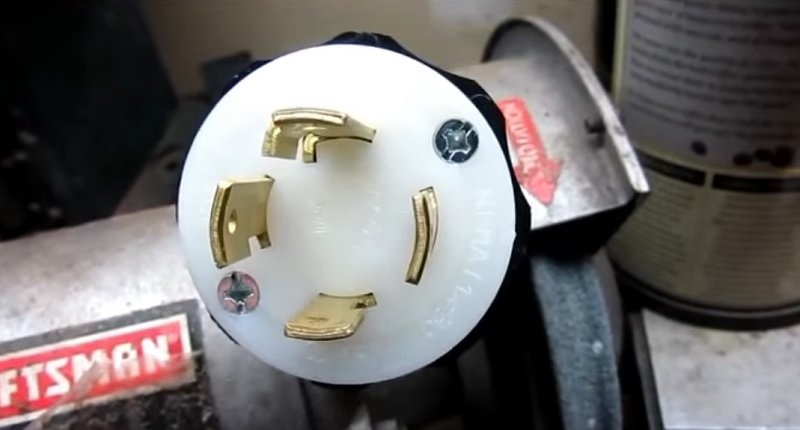
Understanding The 4 Prong Plug
Understanding the 4 prong plug is essential for safe generator use. This plug connects generators to home electrical systems. It offers a secure and reliable connection.
Components Of The Plug
The 4 prong plug has four main components:
- Hot Wire 1 (H1): This carries the first hot current.
- Hot Wire 2 (H2): This carries the second hot current.
- Neutral Wire (N): This returns the current to the source.
- Ground Wire (G): This provides safety by grounding excess electricity.
How It Differs From Other Plugs
The 4 prong plug differs from 3 prong plugs in several ways:
| Feature | 4 Prong Plug | 3 Prong Plug |
|---|---|---|
| Number of Wires | Four | Three |
| Safety | Higher | Lower |
| Connection Stability | More Stable | Less Stable |
Preparing For Wiring
Before you start wiring a 4 prong generator plug, you need to prepare. Proper preparation ensures safety and efficiency. Follow these steps carefully for a smooth process.
Turning Off The Generator
First, ensure the generator is off. This is crucial to avoid accidents. Unplug any devices connected to the generator. Wait until the generator cools down. This prevents burns and injuries.
Inspecting The Plug
Next, inspect the 4 prong plug. Check for any damage or wear. A damaged plug can be dangerous. Replace it if you find any issues. Make sure all prongs are intact and firm.
Here’s a quick checklist for inspecting the plug:
- Check for visible cracks or breaks.
- Ensure prongs are not bent.
- Look for signs of corrosion.
- Confirm the plug fits securely in the outlet.
If the plug passes inspection, you can proceed. If not, get a new plug from a reliable source.
Gathering Tools And Materials
Prepare the necessary tools and materials. You will need:
- Wire cutters
- Screwdrivers
- Wire strippers
- Electrical tape
- 4 prong generator plug
Having these tools on hand makes the job easier. Organize them for quick access.
Understanding The Wires
Know the wires you will work with:
| Wire Color | Purpose |
|---|---|
| Black | Hot |
| Red | Hot |
| White | Neutral |
| Green | Ground |
Each wire has a specific role. Understanding this is key to proper wiring. Label the wires if needed. This helps avoid confusion later.
Connecting The Wires
Connecting the wires to a 4 prong generator plug can seem daunting. Follow these steps to ensure a secure and functional connection.
Identifying Wire Colors
Understanding wire colors is crucial. Each wire color has a specific purpose:
- Black: This wire is the hot wire. It carries electrical current.
- Red: This is another hot wire. It also carries electrical current.
- White: This wire is the neutral wire. It completes the electrical circuit.
- Green: This is the ground wire. It provides a path to the ground for safety.
Attaching Wires To Terminals
Once you identify the wires, attach them to the correct terminals. Follow these steps:
- Locate the terminals on the plug. They are often labeled.
- Attach the black wire to the terminal marked as X or hot.
- Connect the red wire to the terminal marked as Y or another hot.
- Secure the white wire to the terminal marked as neutral.
- Fasten the green wire to the terminal marked as ground.
Use a screwdriver to tighten the terminals securely. Loose connections can be dangerous.
Ensure no wires touch each other. This prevents short circuits.
Finally, double-check all connections. Properly connected wires ensure safe and efficient operation.
Securing The Connections
Securing the connections in a 4-prong generator plug is crucial. This step ensures the safety and efficiency of your generator. Follow these steps to make sure your connections are tight and secure.
Tightening Screws
Firstly, identify the screws on your generator plug. Use a screwdriver to tighten each screw. Make sure each screw is snug and firm. Loose screws can lead to poor connections.
Tip: Don’t overtighten the screws. This can damage the plug.
Ensuring No Loose Ends
Check all wires for loose ends. Make sure each wire is connected securely. Loose ends can cause electrical issues.
Step-by-step:
- Inspect each wire individually.
- Ensure each wire is firmly in place.
- If a wire is loose, reattach it securely.
Tip: Double-check each connection before finalizing.
Testing The Setup
Testing the setup of your 4 prong generator plug is essential. It ensures everything works correctly and safely. Follow these steps to avoid any issues during operation.
Powering On The Generator
Before testing, ensure all connections are secure. Double-check the wiring for any loose ends. This prevents unexpected disconnections or hazards.
Power on the generator and let it stabilize. Listen for any unusual noises. Ensure it runs smoothly without hiccups.
Next, check the generator’s display panel. Confirm that all indicators show normal operating conditions. This includes voltage, frequency, and load capacity.
Using A Multimeter
Using a multimeter helps verify the electrical output. Set your multimeter to measure AC voltage.
Follow these steps:
- Insert the multimeter probes into the generator plug slots.
- Check the voltage reading. It should match the generator’s rated output.
- Ensure readings for each slot are consistent and within the expected range.
Here’s a quick guide:
| Slot | Expected Voltage |
|---|---|
| Hot to Hot | 240V |
| Hot to Neutral | 120V |
| Hot to Ground | 120V |
Use the multimeter to check continuity. This ensures all connections are sound.
Ensure no shorts between wires. This prevents potential hazards and damage.
Testing the setup thoroughly guarantees a safe and efficient operation. It also prolongs the life of your generator and connected devices.
Troubleshooting
Troubleshooting a 4-prong generator plug can seem tricky. But with the right knowledge, it becomes easy. Here, we will cover common issues and how to fix wiring mistakes.
Common Issues
Incorrect Wiring is the most common problem. Wires may connect to the wrong terminals. This causes the generator to malfunction.
Loose Connections can also be a problem. Loose wires can cause sparks. This is dangerous and can damage your generator.
Damaged Wires are another common issue. Check for cuts or frays in the wires. These can cause short circuits.
Fixing Wiring Mistakes
First, turn off the generator. Safety is important. Never work on a live generator.
Next, check the wiring diagram. Ensure each wire goes to the correct terminal. Use a multimeter to check connections.
If you find a loose connection, tighten the wire. Use a screwdriver to secure it properly. If a wire is damaged, replace it. Always use the right type of wire for your generator.
Here is a simple table for wire colors and their terminals:
| Wire Color | Terminal |
|---|---|
| Black | Hot |
| Red | Hot |
| White | Neutral |
| Green | Ground |
Always double-check your work. Turn on the generator after you finish. Test the plug to ensure it works correctly.
By following these steps, you can solve most wiring issues. Keeping your generator in top shape is important.

Frequently Asked Questions
How Do You Wire A 4 Prong Generator Plug?
Identify each wire by its color. Connect the green wire to the ground terminal, white to neutral, and the remaining two to the hot terminals.
Can I Use A 3 Prong Plug Instead?
No, a 4 prong plug is required to meet modern electrical safety standards, providing a separate ground connection.
What Tools Are Needed For Wiring?
You will need a screwdriver, wire strippers, and a multimeter to ensure proper connections and safety.
Is A Permit Required For Wiring?
Check local regulations. Some areas may require a permit for electrical work, especially for permanent installations.
Final Words
Mastering how to wire a 4 prong generator plug ensures safety and efficiency. Follow the steps carefully for optimal results. Proper wiring prevents potential hazards and enhances generator performance. Always double-check your work for accuracy. With this guide, you can wire your generator plug like a pro, ensuring reliable power.