Disclosure: This post contains affiliate links and I will be compensated if you make a purchase after clicking through my links. Learn More
To test the low oil sensor on a generator, disconnect the sensor wire, turn on the generator, and check if the “Low Oil” indicator goes off. If it does, the sensor is working fine.
Now, let’s discuss how to perform this test in detail. Generators play a crucial role in providing backup power, making it essential to ensure their proper functioning. One critical component is the low oil sensor, which helps protect the generator from potential damage caused by low oil levels.
Testing this sensor is an essential maintenance task to identify any faults or malfunctions. We will guide you on how to test the low oil sensor on a generator. By following these simple steps, you can ensure that your generator runs smoothly and effectively, providing reliable backup power whenever needed.
Understanding The Low Oil Sensor
When it comes to generators, one important component that you need to keep an eye on is the low oil sensor. It plays a crucial role in ensuring the smooth operation of your generator and preventing any potential damage caused by oil depletion. In this section, let’s take a closer look at the low oil sensor, its importance, how it works, and common issues you may encounter.
Importance Of The Low Oil Sensor
The low oil sensor is an essential safety feature in any generator, and its main purpose is to monitor the level of oil in the engine. Maintaining the proper oil level is crucial because if the generator operates without enough oil, it can lead to severe engine damage.
The low oil sensor acts as a safety mechanism that shuts down the generator automatically when the oil level drops below a certain threshold. It provides you with peace of mind, knowing that your generator will not continue to run without adequate lubrication, thus preventing potential breakdowns and expensive repairs.
How The Low Oil Sensor Works
The low oil sensor operates using a simple but effective mechanism. It typically consists of a float switch located in the oil reservoir and an electrical connector that sends a signal to the generator’s control panel. When the oil level is at an acceptable range, the float switch remains in a position that allows the electrical circuit to stay closed. This signals that the generator can continue to operate normally.
However, when the oil level drops, the float switch is no longer buoyant and drops, causing the electrical circuit to open. This triggers the low oil sensor to send a signal to the generator’s control panel, instructing it to shut down the generator to prevent any potential damage caused by oil depletion.
Common Issues With The Low Oil Sensor
While the low oil sensor is a reliable component, like any other mechanical part, it can encounter issues at times. Some common problems with the low oil sensor include:
Incorrect readings: Sometimes, the low oil sensor may provide incorrect readings, indicating low oil levels when they are actually sufficient. This can be due to a faulty sensor or incorrect positioning of the float switch in the oil reservoir.
Sticky float switch: The float switch can get stuck due to dirt, debris, or old oil residue, causing it to send false signals of low oil levels. Regular maintenance and cleaning can help prevent this issue.
Wiring problems: Wiring connections between the low oil sensor and the generator’s control panel can sometimes become loose or damaged, resulting in a faulty signal. Checking and repairing any wiring issues can resolve this problem.
Regularly testing the low oil sensor on your generator is crucial to ensure its proper functionality and prevent any potential issues. By understanding its importance, how it works, and common problems, you can take appropriate measures to ensure the reliable and efficient performance of your generator.
Tools Needed For Testing
List Of Tools Required For Testing The Low Oil Sensor
When it comes to testing the low oil sensor on your generator, having the right tools is essential. Not only can these tools help you detect if there is an issue with the sensor, but they also ensure your safety throughout the testing process. Let’s take a look at the necessary tools you’ll need:
Wrench: A reliable wrench is required to loosen and tighten bolts easily.
Ohmmeter: This handy tool measures electrical resistance and can help determine if the low oil sensor is functioning properly.
Wire Strippers: These are used to strip the insulation off the wires, allowing for proper connection during testing.
Electrical Tape: This essential tool is used to insulate and protect exposed wires.
Multimeter: A multimeter helps measure voltage, current, and resistance, allowing you to verify the readings from the low oil sensor.
Replacement Low Oil Sensor: In case the sensor is faulty, having a replacement on hand can save you time and effort.
Necessary Safety Precautions
Testing the low oil sensor requires some precautionary measures to ensure your safety. By following these necessary steps, you’ll minimize the risk of accidents and injuries:
Disconnect the Power: Before starting any testing procedures, disconnect the power source from the generator to avoid electric shock.
Wear Protective Gear: Always wear safety glasses, gloves, and other appropriate protective equipment to prevent any mishaps.
Read the Manual: Familiarize yourself with the manufacturer’s guidelines and instructions provided in the manual before proceeding with any testing.
Work in a Well-Ventilated Area: Ensure that you are working in a properly ventilated area to avoid the risk of inhaling harmful fumes.
Double-Check Connections: Make sure all connections are secure and properly insulated before testing to prevent short circuits or other electrical hazards.
Take Your Time: Avoid rushing through the testing process. Stay focused and take your time to accurately assess the low oil sensor.
Step-by-step Guide To Testing The Low Oil Sensor

Are you facing issues with the low oil sensor on your generator? Testing this crucial component is essential to ensure the proper functioning of your generator and prevent any potential damage. In this step-by-step guide, we will walk you through the process of testing the low oil sensor on your generator. By following these easy steps, you will be able to diagnose any issues with the sensor and take appropriate action to repair or replace it.
Step 1: Properly Prepare The Generator For Testing
Before you begin testing the low oil sensor, it is important to ensure that the generator is safely turned off and disconnected from any power source. Take the necessary safety precautions and wear protective gear, such as gloves and safety goggles, to protect yourself from any potential harm.
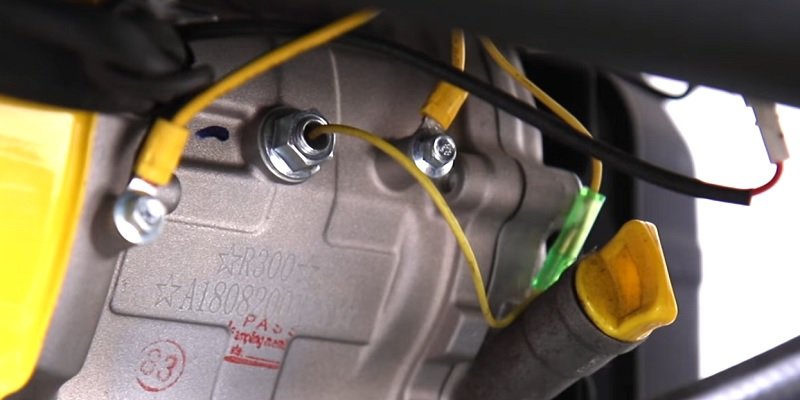
Step 2: Locate The Low Oil Sensor
The next step is to locate the low oil sensor on your generator. Refer to the manufacturer’s manual or consult their website for specific guidance on where the sensor is located. Typically, it is positioned near the engine’s oil reservoir with wires connecting it to the generator’s control panel.
Step 3: Disconnect The Low Oil Sensor
Once you have located the low oil sensor, carefully disconnect the wires that are connected to it. Take note of the wire colors or label them if necessary to ensure proper reconnection later.
Step 4: Test The Low Oil Sensor With A Multimeter
Now it’s time to test the low oil sensor using a multimeter. Set the multimeter to measure resistance and touch the probes to the terminals of the sensor. Note down the reading on the multimeter display.
Step 5: Interpret The Multimeter Readings
Interpreting the multimeter readings will help you determine the functionality of the low oil sensor. Typically, a good sensor will show a low resistance reading while a faulty one will display a high resistance or an infinite reading. Compare the measured resistance with the specifications provided by the manufacturer to determine if the sensor is working properly.
Step 6: Replace Or Repair The Low Oil Sensor If Necessary
If the multimeter readings indicate a faulty low oil sensor, it is time to replace or repair it. Contact the generator manufacturer or visit a local parts supplier to obtain a suitable replacement. Alternatively, if the sensor is repairable, follow the manufacturer’s instructions or consult a professional to fix it.
Troubleshooting Tips For Testing The Low Oil Sensor
Testing the low oil sensor on a generator is essential to ensure its efficient operation and prevent any potential damage. However, encountering common issues during testing can hinder accurate results. In this section, we will explore troubleshooting techniques and potential solutions for a faulty low oil sensor.
Common Issues Encountered During Testing
When testing the low oil sensor on a generator, it is important to be aware of common issues that may arise. These issues can often lead to inaccurate test results and pose challenges in determining the functionality of the sensor. Below are some common problems that you may encounter:
- The low oil sensor does not respond when the oil level is below the threshold: This can be an indication of a faulty low oil sensor or a wiring issue.
- The low oil sensor falsely indicates a low oil level: This could be caused by a malfunctioning sensor or an incorrect threshold setting.
- Inconsistent test results: In some cases, the low oil sensor may provide inconsistent readings, making it difficult to determine its reliability.
Troubleshooting Techniques For Accurate Testing Results
To ensure accurate testing results for the low oil sensor, it is important to employ troubleshooting techniques. These techniques help to identify any underlying issues and eliminate potential errors. The following techniques can be helpful during the testing process:
Visual inspection of the sensor and wiring: Begin by examining the low oil sensor and its wiring for any visible signs of damage, such as corrosion or loose connections. Fixing any visible issues can often resolve the problem.
Testing the sensor using an ohmmeter: An ohmmeter allows you to measure the resistance of the low oil sensor. By following the manufacturer’s instructions, you can determine if the sensor is functioning within the specified range.
Comparing test results with a known working sensor: If possible, compare the test results obtained from the low oil sensor in question with those of a known working sensor. This can help identify any discrepancies and validate the accuracy of your test.
Potential Solutions For Faulty Low Oil Sensor
If the low oil sensor is found to be faulty, it is important to explore potential solutions to rectify the issue. Here are some steps you can take:
- Replacing the low oil sensor: If the sensor is beyond repair, replacing it with a new one is often the most effective solution.
- Adjusting the threshold setting: If the low oil sensor falsely indicates a low oil level, adjusting the threshold setting within the manufacturer’s recommended range can help rectify the issue.
- Consulting a professional: If you are unable to diagnose or resolve the problem yourself, it is advisable to seek assistance from a professional technician who specializes in generator maintenance and repair.
Frequently Asked Questions For How To Test Low Oil Sensor On Generator?
How Do You Test A Low Oil Pressure Sensor?
To test a low oil pressure sensor:
- Locate the sensor on your vehicle’s engine.
- Disconnect the sensor and connect a multimeter to it.
- Start the engine and observe the multimeter readings.
- Compare the readings to the manufacturer’s specifications.
- If the readings are outside the acceptable range, the sensor may need to be replaced.
How Do You Bypass The Oil Sensor On A Generator?
To bypass the oil sensor on a generator, you can follow these steps: First, locate the oil sensor and disconnect the wire attached to it. Then, connect a jumper wire to bridge the connection. Ensure the jumper wire is securely attached. We provide a detailed guide on how to bypass the low oil sensor on Generac generator.
Finally, test the generator to see if it starts and runs without the oil sensor.
What Does The Low Oil Sensor Do On A Generator?
The low oil sensor on a generator detects when the oil level is too low. It alerts the user to prevent engine damage and ensures proper lubrication to keep the generator running smoothly.
How Do You Test A Generator Oil Pressure Switch?
To test a generator oil pressure switch, follow these steps:
- Start the generator and let it run for a few minutes to warm up.
- Locate the oil pressure switch, usually near the oil filter or engine block. Read here how to bypass oil pressure switch.
- Disconnect the wire connected to the switch.
- Use a multimeter to test for continuity across the switch terminals. If there is no continuity, the switch is faulty and needs to be replaced.
- Reconnect the wire and ensure proper functionality before using the generator.
Final Words
Testing the low oil sensor on your generator is a crucial step in ensuring its smooth and efficient operation. By following the simple steps outlined in this post, you can easily determine if the sensor is functioning correctly or if it needs to be replaced.
Regularly testing and maintaining your generator’s components, such as the low oil sensor, will help extend its lifespan and prevent potential damage or downtime. Remember, a well-maintained generator is essential for uninterrupted power supply during emergencies or power outages.