Disclosure: This post contains affiliate links and I will be compensated if you make a purchase after clicking through my links. Learn More
Setting up a stick welder means connecting your machine, choosing the right electrode, and preparing your workspace for safe, strong welding. Proper setup ensures clean welds, fewer problems, and more professional results, even for beginners or hobbyists.
Why Stick Welding Remains Popular
Stick welding, also called Shielded Metal Arc Welding (SMAW), is still a top choice for professionals and DIYers. It’s reliable, portable, and works in tough conditions—rain, wind, and on dirty or rusty metal. You can use stick welders for home repairs, farm equipment, structural steel, and pipeline work. Many welders start with stick because it’s affordable and teaches core welding skills.
Stick welding is forgiving with dirty surfaces compared to MIG or TIG welding. You don’t need expensive shielding gas. The consumable electrode produces its own shield for the molten metal. This simple, tough process has built America’s bridges, skyscrapers, and pipelines for over 100 years.
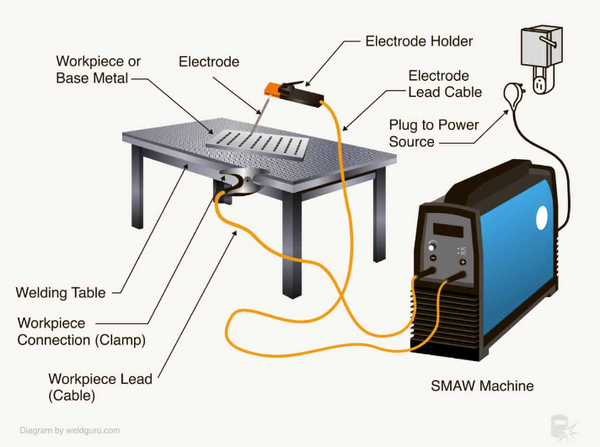
Key Parts Of A Stick Welder Setup
Before you strike your first arc, you need to know the main parts:
- Power source (AC, DC, or both)
- Electrode holder (stinger)
- Ground clamp (work clamp)
- Welding cables
- Welding electrodes (rods)
- Protective gear (helmet, gloves, jacket)
Each part must fit together for safe, effective welding. Let’s break down what you need to do, step by step.
Step 1: Choose The Right Stick Welder
Stick welders come in a few main types. Picking the right one depends on your projects and power source.
| Welder Type | Best For | Pros | Cons |
|---|---|---|---|
| AC Only | Basic repairs, farm work | Cheap, simple | Limited control, not for thin metal |
| DC Only | Automotive, thin steel, critical welds | Smoother arc, less spatter | Costs more, less portable |
| AC/DC | All-purpose, pro use | Most flexible | Heavier, priciest |
| Inverter | Field work, mobile jobs | Lightweight, energy efficient | May not last as long in harsh settings |
Pro tip: If you weld outdoors or move a lot, an inverter stick welder is a smart investment. For home use, even a basic AC machine can handle most jobs.
Step 2: Prepare Your Workspace And Safety Gear
Welding is dangerous without proper safety steps. Before switching on your welder, set up your workspace:
- Clear the area. Remove any flammable items, liquids, or paper.
- Ventilation. Stick welding makes smoke and fumes. Open windows or use a fan.
- Fire extinguisher. Keep one nearby.
- Solid workbench. Metal tables are best for grounding.
- Good lighting. You need to see your weld clearly.
Safety gear checklist:
- Auto-darkening helmet (shade 10-13 for stick welding)
- Leather gloves
- Long-sleeve welding jacket
- Work boots
- Cotton pants (no polyester or shorts)
- Safety glasses
Never skip protective equipment. Stick welding throws hot sparks and UV light, which can burn skin and eyes instantly.
Step 3: Connect Your Stick Welder
Every stick welder has a power cord and two cable sockets: one for the electrode holder and one for the ground clamp.
How To Connect The Cables
- Unplug the welder before making any connections.
- Plug in the ground clamp to the negative (-) or positive (+) terminal, depending on your electrode type.
- Attach the electrode holder to the other terminal.
- Tighten the connections so cables don’t slip during welding.
Dcen Vs Dcep: What’s The Difference?
Stick welding lets you choose DC electrode negative (DCEN) or DC electrode positive (DCEP).
- DCEN (straight polarity): More heat on the workpiece. Good for fast, deep welds.
- DCEP (reverse polarity): More heat on the electrode. Good for certain rods and vertical welding.
Check your rod’s package for the correct polarity. E6010 rods work best on DCEP. E7018 can run on either, but DCEP gives a smoother arc.
Step 4: Attach The Ground Clamp
The ground clamp must touch clean, bare metal. Rust, paint, or dirt can cause a weak arc and bad welds.
- Scrape a spot on your workpiece.
- Clamp tightly so it won’t move.
- On large jobs, move the clamp as you weld different areas.
A poor ground connection is a common cause of arc starting problems.

Credit: www.bunnings.com.au
Step 5: Insert The Electrode (rod)
Choose your electrode based on the metal and weld position.
| Electrode Type | Best For | Typical Amps | Notes |
|---|---|---|---|
| E6010 | Dirty/rusty steel, pipe | 70-130 | Deep penetration, DCEP only |
| E6011 | AC welders, general work | 70-130 | Good on old farm equipment |
| E6013 | Thin metal, smooth finish | 40-90 | Easy for beginners |
| E7018 | Critical welds, structural | 90-150 | Strong, low hydrogen, keep dry |
Insert the rod into the electrode holder, leaving about 2 inches sticking out. Tighten the holder so the rod won’t wiggle.
Advanced tip: Keep E7018 rods in a rod oven or sealed container. They absorb moisture quickly, which can cause weld cracking.
Step 6: Set The Welding Amperage
Every electrode has a recommended amp range. Setting the right amperage is critical for clean, strong welds.
- Too low: The rod sticks, the arc is unstable, poor penetration.
- Too high: The weld is messy, excess spatter, rod burns too fast.
How To Choose The Amps
A fast rule: use 1 amp per 0.001 inch of rod diameter. For example, a 1/8 inch (0.125 inch) rod uses about 125 amps.
Always start low and increase in small steps until the arc is smooth and steady.
Beginner insight: Most issues like sticking, spatter, or poor fusion come from wrong amperage or polarity. Adjust these first before blaming your technique.
Step 7: Power On And Test Your Setup
Plug in your welder and switch it on. Listen for the cooling fan and check the display (if your model has one).
- Double-check your ground clamp is tight.
- Test arc on scrap metal first.
- Adjust amperage if needed.
A healthy arc should sound like bacon frying—steady, not popping or hissing.
Step 8: Practice Striking The Arc
Striking the arc is the first skill to master. There are two main methods:
- Scratch method: Drag the rod tip across the metal, like lighting a match.
- Tap method: Tap the rod straight down and quickly lift.
If the rod sticks, twist it gently or reduce your amperage. Clean the tip and try again. With practice, starting the arc becomes second nature.
Step 9: Run A Bead On Scrap Metal
Before welding your real project, run beads on scrap pieces. Focus on:
- Travel speed: Move too fast and the bead is skinny; too slow and it piles up.
- Rod angle: Hold at about 15 degrees from vertical, pushing the puddle.
- Arc length: Keep the tip about the same distance as the rod diameter from the metal.
Study your bead. A good weld is even, with little spatter and no holes.
Insider tip: Beginners often pull the rod away too far. Stay close to maintain arc stability.
Step 10: Clean And Inspect Your Work
After each weld, chip off the slag (the crusty coating) with a chipping hammer and brush. Inspect for:
- Cracks
- Porosity (tiny holes)
- Undercut (groove at the weld edge)
- Lack of fusion
If your weld looks bad, adjust your settings or technique. It’s better to fix problems on practice pieces than on your real project.
Extra Tips For Flawless Stick Welding
1. Keep Your Rods Dry
Moisture ruins certain rods (especially E7018). Store them in sealed containers or rod ovens.
2. Use The Right Extension Cord
If you must use an extension, pick a heavy-duty one. Thin cords cause voltage drop and poor performance.
3. Clean Metal Yields Better Results
Even though stick welding works on dirty steel, you get the strongest welds on clean, bare metal.
4. Replace Worn Parts
Electrode holders and cables wear out over time. Replace them if they get hot or connections are loose.
5. Learn To Read The Arc
A steady, frying sound means the right settings. Spitting, popping, or a wandering arc signals a problem.
6. Don’t Skip Safety
Stick welding can start fires, cause burns, and blind unprotected eyes. Always wear PPE and work in a safe area.
Common Mistakes Beginners Make
Even smart welders make avoidable errors. Watch out for these:
- Wrong polarity – Many rods only work with DCEP or DCEN.
- Bad ground connection – Causes arc starting trouble and weak welds.
- Too much arc length – Produces spatter and weak fusion.
- Not cleaning metal – Leads to porosity and poor weld strength.
- Ignoring safety gear – Increases risk of burns and eye damage.
- Welding with wet rods – Causes cracks, especially on critical jobs.
- Using wrong amps – Most rod sticking happens from low amperage.
Choosing The Right Rod For Your Project
Selecting the correct electrode changes everything. Here’s a quick guide:
- E6010/E6011: Use for farm, pipe, or repairs on dirty/rusty steel. Good for deep penetration.
- E6013: Best for thin sheet metal—like auto body work.
- E7018: Needed for critical jobs—frames, brackets, and anything under stress.
Expert insight: Some rods (like E7018) must stay dry or they create weak, brittle welds. Always store them in a sealed container or rod oven.
Comparing Stick Welding To Mig And Tig
Stick welding is not your only option. Here’s how it stacks up:
| Process | Best For | Pros | Cons |
|---|---|---|---|
| Stick (SMAW) | Heavy steel, outdoors | No gas needed, cheap | Slag, more spatter, less pretty welds |
| MIG (GMAW) | Thin steel, sheet metal | Clean welds, fast | Needs shielding gas, not great outdoors |
| TIG (GTAW) | Aluminum, stainless, precise jobs | Most control, cleanest welds | Slow, expensive, tough for beginners |
Stick welding wins for outdoor, heavy-duty work and tight budgets. MIG and TIG are better for auto and artwork, but cost more and need extra gear.
How To Store And Care For Your Stick Welder
A stick welder lasts decades if you care for it:
- Keep it dry and dust-free.
- Wrap cables loosely to prevent cracking.
- Check vents for dust and blockages.
- Store rods in sealed containers.
- Inspect clamps for rust or looseness.
Industry fact: Many old stick welders from the 1960s still work fine. Their simple, tough design means fewer things break.
Troubleshooting Stick Welder Setup Problems
If your welder won’t start or weld right, check these first:
- No arc: Check power, ground clamp, and rod insertion.
- Arc starts, then stops: Check for a loose cable or poor ground.
- Rod sticks: Increase amperage or use a different rod.
- Lots of spatter: Lower your arc length or change polarity.
If the machine smells burned or trips breakers, unplug and have a pro check it.
How To Upgrade Your Stick Welding Setup
Once you master the basics, you can add accessories:
- Longer cables for bigger work areas.
- Magnetic ground clamps for faster setup.
- Better helmet (auto-darkening, variable shade).
- Rod ovens to keep electrodes dry.
- Carrying cart for easy movement.
Upgrades make your setup safer and more productive.
What Matters Most For Strong Stick Welds
The three keys to quality stick welding:
- Correct amperage and polarity
- Clean metal and tight ground
- Proper rod angle and arc length
Most weld failures happen because one of these steps was rushed or skipped. Take your time on setup, and your results will look pro—even if you’re new.

Credit: primeweld.com
Stick Welding For Home, Farm, Or Industry
Stick welding is still the backbone of heavy steelwork in America. It’s the only process you’ll find on pipelines in Alaska, farm repairs in Iowa, and on skyscraper construction in New York.
For home use, a basic stick welder will fix trailers, gates, fences, and even make art. You don’t need fancy gear—just basic knowledge, the right settings, and good safety habits.
For more detailed process info, the Wikipedia SMAW article is a solid reference.
Frequently Asked Questions
What Size Breaker Do I Need For A Stick Welder?
Most small stick welders (up to 140 amps) run on a 20 or 30 amp breaker. Bigger machines may need 50 amps. Always check your welder’s manual for the right breaker size and use the correct outlet.
Can I Use Stick Welding On Aluminum?
Stick welding aluminum is possible, but not recommended. The arc is unstable and the welds are weak. TIG or MIG welding works better for aluminum and produces stronger, cleaner welds for this metal.
Why Does My Electrode Keep Sticking?
Sticking happens if your amperage is too low, the rod is damp, or your ground connection is poor. Increase amperage, dry your rods, and check that the ground clamp touches clean metal for best results.
Do I Need To Chip Off Slag After Stick Welding?
Yes, always chip off the slag after every pass. Slag protects the weld but must be removed for strong, clean layers and to inspect your weld for cracks, holes, or defects. Use a chipping hammer and wire brush.
Is Stick Welding Safe For Beginners?
Stick welding is safe if you use the right protective gear and follow instructions. Wear a welding helmet, gloves, jacket, and boots. Never weld near flammable materials and always work in a ventilated area.
—
Setting up a stick welder is simple with the right steps and tools. Start with safety, use the correct amperage, and practice on scrap metal. Stick welding is a skill that opens doors for repairs, building, and creative projects—no matter your experience level.
With patience and the right setup, you’ll make strong, reliable welds every time.
Credit: www.arccaptain.com