Disclosure: This post contains affiliate links and I will be compensated if you make a purchase after clicking through my links. Learn More
Setting up a TIG welder demands accuracy, the right tools, and a clear understanding of each step. Proper setup ensures quality welds, safety, and saves you hours of frustration, whether you’re a beginner or a professional.
Why Tig Welding Demands Precision
TIG welding, or Tungsten Inert Gas welding, uses a non-consumable tungsten electrode to produce clean, high-quality welds. People choose TIG for aluminum, stainless steel, and thin metals because it gives control and a smooth, spatter-free finish. Getting the setup right is more than comfort—it’s the difference between strong, beautiful welds and wasted material.
Many beginners skip steps or use poor settings and end up with porosity, weak joints, or tungsten contamination. Each mistake costs time and money. A professional TIG setup gives you confidence, control, and repeatable results for every job.
Essential Equipment And Workspace
Before you start, gather everything you need. Missing or low-quality tools lead to poor welds or dangerous mistakes.
Core Tig Welding Equipment
- TIG Welder Unit: Choose an AC/DC machine for aluminum and steel, with adjustable amperage and pulse controls. Popular brands include Miller, Lincoln, and Everlast.
- Tungsten Electrode: Pick the correct type—2% Thoriated (red) for steel, Pure Tungsten (green) for aluminum.
- Torch: Air-cooled torches are fine for low amps; water-cooled for continuous high-amp jobs.
- Power Source: A reliable, grounded 220V or 110V outlet. Many modern inverters work on both.
- Foot Pedal or Hand Control: Lets you adjust amperage as you weld, essential for precision.
- Shielding Gas Cylinder: 100% Argon is standard. Use a quality regulator and flowmeter.
- Filler Rods: Match filler metal to base material—ER70S-2 for mild steel, ER4043 for aluminum.
- Ground Clamp: Clean, tight connection to your workpiece.
- Personal Protective Equipment (PPE): Auto-darkening helmet (rated for TIG), gloves, flame-resistant jacket, safety glasses, and closed-toe shoes.
Workspace Setup
- Ventilation: TIG produces less smoke than MIG, but always work in a well-ventilated area.
- Clean Surface: Welding table must be metal, flat, and free from oil, rust, or paint.
- Lighting: Good overhead lighting prevents mistakes.
- Fire Safety: Keep a fire extinguisher nearby, and clear the area of flammable materials.
- Organization: Arrange tools for easy reach—set up clamps, brushes, and consumables before turning on your welder.
Pro Insight: Many skip cleaning the workspace, but even small bits of oil or paint can ruin a TIG weld by causing porosity or contamination.
Understanding Tig Welder Controls
Every TIG welder has specific controls. Knowing what they do gives you an edge.
Common Tig Controls And What They Mean
- Amperage Control: Sets welding current. High amps for thick metal, low for thin.
- AC/DC Switch: Use AC for aluminum, DC for steel and stainless.
- High Frequency Start: Gives non-contact arc starts—cleaner, ideal for aluminum.
- Post-Flow and Pre-Flow: Sets how long argon flows before and after arc to protect tungsten.
- Pulse Control: Allows you to alternate high/low amps for better control on thin metals.
- Balance Control: Adjusts cleaning vs. penetration on AC. More cleaning for dirty aluminum, more penetration for thick pieces.
Pro Insight: Many entry-level welders ignore post-flow time. Short post-flow leads to tungsten oxidation and a dirty electrode, shortening its life.
Step-by-step: Setting Up Your Tig Welder
Follow these steps in order for a reliable, safe setup.
1. Place The Welder And Connect Power
Set your TIG welder on a stable, dry surface. Connect it to the correct outlet. For 220V machines, use a dedicated breaker. Double-check the power cord for cuts or signs of damage.
2. Attach And Secure The Ground Clamp
Connect the ground clamp to clean, bare metal on your work table or directly to your workpiece. Use a wire brush or grinder to ensure solid contact—paint, rust, or dirt will cause arc problems or weak welds.
3. Connect The Tig Torch
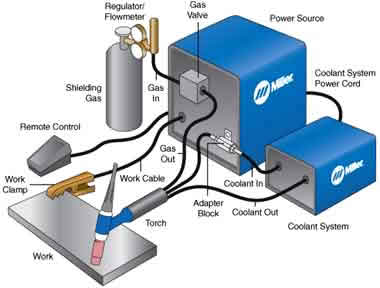
Attach the torch lead to the welder’s output terminal. For water-cooled torches, connect water lines to the welder’s cooler and check for leaks. Tighten all connections by hand, then with a wrench—loose fittings can leak gas or water.
4. Select And Install The Tungsten Electrode
- Choose the right tungsten: 2% Thoriated (Red) for steel, Pure (Green) for aluminum.
- Sharpen the tip to a point for DC (steel), or ball it for AC (aluminum).
- Insert tungsten into the collet, leaving 1/4 inch extending from the cup.
- Tighten the back cap—don’t overtighten.
Common Mistake: Using a bench grinder for both tungsten and regular metal ruins the tip. Always dedicate a clean grinder for tungsten sharpening.
5. Connect Shielding Gas And Set Flow
- Secure the argon gas cylinder upright.
- Attach the regulator and flowmeter.
- Connect the gas hose to your welder.
- Open the cylinder valve slowly.
- Set the flow to 15–20 cubic feet per hour (CFH) for most jobs. Too low: Contamination; too high: turbulent flow.
Pro Tip: Always leak-check gas fittings with soapy water before welding.
6. Install Filler Rods And Test Controls
Pick the right filler rod for your metal. Cut it to 12–18 inches for easy handling. Lay rods within arm’s reach. Test your foot pedal or hand control—make sure amperage ramps up and down smoothly.
7. Set Polarity And Welding Mode
- For steel: Set to DCEN (Direct Current Electrode Negative).
- For aluminum: Set to AC (Alternating Current).
- Select high-frequency start for AC welding.
8. Adjust Pre-flow, Post-flow, And Pulse
- Pre-flow: 0.5–1 second (protects tungsten at arc start).
- Post-flow: 3–8 seconds (shields tungsten as it cools).
- Pulse settings (if available): Start with 1–2 Hz, adjust as needed for thin metals.
9. Final Safety Check
- Confirm all PPE is worn.
- Clear workspace of obstructions.
- Check for gas leaks and secure all connections.
- Power on your welder.
Now, your TIG welder is ready for a test arc.
Setting Up For Different Metals
TIG welding shines because you can tune your setup for different metals. Here’s how to adjust your welder for the most common types.
Tig Welding Aluminum
- Use AC mode.
- Fit a pure tungsten (green) or 2% lanthanated (blue) electrode.
- Ball the tungsten tip for better arc stability.
- Set balance control to 60–70% EN (penetration) for clean aluminum; higher for dirty or oxidized pieces.
- Argon flow: 15–20 CFH.
- Filler rod: ER4043 or ER5356.
Tig Welding Steel
- Use DCEN mode.
- 2% thoriated (red) tungsten, sharpened to a point.
- Pulse off for thick steel; on for thin.
- Argon flow: 15–20 CFH.
- Filler rod: ER70S-2 or ER70S-6.
Tig Welding Stainless Steel
- Use DCEN mode.
- 2% ceriated (gray) or thoriated (red) tungsten.
- Sharpen to a fine point.
- Argon flow: 15–20 CFH.
- Filler rod: ER308L (for 304/308 stainless).
Non-Obvious Tip: For stainless, use a gas lens on your torch. It spreads the argon more evenly, giving a cleaner, shiny weld with less oxidation.
Table: Tig Settings For Common Metals
Here’s a quick reference for welding different metals:
| Metal Type | Polarity | Tungsten Type | Filler Rod | Gas Flow (CFH) |
|---|---|---|---|---|
| Aluminum | AC | Pure/2% Lanthanated | ER4043/ER5356 | 15–20 |
| Steel | DCEN | 2% Thoriated | ER70S-2/6 | 15–20 |
| Stainless Steel | DCEN | 2% Ceriated/Thoriated | ER308L | 15–20 |
Setting Up The Tig Torch
Proper torch setup is key for arc control and comfort.
Choosing The Right Torch And Accessories
- Air-cooled torches are lighter and fine for short jobs (under 150 amps).
- Water-cooled torches stay cool for heavy, continuous welding (over 150 amps).
- Use the right size gas cup—#6–#8 for most work.
- Add a gas lens for smoother argon coverage.
Assembling The Torch
- Insert the tungsten into the collet and secure with the back cap.
- Attach the gas cup.
- Plug in the torch lead.
- Set torch angle: 15–20 degrees from vertical for most welds.
Tip: Too much tungsten stick-out causes an unstable arc and poor shielding.
Preparing The Workpiece
Clean metal is essential for TIG welding—dirt, oil, and oxides lead to porosity and weak welds.
Cleaning Steps
- For aluminum: Use a stainless wire brush and acetone.
- For steel: Grind or wire-brush to bright metal; wipe with acetone.
- For stainless: Use dedicated stainless brushes (never used on carbon steel).
Fit-up And Clamping
- Align pieces tightly. Gaps cause burn-through or ugly welds.
- Clamp securely to prevent movement.
- Tack weld corners before full welding.
Non-Obvious Insight: Even new metal often has mill scale or oil. Always clean, no exceptions.
Credit: www.millerwelds.com
Table: Tig Vs. Mig Welding Setup Requirements
See how TIG setup compares to MIG welding for context.
| Feature | TIG Welding | MIG Welding |
|---|---|---|
| Electrode | Non-consumable tungsten | Consumable wire |
| Shielding Gas | 100% Argon (most cases) | CO2, Argon, or mix |
| Control Type | Foot pedal/hand control | Trigger only |
| Metal Prep | Very clean | Moderate clean |
| Weld Quality | Very high, precise | Good, fast |
Initial Test Weld And Adjustments
Once setup is complete, always do a test weld on scrap metal of the same type and thickness.
Steps For Test Weld
- Strike an arc using the foot pedal or torch switch.
- Observe arc stability—should be smooth and focused.
- Add filler rod as puddle forms.
- Watch for color, oxidation, and gas coverage.
If the weld is dirty, porous, or the arc wanders:
- Check for drafts or low argon.
- Re-clean the tungsten and metal.
- Adjust amperage—too high will burn through; too low won’t melt base metal.
Pro Guidance: If you see “frosting” or dull gray around your weld, post-flow may be too short or argon flow too low.
Troubleshooting Common Tig Setup Issues
Even with a perfect setup, problems can happen. Here’s how to solve the most frequent ones:
1. Porosity In Welds
- Cause: Contaminated metal, low argon, or drafts.
- Fix: Re-clean, increase gas flow, block wind.
2. Arc Won’t Start
- Cause: Poor ground, tungsten too far out, wrong settings.
- Fix: Check clamp, re-insert tungsten, confirm settings.
3. Tungsten Contamination
- Cause: Touching puddle with tungsten or filler rod.
- Fix: Grind tungsten, keep steady hand, sharpen properly.
4. Unstable Arc
- Cause: Gas leaks, tungsten stick-out, worn collet.
- Fix: Tighten connections, shorten stick-out, replace collet.
5. Overheating Torch
- Cause: High amps with air-cooled torch.
- Fix: Switch to water-cooled or lower amperage.
Table: Quick Fixes For Tig Weld Problems
| Problem | Possible Cause | Solution |
|---|---|---|
| Porosity | Dirty metal, low argon | Clean metal, increase gas |
| Arc fails | Poor ground, settings | Check clamp, confirm polarity |
| Tungsten contaminated | Touched puddle, dirty rod | Resharpen, use clean rod |
| Overheating torch | High amps, air-cooled torch | Switch to water-cooled |

Credit: us.misumi-ec.com
Safety Essentials In Tig Welder Setup
TIG welding is safer than stick or MIG for fumes, but safety rules still matter.
- Always wear a welding helmet with a proper shade for TIG (usually 9–13).
- Use gloves made for TIG—thin, heat-resistant, and flexible.
- Wear a flame-resistant jacket; avoid synthetic fibers that melt.
- Boots should be leather, high-top, with no exposed skin.
- Keep a fire extinguisher and first aid kit nearby.
- Never weld near flammable liquids or gas cylinders.
Insider Tip: Even TIG’s UV arc causes sunburn and eye damage—don’t skip safety gear.
Maintaining Your Tig Welder
A well-maintained TIG welder lasts years and gives consistent results.
- Blow dust out of the welder with compressed air every month.
- Inspect cables and leads for wear; replace cracked insulation.
- Store tungsten electrodes and filler rods dry and clean.
- Drain and refill water coolers every 6 months (if used).
- Check O-rings and seals on torches and regulators.
Advanced Setup Tips For Best Results
- Use a gas lens for the torch for smoother argon flow and less turbulence.
- Try a “furick cup” for difficult joints, especially on stainless or titanium.
- Use a remote finger control for out-of-position welds.
- Dial in pulse settings for razor-thin metals.
- Ground directly to the workpiece for the most stable arc.
Where To Learn More
For detailed TIG welding guides, safety standards, and the latest industry news, visit the Welding Tips and Tricks site. It’s trusted by professionals and hobbyists worldwide.

Credit: www.youtube.com
Frequently Asked Questions
How Do I Know What Amperage To Set On My Tig Welder?
Start with 1 amp per thousandth of an inch of metal thickness. For example, 1/8″ steel needs about 125 amps. Adjust up or down based on the puddle size and penetration during your test weld.
Can I Use The Same Tungsten Electrode For All Metals?
No. Use 2% thoriated for steel and stainless, and pure or 2% lanthanated for aluminum. Using the wrong tungsten causes poor arc stability and contamination. Keep separate, clearly labeled tungsten rods for each metal type.
Why Does My Tungsten Electrode Turn Black Or Split?
This happens from poor shielding gas coverage, too short post-flow, or touching the tungsten to the puddle. Check for leaks, increase argon flow, and don’t let the tungsten contact the weld pool or filler rod.
How Often Should I Clean My Tig Torch And Cables?
Inspect and clean your torch and cables before each welding session. Dust, dirt, or damaged insulation can cause arc instability, poor welds, or even electrical hazards. Replace worn parts as soon as you notice problems.
Is Tig Welding Safe Indoors?
Yes, TIG welding is safe indoors if the area is well-ventilated and free from flammable materials. Always use proper PPE and keep a fire extinguisher nearby. TIG produces less smoke than stick or MIG, but safety is always first.
Setting up a TIG welder is about more than plugging in and striking an arc. The right preparation and settings unlock the precision, beauty, and strength that make TIG the choice of top welders. Follow each step, invest in quality gear, and your welds will stand out.