Disclosure: This post contains affiliate links and I will be compensated if you make a purchase after clicking through my links. Learn More
To make a load bank for generator testing, gather resistive elements and connect them to a control panel. Ensure proper ventilation for heat dissipation.
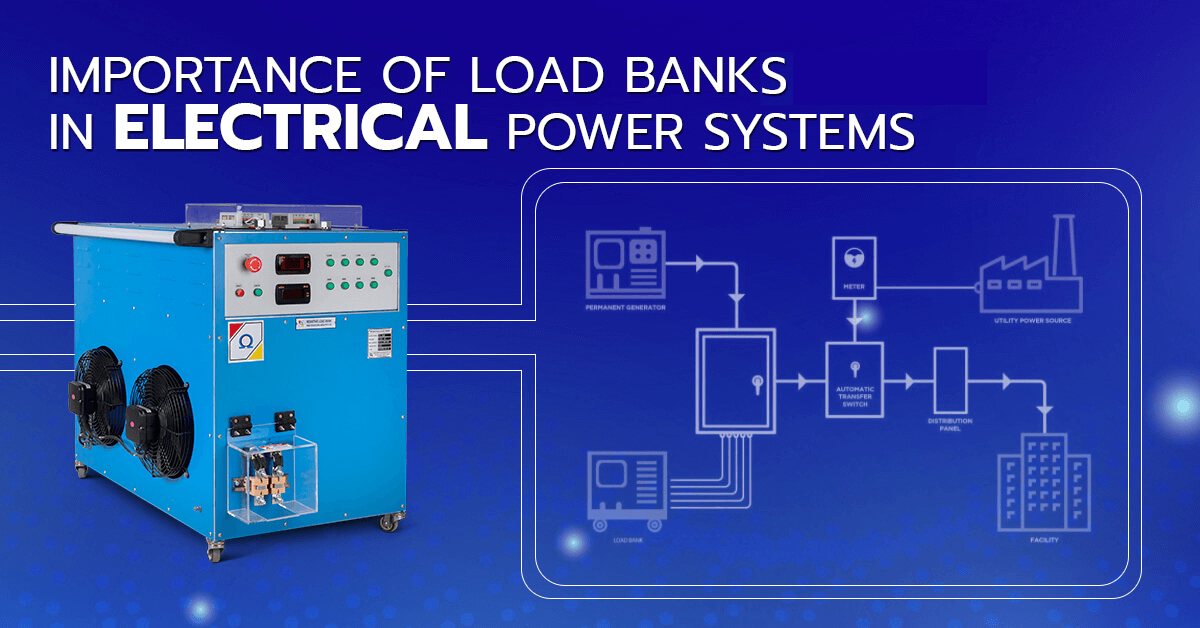
Testing generators with a load bank is crucial for evaluating their performance and reliability. Load banks simulate real-world electrical loads, helping identify potential issues before they arise in critical situations. This process ensures that generators can handle their rated capacity, maintain voltage stability, and operate efficiently.
The primary components of a load bank include resistive elements, control panels, and safety mechanisms. These components work together to mimic operational conditions and stress-test the generator. Proper construction and usage of a load bank can significantly extend the lifespan of your generator and ensure it performs optimally when needed most.

Introduction To Load Banks
Load banks are essential tools for testing generators. They help ensure that generators work correctly. Understanding load banks can make generator testing easier and safer.
Purpose Of Load Banks
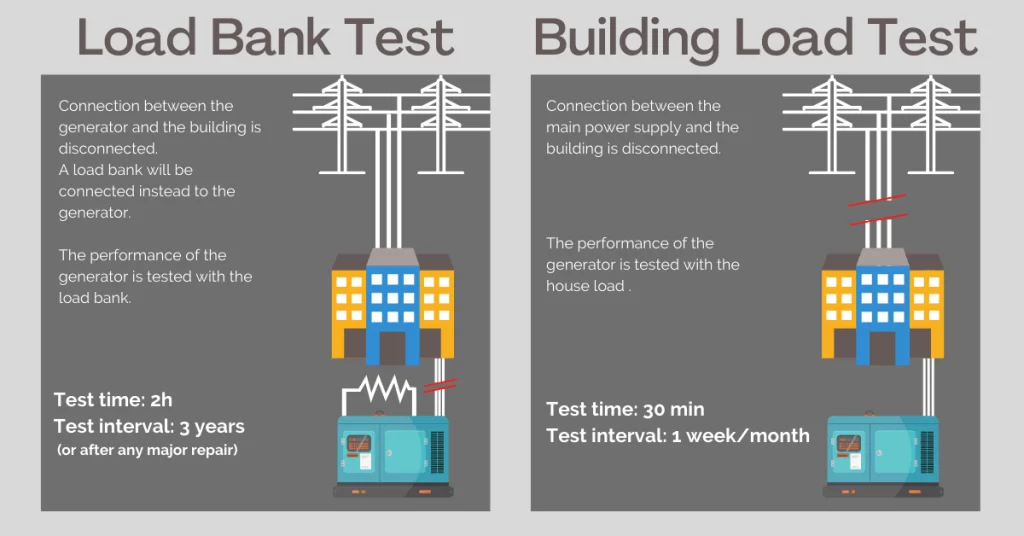
Load banks help test the performance of generators. They simulate real electrical loads. This ensures the generator can handle the expected power demand. Load banks also help identify potential issues early. This can prevent future failures.
| Purpose | Description |
|---|---|
| Testing Performance | Simulates real electrical loads to ensure generator efficiency. |
| Identifying Issues | Helps find problems before they cause failures. |
| Preventing Failures | Ensures reliable operation of the generator. |
Types Of Load Banks
There are different types of load banks. Each type has its own use. Here are some common types:
- Resistive Load Banks: These use resistors to create load. They are simple and effective.
- Reactive Load Banks: These use inductors or capacitors. They simulate reactive loads like motors.
- Resistive/Reactive Load Banks: These combine resistive and reactive elements. They provide a more complete test.
Choosing the right type depends on the testing needs. Each type offers unique benefits.
Materials And Tools Needed
To create a load bank for generator testing, you need specific materials and tools. These items ensure your load bank functions correctly and safely. Below is a detailed list of essential and optional components.
Essential Components
- Resistors: High-wattage resistors are crucial. They simulate the electrical load.
- Cooling Fans: Keep resistors cool. Prevent overheating.
- Enclosure: Safely house all components.
- Wiring: High-gauge wires handle the electrical load.
- Switches: Control the flow of electricity.
- Connectors: Ensure secure connections between components.
- Circuit Breakers: Protect your setup from electrical surges.
Optional Add-ons
- Digital Display: Monitor the load bank status in real-time.
- Remote Control: Operate the load bank from a distance.
- Temperature Sensors: Track the temperature of resistors.
- Protective Gloves: Ensure safety while handling electrical components.
- Ventilation System: Enhance cooling efficiency.
Safety Precautions
When making a load bank for generator testing, safety is crucial. This section covers the essential safety precautions you need to follow. Proper care ensures safety and the efficiency of your testing process. Let’s delve into the key safety measures you must consider.
Personal Protective Equipment
Wearing the right Personal Protective Equipment (PPE) is vital. Below is a list of essential PPE:
- Safety Glasses: Protects your eyes from sparks and debris.
- Insulated Gloves: Shields your hands from electrical shocks.
- Ear Protection: Guards your ears against loud noises.
- Safety Boots: Offers protection against electric hazards and heavy objects.
- Fire-Resistant Clothing: Reduces injury risk from potential fires.
Ensuring you have the right gear can save lives. Always check your PPE before starting the testing process.
Electrical Safety
Electrical safety measures are essential to prevent accidents. Follow these guidelines to ensure safe testing:
- Disconnect Power: Always disconnect the generator from the main power source.
- Use Insulated Tools: Only use tools with insulated handles.
- Check Cables: Inspect all cables for wear and damage before use.
- Proper Grounding: Ensure the load bank is properly grounded to avoid shocks.
- Avoid Wet Conditions: Never perform electrical testing in damp or wet areas.
Following these steps can significantly reduce the risk of electrical accidents. Always remain vigilant and prioritize safety.

Designing The Load Bank
Building a load bank for generator testing requires careful planning. You need to ensure that it meets your specific needs. In this section, we will discuss how to design your load bank.
Choosing The Right Resistors
Resistors are the heart of your load bank. Choosing the right ones is crucial for accurate testing. Consider the following factors:
- Power Rating: Ensure the resistors can handle the power.
- Resistance Value: Pick resistors that match your load requirements.
- Heat Dissipation: Resistors will generate heat. Ensure proper cooling.
Common types of resistors used in load banks include:
| Type | Advantages | Disadvantages |
|---|---|---|
| Wirewound | High power, stable | Bulky, expensive |
| Metal Film | Stable, cost-effective | Lower power rating |
| Ceramic | High temperature tolerance | Fragile, bulky |
Calculating Load Capacity
Calculating the load capacity ensures your load bank meets testing needs. Follow these steps:
- Determine Total Power: Calculate the generator’s total power output.
- Define Load Steps: Break down the total power into manageable steps.
- Select Resistors: Choose resistors that match these steps.
Example Calculation:
Total Power = 10 kW
Load Steps = 1 kW, 2 kW, 3 kW, 4 kW
Resistors: 1 kW, 2 kW, 3 kW, 4 kW
For accurate results, test each step separately. This ensures the load bank works correctly. Proper calculation avoids overloading your generator.
Building The Load Bank
Creating a load bank for generator testing can be complex but rewarding. This guide covers the essential steps to build a reliable load bank. Proper planning and execution are crucial.
Assembling The Frame
Start with a strong frame. Choose a metal frame for durability. Use a drill to make holes for mounting components.
- Cut metal pieces to desired lengths.
- Join pieces using bolts and nuts.
- Ensure the frame is stable and secure.
A stable frame ensures your load bank functions well. It also keeps components safe.
Wiring The Components
Wiring is critical for your load bank. Follow these steps for proper wiring:
- Connect resistors to the frame.
- Use thick, insulated wires for connections.
- Ensure all connections are tight and secure.
Proper wiring helps avoid short circuits. Use a multimeter to check connections. This ensures everything works correctly.
Label each wire. This makes future maintenance easier. Keep wires organized to prevent tangling.
Testing The Load Bank
Testing the load bank ensures your generator works properly. This step is crucial for reliable power backup. You need to follow systematic steps for accurate results.
Initial Power-up
Before starting, double-check all connections. Ensure all cables are secure. Turn on the load bank’s main power switch. Watch for any warning lights or error codes. If everything looks good, proceed with the next steps.
Gradually apply load increments. Start with a low load, like 10% of the generator’s capacity. Monitor the generator’s performance at each step. Use a table to track your observations:
| Load Percentage | Generator Output (kW) | Comments |
|---|---|---|
| 10% | 2 kW | Steady output |
| 25% | 5 kW | No issues |
| 50% | 10 kW | Stable performance |
Verifying Load Accuracy
Next, it’s time to verify load accuracy. Use a reliable multimeter for this task. Measure the voltage and current at different load levels. Compare these readings with the load bank’s display.
- Check voltage stability.
- Ensure current readings are consistent.
- Identify any discrepancies immediately.
Record your findings in a log. This will help track the generator’s performance over time. Address any issues promptly to maintain generator efficiency.
By following these steps, you ensure your generator is ready for any power outage. Regular testing can prevent unexpected failures and prolong the generator’s life.
Using The Load Bank With Generators
Using a load bank with generators ensures your generator performs at its best. This section will guide you through the process.
Connecting To The Generator
Connecting the load bank to the generator is the first step. Follow these steps:
- Turn off the generator.
- Locate the generator’s output terminals.
- Connect the load bank cables to these terminals.
- Secure the connections tightly.
Ensure the connections are firm. Loose connections can cause problems.
Conducting Load Tests
Once connected, start the load tests. Follow these steps:
- Turn on the generator.
- Gradually add load using the load bank controls.
- Monitor the generator’s performance metrics.
Keep an eye on the generator’s temperature and voltage. Record the data for analysis.
| Load Level | Duration | Temperature | Voltage |
|---|---|---|---|
| 25% | 15 mins | Normal | Stable |
| 50% | 15 mins | Normal | Stable |
| 75% | 15 mins | Normal | Stable |
| 100% | 15 mins | Normal | Stable |
Test at different load levels. Ensure all readings are within safe limits.
Using a load bank properly ensures your generator is ready. Follow these steps for effective testing.
Maintenance And Troubleshooting
Proper maintenance and troubleshooting are essential for efficient generator testing. Regular inspections can prevent unexpected failures and ensure smooth operation. This section covers how to maintain and troubleshoot your load bank effectively.
Regular Inspections
Regular inspections are crucial for the longevity of your load bank. Check for any visible damage like frayed wires or loose connections.
- Inspect the cooling system for any blockages.
- Ensure all electrical connections are tight and secure.
- Look for signs of corrosion on terminals and connectors.
Common Issues And Fixes
Understanding common issues can help in quick troubleshooting. Below are typical problems and their fixes:
| Issue | Possible Cause | Fix |
|---|---|---|
| Load bank not starting | Power supply issue | Check the power source |
| Overheating | Blocked cooling system | Clear any blockages |
| Inconsistent load | Loose connections | Tighten all connections |
Regular maintenance and quick troubleshooting can extend the life of your load bank. Follow the steps above for a smooth testing process.
Frequently Asked Questions
What Is A Load Bank For Generator Testing?
A load bank simulates electrical loads to test and verify a generator’s performance.
Read More: What is a Load Bank for a Generator
Why Use A Load Bank For Generator Testing?
Using a load bank ensures the generator operates correctly under expected load conditions, preventing failures.
How Do You Make A Load Bank?
You make a load bank by assembling resistive, inductive, or capacitive components that match the generator’s specifications.
What Materials Are Needed For A Load Bank?
Materials include resistors, inductors, capacitors, wiring, a frame, and cooling fans for heat dissipation.
Final Words
Building a load bank for generator testing ensures reliable performance. Follow the steps carefully for optimal results. Proper testing helps prevent future issues. A well-maintained generator is crucial for uninterrupted power supply. Now you can confidently test your generator with a homemade load bank.


