Disclosure: This post contains affiliate links and I will be compensated if you make a purchase after clicking through my links. Learn More
Welding stands at the center of modern construction, manufacturing, and repair work. It creates everything from ships and skyscrapers to delicate metal art. No matter the size or complexity of the project, one thing always matters: control. One of the most important aspects to control in welding is the work angle. This single factor can change the strength, look, and safety of a weld. Yet, many welders—beginners and sometimes even those with experience—make mistakes with work angle.
If you want strong, reliable welds, you need to understand what work angle means, how to set it, and how to keep it steady. This article will guide you through the details of controlling work angle in welding. You will learn what work angle is, why it matters, how to measure and adjust it, and the best methods for different welding positions. We will discuss tools, techniques, and practical tips for a better welding experience. Whether you are starting out or want to fix common mistakes, you will find clear answers here.
What Is Work Angle In Welding?
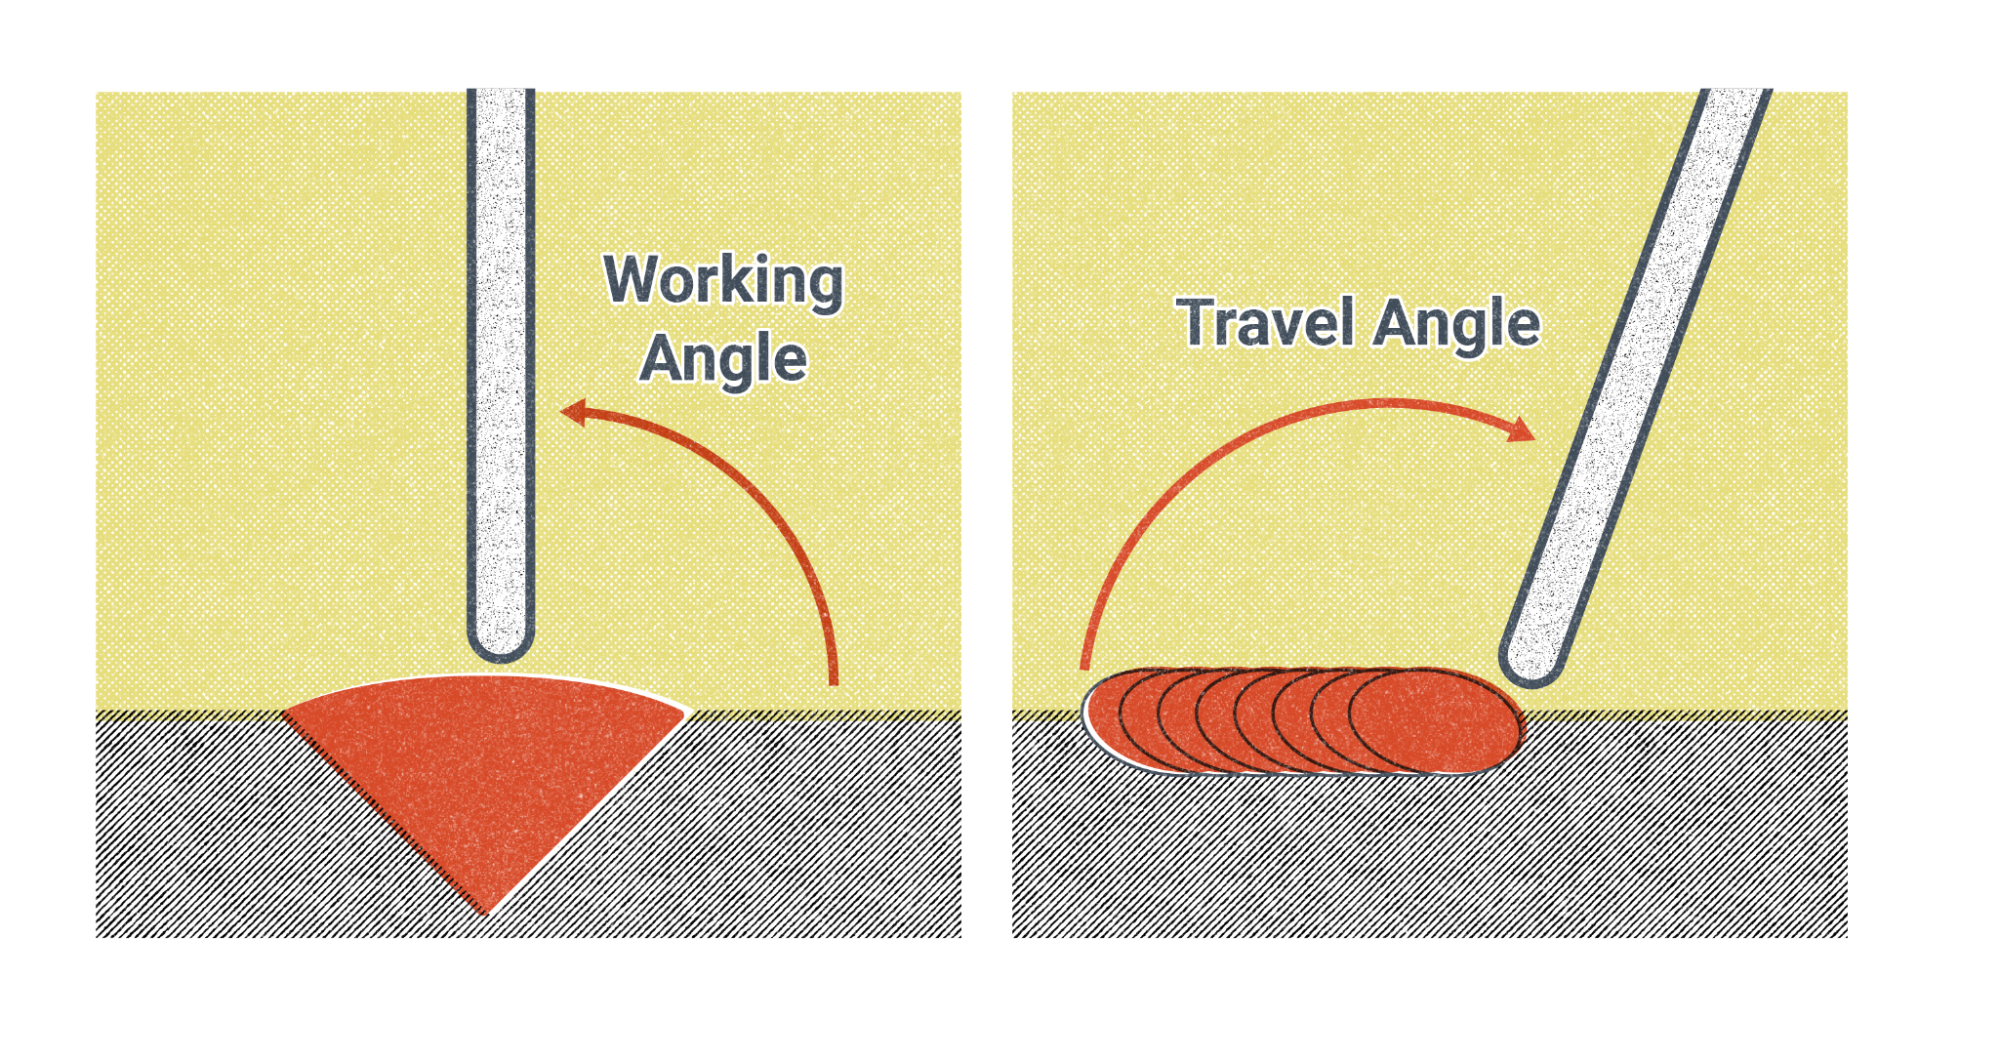
The term work angle means the angle between the welding gun, torch, or electrode and the surface of the workpiece. Picture the metal you want to join as a flat surface. The work angle is not the same as the travel angle (which is the tilt of the torch in the direction you move). Instead, the work angle is the side-to-side tilt, measured across the face of the joint.
For example, if you hold your welding torch straight up, at a 90-degree angle to the metal, the work angle is zero. If you tilt the torch to the left or right, you change the work angle. The specific angle you use depends on the weld joint type: butt joints, fillet joints, lap joints, or corner joints. Each joint has an ideal work angle that provides the strongest, cleanest weld.
Why Work Angle Matters
Many beginners focus on settings like current, voltage, and wire speed, but work angle is just as important. Here’s why:
- Penetration: The right work angle helps the weld heat go deep into the metal, making the joint strong.
- Bead Shape: A good angle creates a smooth, even weld bead. A bad angle leads to uneven, weak, or messy beads.
- Spatter Control: The wrong angle can spray melted metal (spatter) everywhere, making cleanup hard.
- Defect Reduction: Incorrect work angles increase the risk of problems like undercut, overlap, and lack of fusion.
- Weld Appearance: Proper angles give cleaner, more professional-looking results.
Ignoring work angle often leads to weak welds that might look fine but fail under stress. This is a common mistake, especially in the early stages of learning welding.

Credit: esab.com
Work Angle Vs. Travel Angle
Before going deeper, it is important to know the difference between work angle and travel angle. These two terms often cause confusion.
- Work Angle: The angle between the electrode and the workpiece, measured across the joint.
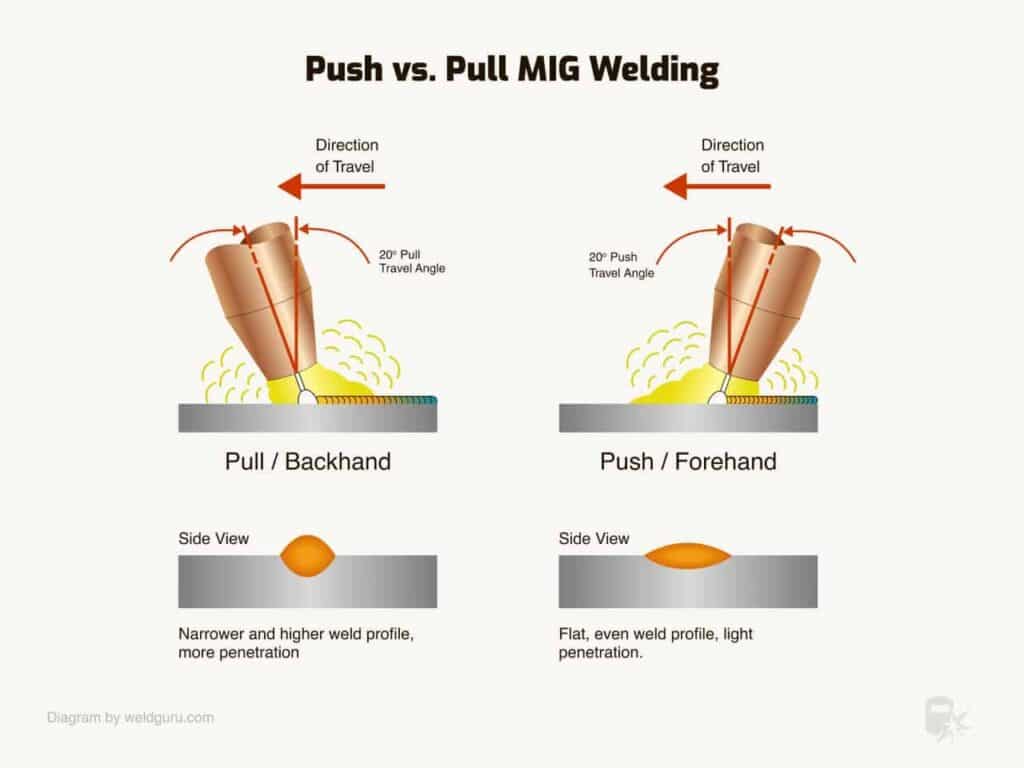
- Travel Angle: The angle in the direction you move the welding torch or rod. It is usually between 5° and 20° from vertical, either pushing or pulling the weld pool.
Both angles affect weld quality, but work angle mostly controls the bead’s width, shape, and penetration balance between both sides of the joint.
Recommended Work Angles For Different Joints
The best work angle depends on the type of joint you are welding. Using the right angle helps you achieve good fusion and bead shape. Here are standard angles for common joints:
| Joint Type | Typical Work Angle | Description |
|---|---|---|
| Butt Joint (flat) | 90° | Hold torch perpendicular to workpiece, centered between both plates. |
| Fillet Joint (T-joint) | 45° | Halfway between vertical and horizontal parts. |
| Lap Joint | 60°–70° | Tilt torch toward thinner piece for better fusion. |
| Corner Joint | 45°–60° | Angle depends on material thickness and access. |
| Edge Joint | 90° | Perpendicular to joint, focus on melting both edges. |
These angles are starting points. You might need to adjust them for position (horizontal, vertical, overhead), metal thickness, and your process (MIG, TIG, stick).
The Impact Of Incorrect Work Angles
You might ask, “What happens if my work angle is off?” The answer: a lot can go wrong. Here are some common problems caused by poor angle control:
- Undercut: If the torch tilts too far from the joint, the arc gouges the base metal, leaving a groove.
- Lack of Fusion: Too much angle can prevent the weld from melting both sides of the joint fully.
- Overlap: When the angle is too shallow, molten metal rolls over the base without bonding.
- Excess Spatter: An incorrect angle increases spatter, making the weld messy and wasting time on cleanup.
- Distortion: Uneven heat caused by bad angles can warp thin metals or pull the joint out of shape.
- Poor Appearance: The bead becomes lopsided, rough, or inconsistent.
Many of these problems are easy to fix just by correcting your work angle. It is one of the simplest ways to improve your welding results.
How To Set And Hold The Correct Work Angle
Setting the work angle is not just about aiming your torch or rod. It requires attention, practice, and sometimes a bit of adjustment depending on your position. Follow these steps to set and keep the right work angle:
1. Prepare The Work Area
A clean, stable work surface helps you focus on your torch angle. Remove rust, oil, paint, and debris from the metal. Secure pieces with clamps so they do not move.
2. Check The Joint Type
Identify if you are welding a butt, fillet, lap, or corner joint. Each joint has its own ideal angle. Refer to the table above as a starting point.
3. Position Your Body
Stand or sit so your arms, shoulders, and eyes are level with the joint. Your body should feel relaxed but stable. Avoid twisting or stretching, as this will make it hard to hold a steady angle.
4. Hold The Torch Or Electrode Correctly
Grip the torch or electrode holder lightly but firmly. For MIG and TIG, hold the torch like a pencil. For stick welding, hold the stinger like a hammer. Keep your wrist straight and use your forearm to guide the movement.
5. Set The Angle Before Striking The Arc
Before you start the weld, line up your torch or rod at the recommended angle. Double-check by looking from the side and above.
6. Start Welding And Watch Your Angle
As you move, keep your eyes on the arc and the puddle, but also check the angle. Slow down if needed. If you notice the bead getting wider on one side, adjust your angle back to center.
7. Use Guides Or Jigs (if Needed)
If you struggle to hold a steady angle, use a welding guide or jig. Some welders use small wood or metal blocks as a physical guide.
8. Practice Consistently
Work angle control improves with practice. Use scrap metal to practice holding the same angle over the length of a joint.
Credit: openwa.pressbooks.pub
Tools And Accessories To Help Control Work Angle
Technology and simple tools can help you maintain the right work angle, especially for beginners or precision work. Here are some options:
- Angle Gauges: Small metal or plastic tools that show exact angles (45°, 60°, 90°, etc.). Place them next to your joint to check your torch alignment.
- Magnetic Holders: These hold your workpieces at set angles, so you can focus on your torch position.
- Welding Jigs: Custom-made fixtures that hold parts and sometimes guide your hand or torch.
- Laser Guides: Some advanced torches have built-in lasers to help you keep the angle steady.
- Practice Coupons: Pre-cut metal pieces designed for practicing specific joints at the correct angle.
While tools help, your own hands and eyes are the best guides with enough experience.
Differences In Work Angle Control For Mig, Tig, And Stick Welding
Each welding process requires a slightly different approach for work angle control. Here’s how they compare:
| Process | Typical Work Angle | Key Points |
|---|---|---|
| MIG (GMAW) | Flat: 90° (butt), 45° (fillet) | Push or pull technique; small changes in angle affect bead width and penetration. |
| TIG (GTAW) | Flat: 90° (butt), 45° (fillet) | Precise torch control; filler rod angle also matters. |
| Stick (SMAW) | Flat: 90° (butt), 45° (fillet) | Rod shortens as you weld; keep adjusting to maintain angle. |
TIG welding is especially sensitive to work angle. Even small changes can affect penetration and bead shape. In stick welding, you need to adjust for the rod getting shorter as it burns.
Work Angle In Different Welding Positions
Not all welds are done on a flat table. You may need to weld vertical, overhead, or in a pipe. Each position changes how you set and control work angle:
Flat Position (1g/1f)
This is the easiest. Use the recommended angles for your joint. Gravity helps the molten metal settle in the joint.
Horizontal Position (2g/2f)
For fillet welds, keep a 45° angle, but tilt slightly (5–10°) up to prevent the weld pool from sagging. For butt welds, hold at 90°, but watch for metal dripping.
Vertical Position (3g/3f)
Angle the torch 5–15° upward to control the pool. This helps prevent the weld from running down the plate.
Overhead Position (4g/4f)
Hold the recommended work angle, but move faster and use a smaller weld pool. Gravity will try to pull molten metal down, so keep the torch steady.
Pipe Welding (5g/6g)
Pipe welds often need you to change your body and torch position as you work around the pipe. Start at the standard angle, but adjust slightly as you move to keep penetration even.
Common Mistakes And How To Fix Them
Many welders struggle with work angle, especially early on. Here are mistakes to watch for and how to correct them:
- Tilting the Torch Too Much: Causes undercut or lack of fusion. Solution: Practice holding the torch more upright and watch the bead.
- Letting the Angle Drift: Your angle changes as you move. Solution: Slow down and check your position every few centimeters.
- Wrong Angle for the Joint: Using a 45° angle on a butt joint instead of 90°. Solution: Study the joint type and use the right angle.
- Ignoring Body Position: Poor stance leads to shaky hands. Solution: Plant your feet and rest your arms if possible.
- Not Adjusting for Rod Burn-off (Stick Welding): As the rod gets shorter, angle changes. Solution: Move your hand forward as the rod burns.
- Not Compensating for Gravity (Vertical/Overhead): Pool sags or drips. Solution: Tilt the torch slightly up, use a faster travel speed.
Non-obvious insight: Many welders only check their angle at the start of the weld, but even a small drift during the weld can ruin the bead. It helps to use your non-dominant hand as a support or rest your wrist on the workpiece for steadier movement.
Another key point: When welding thin metal, even a small change in work angle can mean the difference between a clean weld and burning through the material. Always practice on scrap metal first to see how angle changes affect thin pieces.
Credit: wholesale.yeswelder.com
Advanced Tips For Better Work Angle Control
After you learn the basics, these strategies will help you maintain an even better work angle:
- Use Both Hands: Steady your torch or rod with both hands when possible. One hand holds, the other guides.
- Visual Cues: Some welders use the edge of their helmet or a part of the torch as a visual guide to keep the angle steady.
- Mark the Metal: Draw light lines with a marker to remind yourself of the correct angle direction.
- Mirror Practice: Use a mirror to watch your technique from another angle.
- Video Feedback: Record yourself welding and watch to spot when your angle drifts.
- Lighting: Good lighting helps you see the puddle and your angle more clearly.
- Take Breaks: If your hand gets tired, stop and rest. Fatigue leads to poor angle control.
Measuring And Checking Your Work Angle
Professional welders sometimes measure their work angle to be sure they are within the best range. Here’s how you can do it:
- Angle Finder: A digital or manual angle finder can quickly show the angle between your torch and the workpiece.
- Protractor Tool: Place a small protractor beside the joint and visually line up your torch.
- Smartphone Apps: Some apps use your phone’s sensors to measure angle, but be careful near magnets and hot surfaces.
Pro tip: After welding, look at your bead. If it is too wide on one side, you likely held the angle away from center. If you see undercut, you likely tilted the torch too much.
How Work Angle Affects Weld Strength And Quality
Controlling the work angle is about more than looks. It directly affects how strong and safe your welds are. Here are some effects:
- Proper Angle: Good penetration, even bead, minimal spatter, strong joint.
- Too Steep (over 90°): Causes undercut, weakens the edge of the joint.
- Too Shallow (under 45°): Causes overlap, poor penetration, weak joint.
Studies show that incorrect work angle can reduce weld strength by up to 30% compared to recommended angles. This is critical in load-bearing structures or safety-related repairs.
Comparing Common Work Angle Mistakes
Here is a quick comparison of what happens with different work angle errors:
| Work Angle Error | Visual Result | Strength Effect |
|---|---|---|
| Too steep | Undercut, narrow bead | Weaker edge, risk of cracking |
| Too shallow | Overlap, wide bead | Poor fusion, weak joint |
| Angle drifts during weld | Uneven bead, inconsistent width | Variable strength, weak spots |
| Correct angle | Even, consistent bead | Maximum strength |
How To Train Yourself To Control Work Angle
Building muscle memory is key. Here’s how to practice:
- Dry Runs: Practice moving the torch along the joint without striking an arc. Focus on keeping the angle steady.
- Slow Motion: Weld slowly at first, then speed up as you gain control.
- Practice Different Joints: Each joint type feels different. Practice all to learn how your hands and arms should move.
- Feedback from Others: Ask experienced welders to watch and point out where your angle changes.
- Use a Mirror or Camera: Seeing yourself from another view helps you spot errors.
Insider tip: Many professionals spend hours on scrap metal perfecting their angle before starting critical jobs. This is time well spent, as it saves work and materials later.
Safety Considerations When Adjusting Work Angle
Holding the correct work angle is not just about quality; it also affects safety:
- Arc Blow: In stick welding, the wrong angle can cause the arc to jump, which is dangerous and can damage equipment.
- Spatter Direction: Bad angles can throw hot metal toward your body or others.
- Fume Direction: Keep your head out of the smoke path by adjusting angle and body position.
- Burns: Touching the workpiece or torch in the wrong way because of awkward angles can lead to burns.
Always wear proper protective gear, and set up your work area to allow a safe, comfortable angle.
The Role Of Experience And Environment
No two welding jobs are exactly the same. Factors like workpiece size, joint location, lighting, and access all affect how you control your work angle. In tight spaces, you may need to adjust your grip or use special torches. Outdoors, wind can blow your shielding gas away, so angle becomes even more critical.
Experienced welders develop a sense for what feels right, but they still check and adjust as needed. Beginners should not feel bad if they need to pause and reset their angle often.
Getting Professional Guidance
If you are struggling, consider joining a welding class or workshop. Many technical schools offer hands-on training where instructors check your angle and technique. Watching others weld in person can also help you understand how to hold and adjust your torch.
For more detailed information about welding angles and their effects, you can visit Wikipedia: Welding.
Frequently Asked Questions
What Is The Difference Between Work Angle And Travel Angle In Welding?
Work angle is the angle between the welding torch or rod and the surface of the workpiece, measured across the joint. Travel angle is the tilt of the torch in the direction you are moving as you weld. Both angles affect weld quality, but they control different parts of the weld bead.
How Can I Keep A Steady Work Angle During Long Welds?
Use both hands for better control. Rest your wrist or forearm on the table or workpiece for stability. Take short breaks if your hand gets tired, and practice often to build muscle memory.
Why Does My Weld Bead Look Uneven On One Side?
This is usually because your work angle drifted away from center during the weld. Check your torch position often, and slow down if you see the bead getting wider on one side.
Is There A Tool To Help Me Set The Right Work Angle?
Yes. You can use angle gauges, magnetic holders, or even digital angle finders. For beginners, simple plastic or metal angle guides can help you learn what the correct angle feels like.
Does Work Angle Matter With All Welding Processes?
Yes, but the effect may differ. MIG, TIG, and stick welding all require correct work angle for strong, clean welds. TIG is especially sensitive to angle changes, while stick welding requires more adjustment as the electrode gets shorter.
Controlling work angle is a skill that brings real results. It is worth every minute you spend practicing and learning. Strong, safe, and attractive welds begin with this simple but vital detail.

