Disclosure: This post contains affiliate links and I will be compensated if you make a purchase after clicking through my links. Learn More
When it comes to painting your house, efficiency and precision are key. Many homeowners wonder, “Can I use my air compressor to paint my house?” The answer is a resounding yes, but there are essential factors to consider.
In this detailed guide, we will delve into everything you need to know about using your air compressor for house painting. From equipment requirements to best practices, we’ve got you covered.
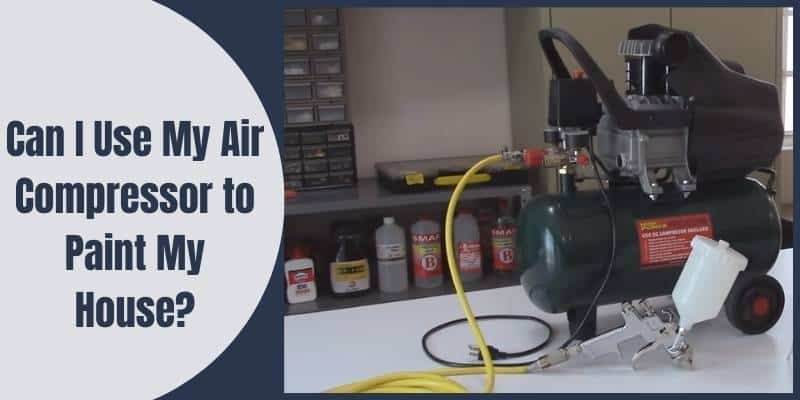
Can I Use an Air Compressor to Paint My House?
The short answer is yes. Air compressors are used alongside spray paints to paint your home. Using the spray paint and the air compressor together is also faster and more effective. You also don’t need a lot of skill.
Understanding the Basics
To answer the question of whether your air compressor is suitable for house painting, it’s crucial to understand the basics of both tools. An air compressor, typically used for powering pneumatic tools like nail guns and impact wrenches, generates compressed air at high pressure. On the other hand, house painting requires a consistent and even flow of paint onto surfaces, which is typically achieved using dedicated paint sprayers.
The Pros and Cons
Pros
Using your air compressor for house painting does come with its fair share of advantages. Let’s delve into these benefits before addressing the potential downsides.
- Cost Efficiency: One of the primary reasons homeowners consider this approach is cost savings. If you already own an air compressor, it seems logical to repurpose it for house painting rather than investing in a separate paint sprayer.
- Versatility: Air compressors are versatile tools that can be used for various tasks. By adapting your compressor for painting, you can potentially tackle a range of DIY projects with a single device.
- Precise Pressure Control: Air compressors allow you to control the pressure of the air supply, which can be advantageous when you need to fine-tune the paint application for different surfaces.
Cons
While the idea of using your air compressor for house painting has its merits, there are several notable drawbacks that you must consider.
- Inconsistent Paint Flow: The primary challenge lies in achieving a consistent and even flow of paint, which is crucial for a professional finish. Most air compressors are not optimized for this purpose, leading to potential issues like streaks and uneven coverage.
- Potential Damage: Using an air compressor not designed for painting can damage your equipment and lead to costly repairs or replacements. Paint can clog the compressor’s components, affecting its performance and lifespan.
- Safety Concerns: House painting involves working with paints and solvents, which can be hazardous if not handled correctly. Using the wrong equipment can increase the risk of accidents or inhalation of harmful fumes.
Choosing the Right Equipment
If you’re determined to proceed with using your air compressor for house painting, it’s crucial to choose the right equipment and make necessary adjustments to minimize potential issues.
1. Select a Compatible Paint Gun
To achieve better results, invest in a high-quality paint gun designed for air compressors. These guns are specifically engineered to deliver a consistent flow of paint.
Ensure the paint gun is compatible with your air compressor’s output capacity. Check the gun’s specifications and match them with your compressor’s capabilities.
2. Regulate Air Pressure
Fine-tune your air compressor’s pressure settings to match the requirements of the paint gun. Experiment with different pressure levels to achieve the desired spray pattern and coverage.
3. Use the Right Paint
Select paint that is compatible with your chosen paint gun and air compressor setup. Thicker paints may require higher pressure settings, so be sure to check the manufacturer’s recommendations.
What Type of Air Compressor Do I Need to Paint My House?
In painting homes, electrically powered air compressors are preferred over gas-powered air compressors. There are many reasons, but mainly for safety concerns. Gas-powered air compressors are known for oil leakages which could cause dangerous situations.
Use the gas-powered air pressure if you are painting outside. Be warned, though; they are very loud. However, electrically powered air compressors also make their fair share of noise. Therefore, when selecting an air compressor to paint your home, always pay attention to capacity and PSI. In the later part of the article, we will talk about the grade and stage of the air compressor.
How to Paint Your House Using Air Compressors?
If you have been paying attention, you know you generally need two primary tools to start painting. You need an air compressor, and you need a spray painter.
Here we look at the step-by-step guide for using air compressors and spray painters at home.
1. Prepare The Area or Surface to Paint
First, you need to identify the area you want to paint. Then, put cardboard or tape on the edges, so the paint doesn’t spill out of that surface. Also, put a covering on the floor to avoid damage.
2. Prepare Your Paint and Thinner
You should know the type of paint or thinner you are using. Oil-based paints work best with air compressors, but others also serve the purpose. Decide the color of paint you want and have enough paint on hand for the task. You will not want to buy paint in the middle of the process.
3. Confirm The Air Pressure Your Spray Gun Requires
Check the level of air pressure your spray gun needs. Also, confirm that your air compressor can meet that. If the air compressor fails to produce the required pressure, the task will be a total failure.
4. Put On Safety Gears
Always make sure you have your safety kit handy. Put on gloves, goggles, masks, and overalls. The safety gear helps safeguard you against harm or dangerous situations.
5. Prime the Surface
If necessary, prime the surface. Apply with a brush or roller, then sand it. This helps the paint stick better.
6. Mix The Paint and Thinner
Follow the manufacturer’s guidelines on the ratio of paint to thinner. The amount of thinner you need will depend on the type of your paint, surface area, and air hose nozzle, but it is advisable to use at least 20%.
7. Set Up the Air Compressor
Connect the electrical cable of your air compressor to the outlet and attach its hose. Turn on the air compressor, and allow it to pressurize. Next, attach the spray gun to the hose, and make sure you set the pressure gauge on the hose to the required PSI.
8. Prime With the Spray gun
Pour a small amount of thinner into the spray gun. Aim it at the cardboard or waste bin and spray. After a few seconds, it should produce a steady flow of the paint thinner. When satisfied, empty the paint cup of the remaining thinner.
9. Pour The Mixed Paint into The Paint Cup
Fill up the paint cup with your mixed paint. Attach the paint cup to the top or bottom of the spray gun. The location depends on what type of spray gun you are using. Make sure the paint cup locks onto the spray gun.
10. Test the Spray
Aim at the same cardboard you used earlier while priming. Spray steadily, taking an up and down approach. See if you are satisfied with the result. If not, you might try remixing the paint or adjusting the air pressure. Satisfied? Then do the next step.
11. Start Painting
Imitate the same up and down movement you used earlier.
Advice and Cautions
There are a few safety tips you should adhere to while painting your home with the spray gun and air compressor.
- Always wear safety gear—goggles, masks, gloves, and any other item you might find helpful.
- Paint fumes and stains are harmful to inhale. They are also highly flammable. Always ensure there is proper ventilation by keeping all doors and windows open.
- Because you will be using an electric air compressor, make sure there are no exposed wires.
- Always make sure you are using safe paints.
- Do not spray yourself or another person. Always aim at a surface, preferably a sturdy one.
- Properly dispose of any waste when done with the painting.
Factors to Consider When Choosing an Air Compressor for Spray Painting
1. Capacity
The capacity of your air compressor lets you know how successful your painting will be. While checking for the capacity, consider the following:
- PSI
- CFM
- HP
Spray guns usually require low pressure. However, they can produce high or low volumes.
CFM stands for cubic feet per minute. It entails the volume of air the air compressor can produce. It is probably the most important parameter when considering an air compressor. Check the spray gun to know the required CFM.
HP stands for horsepower. It is the amount of power your air compressor can produce. You want to get an air compressor that can produce enough power for your spray gun.
2. Tank size
If you are using a gas-powered air compressor, consider the tank size. You want to get something with an adequate tank size. There are different sizes ranging from 5 gallons to 50 gallons.
But what size air compressor do you need to paint a house?
The Spray painter requires a constant supply of air. This means you would need a larger tank to handle this supply. Consider getting the 50 gallons.
3. Power Source
Spray guns run on a constant air supply, meaning the energy required is high. Make sure the power source can handle this. Also, make sure it is safe to use.
4. Grade and Stages
One stage air compressors are popular but not suitable for painting. They deliver 1 CFM per HP, which is insufficient. Use stage 2 air compressors which offer at least 4 CFM per HP. For painting, get a stage 2 air compressor with at least 5 horsepower (HP) rating.
FAQs
Can I use any air compressor for house painting?
No, you need an air compressor with sufficient PSI, CFM ratings and a larger tank.
What type of paint works best with an air compressor?
Latex and oil-based paints are commonly used. The choice depends on your project and personal preference.
How do I prevent overspray?
Mask off areas you don’t want to paint and practice proper technique to minimize overspray.
Can I use my air compressor for other DIY projects?
Yes, an air compressor is a versatile tool. You can use it for tasks like inflating tires, powering pneumatic tools, and more.
Is it cost-effective to paint my house with an air compressor?
Using an air compressor for painting can be cost-effective due to its efficiency and the professional finish it delivers.
What safety precautions should I take?
Always wear protective gear, work in a well-ventilated area, and follow safety guidelines provided with your equipment.
Conclusion
Painting your home can be pretty tedious, but with air compressors, it becomes much easier. An air compressor does not only give you speed but also ensures efficient use of paint. However, if you do not have an air compressor, buying it would be expensive.
As always, there are pros and cons to most things; consider them when deciding what method of painting to use.