Disclosure: This post contains affiliate links and I will be compensated if you make a purchase after clicking through my links. Learn More
Designing your own welding table for your garage can change the way you work. If you often weld, you know how much a strong, flat, and practical table helps with every project. But buying a ready-made welding table can cost a lot and may not fit your space or your way of working.
Building a custom table gives you a solution that matches your needs exactly. You choose the size, the shape, and even the features you want.
A good welding table makes your work safer, helps you get better results, and keeps your tools close by. This article shows you each step: from what to think about before you start, to how to choose the right materials, and finally, how to build and finish your table. You will find practical advice, common mistakes to avoid, and tips from real experience. By the end, you will know how to design and build a welding table that makes your garage work better.
Why Build A Custom Welding Table?
Many people start with an old wooden workbench or a cheap metal table. These can work for a short time, but they have limits. A custom welding table gives you control over your workspace.
Custom fit: Your table can fit your garage exactly. No wasted space or hard-to-reach corners.
Better safety: You can add clamps, grounding points, and metal tops that handle high heat.
Improved workflow: Add tool racks, shelves, or wheels so you can move the table easily.
Long-term value: A strong table lasts for years, even with heavy daily use.
You also learn a lot by building your own table. You will gain welding practice and learn about metalwork at the same time.
Planning Your Welding Table
Before you start cutting steel, you need a clear plan. Good planning saves time and money.
Measuring Your Space
Measure the area in your garage where you want the table. Leave enough room to walk around and work safely. Think about:
- Doorways and garage doors
- Nearby tools or machines
- Power outlets for your welder
A common size for a home garage welding table is 36 inches by 24 inches. If you work on larger projects, you may want 48 inches by 36 inches or bigger. Height is important too; most people choose 36 inches so you can work while standing.
Deciding Table Features
List the jobs you do most. Do you weld car parts? Make metal art? Fix tools? Your needs affect your design.
Popular features:
- Steel top: Handles heat and sparks.
- Clamping holes or slots: Make it easy to hold workpieces in place.
- Shelves: Store tools and supplies.
- Wheels: Move the table when needed.
- Grounding lug: Safe place to connect your welder.
Drawing Your Design
Draw your table on paper or use free software like SketchUp. Mark the length, width, and height. Add the features you want. Show where the legs, top, and shelves go. This drawing guides your build and helps you buy the right materials.
Common Beginner Mistakes
- Table too low or too high: Test the height with a cardboard box or stack of wood before building.
- Not enough space: Always measure twice. Leave space for your welder and big projects.
- Too thin steel: Thin tops bend easily. Use at least 3/16 inch thick steel for the work surface.
Choosing The Right Materials
The right materials make your table strong and safe. Cutting corners here can cost more in the long run.
Table Top
The table top takes the most abuse. It needs to be flat, strong, and heat-resistant.
Best choice: Mild steel plate
- Thickness: 3/16 inch (about 5 mm) for light work. 1/4 inch (about 6 mm) for heavy projects. Thicker steel is better but heavier and more expensive.
- Size: Match your design, usually 24” x 36” or 36” x 48”.
Avoid aluminum or thin sheet metal. Wood burns and does not last.
Table Frame
The frame holds up the top. It should not move or shake.
Best choice: Square steel tubing
- Size: 1.5” x 1.5” or 2” x 2” with 1/8” wall thickness is strong and easy to weld.
Angle iron also works for light tables, but square tubing is stronger.
Legs
Legs can use the same square tubing as the frame. For heavy tables, use 2” x 2” tubing.
Shelves And Storage
If you add a shelf, use expanded metal sheet or thick steel sheet. Expanded metal is strong but lets sparks fall through.
Casters (wheels)
Choose heavy-duty casters with brakes. Each caster should support at least 200 lbs if your table is heavy.
Grounding Lug
Use a thick steel bolt welded to the frame for a safe welder ground connection.
Comparison Of Common Materials
Here’s a quick look at popular material choices for welding tables:
| Material | Strength | Heat Resistance | Cost | Common Use |
|---|---|---|---|---|
| Mild Steel Plate | High | Excellent | Medium | Table Top |
| Stainless Steel | High | Excellent | High | Specialty Tables |
| Aluminum Plate | Medium | Good | Medium | Lightweight Use |
| Wood | Low | Poor | Low | Not Recommended |
Insight: Many beginners use scrap metal. This works for frames but not for the top. Scraps can have bends or rust that ruin your work.
Tools You Need For The Build
You don’t need a full machine shop, but a few good tools make the job much easier.
Must-have tools:
- Welder (MIG or stick is common)
- Angle grinder with cutting and grinding wheels
- Tape measure and marker
- Clamps (at least four)
- Drill and bits for metal
- Square and level
Helpful extras:
- Magnetic welding squares
- Chop saw for straight cuts
- Safety gear (gloves, helmet, boots)
Tip: Check tool rental shops for large tools like chop saws if you don’t own them.

Credit: www.thefabricator.com
Cutting And Preparing Materials
Start by cutting your steel to size. Work slowly and check measurements often.
Marking And Cutting
Mark each piece with a marker. Use a straight edge or square for clean lines. Double-check lengths before cutting.
Cut with an angle grinder, chop saw, or band saw. Clean up sharp edges with a grinder.
Preparing For Welding
Wipe steel with acetone to remove oil. Grind the spots where you will weld. Clean metal gives better, safer welds.
Lay out all parts before welding. Check that everything fits and nothing is missing.
Common mistake: Rushing the cuts. Crooked cuts make assembly harder and weaken the table.
Building The Table Frame
The frame gives your table its shape and strength. Take your time and check for square at each step.
Assembling The Base
Lay out the four side pieces of your frame on a flat surface. Clamp the corners and check they are square with a carpenter’s square.
Tack weld each corner. Don’t weld fully yet. Tack welds hold the shape but let you fix mistakes.
Once all corners are tacked and checked, weld the joints fully.
Attaching The Legs
Stand the frame up. Weld a leg to each corner. Use a level to keep each leg straight. Tack weld, check, then finish weld.
For extra strength, add cross braces between the legs. This stops shaking and makes the table last longer.
Adding The Top
Place the steel top on the frame. Check for overhang (an extra inch or two is helpful for clamping). Clamp the top in place and weld from underneath. This keeps the top flat and the work area smooth.
If your top is thick and heavy, you can bolt it to the frame instead.
Insight: Some people weld the top from above, but this leaves bumps. Welding from under the frame keeps the surface smooth for work.
Table Frame Comparison
Here’s a quick look at different frame shapes and their uses:
| Frame Shape | Strength | Best For | Notes |
|---|---|---|---|
| Rectangle | High | General use | Most common |
| Square | Very High | Heavy work | Less space for long pieces |
| Custom L-shape | Medium | Corner spaces | More complex to build |
Adding Features And Upgrades
A plain table works, but a few smart features make your table much more useful.
Clamping Solutions
Drill 5/8 inch holes in the top, spaced every 4-6 inches. These holes let you use many types of clamps. You can also cut slots or add a “T” track for special clamps.
Tip: Start with holes at the edges. Add more later if you need them.
Shelves And Tool Storage
Weld a lower shelf frame about 12 inches from the ground. Cover with expanded metal or steel sheet. This shelf holds tools, grinders, and safety gear.
Add hooks to the sides for cables or clamps. A magnetic strip can hold small tools or bits.
Wheels (casters)
Weld caster plates to the legs if you want your table to move. Use locking casters so the table stays still when you weld.
Tip: Only add wheels if your floor is smooth. On rough floors, tables with wheels can move when you do heavy work.
Power Outlets
Mount a power strip on one end of the table. This keeps grinders, lights, and other tools close.
Grounding Lug
Weld a thick bolt or steel tab to the table frame. This gives a solid place to clamp your welder ground cable. A good ground makes welding safer and easier.
Fire Safety Feature
Keep a metal bucket under the table for hot scraps. This simple step reduces fire risk.
Surface Treatments And Finishing
A bare steel top works well, but a few extra steps make your table last longer and look better.
Grinding The Top
After welding, grind the top smooth. Remove any weld spatter or bumps. A flat, smooth top makes work easier.
Rust Protection
Bare steel rusts quickly. You can wipe the surface with a thin coat of oil, like WD-40 or used motor oil. Some people use special welding table sprays. Do not paint the top—paint burns and makes welding harder.
For the frame and shelves, use spray paint or primer. This keeps rust away and looks neat.
Leveling
Adjust the table feet so your table does not rock. For fixed tables, use leveling pads. For mobile tables, make sure the casters all touch the floor.
Practical tip: If your floor is uneven, weld nuts to the bottom of each leg and use bolts as adjustable feet.
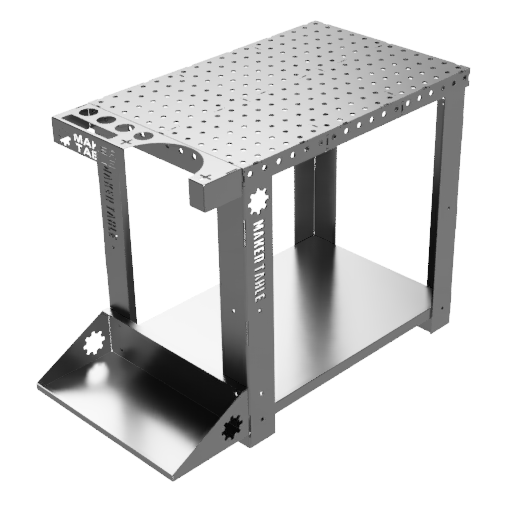
Credit: makertable.com
Table Maintenance And Care
A little care keeps your table in top shape for years.
- Wipe the top after each use.
- Remove slag and spatter with a scraper or grinder.
- Check for loose bolts or welds every few months.
- Oil the top when you see rust spots.
Non-obvious insight: Keep a wire brush and scraper near the table. Clean up right away after each job so rust and dirt do not build up.
Safety Tips For Welding Table Use
Welding can be dangerous. Your table should help keep you safe.
- Always wear gloves, boots, and a welding helmet.
- Keep flammable items off and under the table.
- Ground your table before starting work.
- Keep a fire extinguisher within reach.
- Check all electrical cords and outlets before use.
Extra tip: Always check your table for loose wires or hot metal before touching. Even a small spark can cause a fire if you are not careful.

Credit: www.youtube.com
Cost And Time: What To Expect
Building a welding table is not free, but you can control costs with smart choices.
Material costs: For a basic 36” x 24” table:
- Steel plate (top): $50–$100
- Square tubing (frame/legs): $50–$100
- Shelves, casters, and extras: $40–$80
Total: $140–$280 for most home tables
Time required: Plan for 1–2 full days (6–12 hours), more if you add shelves and upgrades.
Pro tip: Buy all materials at the same supplier to save on delivery fees.
Example Designs For Different Needs
Your needs shape your design. Here are three real examples:
Compact Table For Small Garages
- Size: 24” x 24” top, 32” height
- Features: One lower shelf, no wheels
- Best for: Small tool repairs, tight garages
Heavy-duty Table For Auto Work
- Size: 48” x 36” top, 36” height
- Features: Thick 1/4” top, clamping holes, heavy casters, two shelves
- Best for: Car parts, heavy projects
Multi-use Welding And Woodworking Table
- Size: 36” x 36” top, 34” height
- Features: Steel top over a wood core, clamps, bench vise, power strip
- Best for: People who weld and do other shop work
Non-obvious insight: You can add a removable steel top over a wood table. This way, you have one table for many tasks.
Table Feature Comparison
To help you choose, here’s a quick comparison of key features:
| Feature | Basic Table | Upgraded Table | Heavy-Duty Table |
|---|---|---|---|
| Top Thickness | 3/16” | 1/4” | 1/2” |
| Clamping Holes | No | Yes | Yes |
| Shelves | None | 1 | 2 |
| Wheels | No | Yes | Optional |
| Power Strip | No | Yes | Yes |
Common Problems And How To Fix Them
Even with a good plan, you may face issues. Here’s how to solve them:
Table wobbles: Check if all legs are the same length. Add leveling bolts to fix uneven floors.
Top is not flat: Weld the frame first, then clamp the top tightly before welding. If the top bends, you may need thicker steel.
Rust forms: Wipe the top after each job and oil it weekly.
Welds crack or break: Clean metal before welding. Make sure your welder is set to the right settings for the steel thickness.
Casters break: Use heavy-duty wheels rated for your table’s weight. Do not use plastic wheels.
Learning From Experienced Welders
People who build many tables share some smart advice:
- Always leave extra space on the table top for clamping.
- Keep your welding leads and cables off the floor.
- Paint the frame, but never the top.
- Make sure the table is not too big to move out of your garage if needed.
- Use strong welds for legs and braces; these take the most stress.
Pro tip: Test your table with a heavy load before using it for real work. Place a heavy object (like a car battery) on each corner and check for movement.
Resources For Further Learning
If you want to see examples, search for DIY welding table videos on YouTube. Many people share step-by-step builds with tips for beginners. For more on welding safety and table designs, check the Wikipedia Welding page.
Final Thoughts
Designing and building a custom welding table for your garage can feel like a big project, but it pays off in daily use. You get a table that fits your space, supports your style of work, and keeps you safe.
With a clear plan, good materials, and careful building, you can make a table that lasts for many years.
Take your time, measure carefully, and add the features that matter most to you. Whether you weld for work or as a hobby, a custom table helps you do better work with less stress. Start with the basics, then upgrade as your skills and needs grow.
Frequently Asked Questions
What Size Should My Welding Table Be?
Most home welding tables are 36 inches by 24 inches or 48 inches by 36 inches. Choose a size that fits your garage and your projects. Always leave room to walk around the table safely.
How Thick Should The Steel Top Be?
Use at least 3/16 inch (about 5 mm) thick steel for light work. For heavy use, 1/4 inch (about 6 mm) or more is better. Thicker tops stay flat under heat and weight.
Can I Put Wheels On My Welding Table?
Yes, you can use heavy-duty casters with brakes. Make sure each caster supports the full weight of the table plus your workpieces. Lock the wheels before welding.
What Is The Best Way To Prevent Rust On My Table?
Keep the top clean and dry. Wipe with a thin coat of oil after each use. Do not paint the table top—paint can burn and cause problems when welding.
Is It Safe To Use A Wooden Workbench For Welding?
No, wood burns easily and does not handle sparks or hot metal. Always use a steel top for welding. If you need a multi-use bench, use a removable steel plate on top.
With these steps and tips, you can design and build a welding table that improves your garage and your welding work.

