Disclosure: This post contains affiliate links and I will be compensated if you make a purchase after clicking through my links. Learn More
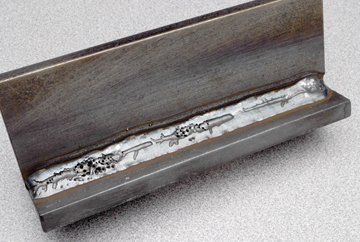
Flux core welding is popular for its speed and strength, but sometimes welders see strange patterns on the finished bead. One common defect is worm tracks—thin, raised lines that look like tiny worms under the surface of the weld. These marks are not just cosmetic. They can show deeper problems with your welding process. Understanding why worm tracks form is key if you want clean, strong welds.
This article explains all the main causes of worm tracks in flux core welding. You will see how settings, technique, materials, and even the environment play a role. We will also cover how to fix these problems, and share tips that experienced welders use to avoid worm tracks.
Whether you are new to welding or have years of experience, you will find advice and insights here to improve your results and avoid common mistakes.
What Are Worm Tracks In Flux Core Welding?
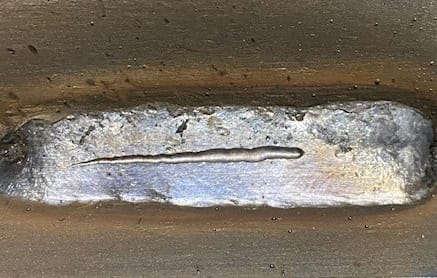
Worm tracks are small, raised lines found on or just under the surface of a weld made with flux core arc welding (FCAW). They are usually straight or curved and can stretch along the bead. Some people call them “wormholes” or “surface gas tracks.” They are easy to spot if you look closely at the weld after it cools.
These tracks are not just ugly. They can mean gas was trapped under the surface while the weld cooled. Sometimes, the trapped gas causes small holes or porosity below the surface. In other cases, the track is visible on top and feels rough to the touch.
Both cases can weaken the weld and make it fail important tests.
Why Do Worm Tracks Matter?
Worm tracks are a sign that something is wrong in your welding process. Here are the main reasons they cause concern:
- Weakened weld strength: Gas trapped inside can create hidden holes.
- Bad surface quality: Paint, powder coat, or other finishes may not stick well.
- Failed inspections: Many codes and standards do not allow worm tracks.
- Possible cracking: Gas pockets can lead to cracks as the weld ages.
If you see worm tracks, you should fix the root cause before using the weld in a real project. Ignoring these marks can lead to failures, wasted material, and extra costs.
Main Causes Of Worm Tracks In Flux Core Welding
Many factors can cause worm tracks. Some are easy to fix, while others take more work. Here are the most common reasons, explained in detail.
1. High Welding Voltage
If you set the voltage too high, the arc becomes harsh and melts the wire too quickly. This can make the flux inside the wire release more gas than the weld pool can handle. The gas gets trapped and forms worm tracks as it tries to escape.
Example: If you normally weld at 22 volts but set the machine to 28 volts by mistake, you may see more worm tracks.
Tip: Always check the voltage setting for your wire size and metal thickness. If you see worm tracks, lower the voltage in small steps and watch the results.
2. Excessive Wire Feed Speed
High wire feed speed means more wire and flux enter the weld. The flux releases more gas, which may not escape fast enough. This overloads the weld pool and traps gas, causing worm tracks.
Example: A new welder may think “more wire equals more strength.” But if you push the wire feed too high, you get more defects instead.
Tip: Start with the manufacturer’s recommended speed. If you get worm tracks, slow down the wire feed and see if the problem disappears.
3. Using The Wrong Flux Core Wire
Not all flux core wires are the same. Some are designed for high-speed welding and release gas quickly, while others work best at lower speeds. Using wire not matched to your settings or metal can cause worm tracks.
Example: Using a gas-shielded wire when you do not supply enough gas, or using a wire rated for thin steel on thick plate.
Tip: Always choose wire that matches your job and machine. Check the label for correct polarity, speed, voltage, and shielding gas (if needed).
4. Incorrect Welding Angle
Your welding torch angle affects how gas escapes from the weld pool. If you hold the torch too steep or too flat, you can trap gas and create worm tracks.
Example: Pushing the torch forward at 30° instead of the usual 10-15° can cause more defects.
Tip: Keep your torch at the angle recommended for your wire and position. For most flat work, a 10-15° push angle works best.
5. Fast Travel Speed
Moving the torch too fast does not let the weld pool stay open long enough for gas to escape. The gas gets trapped under the solidifying metal and forms worm tracks.
Example: Rushing to finish a long bead and moving the torch twice as fast as normal.
Tip: Slow down your travel speed so the weld pool can “breathe” and release gas. Watch the puddle to make sure it flows well and does not trap bubbles.
6. Poor Surface Preparation
Dirt, rust, oil, and paint on the metal surface can create extra gas during welding. The flux has to work harder to clean the metal, and more gas is released. This can overload the weld pool and cause worm tracks.
Example: Welding over mill scale or oily steel plate.
Tip: Clean the metal before welding. Remove rust, oil, grease, and paint with a wire brush or grinder. A clean surface gives better welds and fewer defects.
7. Moisture In The Welding Wire
If flux core wire absorbs moisture from the air, water gets into the flux. When you weld, this moisture turns to steam and creates extra gas. This can easily cause worm tracks and porosity.
Example: Storing wire in a damp shop or leaving it unwrapped overnight.
Tip: Keep wire in a dry place. Use sealed containers or wire ovens if possible. If you suspect moisture, replace the spool.
8. Wrong Shielding Gas (or Lack Of Gas)
Some flux core wires need extra shielding gas, while others are self-shielded. If you use the wrong gas, or forget to open the gas valve, you can get worm tracks.
Example: Using 100% CO₂ when the wire needs a mix of CO₂ and argon, or welding outdoors with self-shielded wire and a strong wind.
Tip: Check the wire label for the right gas. For gas-shielded wires, use the exact mix and flow rate recommended. For self-shielded wires, avoid windy conditions.
9. Ambient Conditions (wind, Humidity, Temperature)
Wind can blow away shielding gas, letting air into the weld pool. High humidity can add moisture to the wire and the weld. Cold temperatures can cool the weld pool too fast, trapping gas.
Example: Welding outside on a windy day and noticing more worm tracks than usual.
Tip: Shield your weld area from wind. Store wire and metal in a dry place. Try to weld at moderate temperatures for best results.
10. Poor Machine Maintenance
Dirty or worn-out welding machines can give unstable voltage and current. This can cause the arc to fluctuate, which leads to uneven melting and more worm tracks.
Example: Using a machine with dirty contacts or a damaged cable.
Tip: Clean and check your machine often. Replace worn cables, tips, and liners to keep performance stable.
11. Using The Wrong Polarity
Most flux core wires need a specific polarity (usually DCEN or DCEP). If you set the machine to the wrong polarity, the arc changes and the flux does not work right. This can trap gas and make worm tracks.
Example: Setting the machine to DCEP when your wire needs DCEN.
Tip: Always check polarity before welding. The wire packaging or datasheet will tell you the correct setting.
12. Impurities In The Base Metal
Some metals have hidden impurities like sulfur, phosphorus, or silicon. These can react with the flux and create more gas, leading to worm tracks.
Example: Using recycled steel or unknown alloys.
Tip: Use known, clean steel when possible. If you must use scrap or unknown metal, be extra careful with prep and settings.
13. Excessive Arc Length
A long arc means more voltage at the tip, which can overheat the flux and produce more gas. This extra gas may not escape, causing worm tracks.
Example: Holding the tip far from the weld pool instead of keeping it close.
Tip: Keep a steady, short arc—usually about 1/2 inch (12 mm) from the tip to the work.
14. Using Damaged Or Old Flux Core Wire
Old or damaged wire can have cracks or broken flux inside. This can cause uneven gas release and make worm tracks more likely.
Example: Using a wire spool that has been dropped or bent.
Tip: Inspect wire before use. If you see cracks, rust, or damage, replace the spool.
15. Overlapping Weld Passes Without Cleaning
If you make multiple passes and do not clean between them, slag and trapped gas from the first pass can cause defects in later passes.
Example: Running a second bead right over a dirty or slag-covered first bead.
Tip: Clean each pass before starting the next. Use a chipping hammer or wire brush to remove slag.
16. Poor Technique (erratic Movement, Pausing)
Inconsistent torch movement, sudden stops, or shaky hands can disturb the weld pool. This can trap gas and form worm tracks.
Example: Hesitating in the middle of a bead or moving the torch in jerky motions.
Tip: Practice smooth, even movements. Keep the torch steady and use a rhythm that matches your speed and settings.
17. Using Too Much Flux Core Wire Extension (stickout)
If you let the wire stick out too far from the tip, the wire can overheat before it hits the pool. This can break down the flux unevenly, causing more gas and worm tracks.
Example: Using a 2-inch (50 mm) stickout instead of the recommended 3/4 inch (20 mm).
Tip: Keep the stickout within the wire maker’s guidelines, usually 3/4 to 1 inch (20–25 mm).
18. Improper Storage Of Welding Materials
If you store welding wire or plates in a humid or dirty area, they can pick up moisture, oil, or dirt. All these add unwanted gas to the weld pool.
Example: Keeping wire spools in an open, dusty warehouse.
Tip: Store all materials in a dry, clean space. Use covers or sealed bins for extra protection.
19. Using Out-of-spec Welding Parameters
Every wire has a “sweet spot” for voltage, speed, and travel. If you use settings outside the wire’s range, you can get worm tracks.
Example: Trying to weld thick plate with settings meant for thin sheet metal.
Tip: Use the datasheet or a settings chart for your wire and job. Stay within the ranges given.
20. Ignoring Manufacturer’s Recommendations
Welders sometimes skip the instructions and use “what worked last time. ” But each wire and job is different. Ignoring the manufacturer’s advice can lead to many defects, including worm tracks.
Example: Using the same settings for all wires, no matter the brand or type.
Tip: Always read and follow the recommendations for your wire, machine, and shielding gas.
How To Prevent Worm Tracks
Now that you know the causes, here are practical ways to prevent worm tracks in your flux core welds.
Adjust Settings Carefully
- Voltage: Start low, then raise until the bead looks right.
- Wire Feed Speed: Use the chart on your machine or the wire package.
- Travel Speed: Watch the puddle. If you see bubbles or tracks, slow down.
Prepare Materials Properly
- Clean: Remove all rust, oil, and dirt.
- Dry: Keep wire and plates dry at all times.
Store Materials Well
- Wire: Keep in sealed bags or dry cabinets.
- Plates: Store indoors if possible.
Use The Right Equipment
- Polarity: Double-check before starting.
- Tip Size: Match to your wire size.
Follow Best Practices
- Angle: Hold the torch at 10–15° push angle.
- Stickout: Keep to 3/4–1 inch (20–25 mm).
- Clean Between Passes: Remove slag and inspect the weld.
Protect Your Workspace
- Wind: Use screens or barriers if welding outdoors.
- Humidity: Avoid welding on damp days or in wet areas.
Table: Common Causes Vs. Solutions
This comparison helps you match each cause to its solution.
| Cause | How to Fix |
|---|---|
| High Voltage | Lower voltage in small steps |
| Excess Wire Feed | Reduce wire speed |
| Dirty Metal | Clean with brush or grinder |
| Moist Wire | Store in dry place |
| Wrong Polarity | Check and set correct polarity |
| Fast Travel Speed | Slow down and watch puddle |
| Poor Technique | Practice smooth movement |
Real-world Example: Fixing Worm Tracks On A Job Site
Imagine a welder working on a structural beam outdoors. He sees worm tracks after each pass. He checks his settings and sees the voltage is 4 volts higher than the wire’s recommended range. The wind is blowing at 20 km/h.
He also notices rust near the edges of the plate.
He lowers the voltage by 3 volts, uses a windscreen to block the wind, and grinds off the rust. After these changes, the worm tracks disappear. This shows how small adjustments make a big difference.
Table: Recommended Parameters For Common Flux Core Wires
These are typical settings for popular wire sizes. Always check your wire’s datasheet for exact numbers.
| Wire Size | Voltage (V) | Wire Feed Speed (in/min) | Polarity | Shielding Gas |
|---|---|---|---|---|
| 0.030″ (0.8 mm) | 16–19 | 200–300 | DCEP | None (Self-Shielded) |
| 0.035″ (0.9 mm) | 17–21 | 250–350 | DCEP | 75% Argon/25% CO₂ |
| 0.045″ (1.2 mm) | 22–28 | 300–500 | DCEP | 100% CO₂ |
Hidden Insights Most Beginners Miss
Many welders focus only on machine settings, but work environment and material condition are just as important. For example, even perfect settings can’t fix the problem if your wire has absorbed moisture or your metal is rusty. Also, some brands of flux core wire are much more sensitive to stickout and angle than others. Experiment with small changes to find what works best for your setup.
Another tip: welding position matters. Overhead and vertical welds often show more worm tracks if you use the same settings as for flat work. Always adjust voltage, wire speed, and travel speed for the position you are welding.
Credit: www.hobartbrothers.com
Quality Control And Inspection
Detecting worm tracks early saves time and money. After welding, inspect each bead closely under good light. Run your finger along the weld—worm tracks often feel rough or raised. If you suspect trapped gas, use dye penetrant or X-ray testing for critical welds.
For high-stress or safety-sensitive jobs, always follow industry standards such as those from the American Welding Society (AWS). These standards tell you what defects are allowed and how to test for them. You can read more about welding defects and codes on the Flux-cored arc welding Wikipedia page.
Common Mistakes And How To Avoid Them
- Ignoring wire storage: Even the best wire will cause problems if stored wrong.
- Skipping surface cleaning: Rust and oil are common sources of extra gas.
- Wrong settings for job: Settings from one project may not work on another.
- Not watching the puddle: If you see bubbles, slow down or change angle.
- Not cleaning between passes: Slag from the first pass can create worm tracks in the next.
Credit: www.hobartbrothers.com
Table: Visual Signs Of Worm Tracks Vs. Other Welding Defects
This table helps you tell worm tracks apart from similar defects.
| Defect | Appearance | Main Cause | How to Prevent |
|---|---|---|---|
| Worm Tracks | Thin, raised lines on weld | Gas trapped by flux | Adjust settings, clean materials |
| Porosity | Small holes on or under surface | Trapped gas or contamination | Better gas shielding, clean metal |
| Undercut | Groove at edge of bead | High voltage, fast speed | Lower voltage, slow down |
| Slag Inclusion | Non-metallic material in weld | Not cleaning between passes | Remove slag after each pass |
Frequently Asked Questions
What Are Worm Tracks In Flux Core Welding?
Worm tracks are thin, raised lines found on or just under the surface of a weld bead. They are caused by trapped gas escaping from the weld pool, usually because of too much gas from the flux or poor welding conditions.
Can Worm Tracks Cause Weld Failure?
Yes, worm tracks can weaken the weld. They often mean that gas is trapped inside, which can make the weld brittle or cause it to crack, especially under stress or heavy load.
How Do I Get Rid Of Worm Tracks In My Welds?
First, check your voltage and wire speed settings and adjust them to match your wire and job. Clean your metal and wire, keep your materials dry, and use the correct torch angle and stickout. Always follow the manufacturer’s instructions.
Are Worm Tracks Allowed In Structural Welds?
Most welding codes do not allow worm tracks in structural or safety-critical welds. Inspectors often fail welds that show this defect, so it is important to prevent and fix them.
Is It Safe To Grind Out Worm Tracks And Reweld?
You can often grind out surface worm tracks and reweld the area. But if the defect goes deep, you may need to cut out and replace the weld section. Always check the depth and follow any codes that apply to your project.
Clean, strong welds are possible with the right knowledge and habits. By understanding what causes worm tracks in flux core welding, you can spot problems early, make smart adjustments, and deliver better results on every job.

Credit: www.youtube.com

